If you’re managing an Active Directory domain, you’ve probably found yourself jumping between multiple tools like ADUC to manage users, computers, OUs, etc., GPMC to apply policies, and so on. Also, when you need to perform tasks like creating multiple user accounts or applying policies across multiple OUs, you end up repeating the same steps again and again. This constant hopping between consoles and repeating the same tasks can be time-consuming and frustrating. 😑
This is where the Active Directory PowerShell module changes the game. Instead of relying on multiple GUI tools, you can manage everything from a single interface, making tasks much faster and consistent. In this blog, let’s explore how to install and import the Active Directory PowerShell module across workstations and servers.
Active Directory Module for Windows PowerShell
Before we jump into the setup, first let’s have an understanding of what the Active Directory PowerShell module is.
The Active Directory module for Windows PowerShell is a collection of cmdlets used to manage Active Directory Domain Services (AD DS), Active Directory Lightweight Directory Services (AD LDS), etc., and other directory objects. It acts as a bridge between the PowerShell environment and the Active Directory database, enabling admins to perform directory operations programmatically.
Before this module, admins often relied on GUI tools or complex ADSI and LDAP queries. The Active Directory PowerShell module simplifies administration by introducing intuitive verb-noun cmdlets, such as Get-ADUser and Set-ADGroup, and so on, that are easier to read, write, and automate.
This module is included as a part of the Remote Server Administration Tools (RSAT), which is required to enable Active Directory management tools on Windows client machines.
Now, let’s see how this module helps you in your day-to-day work.
Why Admins Should Install Active Directory PowerShell Module?
While GUI tools like Active Directory Users and Computers (ADUC) are suitable for one-off tasks, the PowerShell module significantly improves efficiency and scalability.
- Bulk Management: Perform actions on multiple objects at once, such as moving users between OUs or updating attributes across departments, within seconds using CSV or text file inputs.
- Automation of Routine Tasks: Schedule PowerShell scripts to handle tasks like identifying inactive accounts or enforcing policies, reducing manual effort and minimizing human error.
- Advanced Reporting: Generate detailed reports, such as users with expired passwords or specific configurations, and export them to CSV or text file formats for audits and analysis.
- Granular Object Queries: Use advanced filters, such as LastLogonTimestamp, PasswordLastSet, etc., to retrieve precise data that is difficult to extract using GUI tools.
- Consistency and Standardization: Ensure tasks are executed the same way every time using reusable scripts.
- Remote Management Capability: Manage Active Directory environments without needing direct access to domain controllers, as long as the required permissions are in place.
Now, let’s move on to the step-by-step process to install and import the Active Directory PowerShell module.
Prerequisites to Install Active Directory Module in PowerShell
To configure the Active Directory module for Windows PowerShell, you must have the following pre-requisites.
- PowerShell version 2.0 or later should be installed on your system.
- You must have administrative privileges on the computer where you need to install RSAT.
- You must be using a supported Windows edition such as Pro, Enterprise, or Education.
- The server must be running a supported version of Windows Server, such as Windows Server 2016, Windows Server 2019, Windows Server 2022, or Windows Server 2025.
How to Install Active Directory PowerShell Module Using RSAT?
RSAT (Remote Server Administration Tools) is a collection of Microsoft utilities that allow admins to manage Windows Server roles and features remotely from a Windows client machine. The Active Directory PowerShell module is included as part of the RSAT package. Therefore, by installing the required RSAT features, you can access the PowerShell module on your system.
To get started, choose any of the following methods, depending on the machine you work on.
- Install Active Directory PowerShell module on workstations
- Install Active Directory module for PowerShell on Windows server
1. Install Active Directory PowerShell Module on Workstations
In Active Directory workstations, RSAT tools are available as “Features on Demand,” allowing you to enable them directly from your system settings.
You can follow the steps below to install RSAT for Active Directory PowerShell module on a Windows 11 workstation.
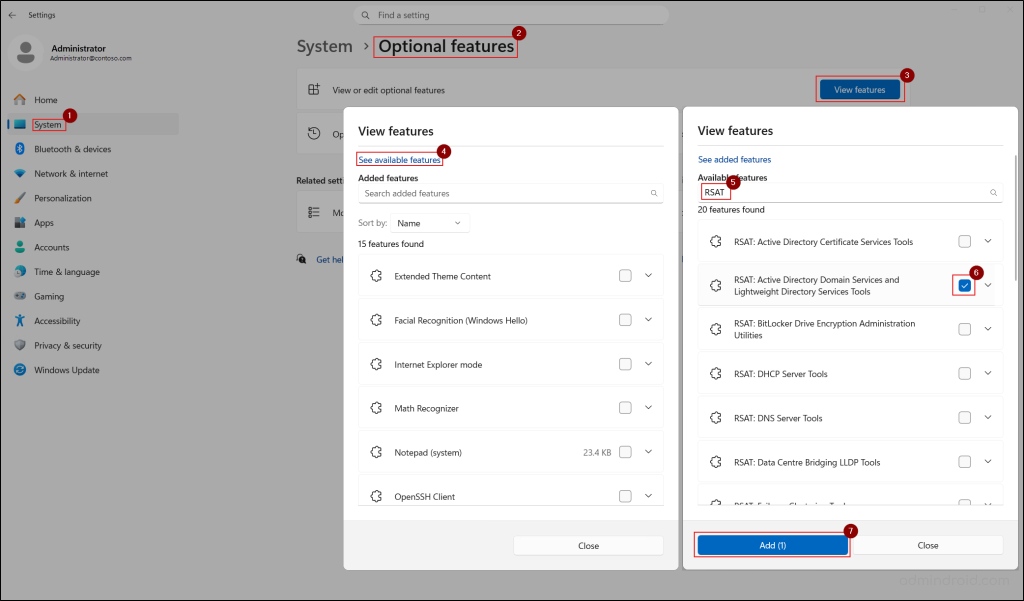
- Open Settings from the Start menu (or press Win + I) and go to System → Optional Features.
- In the View or edit optional features, select View features → See available features.
- Search for RSAT: Active Directory Domain Services and Lightweight Directory Services, select the corresponding checkbox and click Install.
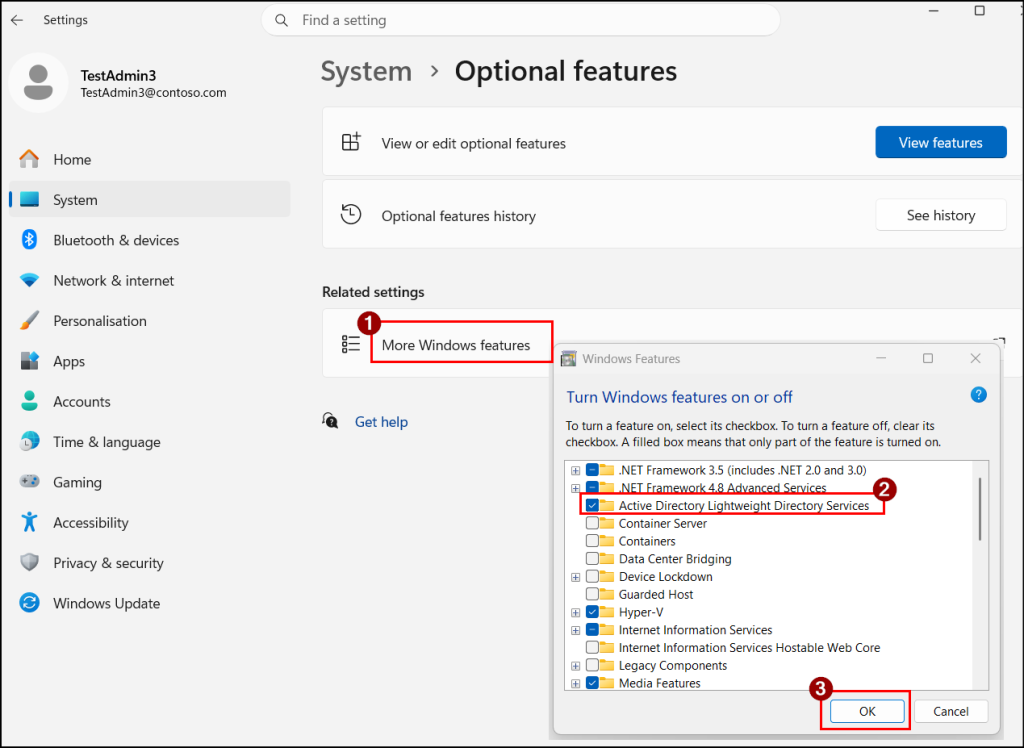
Note: If you don’t find the RSAT here, go to Settings → System → Optional features → More Windows features. Search for Active Directory Lightweight Directory Services, enable it and click OK. After that, return and follow the above steps to install the required RSAT package.
- Once done, wait for the installation to complete. This adds the Active Directory PowerShell module in the Windows workstation, along with other server features like Active Directory Users and Computers (ADUC), Active Directory Administrative Center (ADAC), ADSI Edit, Active Directory Sites and Services, and Active Directory Domains and Trusts.
Alternatively, you can install the RSAT component for the Active Directory PowerShell module on Windows 11 using PowerShell using the cmdlet below:
|
1 |
Add-WindowsCapability -Name Rsat.ActiveDirectory.DS-LDS.Tools~~~~0.0.1.0 -Online |
Both these methods install the entire Active Directory Lightweight Directory Services (AD LDS) feature set. You cannot install only the Active Directory PowerShell module separately, as it is not available as a standalone download on Windows 11 workstations.
2. Install Active Directory Module for PowerShell on Windows Server
The Active Directory module for Windows PowerShell is available by default when you promote a server to a Domain Controller. However, for member servers, you need to install and configure it manually. This enables you to manage and query Active Directory remotely without depending only on Domain Controllers.
Below are the steps to set up the Active Directory PowerShell module on servers:
- Open Server Manager, then in the top right-corner, select Manage → Add Roles and Features.
- Then, in the Add Roles and Features Wizard, click Next. You can modify the default selections on the Installation Type, Server Selection, and Server Roles tabs if required. Otherwise, continue by clicking Next on each page.
- In Features tab, expand Remote Server Administration Tools → Role Administration Tools → AD DS and AD LDS Tools, and select Active Directory module for Windows PowerShell.
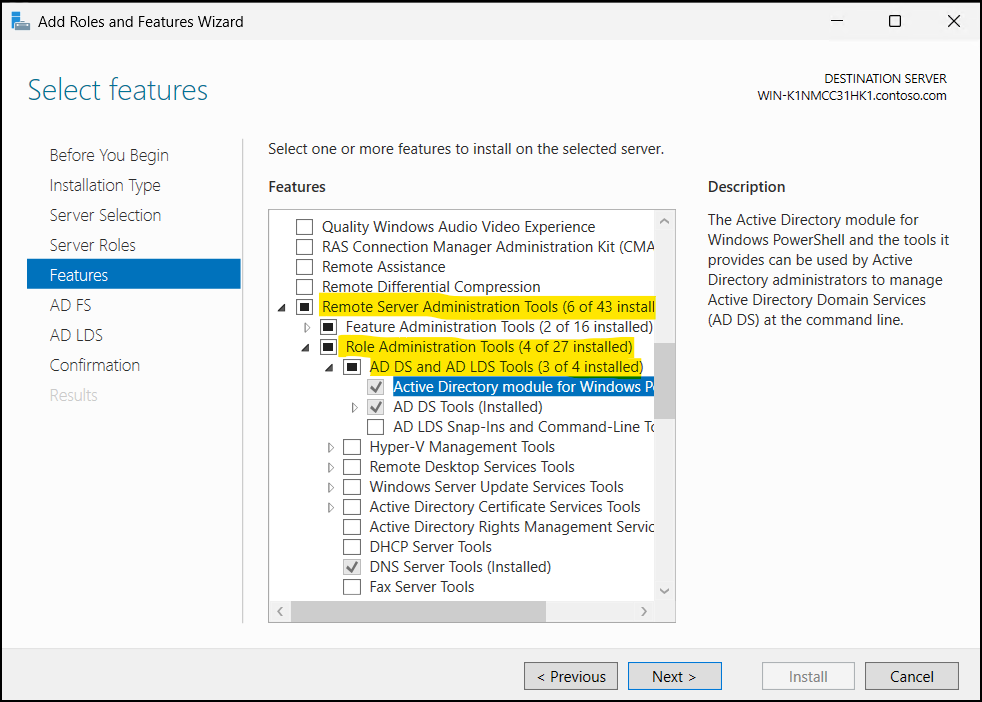
- Then, click Next. Here, you can also add any other features if required.
- Then, in the Confirmation tab, review your selections and click Install.
- Wait for the installation to complete and click Close.
Alternatively, you can use the following PowerShell cmdlet to install Active Directory module on Windows server machines.
|
1 |
Install-WindowsFeature -Name "RSAT-AD-PowerShell" -IncludeAllSubFeature |
This approach only installs the required Active Directory module for Windows PowerShell on Active Directory servers, giving you a more precise setup.
Check Installation of the Active Directory PowerShell Module on Windows
After installation, you can verify whether the Active Directory module for Windows PowerShell is installed by running the following cmdlet:
|
1 |
Get-Module -Name ActiveDirectory -ListAvailable |
If the installation is successful, the command will list the module along with the details like module type, version, name, and exported commands.

How to Import Active Directory PowerShell Module
With the module installed, you might expect everything to work right away, but that’s not always the case. If you try to run an Active Directory cmdlet without importing the module, you may receive the following error message:
Import-Module : The specified module ‘ActiveDirectory’ was not loaded because no valid module was found in any module directory.
This happens because the module, although installed, is not automatically loaded in the PowerShell session. To resolve this, you need to import the Active Directory module into your PowerShell session using the following cmdlet:
|
1 |
Import-Module ActiveDirectory |
You only need to import the module once after installation. After that, you can use Active Directory cmdlets directly, as most PowerShell versions automatically load the module when needed.
Note: If you are running a PowerShell version earlier than 3.0, module autoloading is not available, so you will need to import the module every time you start a new session.
How PowerShell Simplifies Active Directory Management for Admins?
Now let’s see how PowerShell makes your daily Active Directory tasks much easier compared to the traditional GUI approach.
Scenario 1: Retrieving an Active Directory User’s Group Membership
Let’s say you want to get the group memberships of a specific user in Active Directory.
Using the GUI, you would typically open the ADUC console, and navigate to the OU or container where the user resides. Then, right-click the user, open Properties, go to the Member Of tab, and then review the groups listed there.
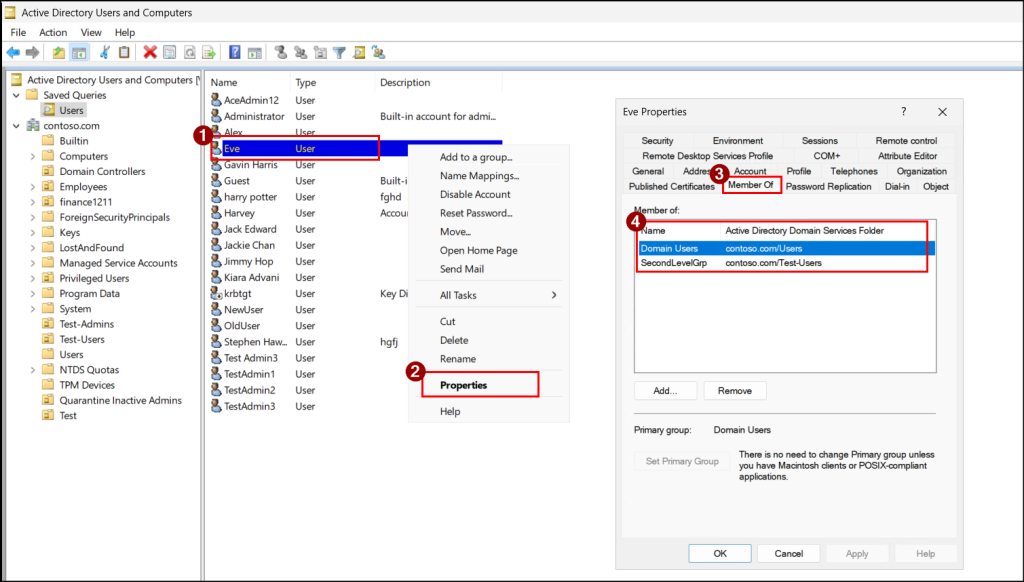
This process involves multiple clicks and can quickly become tedious. It’s manageable for one user but now imagine repeating the same steps for 25 or more users. You would need to open each user individually, switch to the relevant tab, and manually document the group memberships elsewhere.
Instead of repeating the same steps again and again, you can simplify the process with PowerShell. Just use a CSV file with an Identity column containing the users’ SAM account names, and run the below cmdlet:
|
1 2 3 4 5 |
Import-Csv "<InputCSVFilePath>" | ForEach-Object { $user = $_.Identity Get-ADPrincipalGroupMembership -Identity $user | Select-Object @{Name = "UserName"; Expression = { $user }}, Name, DistinguishedName, GroupCategory, GroupScope } | Export-Csv "<OutputCSVFilePath>" -NoTypeInformation |
This will fetch group memberships for multiple users within seconds and export the results for easy analysis.
Scenario 2: Creating Multiple Users in Active Directory
Now, let’s look at another common task of creating users in Active Directory.
Using ADUC, the process involves opening ADUC and navigating to the target domain or OU. Then, right-click it, select New → User, enter user details and completing the setup.
Once created, you often have to right-click the user again to fill in extra attributes like department, manager, job titles, etc.
Now, imagine doing this for bulk hiring. That is 100+ manual data entries. In ADUC, each time you must navigate to correct location, ensure all required fields are filled, and avoid missing critical attributes or settings. This increases the chances of human errors and inconsistencies.
Instead, you can automate this user creation using PowerShell. Create a CSV file with required columns like SamAccountName, DisplayName, Password, Department, Manager, and JobTitle then run the cmdlet below.
|
1 2 3 4 |
Import-Csv "<InputCSVFilePath>" | ForEach-Object { $manager = Get-ADUser -Filter "Name -eq '$($_.Manager)'" -ErrorAction SilentlyContinue New-ADUser -SamAccountName $_.SamAccountName -Name $_.DisplayName -DisplayName $_.DisplayName -AccountPassword (ConvertTo-SecureString $_.Password -AsPlainText -Force) -Enabled $true -Department $_.Department -Manager $manager.DistinguishedName -Title $_.JobTitle } |
This allows you to create multiple Active Directory users in one go, saving time and effort.
Common Issues with Installing and Importing Active Directory PowerShell Module
1. Get-ADUser: The term is not recognized as the name of a cmdlet, function, script file, or operable program.
This error occurs when the cmdlet is executed on a non-domain controller machine without installing or importing the Active Directory PowerShell module.
Fix: First, verify whether the Active Directory PowerShell module is installed. If it is already available, import it before executing any Active Directory commands.
2. Get-ADUser : Unable to find a default server with Active Directory Web Services running.
This error can occur when running the cmdlet even after installing and importing the module, due to one of the following reasons:
- The Active Directory Web Services (ADWS) service is not running on the Domain Controller.
- The client machine (workstation or member server) is unable to connect to the Domain Controller.
- Incorrect DNS configuration is preventing proper domain resolution.
- The machine is not joined to the domain.
Fix: Check the following configurations and correct them as needed:
(i) Turn on ADWS in DC: On the DC, open Services or in the Run dialog (Win + R), type services.msc, and press Enter. Locate Active Directory Web Services and ensure the Status is Running and the Startup type is set to Automatic. If it is stopped, right-click it and select Start.
(ii) Check connectivity to DC: Check whether the member server or workstation is connected to the DC over the default ADWS port 9389. To verify this, run the following PowerShell cmdlet:
|
1 |
Test-NetConnection -ComputerName <DCName> -Port 9389 |
Replace <DCName> with the name of the DC you want to communicate. Make sure that Windows Firewall or any network firewall is not blocking this traffic.
(iii) Verify DNS Configuration: Ensure the system uses the Domain Controller as its primary DNS server. You can test the DNS resolution by running the PowerShell cmdlet below:
|
1 |
nslookup <DomainName> |
Replace <DomainName> with the name of the domain.
(iv) Check Domain Membership: Confirm the machine is joined to the domain. If the system is not domain-joined, you can either join the computer to the domain or query Active Directory remotely using the following command.
|
1 |
Get-ADUser -Identity <UserName> -Server <Server> -Credential (Get-Credential) |
That’s a wrap! The Active Directory PowerShell module brings all management capabilities into a single interface. It allows admins to automate routine tasks, manage objects in bulk, and reduce dependency on manual GUI operations. With this, everyday Active Directory management becomes faster, more consistent, and more efficient.
We hope this blog helped you install and import the Active Directory module for Windows PowerShell. With this in place, you can start managing your Active Directory more efficiently and streamline your daily tasks. Have any questions or need clarification? Feel free to share them in the comments section below. We’d love to hear from you! Don’t forget to stay tuned for more upcoming blogs.


