In a world where data disasters strike without warning, waiting for months to restore critical business data is a luxury none of us can afford. Enter Microsoft 365 Backup—the ultimate ally in swiftly securing and recovering your vital business information. Microsoft 365 Backup is not just a solution; with unmatched speed and a user-friendly interface, it ensures not just recovery but a rapid return to business as usual. Let’s see what Microsoft 365 Backup has in store for you!
What is Microsoft 365 Backup?
Microsoft 365 Backup is a tool that backs up and restores your data within secure boundaries. This service helps customers recover their M365 data from major disruptions, including ransomware attacks, data deletion, and data corruption. Similar to Microsoft SharePoint Premium, Microsoft 365 Backup is available on a pay-as-you-go basis. Microsoft 365 products supported by Microsoft 365 Backup include:
- OneDrive accounts
- SharePoint sites
- Exchange mailboxes
- Microsoft Teams – coming soon
Your business is back on its feet within hours than weeks and months— no ransom paid, no compromise on speed.
What are the Features of Microsoft 365 Backup?
Let’s check what are the features offered by Microsoft 365 Backup.
- Efficiently back up either all or specific SharePoint sites, OneDrive accounts, and Exchange mailboxes within your tenant.
- Seamlessly restore OneDrive accounts, SharePoint sites, and mailbox items to previous points in a granular way for your entire tenant.
- Easily search and filter content within your backups using essential metadata, including site names, owners, subjects, creation/modification dates, and event types, across specified restore point date ranges.
- Optimize your data restoration speed by utilizing the express restore points recommended by Microsoft 365 Backup. Quick restores allow data recovery in hours rather than weeks or months.
- Data is stored within the Microsoft 365 trust boundary, minimizing access permissions and reducing security risks.
Note– Microsoft recently announced a public preview for SharePoint Embedded – a new way to build custom content apps for enterprises and ISVs. Plus, they’ve added powerful features like Microsoft 365 Backup, Microsoft 365 Archive, and disaster recovery to make it even more robust. It’s like giving SharePoint Embedded a turbo boost for better capacity and easier management.
Prerequisites to Enable Microsoft 365 Backup
To get started with Microsoft 365 Backup, you first need to set up pay-as-you-go billing. Make sure you’ve linked your Azure subscription to the set up pay-as-you-go system. Even though Microsoft 365 Backup is not part of the Syntex product suite, it follows Syntex billing rules to stay consistent with other pay-as-you-go services in Microsoft 365.
Admin Permissions to Set Up Backup Policy in Microsoft 365
To set up Microsoft 365 Backup smoothly, make sure you have either Global admin or SharePoint admin permissions. Having the right permissions ensures a hassle-free administrative process.
Admin Roles & Backup Management
- Only high-level administrators (Global admins) can create and handle backups using Microsoft 365 Backup.
- Regular users can’t start or manage their own backups; it’s all in the hands of the admins.
- Remember, the type of admin you are determines which parts of Microsoft 365 (OneDrive, SharePoint, or Exchange) you can control.
In the future, there might be a new Backup admin role with control over everything.
| Admin Role | OneDrive | SharePoint | Exchange |
| Global Admin | ✓ | ✓ | ✓ |
| SharePoint Admin | ✓ | ✓ | |
| Exchange Admin | ✓ |
How to Enable Microsoft 365 Backup?
To enable Microsoft 365 Backup, follow the steps mentioned below:
- Open the Microsoft 365 admin center.
- Click on Setup.
- Under the ‘Files and content’ section, select Use content AI with Microsoft Syntex → Manage Microsoft Syntex.
- From the list of products, choose Backup Preview.
- By default, the feature is turned off. Toggle the switch to enable Microsoft 365 Backup for your organization.
- Review the relevant terms of service for Microsoft 365 Backup and click Confirm.
How to Set Up Backup Policies for OneDrive, SharePoint, and Exchange?
To safeguard your Microsoft 365 data in OneDrive, SharePoint, or Exchange using Microsoft 365 Backup, you have to set up a backup policy for each. In the policy, you can specify what data to protect (like OneDrive accounts, SharePoint sites, and Exchange mailboxes).
Follow the steps below to create backup policies using Microsoft 365 Backup.
- Open Microsoft 365 admin center.
- Navigate to Settings → Microsoft 365 Backup.
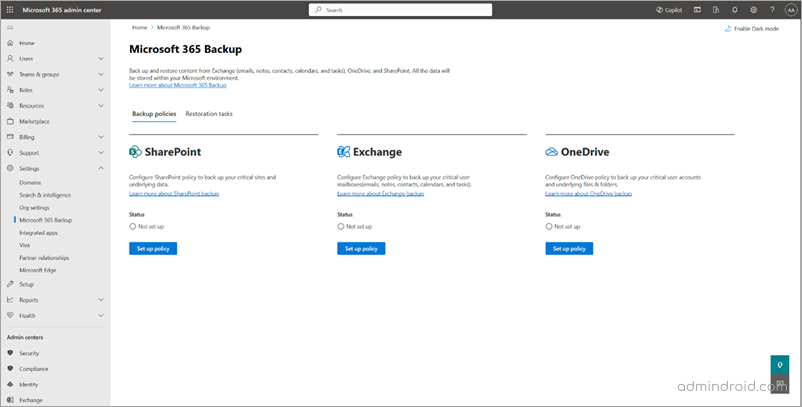
- Within the ‘Microsoft 365 Backup’ page, specifically in the OneDrive/SharePoint/Exchange section, click on Set up policy.
- On the ‘Overview’ page, examine the backup features and click Next.
- Proceed to the Protection scope page, where you can configure accounts using one of three methods – Search, Distribution lists/Security groups, Import from file.
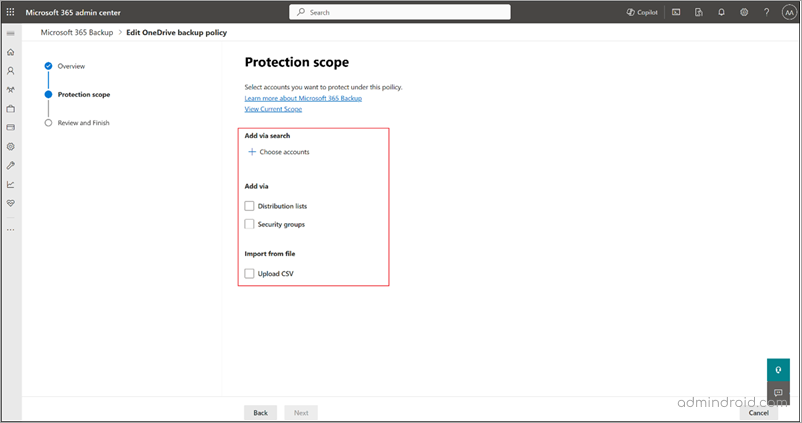
- If using Add via search, select “Choose accounts” to identify user accounts through search. On the Search and select accounts panel, pick the accounts you wish to include in the policy.
- For “Add via Distribution lists or Security groups,” choose either or both options. Note that the distribution list and security group are flattened upon addition, meaning the policy won’t dynamically update if these groups or lists change later.
- Opt for “Import from file” to upload user account details via CSV file.
- Proceed to the Review backup policy page. Ensure that the information aligns with your preferences, then click Create policy.
Pricing of Microsoft 365 Backup
Microsoft 365 Backup charges $0.15/GB/month for keeping your data safe. It includes the size of your emails, OneDrive, and SharePoint. Even if you delete something, you’re still charged for it for a year since it’s saved for recovery. After a year, you won’t be charged for the deleted data.
Recovery Window for Microsoft 365 Backup
With the July 2026 update, Microsoft 365 Backup now supports configurable recovery windows for backup policies. When creating a new backup policy, you can choose a recovery window anywhere from 3 months to 2 years to meet compliance requirements while optimizing backup storage costs. If you don’t change this setting, the default recovery window remains 1 year.
Existing backup policies aren’t updated automatically. If you want to use a different recovery window, you’ll need to edit each backup policy manually in the Microsoft 365 admin center.
To update the recovery window for the existing backup policy, follow the steps below:
- Select the backup policy in the Microsoft 365 admin center.
- Open Update recovery window.
- Choose the required recovery window.
- Save the changes.
Important: If you reduce the recovery window of an existing policy, backup data that falls outside the new retention period may be permanently deleted or retained only during a defined grace period. Before shortening the recovery window, verify that the older backup data is no longer required for compliance or recovery purposes.
Microsoft 365 Backup Partnership with Third-Party Offerings
Microsoft 365 Backup and Recovery has teamed up with stellar partners such as AvePoint, Cohesity, Commvault, Rubrik, Veeam, and Veritas. Together, they deliver top-notch experiences. By utilizing partner applications built on the Backup Storage, you can unlock a world of benefits. These benefits seamlessly blend Microsoft 365 and non-Microsoft 365 data sources in a unified interface.
In addition to ensuring lightning-fast backup and restore speeds for your Microsoft 365 data, these partner apps also maintain the highest level of security and compliance. If you opt for a third-party application, rest assured that the operation and payment will be smoothly handled through the third party. This offers you a streamlined view of all your data backups, along with the potential for some extra enhanced experiences and workflows.
👉June 2026 Update: Microsoft Introduces Full Workload Backup for SharePoint Online, Exchange Online, and OneDrive
Microsoft has announced a new Full Workload Backup capability for Microsoft 365 Backup.
With this feature, you can create a single backup policy for each workload, like SharePoint Online, OneDrive, or Exchange Online, to back up all eligible artifacts within that workload. This helps ensure that backup coverage keeps pace with a growing Microsoft 365 tenant without requiring continuous policy updates.
How Full Workload Backup Works in Microsoft 365 Backup
When enabled for a specific workload, Microsoft 365 Backup acts as an automated safety net through the following capabilities:
- All eligible existing SharePoint sites, OneDrive accounts, or Exchange mailboxes that aren’t already covered by the existing custom backup policies.
- Newly created sites, OneDrive accounts, and mailboxes that are added after the policy is created.
- Existing custom backup policies remain unchanged and take precedence over Full Workload Backup.
This significantly reduces the risk of backup coverage gaps caused by newly provisioned resources that may otherwise be overlooked.
Rollout Timeline of Full Workload Backup Policy
- Public Preview: Rollout begins in early July 2026 and is expected to complete by mid-July 2026.
- General Availability: Rollout begins in mid-September 2026 and is expected to complete by mid-October 2026.
How to Enable Full Workload Backup in Microsoft 365
The feature is available by default but requires admin configuration to turn on. Once the rollout reaches your tenant, follow the steps below to create a Full Workload Backup policy.
- Go to the Microsoft 365 Backup page in the Microsoft 365 admin center.
- Select the workload you want to protect (SharePoint, OneDrive, or Exchange).
- Choose the Back up all artifacts option.
- On the exclusions step, upload a CSV file to exclude specific artifacts from backup coverage.
- Review the coverage summary and create the Full Workload Backup policy.
While this feature is a massive win for automation and disaster recovery compliance, it requires strict financial planning. Microsoft 365 Backup operates on a Pay-As-You-Go (PAYG) model at $0.15/GB/month. Turning on the Full Workload Backup policy means everything not currently protected will begin consuming backup storage. This can lead to an unexpected and substantial spike in your monthly consumption bill.
Restore Data Using Microsoft 365 Backup
Whether you’ve encountered accidental deletions, ransomware attacks, or other events, the ‘Restore’ feature is designed to help you recover your backed-up data. Admins can manually choose a restore point or opt for a faster recovery using recommended express restore points. Currently, you can restore OneDrive accounts, SharePoint sites, and Exchange mailbox content from specific prior points. Keep in mind that site restores overwrite the current state, while mailbox restores follow a roll-forward process, only modifying changed items. During the preview, full OneDrive and SharePoint site restores are available, with file-level granular restore support planned.
How to Restore Data?
After backing up your data in Microsoft 365, you may need to restore it due to accidental deletion or security issues. The restore feature is designed to help you with this process. Follow the steps below to restore data backed up for OneDrive and SharePoint.
- In the Microsoft 365 admin center, go to Microsoft 365 Backup and select “Restore” in either OneDrive or SharePoint section.
- On the “Select type of content” page, choose OneDrive accounts/SharePoint site content and proceed.
- From the list of backed-up accounts, select the ones to restore.
- On the “Select date and time” page, pick a date and time for the restoration.
- Opt for a recommended restore point for a faster experience.
- Confirm the restore point on the “Confirm restore points” page.
- Optionally, select another backup or proceed to the next step.
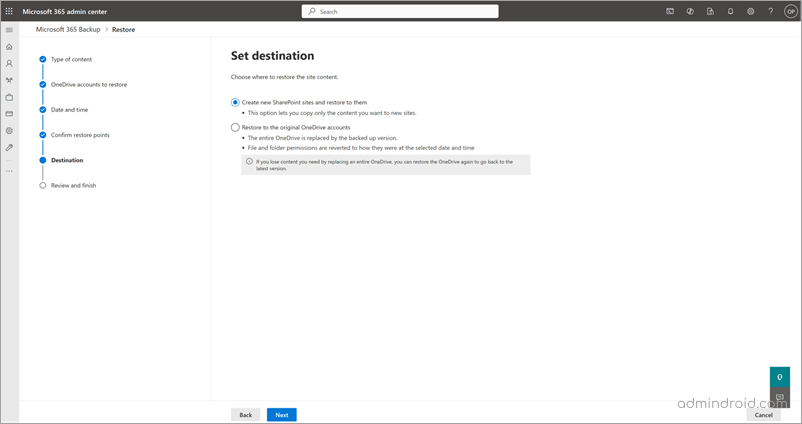
- On the “Set destination” page, choose to restore to the original OneDrive accounts or create a new SharePoint site.
- Restore to Original OneDrive/Sites: Replace the entire OneDrive/SharePoint with the selected backup, including permissions.
- Create New SharePoint Site: Restore to a new SharePoint site for a roll-forward type of restore without overwriting current data.
- On the “Review and Finish” page, review your choices.
- If everything is as desired, select “Restore OneDrive accounts” to complete the process.
Note – To restore data backed up for Exchange, you need to choose content scope between two options: Either all emails, notes, contacts, calendars, and tasks (or) Selected content only.
Presently, there are limitations and constraints in performance and speed of web interfaces, but it’s important to note that these are temporary and specific to the preview phase. It is expected that these issues will be resolved either at general availability or shortly unless explicit communication has been made.
I hope this blog helped you gain valuable information on Microsoft 365 Backup. Feel free to reach us through the comments section if you have any issues.


