Microsoft 365 admins are tasked with a multitude of responsibilities. One major arduous task is to streamline proper Microsoft 365 user management. Manually managing users from onboarding to offboarding in Microsoft 365 is like walking through a maze! Admins need to keep a close eye on users’ lifecycle (Joiner, mover, leaver), and it can get pretty overwhelming.
But what if I told you that there would be no need for tedious onboarding and offboarding processes, no more chasing after users’ lifecycles? Yes, you can automate Microsoft 365 user on-boarding & off-boarding tasks with “Lifecycle workflows in Microsoft Entra ID”. This automated solution relieves HR and the IT department from the manual hassles of identity and access management (IAM).
Let’s explore the blog to learn how this lifecycle workflow streamlines your identity governance in Microsoft Entra ID.
What are Lifecycle Workflows in Microsoft Entra ID Governance?
Lifecycle workflows, an integral component of identity governance, automate Microsoft 365 tasks for users throughout the joiner-mover-leaver (JML) lifecycle. This automation streamlines user lifecycle management, minimizing manual intervention and ensuring a smooth process from onboarding to offboarding.
License and Role Requirements for Creating Lifecycle Workflows
License Requirement: To create a lifecycle workflow, you need a Microsoft Entra ID Governance license. If not, you can use a free Microsoft Entra ID Governance license trial to test it out in your organization. Additionally, the implementation of life cycle workflows requires Microsoft Entra ID Governance subscriptions for your organization’s users. Also, the feature “Custom workflow extensions” comes along with this license. If you have an Entra ID P1 or P2 license, you can purchase the Microsoft Entra ID Governance (User SL) or Microsoft Entra ID Governance Step Up for Microsoft Entra ID P2 license respectively.
Pricing: Currently, the Microsoft Entra ID Governance license is priced at $7 user/month. For Entra ID governance license for business guests, there’s a considerable discount, bringing the price down to $0.75 per user per month.
Role Requirement: To establish a lifecycle workflow, you must have the role of Global administrator or Lifecycle workflow administrator. If you are a Global reader, then you can be able to view the lifecycle workflows in Entra ID without any managing process.
Three Stages of a User Lifecycle in Microsoft 365
The user lifecycle has three main stages: “Joiner,” “Mover,” and “Leaver”. Each stage requires tailored actions like sending onboarding reminder emails, welcome emails to new hires, managing user accounts, provisioning and de-provisioning access to resources, adjusting permissions, or offboarding procedures. For example,
1. Joiner – New Employee joining the organization
Task to be performed: Provide access to the new employee entering the company or organization like granting the necessary Microsoft 365 permissions, privileges, and issuing temporary access pass for passwordless authentication.
- It’s crucial to provide a smooth onboarding experience to new users where they are ready to access information and applications from day one itself.
2. Mover – User moving to other department in the organization
Task to be performed: Adjust access permissions as users transition within the organization. This involves integrating them into new Teams or groups.
- It is essential when users move from one department to another. They often require additional access or authorization to facilitate effective collaboration with the new teams or groups.
3. Leaver – Employee who’s retiring or get terminated.
Task to be performed: Promptly revoke access rights for employees leaving the company.
- It is essential for employees who have had access to sensitive data during their tenure with the organization. Because having access after their retirement could potentially pose a significant threat to the organization.
While methods like automating Microsoft 365 user on-boarding using Power Automate and automating employee offboarding using PowerShell exist, they can be challenging to grasp. But lifecycle workflows in Entra ID simplify the process by automating these user lifecycle management actions through pre-defined tasks and conditions.
- Tasks: Tasks are the actions that need to be performed on the respective users once the flow is triggered.
- Conditions: Conditions define the scope of users and are the triggers for when the scheduled workflow will be executed.
This automation not only enhances the efficiency of identity and access management (IAM); but also reduces the risk of errors raising in manual process.
Now, let’s delve into the process of creating lifecycle workflows in Azure AD.
How to Create an Identity Lifecycle Workflows in Microsoft Entra ID?
You have the option to create and customize workflows either by utilizing templates or by crafting your own based on your unique requirements. When working with workflows in the Microsoft Entra admin center, you need to create flow from templates alone.
However, if you wish to create a workflow without relying on a template, you can use Microsoft Graph.
Limitations in Creating Workflow for Identity Lifecycle Management Tasks:
- A maximum of 50 workflows can be configured per tenant.
- The number of tasks for a single workflow is 25.
- Up to 100 custom task extensions can be configured per tenant.
- Scheduling intervals are allowed only within the range of 1 to 24 hours.
- For on-demand running, you can select a maximum of 10 users.
- Offset days can be set, but the limit extends only up to 180 days.
To create a MS Entra’s lifecycle workflow using templates, follow the navigation below.
- Sign into Microsoft Entra admin center.
- Navigate to Identity governance and select Lifecycle workflows.
- Click +create workflow and select any workflow template from ‘choose a workflow page’ depending on your need.
Here, you are given three tabs.
- Configure workflow and trigger details.
- Configure the scope for the lifecycle workflow.
- Configure tasks for the Automatic lifecycle workflow
4. Configure Workflow and Trigger Details for the Identity Lifecycle Workflow
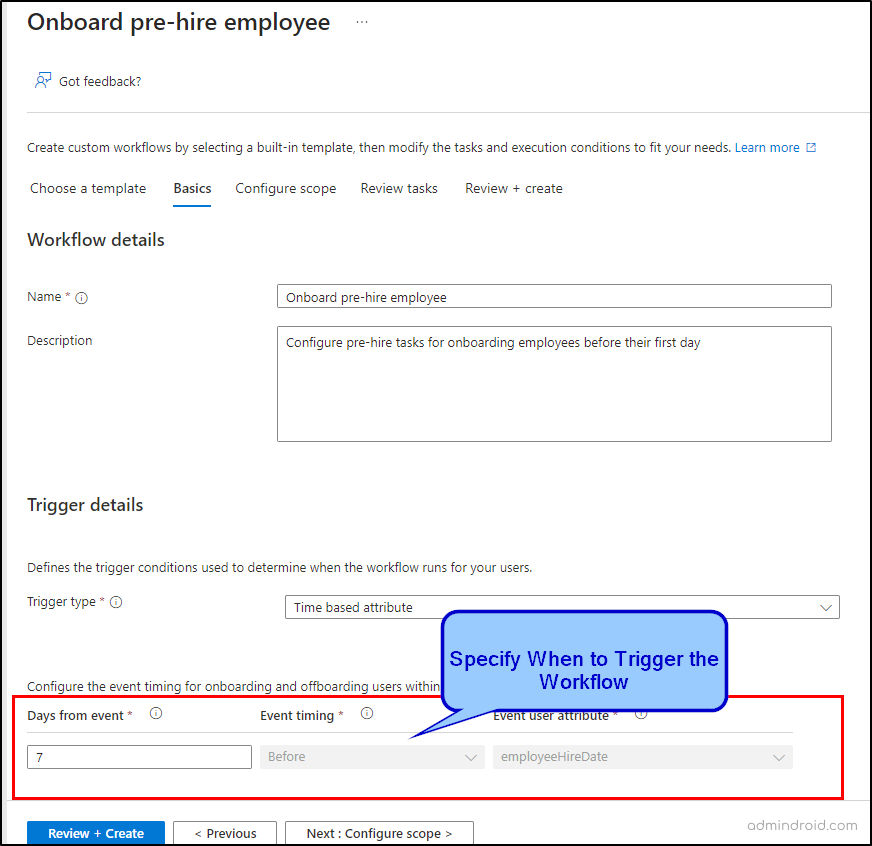
What to do in the Basic tab? In the Basic tab, two sections are available.
- Workflow details: You need to provide a unique display name and description for your workflow.
- Trigger details: You can fill in the trigger details below based on your need.
- Trigger type: It’s preset based on your chosen template.
- Days from event: The “Days from event” trigger allows you to specify when the scheduled workflow activates for the users. It involves a time-based attribute and an offset value.
For instance, if you set the attribute “employeeHireDate” which has been configured as March 28, and choose “Days from event” as 1 day, the defined tasks will be executed one day after the hire date, specifically on March 29. But note, that the attribute values must be configured on the Entra ID for the users.
5. Once done, click ‘Next :Configure scope >’.
6. Configure the Scope for the Lifecycle Workflow in Microsoft 365.
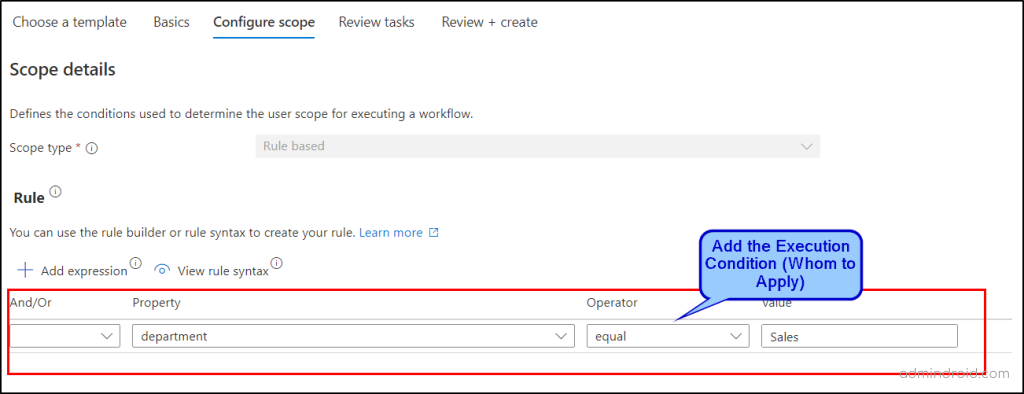
What to do in the “Configure Scope” tab? In the Configure scope tab, you can restrict the workflow to run only for specific user accounts.
- Scope type: It is set as “rule based” by default. That means, the scope are the targeted users configured in the below “Rule” section.
- Rule: Write a rule that includes the users to whom the workflow should be executed. Specify user properties as conditions, such as “department,” “Company Name,” and “jobTitle,” to determine whom the workflow should be executed. You can add those property values under the “Property”, “Operator”, and “Value” options respectively. For example,
| Property | Operator | Value |
| department | Equals | Sales |
The above example will trigger the flow for the users of the “Sales” department. You can add additional conditions using And, And not, Or, Or not expressions.
7. Click “Next: Review tasks”.
8. Configure Tasks for the Automated Lifecycle Workflow
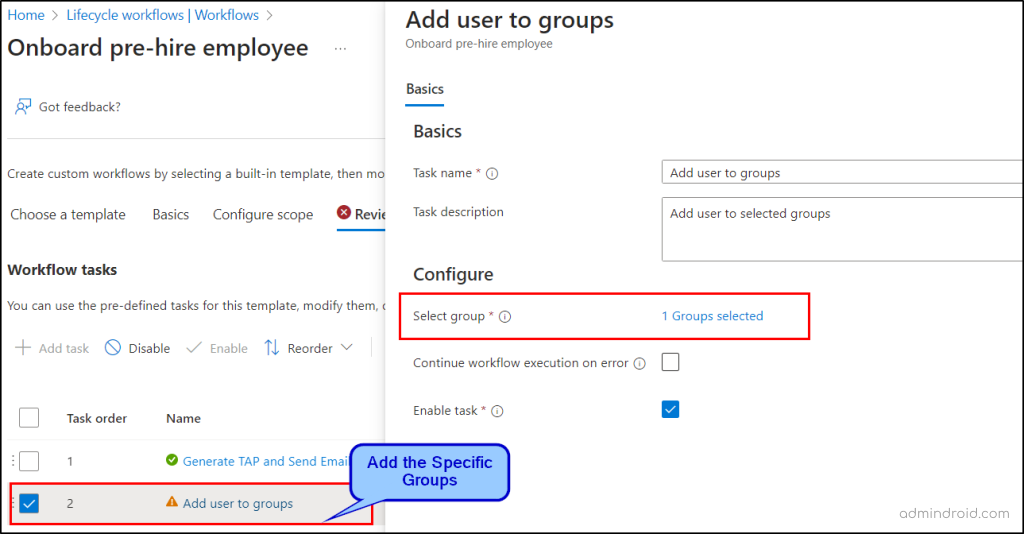
What to do in the “Review tasks” tab? This is where admins can add specific tasks based on your requirements. Below are the tasks supported by each of the categories.
| Supported Tasks | Category |
| Send welcome email to new hire | Joiner |
| Send onboarding reminder email | Joiner |
| Generate Temporary Access Pass and send via email to user’s manager | Joiner |
| Send email to notify manager of user move | Mover |
| Request user access package assignment | Joiner, Mover |
| Add user to groups | Joiner, Leaver, Mover |
| Add user to teams | Joiner, Leaver, Mover |
| Enable user account | Joiner, Leaver |
| Run a custom task extension | Joiner, Leaver, Mover |
| Disable user account | Leaver |
| Remove user from selected group | Joiner, Leaver, Mover |
| Remove users from all groups | Leaver |
| Remove user from teams | Leaver |
| Remove user from all teams | Leaver |
| Remove access package assignment for user | Leaver, Mover |
| Remove all access package assignments for user | Leaver |
| Cancel all pending access package assignment requests for user | Leaver |
| Remove all license assignments from user | Leaver |
| Delete user | Leaver |
| Send email to manager before user’s last day | Leaver |
| Send email on user’s last day | Leaver |
| Send email to user’s manager after their last day | Leaver |
Already there will be some existing tasks for the templates, you can enable them using the “Enable” option at the top. Also, you can disable, remove or reorder the existing tasks with the respective option at the top. Here, I’ve included the “Add users to groups” task as an example. After its addition, you must specify the groups within the task to enable its functionality.
8.Once done, select “Next: Review and create >”.
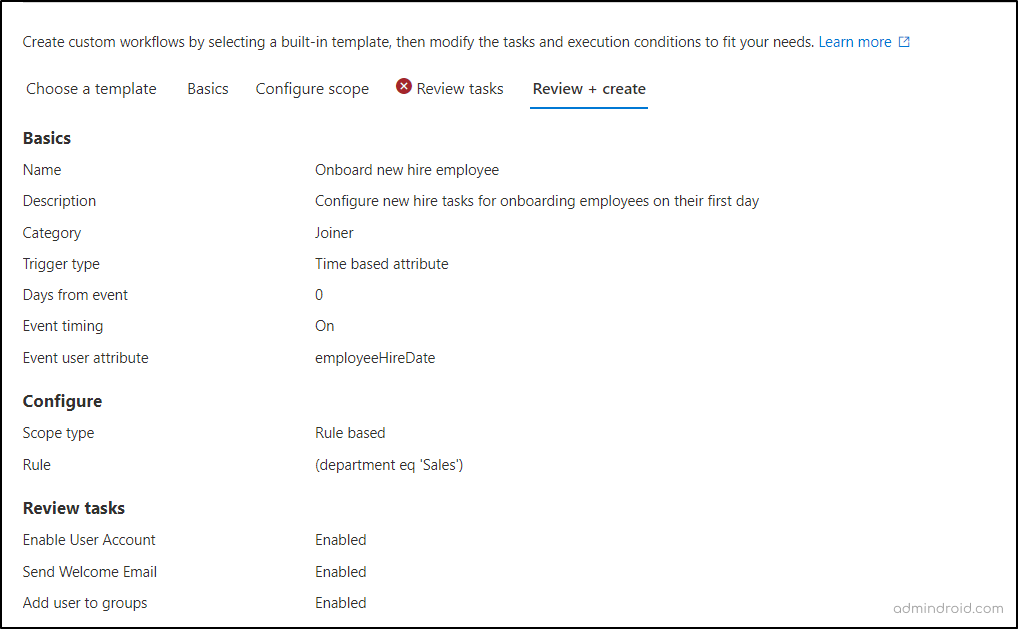
9. Finally, review the scope and tasks for your workflow in “Review and create” tab and proceed to create the workflow. You can enable scheduling in this tab to run the workflow at regular intervals. If you missed enabling it, you can do that from workflow overview page, once it is created.
Manage Lifecycle Workflow Settings in Identity Governance
The Microsoft Entra ID allows you for the fine-tuning of scheduling Values and thorough testing of your lifecycle workflow. Let’s see them in detail in the below sections.
- Customize the schedule of lifecycle workflows in Microsoft Entra ID
- Run the lifecycle workflow on-demand in MS Entra admin center
Customize the Schedule of Lifecycle Workflows in Microsoft Entra ID
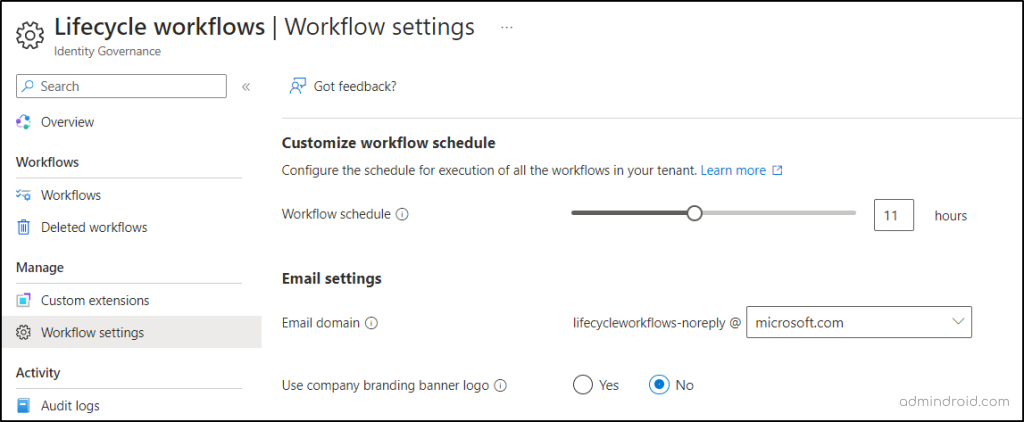
By default, workflows are set to run every 3 hours, but you have the flexibility to customize the duration, extending it up to 24 hours. To personalize the workflow schedule in the Microsoft 365 admin center, follow these steps:
- Sign into Microsoft Entra admin center.
- Navigate to Identity governance and select Lifecycle workflows.
- On the Lifecycle workflows overview page, click “Workflow settings”.
- Here, you can set the values for the schedule as per your needs.
Run the Lifecycle Workflow On-demand in MS Entra Admin Center
If you wish to test your workflow or encounter a situation demanding immediate execution, you can utilize the “Run on demand” option. It’s essential to note that, despite being an on-demand scheduling option, the workflow will not consider whether the specified execution conditions are met. This feature requires you to specify the user to whom the configured tasks will apply.
Simply, it can be used for flow testing purposes. Also, this run-on-demand can be used when the need to manage real-time employee role changes with lifecycle workflows arises.
You can also create a custom workflow using Graph API, if you want to build a workflow from scratch.
Manage Workflows in Microsoft Entra Admin Center
You can effectively manage your newly created policy by navigating through its dedicated overview page, comprising three key sections. To assess the three sections, follow the navigation below.
- Sign into Microsoft Entra admin center.
- Navigate to Identity governance and select Lifecycle workflows.
- Select Workflows from the navigation pane and select the specific workflow.
From here, you can manage the workflow using the three sections below.
1. Basic Information: Within this segment, you can access essential details such as the,
✅Display name and description of the workflow.
✅ Scheduling status of the lifecycle workflow.
✅ Creation date and time of the scheduled workflow.
✅ Last modification date and time, and more.
2. My Feed: This section serves as a monitoring hub for workflow execution. Here, you can keep track of the,
✅ Next scheduled run’s date and time.
✅ Identify any failed tasks.
✅ Total number of tasks.
✅ Review different versions of the workflow created.
3. Quick Actions: This section empowers you to take swift action on the workflows. For example, you can,
✅ Trigger an immediate on-demand schedule run.
✅ Manage tasks, enabling actions like deletion, editing, addition, and reordering of configured tasks within the workflow.
✅ Gain insights into user summaries, task summaries, and workflow history-based task summaries.
As an alternative to the Quick Actions section, you can utilize the Manage section of a workflow to perform various actions within the workflow.

Benefits of Using Lifecycle Workflows in Microsoft Entra ID
Here are some of the benefits of lifecycle workflows that grab the attention of the admins.
- Centralized Workflows: You can create and manage all lifecycle workflows efficiently from a single location.
- Reduced Time Consumption: Time-saving benefits are evident, especially during onboarding and offboarding, where individual access provisioning and revocation can be laborious. Lifecycle workflows significantly reduce the time spent on these tasks.
- Error Reductions: Manual processes can introduce mistakes that pose threats to your organization, but workflows help minimize errors in repetitive tasks.
- Easy Troubleshooting of Errors: Troubleshooting becomes seamless with access to the workflow history, allowing easy identification and resolution of issues during each phase.
- Integration with Logic Apps: Achieve seamless integration by incorporating logic apps into your workflows, addressing complex scenarios effortlessly.
In essence, creating lifecycle workflows for automated Microsoft 365 offboarding and onboarding not only streamlines the user management process but also serves as a potent timesaving one. But tasks like onboarding, offboarding, MFA setup, license assignments, and group configurations in Microsoft Entra ID often take up valuable time and are prone to errors. This is where AdminDroid comes in!
Automate User Lifecycle Management in Microsoft 365 with AdminDroid Flow Agents
AdminDroid Flow Agents remove the friction by automating these tasks intelligently, without coding, portal overload, or risk. Flow Agents are nothing but smart Microsoft 365 automation workflows that handle your entire user lifecycle. From joining to leaving, they ensure every step is executed accurately, efficiently, and auditable.
How Flow Agents Solve Real IT Challenges
- Automate Every Manual Step: From onboarding new hires to setting up MFA, assigning licenses, or configuring groups, all tasks are automated in one seamless flow, so users can get started right away.
- Reusable Templates for Repetitive Tasks: Whether onboarding multiple employees or updating licenses for an entire team, capture the inputs required once and reuse them to save hours of manual effort.
- Bulk Management Without Stress: Onboard and offboard hundreds or even millions of users at once, ideal for global operation cases, without worrying about delays or extra resources.
- Instant Undo with Revert: If you accidentally offboard the wrong user or apply incorrect settings, simply revert the change and get everything back on track without the hassle of manual fixes.
- Built-in Oversight: Require approvals before making important changes such as granting admin access or updating permissions and maintain a full audit trail to ensure compliance and accountability.
- Ready-to-Use Yet Fully Customizable: Access pre-built workflows that you can easily customize to meet unique scenarios like contractor management or department transfers.
From the first day a user joins to the moment they leave, AdminDroid Flow Agents handle Microsoft 365 lifecycle tasks faster, safer, and smarter, so IT teams can focus on strategy instead of repetitive portal work.

Go Beyond Automation; Take Full Control of Microsoft 365
AdminDroid doesn’t stop at automating routine administrative tasks, it gives you unparalleled visibility and control over your entire Microsoft 365 environment. It brings together advanced reporting, auditing precision, centralized management, and meaningful analytics — delivering admins a holistic view of Microsoft 365 at their fingertips.
📈 3,500+ Actionable Reports – Audit Teams, Exchange, SharePoint, OneDrive, and more in seconds.
✨ AI-Powered Customization – Personalize reports so you always see the most relevant metrics.
🛠️ 450+ Built-In Actions – om creating users and assigning licenses to managing groups and adding members to Teams, get it all done without portal-hopping.
🔍 Deep Insights – Track licenses, permissions, mail flow, and sign-ins with precision.
📊 360° Dashboards – Spot trends, visualize usage, and monitor security from a single screen.
📢 Instant Alerts – Get notified the moment a critical change occurs, down to the smallest detail.
⏰ Smart Reminders – Send timely reminders for MFA enrollment, password resets, and security policies so users stay on track and IT teams don’t have to follow up repeatedly.
👥 Delegation – Assign responsibilities with precision, ensuring users receive only the access they need, nothing more.
🌐 Virtual Tenant Management – Delegate specific resources like users and groups to designated admins, providing scoped management without compromising broader access.
✅ Approvals – Maintain control over sensitive actions by automating approval workflows.
Hope this blog brings you more information about the lifecycle workflows in Microsoft Entra ID. Furthermore, feel free to reach out to us in the comments section for any assistance needed.


