Onboarding external users to access specific resources is a common necessity for Microsoft 365 organizations. However, directly adding an external user to Microsoft Entra ID can lead to security risks and unmanaged access. This makes it difficult to track and revoke permissions when they are no longer needed.
To address this, Microsoft Entra ID provides access packages in entitlement management. This allows organizations to streamline external user onboarding through an approval process. With an access package, you can define the necessary resources, enforce approval workflows, and ensure that external users receive only the required access for a specific period of time.
In this blog, we’ll walk you through the process of onboarding external users through an approval process using an access package in Microsoft Entra ID.
What is an Access Package in Microsoft Entra ID?
An access package in entitlement management enables you to set up resources and roles once to streamline user access. It is a bundled set of permissions and resources that can be assigned to internal or external users. This gives them the exact access they need for a specific project or role within the organization, limited to a defined time period.
All access packages must belong to a catalog, which allows the respective users to request an access package. Approvers then review and either accept or reject the request. This ensures that no unauthorized external users are added to the organization.
To create an access package in entitlement management, you must have one of the following licenses.
- Microsoft Entra ID P2 or Microsoft Entra ID Governance
- Enterprise Mobility + Security (EMS) E5 license
Govern Access for External Users Using Access Packages in Microsoft Entra ID
To manage external users access in entitlement management using access packages in Microsoft 365, follow the detailed steps below:
- Create an access package in Microsoft Entra ID to onboard external users
- Share the access package request link with external users
- Approve or reject access requests for external users
Create an Access Package in Microsoft Entra ID to Onboard External Users
Imagine you need to onboard external users for a partner collaboration project. You want to grant them access to specific teams, SharePoint sites, applications, and roles while ensuring secure and controlled access. Instead of assigning these resources individually, you can create an Entra access package for external users that includes all necessary permissions. External users can request access, and once approved, they will automatically receive the assigned resources.
Let’s see how to create an access package to onboard external users through an approval process using the Entra admin center.
- Configure name and catalog for the access package
- Specify resources roles to the access package
- Set up request settings for the access package
- Gather requestor information for the access package
- Change lifecycle settings for the Entra ID access package
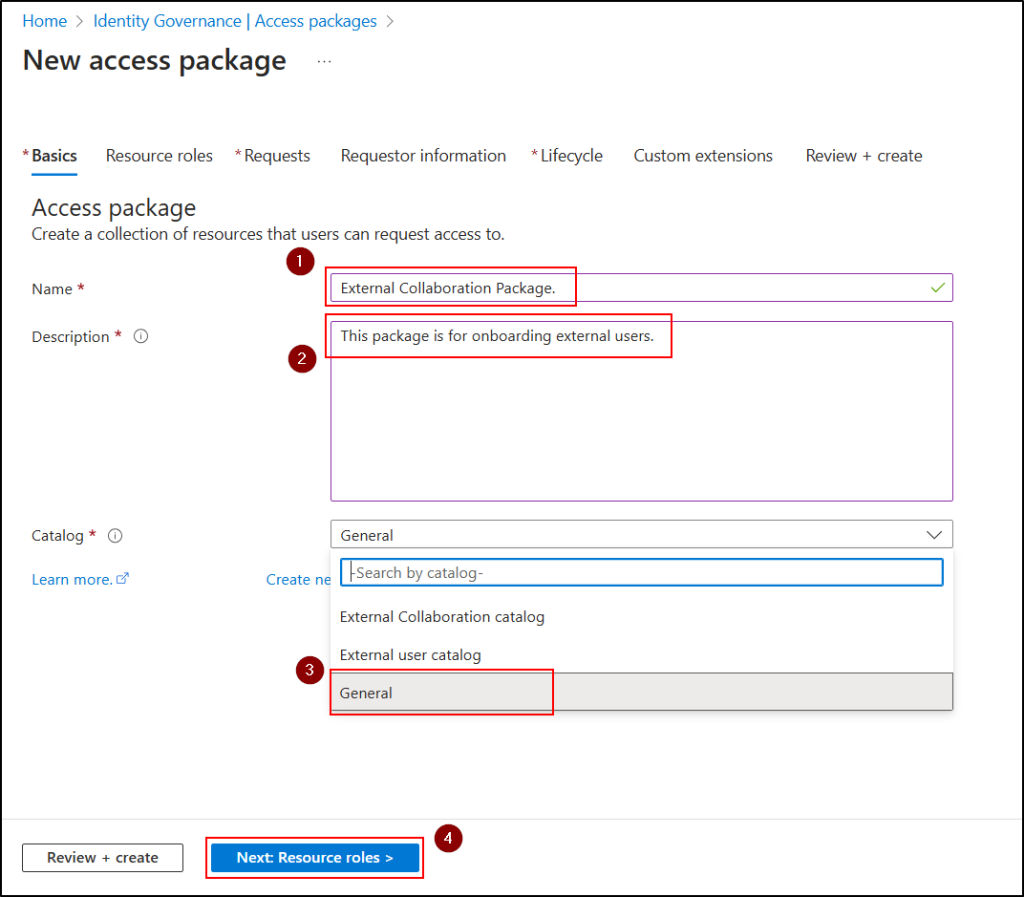
1. Configure Name and Catalog for the Entra ID Access Package
Before creating an access package in the Microsoft Entra admin center, ensure you at least have Identity Governance administrator privilege. A Catalog owner or Access Package manager can also create an access package.
- Log in to the Microsoft Entra admin center.
- Navigate to Identity Governance > Entitlement management > Access packages and click + New access package.
- On the Basics page, enter a name and description for the access package.
- You can either use the default General catalog or create a new catalog by selecting Create new catalog. If you create a new catalog, make sure to select Yes for Enable for external users.
- After selecting the catalog, click Next: Resource roles >.
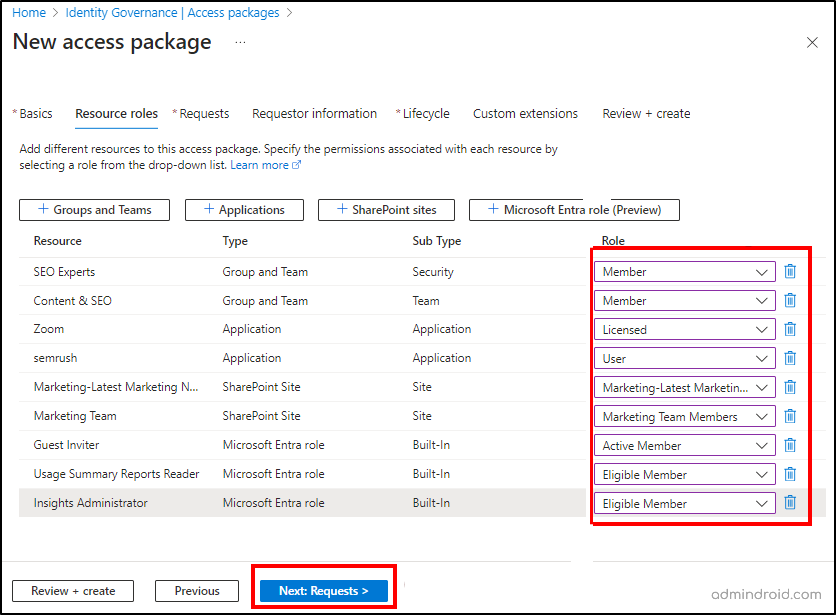
2. Specify Resources Roles to the Access Package
In this step, add the necessary roles and resources that external users will need access to. While this step is optional, defining roles ensures appropriate access control.
- Add required groups, teams, applications, SharePoint sites, and Microsoft Entra roles for external users.
- To provide the external users access to specific groups and teams:
- Click on the + Groups and Teams option.
- In the flyout pane, select the checkbox “See all Groups and Team(s) not in ‘External user catalog’ catalog” to view all available groups and teams.
- Select the desired groups or teams and click Select to add them as resources.
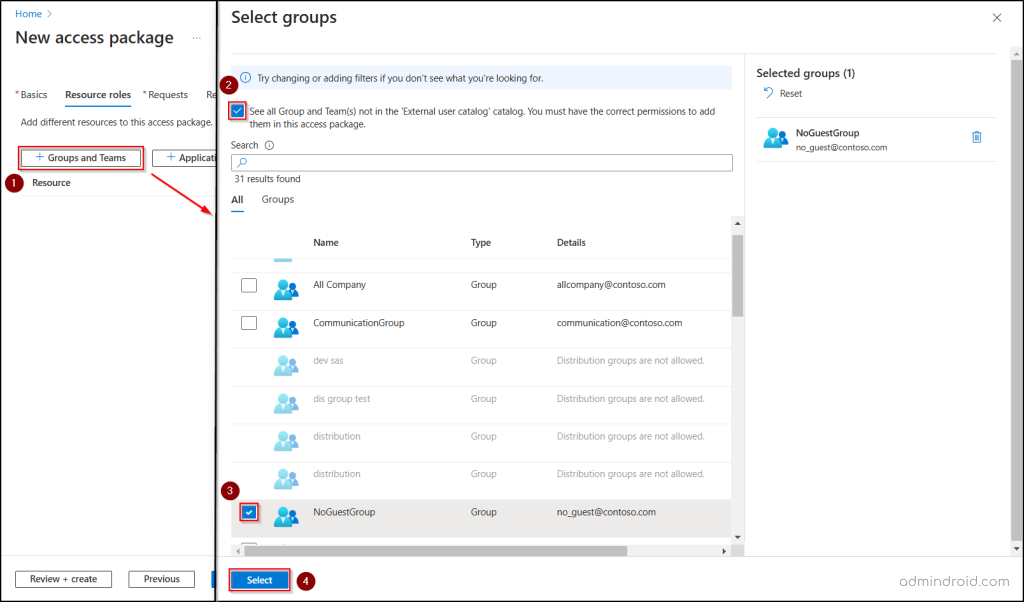
- Repeat the procedure to add the necessary resources to the access package, such as applications, SharePoint Online sites, and Entra roles.
- After adding all the required resources, assign the appropriate role for each resource using the Select role dropdown.
- Once the roles and resources are configured, click Next: Requests >.
Note: To add Microsoft Entra roles to the access package resources, Microsoft Entra ID Governance license is required.
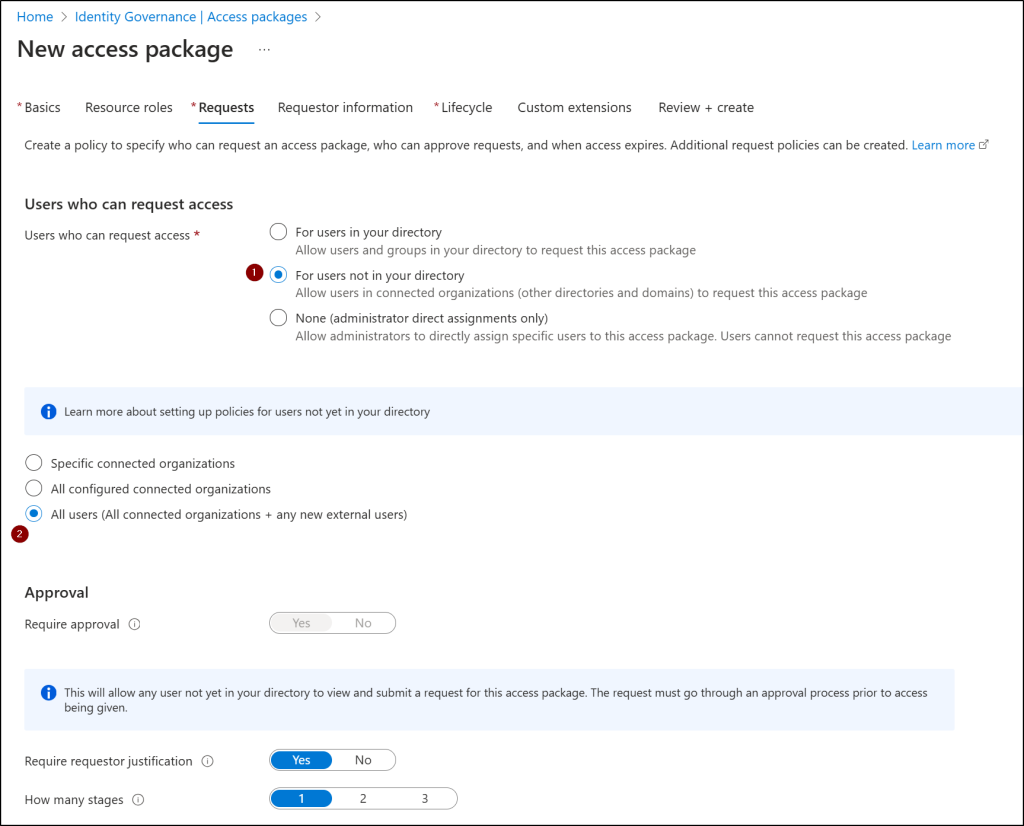
3. Set Up Request Settings for the Access Package
Now, define a request policy that determines who can request the access package, who approves the requests, the number of approval stages, and more.
- In the Users who can request access section, select ‘For users not in your directory’, then choose All users (All connected organizations + any new external users) to allow external users to request access.
Note: Since any external user can submit a request, the Require approval option is enabled by default and cannot be changed. - The Require requestor justification option is enabled by default. You can disable this option if you don’t want any justification from the requestor.
- Select the number of approval stages. By default, it is 1.
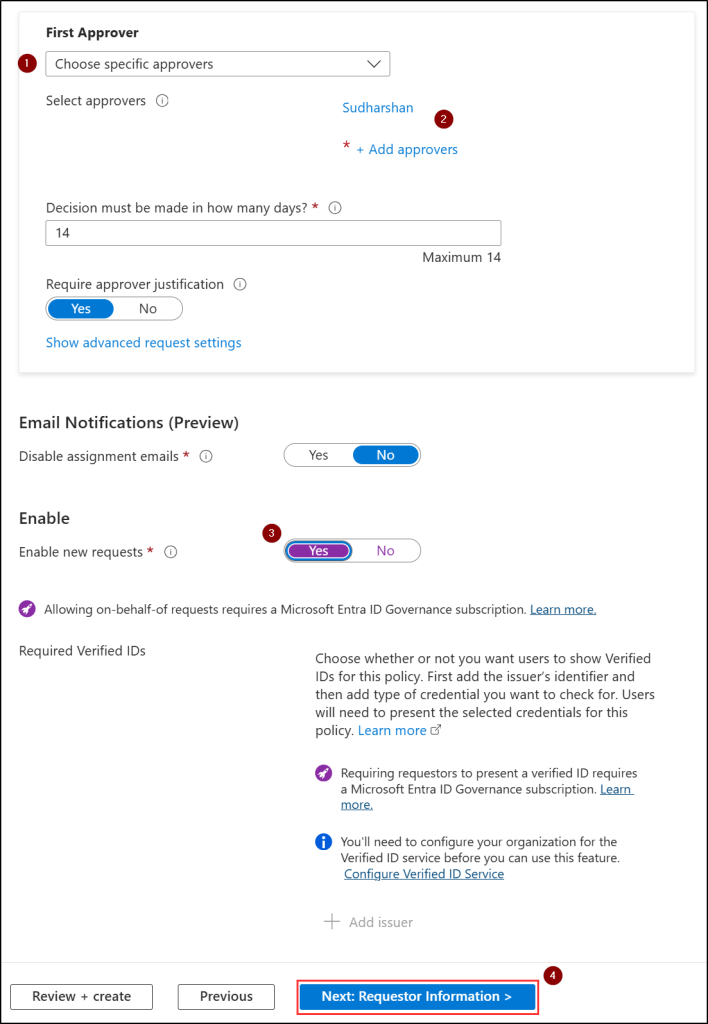
- Under the First Approver section, click the dropdown and choose one of the following options, then add the appropriate fallback/approvers: External sponsors, Internal sponsors, or Choose a specific approver.
- If you have selected External sponsors or Internal sponsors, you need to add a fallback for approval. If you have selected Choose a specific approver, you can just add an approver.
- If you have selected multiple approval stages, repeat the same process for each stage by selecting the approvers accordingly.
Note: Fallback approvers will receive request notifications only if the requesting user does not have a sponsor in your organization. - Set the approval deadline (up to 14 days). If no action is taken within this period, the request will be automatically rejected.
- The Require approver justification option is enabled by default. You can disable it if approver justification isn’t required.
- Ensure Enable new requests is set to Yes so that users can start requesting access immediately.
- Click Next: Requestor information >.
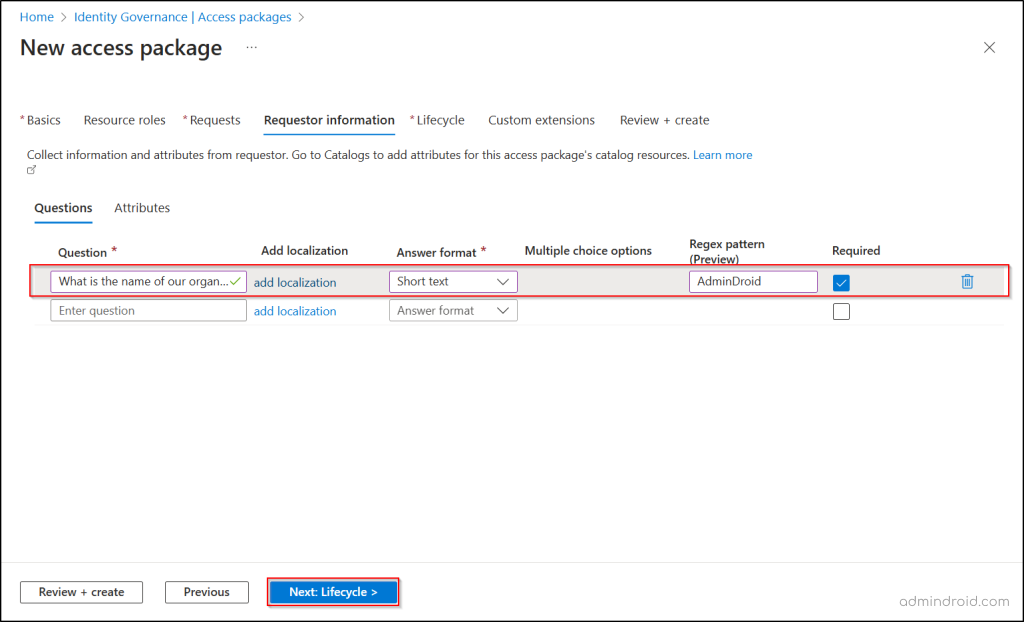
4. Gather Requestor Information for the Access Package
In this step, you can add custom questions to collect additional details from the access package requestors. These questions appear on the request form, and the respective answers provided by requestors help approvers assess whether access should be granted.
Once you have added the required number of questions based on your requirements, click Next: Lifecycle >.
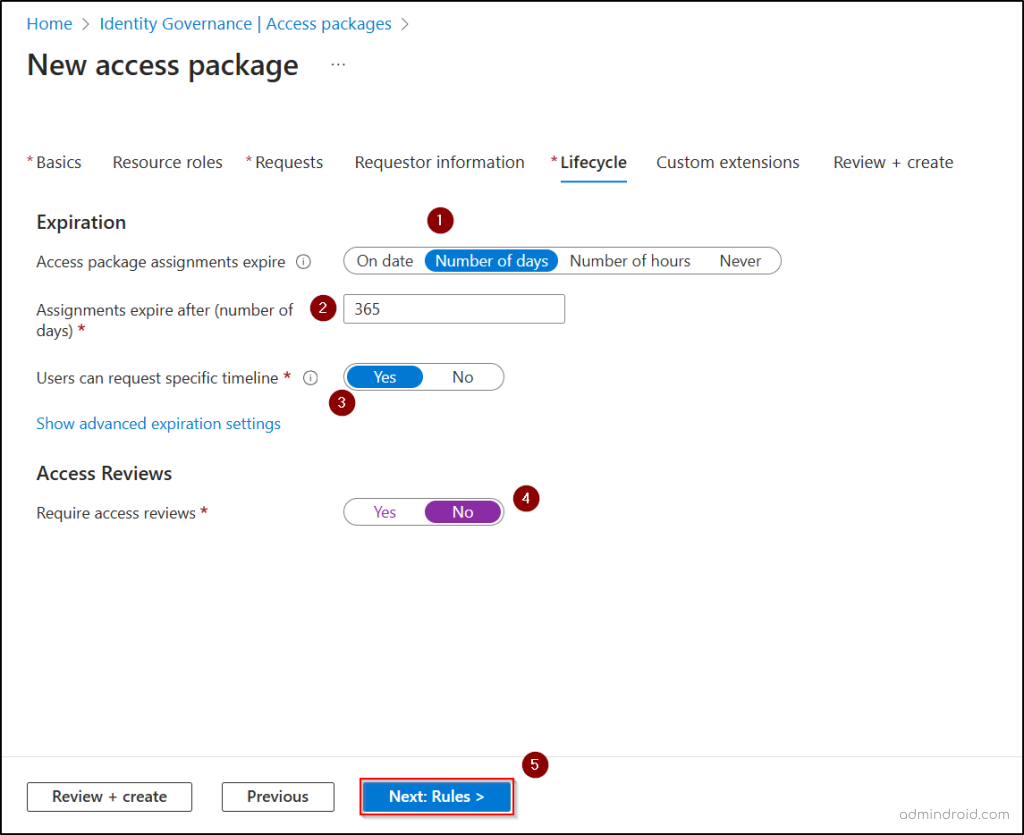
5. Change Lifecycle Settings for the Entra ID Access Package
Here, you can define the access package lifecycle, including how long assignments remain active and whether users can request specific timelines.
- In the Access package assignment expire field, choose when the policy should expire, such as on a specific date, after a certain number of days, after hours, or never.
- Then, adjust the assignment period based on the assignment expiry method chosen. If ‘Number of days’ is chosen, the default days assigned is 365.
- By default, the option Users can request specific timeline is set to Yes, allowing external users to submit a start date and end date while requesting access. You can set it to No if you don’t want users to specify the timeframe for access.
Note: The requestor cannot specify the end date beyond the timeline defined in the access package. - Then, if required, you can configure Entra ID access reviews under the Access Reviews section by toggling it to the Yes position.
- If access reviews are configured, assigned users will undergo periodic reviews to ensure they still need access. Approvers can then decide whether to extend or revoke access based on the review findings.
- Once the lifecycle settings are configured, click Next: Rules >.
After finishing the above five steps, you can optionally configure custom extensions to trigger a previously defined custom flow if you have a Microsoft Entra ID Governance subscription. For example, you can use custom extensions in entitlement management to trigger Logic Apps.
Finally, click Next: Review + create to ensure everything is correctly set up. Once verified, click Create to finalize the access package in Microsoft Entra entitlement management.
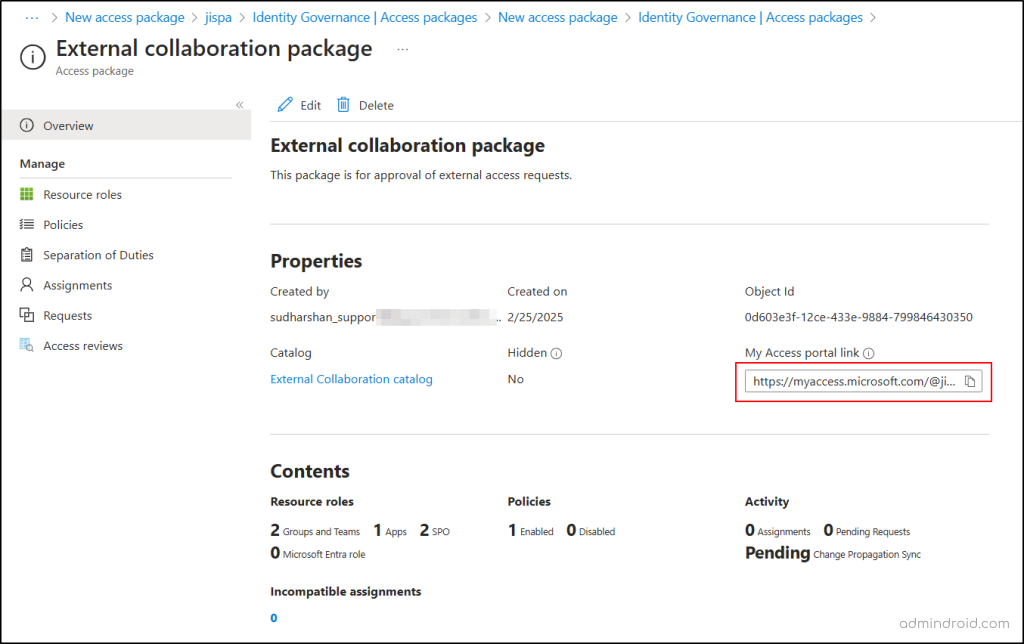
Share the Access Package Request Link with External Users
Once the access package is created, you will be redirected to the Overview page. Copy the My Access portal link and share it with external users via any medium to start collaborating.
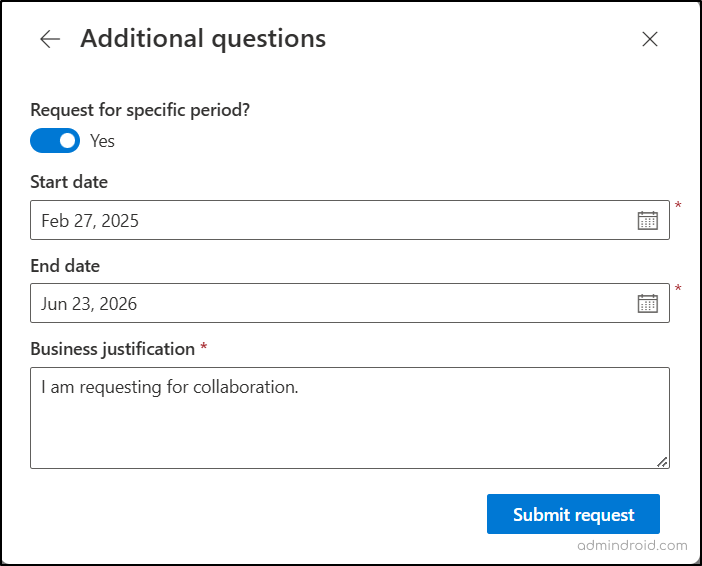
The external user having the My Access portal link can follow the procedure below to request access to the access package.
- Open the My Access portal link provided and sign in with a Microsoft 365 account. A consent form will appear requesting to read your profile; you must accept it before proceeding.
- Click Continue on the Request details page.
- First, answer the questions configured by the admin.
- If you want to request access for a specific period, enable the toggle and specify the start date and end date. If requesting a specific timeline option is disabled, this setting will not be available.
- If requestor justification is mandatory, you must provide a justification for the request.
- Click Submit request and wait for approval.
Approve or Reject an Access Request in Microsoft Entra ID
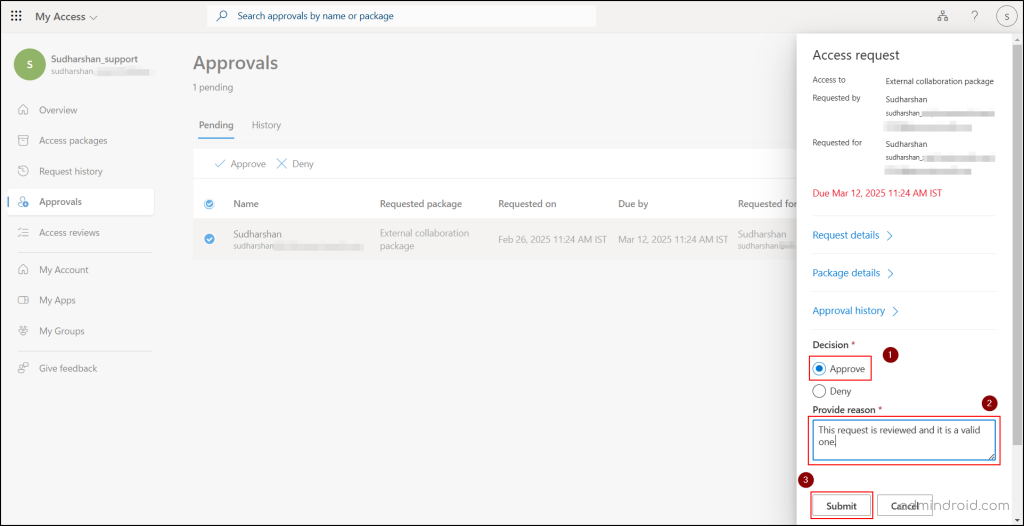
Approvers, such as external sponsors, internal sponsors, or specifically assigned approvers, will receive an email to review the access request. Here’s how an approver can approve or reject the request.
- Click the Approve or deny request button in the desired email or log in to the My Access page and navigate to the Approvals section to see all pending approvals.
- Click the Review button associated with the desired request.
- Verify the request details and choose to Approve or Deny the request based on the need.
- Provide a reason for the approval or denial, then click Submit.
For bulk approvals or rejections: If you want to approve or deny multiple access requests at once, select the requests and click Approve or Deny in the toolbar. You will be prompted to provide a reason for approval or denial. Enter the reason and click Submit.
Note: Once the request is approved, the approver will automatically be assigned as a sponsor for the external user once they onboard.
I hope this blog has provided you with a clear understanding of how to onboard external users through an approval process in Microsoft Entra ID. Restricting external user access to specific resources for a limited time helps ensure security and aligns with Microsoft 365 security best practices. If you have any questions or need further clarification, feel free to leave a comment below!


