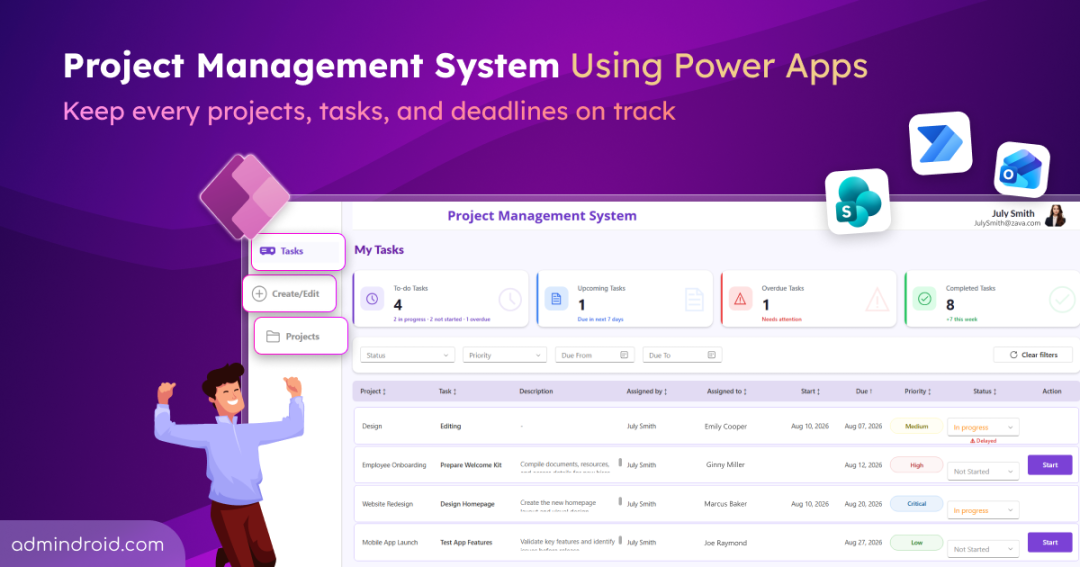
Users and managers need to keep project details, tasks, and deadlines up to date to keep projects on track. As projects grow, this becomes challenging when information is distributed across multiple tools. Organizations often rely on Excel sheets, SharePoint lists, Teams chats, email threads, or third-party applications for managing projects. However, this can lead to fragmented information, sync challenges, additional costs, and context switching, ultimately causing project delays and resource wastage.
To address these gaps, we’ve built a project management system using Microsoft Power Apps that brings project creation, task assignments, and progress tracking together in one place. In this blog, we’ll explore how to import the solution and use it to manage projects and tasks more effectively within Microsoft 365.
Why Organization Should Use Power Apps for Project Tracking System?
Before getting started, let’s first understand why Power Apps can be a suitable choice for project management.
Organizations need a way to manage projects, assign tasks, track deadlines, and monitor progress, but their workflows and requirements can vary. A project management system must be a centralized platform, where projects can contain multiple tasks assigned to different users. Then, employees can view their assigned tasks and deadlines, and managers can monitor project progress and areas that need attention.
However, traditional project management tools may not always align with an organization’s specific workflows, and requirements. Organizations may need to customize how projects and tasks are created, assigned, tracked, and managed.
This is where Power Apps can help. Power Apps is a low-code development platform from Microsoft that enables organizations to build custom business applications with minimal coding. It can connect to Microsoft 365 services and other data sources, allowing organizations to build project management solutions that fit their existing processes and requirements.
How Power Apps Makes Project Management Easier
Here are some of the key features of the Power Apps project tracker that make project creation, task management, and progress tracking easier:
- Role-Based Access: Give employees and managers the right views and controls based on their responsibilities.
- Create and Manage Projects: Managers can create projects, update project details, assign tasks, priorities, and due dates, and track task progress.
- View and Update Tasks: Users can only view the tasks assigned to them from the My Tasks page, update their progress, and mark tasks as completed.
- Track Progress at a Glance: Use dashboards, reports, filters, and cards to quickly identify assigned, upcoming, overdue, and completed tasks.
- Automate Routine Work: Create workflows with Power Automate to send task assignments, reminders, and status notifications automatically.
- Customize Based on Your Needs: Adapt screens and business logic to match your project management process. To make these changes, you can either use Power Fx formulas or AI-powered development tools with the canvas app authoring MCP Server to modify the canvas apps.
- Access from any Device: Power Apps provides responsive app layouts to use this app across multiple platforms, including desktops, tablets, and mobile devices.
Now that we’ve seen the key features, let’s see how the project management system brings them together.
How the Project Tracker Built With Power Apps Works
The project management app has three main screens, each designed for a specific part of the workflow. Let’s explore each screen in detail:
1. View ‘My Tasks’ Page to Track Assigned Tasks
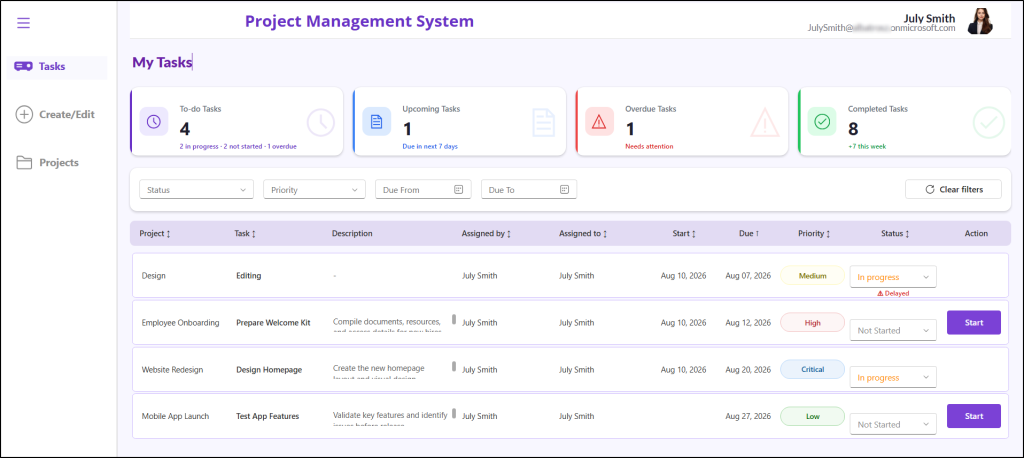
The My Tasks page is available to employees, including users and managers who are assigned tasks. Users without manager permissions in Microsoft Entra ID can access only this screen within the app. In this page,
- At the top, To-do, Upcoming, Overdue, and Completed cards that display task counts to provide a quick overview of the user’s tasks.
- Users can filter tasks by Status, Priority, and Due Date. The Clear filters option makes it easy to remove all applied filters.
- The page also includes a task list that displays details such as Project, Task, Description, Assigned By, Assigned To, Start Date, Due Date, Priority, Status, and Action.
- Upcoming, pending, and overdue tasks are displayed by default in task lists. Set the Status filter to Completed to view completed tasks and sort any column to arrange tasks based on the information displayed.
- Users can select Start when they begin working on a task, which automatically updates the task’s Start Date. They can also update the Status as work progresses, while other project and task details remain non-editable.
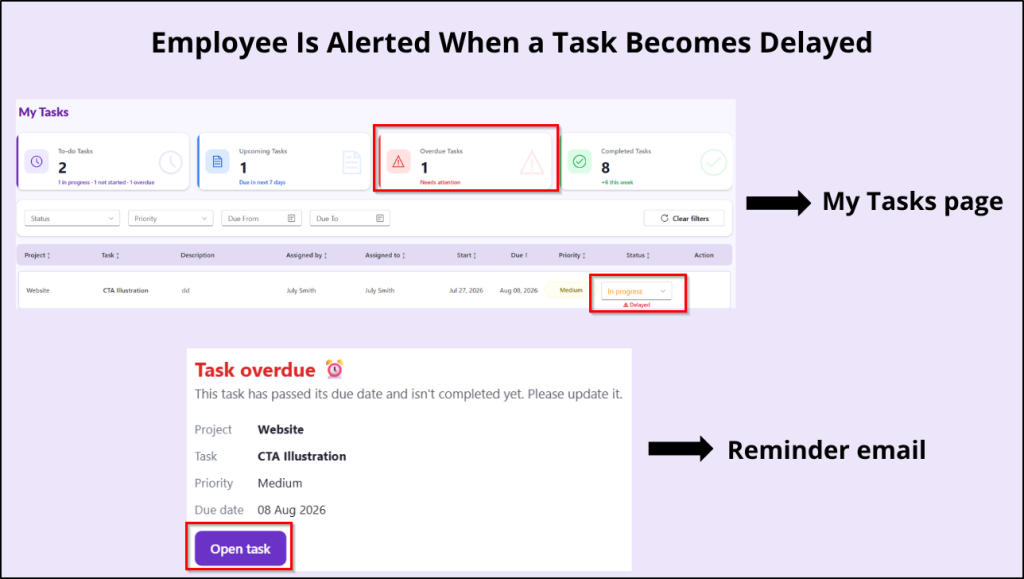
- Tasks that pass their due date are marked as Delayed, making them easy to identify.
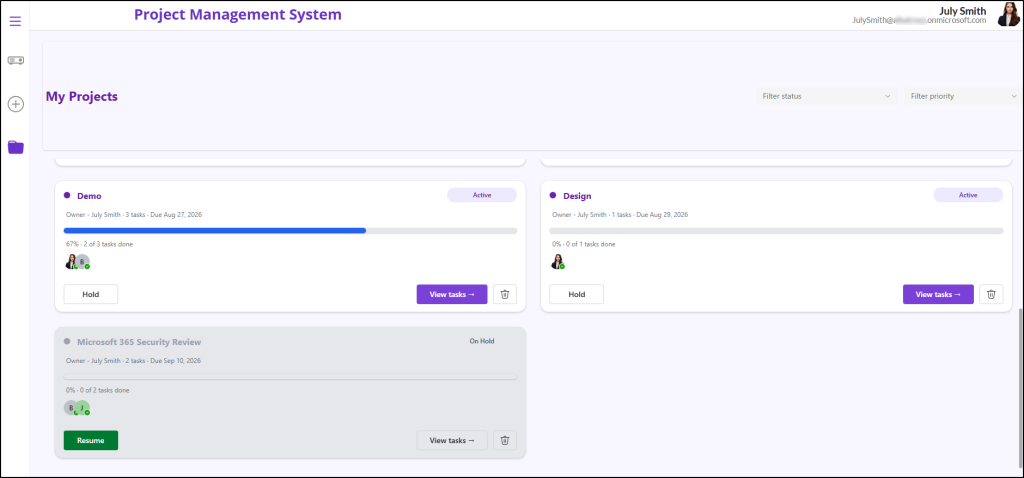
- If a project is placed on Hold by a manager, its associated tasks are paused and greyed out until the project is resumed. Once resumed, the tasks can continue from their last known status.
2. ‘Create or Edit’ Page to Create Projects and Assign Tasks
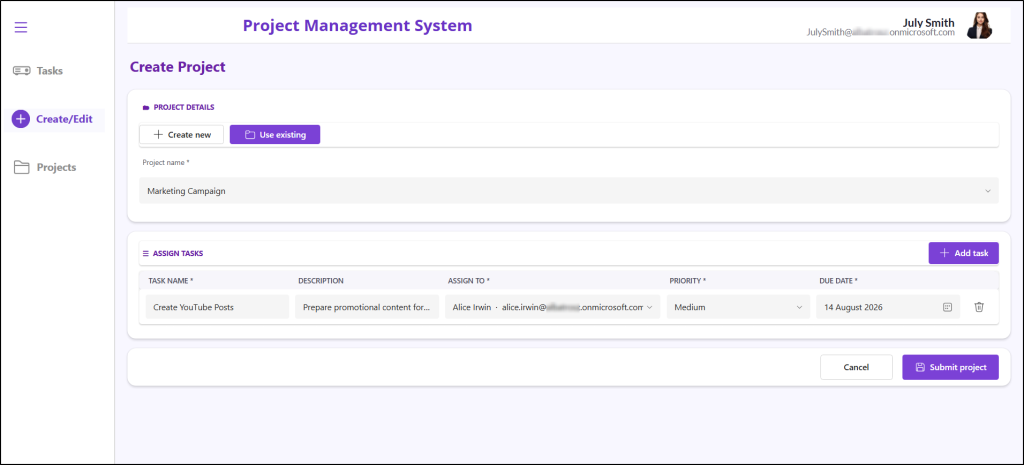
The Create/Edit screen is available only to Entra ID managers, giving them the controls needed to create, manage, and monitor projects and their tasks. This screen has two tabs:
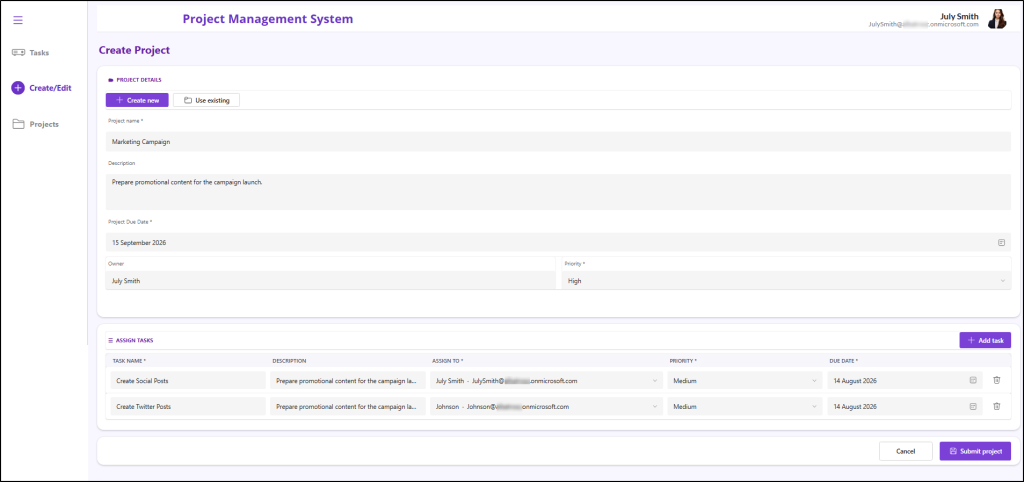
‘Create New’ Tab to Set Up Projects and Assign Tasks
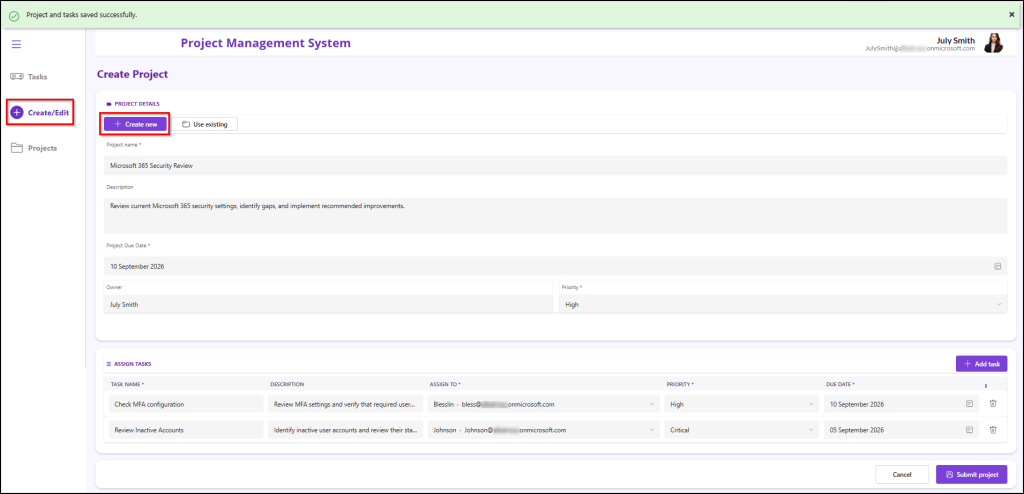
This tab allows managers to create a new project by entering details such as the Project Name, Description, Due Date, Priority, and Owner. The Owner field is automatically populated with the name of the logged-in user.
Managers can then use Add task option to add tasks within the project and specify details such as the Assignee, Priority, and Due Date for each task. Tasks can also be added or removed while creating the project, before it is submitted.
The app validates the information entered before creating the project. If a required field is left blank or the due date is not set to a future date, an appropriate validation message is displayed.
Once all required details are provided and the information passes validation, the manager can select Submit project to create the project along with its associated tasks.
‘Use Existing’ Tab for Adding Tasks to Ongoing Projects
In this tab, managers can select an existing project from the list and add new tasks to it. They can enter the task details, assign it to a user, set its priority and due date, and the task is automatically associated with the selected project.
If a task is added by mistake, it can be removed before submitting the changes, while existing tasks can be deleted from the Project Details page.
3. View ‘My Projects’ Page to Manage Project and Track Progress
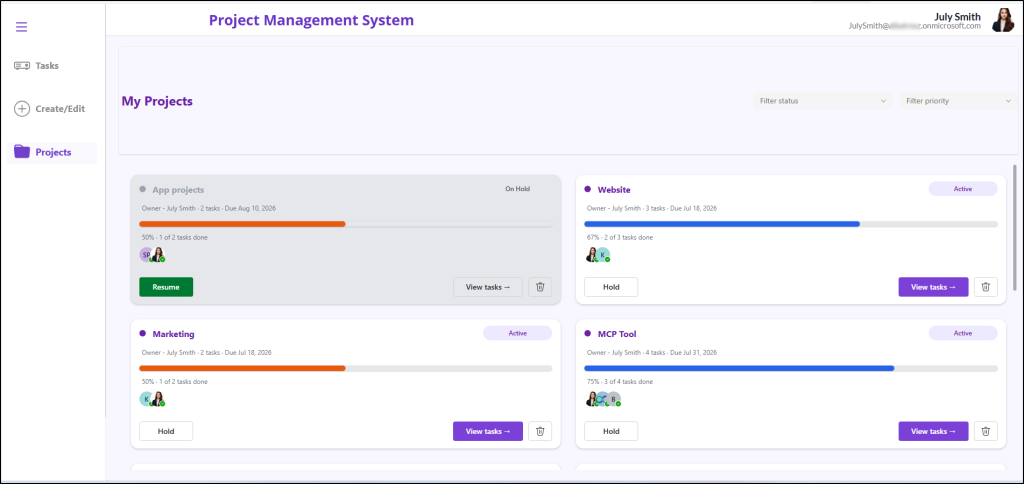
This page is also available only to Entra ID managers. They can view each project as a card with key details such as the project name, owner, due date, status, task count, completion percentage, and assigned team members.
Each project card also includes a progress indicator and completion percentage. As tasks are completed, the progress indicator updates accordingly, giving managers a quick view of the project’s progress.
By default, active and pending projects are displayed, keeping the view focused on ongoing work. Managers can apply the Completed status filter to view completed projects when needed. They can also use the Status and Priority filters to quickly find specific projects.
Based on project status, managers can take the following actions directly from the project card:
- Hold: Temporarily pause a project when work needs to be put on hold.
- Resume: Use this option to resume the projects when work can continue.
- View tasks: Select this option to open the Project Details page and view the tasks with their progress.
- Delete: Delete the project when it is no longer required.
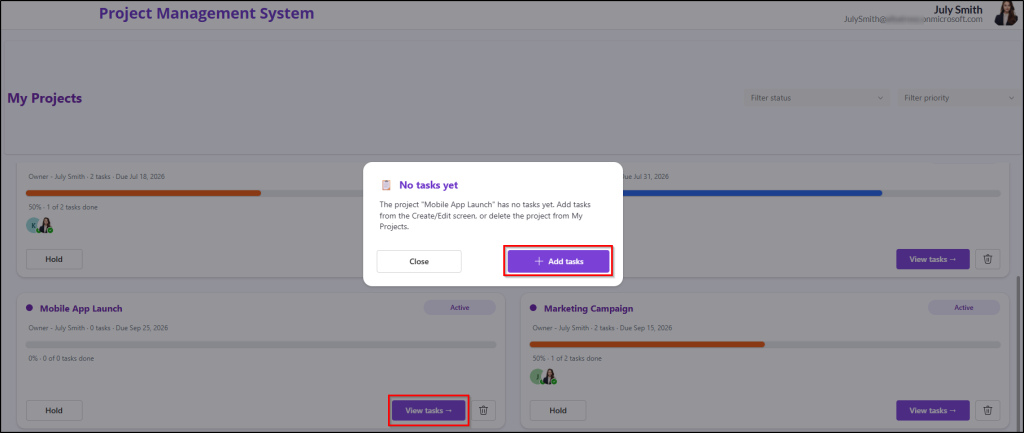
In case, if all the tasks within a project are deleted, the project remains available on the My Projects page. Managers can select the View Tasks button to open a No tasks yet message where they can either choose Add Tasks option to create new tasks for the project or Delete Project option to remove the project if it is no longer needed.
Selecting Add tasks takes them to the Use existing tab in the Create/Edit Project page, with the selected project already populated, allowing them to add new tasks directly to it.
View ‘Project Details’ Page to Track and Manage Progress
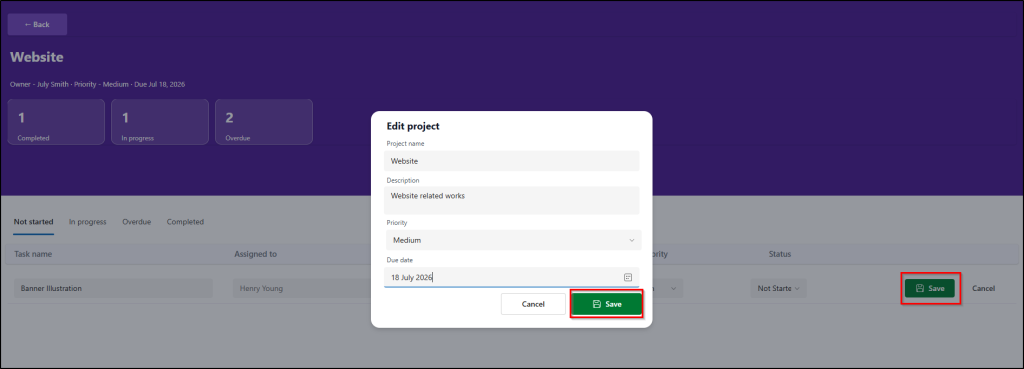
This page provides summary cards for Completed, In Progress, and Overdue task counts for the selected project. Below the cards, four status tabs allow managers to view tasks based on their current status: Not Selected, In Progress, Overdue, and Completed. Selecting a tab automatically applies the corresponding status filter to the task list.
Each task displays details such as Task Name, Assigned To, Due Date, Priority, and Status. This page also allows managers to Hold or Resume the project when required.
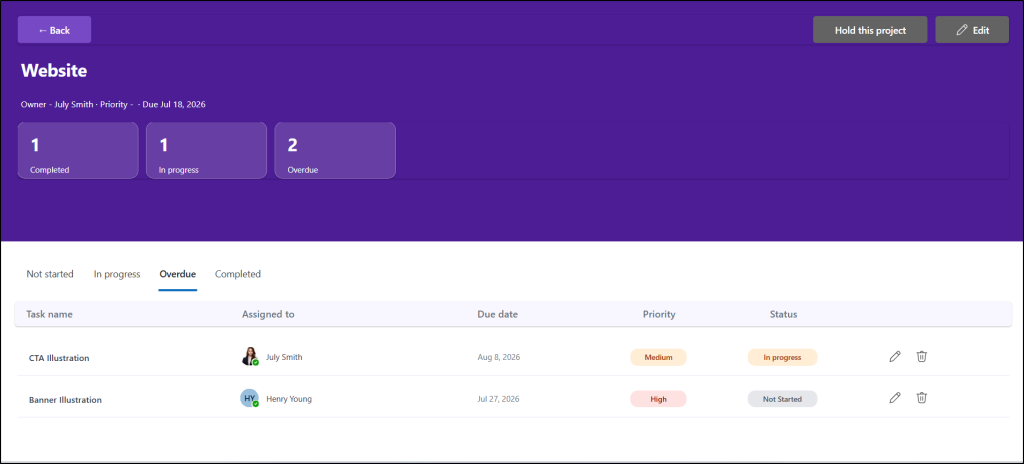
In addition, managers can select Edit to update the project details, such as the project name, description, priority, and due date. They can also update the details of individual tasks associated with the project when changes are required.
On top of it, managers and users are also stay informed through automated notifications and alerts for task assignments, completions, and overdue tasks.
With an understanding of the features, let’s look at the requirements for setting up the project management system.
Prerequisites to Set Up the Project Tracker
Before setting up the project management application in your environment, make sure the following requirements are in place:
- Power Apps License: Ensure users have an active Power Apps license that supports running the application.
- Environment: Use a Production environment to deploy and run the app. If you want to test it first, use a Sandbox environment and move it to Production environment after validation.
- Required Roles: The person setting up the application must have either the “System Administrator” or “Environment Maker” role in Power Apps.
- SharePoint Permissions: You must need “Site Owner” permissions on the SharePoint site where the required project and task lists will be created.
- SharePoint Site and Lists: Create the required SharePoint lists in a SharePoint site with the specified columns and data types required by the app.
- Microsoft Entra ID Manager Assignment: Make sure managers are correctly assigned to users in Microsoft Entra ID. The app uses this information to provide managers with the right access within the app.
- Mailbox Access: Users and managers need active mailboxes to receive automated task notifications.
Once these requirements are in place, you’re ready to import the app into your environment.
Create the Required SharePoint Lists for Project Management App
Before importing the app, it is essential to create the required SharePoint site and the lists. These lists serve as the app’s data source, allowing it to read project and task information and save updates back to SharePoint.
⚠️Use the specified site and list names, and configure each column with the exact name, data type, and values provided. Make sure the column names match exactly for the app to avoid errors.
The required SharePoint lists are:
1. Create the ‘Projects’ SharePoint List
The Projects list stores the main details of each project, including its owner, priority, status, and deadlines.
Follow these steps to create the list:
- Sign in to the SharePoint admin center and create a Communication site named Project Management Hub.
- Open the created site and select + New –> List –> Blank list.
- Enter Projects as the list name and select Create.
- In the created list, click + Add column and add the columns listed in the table below.
| Column name | Data type | Required | Choices |
| ProjectTitle | Text | Yes | — |
| ProjectDescription | Multiple lines of text | No | — |
| ProjectOwner | Person | No | — |
| ProjectStatus | Choice | No | Active, On Hold, Not Started, Completed |
| ProjectStartDate | Date and Time | No | — |
| ProjectDueDate | Date and Time | Yes | — |
| Priority | Choice | Yes | Low, Medium, High, Critical |
2. Create the ‘Tasks’ SharePoint List
The Tasks list stores the individual tasks associated with each project. To associate each task with its respective project, the ProjectLookup column in this list links the task to the corresponding project in the Projects list.
To create the list:
- Open the same SharePoint site named Project Management Hub where you have created the Project list.
- Select + New –> List –> Blank list.
- Enter Tasks as the list name and select Create.
- In the created list, click + Add column and add the columns listed in the table below.
| Column name | Data type | Required | Choices |
| Title | Text | Yes | — |
| Description | Multiple lines of text | No | — |
| ProjectLookup | Lookup | Yes | Projects → Title |
| AssignedTo | Person | Yes | — |
| AssignedBy | Person | No | — |
| TaskPriority | Choice | Yes | Low, Medium, High, Critical |
| TaskStatus | Choice | No | Not Started, In Progress, Delayed, Completed, On Hold |
| TaskStartDate | Date and Time | No | — |
| TaskDueDate | Date and Time | Yes | — |
| IsProjectOnHold | Choice | No | Active, On Hold |
Import Project Management Solution Package Into Your Power Apps
Once the required SharePoint lists are created, download the below solution package.
Download: ProjectManagementApp.zip
After downloading, follow the below steps to import the app package into your environment:
- Sign in to Power Apps and select the requirement environment.
- Go to Solutions and select Import solution.
- Select Browse, choose the downloaded ZIP file, and select Next.
- Review the solution details and select Next.
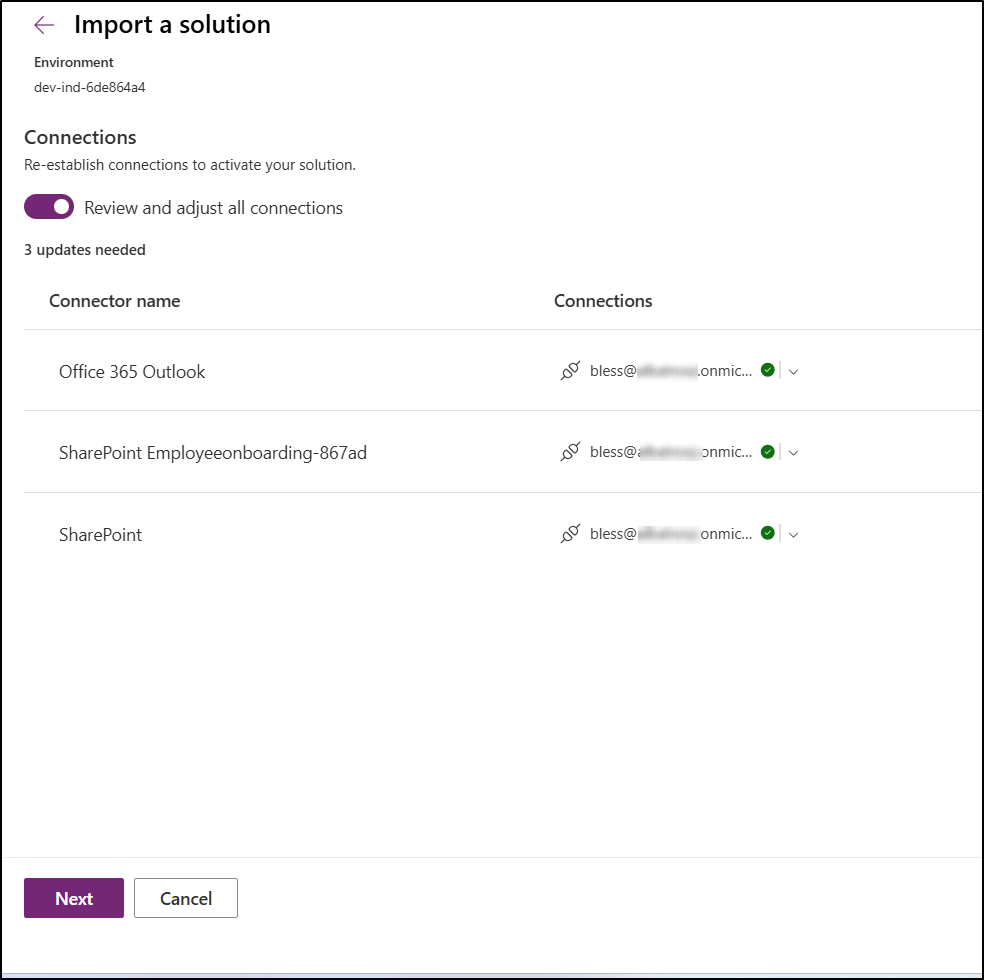
- Under Connections, ensure that Review and adjust all connections option is toggled. Also, make sure that the connections /data sources are signed in to services and click Next.
- Under Environment Variables, select the SharePoint site – Project Management Hub where the Projects and Tasks lists were created.
- Select Import.
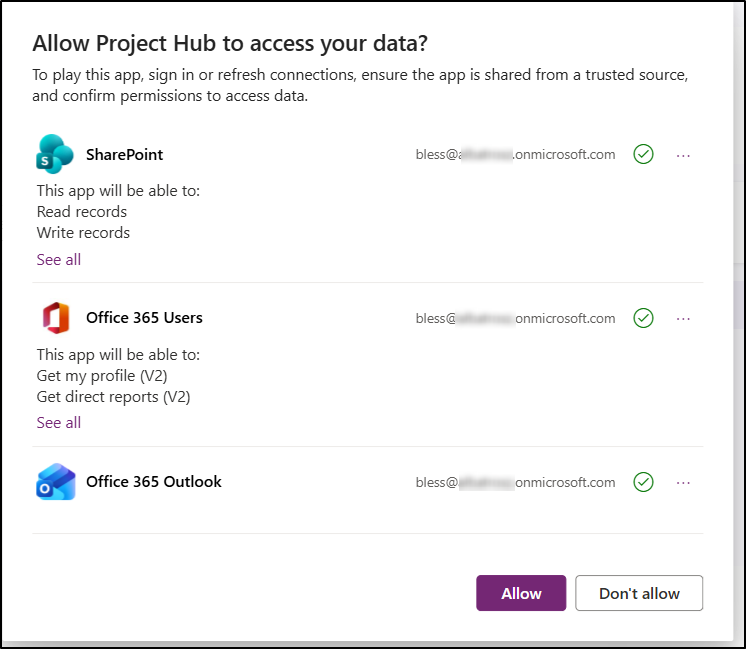
Once the import is complete, the solution will be available under Solutions → Unmanaged. Open the imported solution, go to Objects, and select Project Hub. When prompted to access to the required data, select Allow to open the app in Edit mode.
Verify the Data Source Configurations and Customize the Power Apps
Once the app is opened, the app’s Data section from the left navigation pane, verify that the following data sources are connected:
- Office365Users
- Office365Outlook
- Projects
- Tasks
If required, select the three dots (…) next to a data source and choose Refresh to ensure the latest data is available.
Once the data sources are verified, you can also customize the app, if needed, to suit your organization’s requirements, such as adding priority levels, project categories, or modifying screens and workflows. To customize the app, use Power Fx or AI-assisted development tools, such as the Canvas App authoring MCP Server.
You can also use the Run icon to test the app and verify that it works as expected before deployment. Once you’re satisfied with the changes, Save and Publish the app.
End User Experience of the Project Management App
Now that the app is published, let’s see how a typical project moves from task assignment by a manager to task completion by an employee.
1. Manager Creates the Project and Assigns the Task
A manager starts by using the “Create new” tab in the Create/Edit page to set up the project with the required details. They then add the tasks, assign each one to the appropriate employees, set the priority and due date and submit the project.
2. Employee Views the Assigned Work
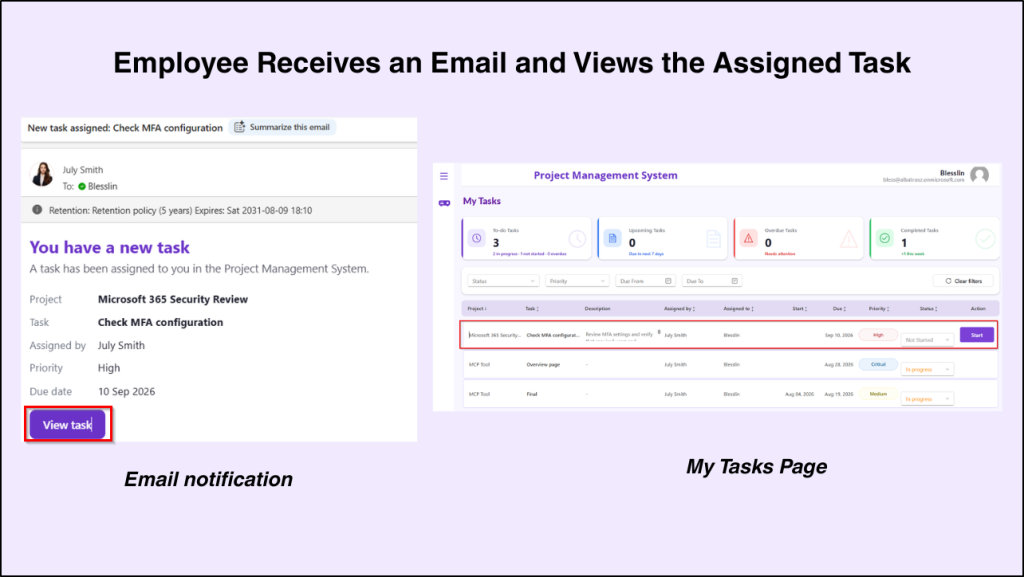
Once the project is submitted, the employee assigned to the task receives an email notification. The email consists of task details and a View Task option that links directly to the My Tasks page in the app. The assigned task appears with a Not Started status, allowing the employee to review the details before beginning the work.
3. Employee Starts the Task
When the employee is ready to begin, they need to select Start button on the My Tasks page as shown above. Once done, the task automatically changes to In Progress status, and the Start Date is recorded. As the employee updates the task status, the changes are reflected in the manager’s project view as well, keeping the project progress up to date.
4. Employees Stay Ahead of Task Deadlines
Meanwhile, the employees can use the My Tasks page to monitor upcoming and overdue tasks. If a task passes its due date without being completed, it is marked as Delayed, and the employee receives a daily email reminder. This email also includes the task details and a direct link to open the task in the app.
5. Managers Tracks Project Progress
While employees work on their assigned tasks, managers can use the My Projects page to see project progress, pending tasks, and overdue in one place.
If a project needs to be temporarily paused, managers can place it on Hold and Resume it when work can continue.
6. Tasks and Projects Reach Completion
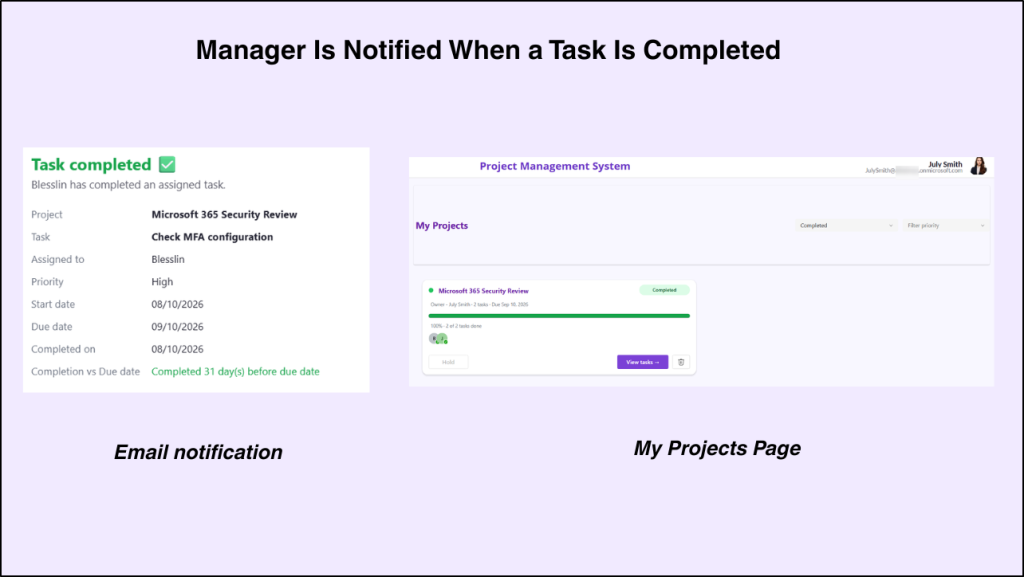
When an employee completes a task, they can update its status to Completed. The manager then receives an email notification, and the completed task is reflected in the project’s progress. Once all tasks within the project are completed, the project is automatically marked Completed.
That’s it! We hope this project management system built using Power Apps helps bring more structure and visibility to how your organization manages projects and tasks. Similarly, you can also use Power Apps to build solutions for other business needs, such as leave management, asset tracking, and more, based on your organization’s requirements. Customize the app to fit your workflow and make the most of your existing Microsoft 365 environment.
Have questions or run into any issues while setting up the solution? Feel free to share them in the comments, we’d be happy to help!