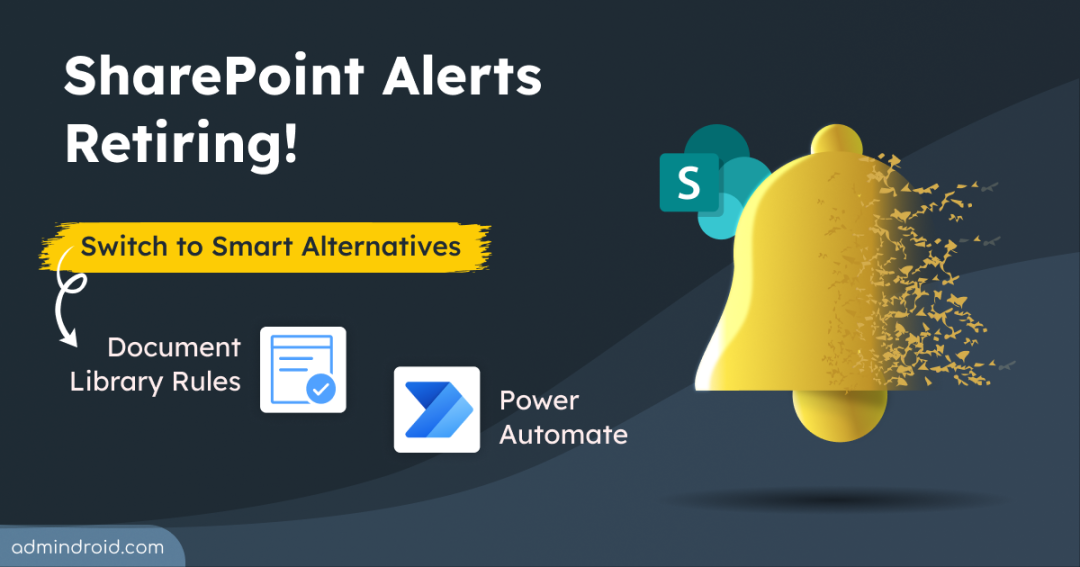
For years, SharePoint Alerts have offered a simple way to keep users informed of changes in document libraries and lists. While they were never the most advanced feature, their simplicity made them effective for everyday use. Now, with this feature heading into retirement, organizations must adapt. Whether you’re managing internal collaboration, tracking changes in shared libraries, or simply helping users stay up to date, it’s important to find a reliable replacement. This blog walks through SharePoint Alerts retirement, and the best alternatives available in Microsoft 365 to ensure a smooth transition while reinforcing SharePoint Online security best practices.
What Are SharePoint Alerts and Why Are They Used?
Alerts in SharePoint Online are a notification feature that keeps users informed about changes within a SharePoint site. These alerts can be set up for lists, libraries, folders, files, or specific list items, allowing users to stay informed about any changes.
Whenever a document or list is added, uploaded, edited, or deleted, SharePoint Alerts help keep users up to date without needing to manually check for updates.
However, as a part of Microsoft’s effort to modernize notification experiences, SharePoint Alerts are being retired. Let’s take a closer look at how this retirement process will unfold.
Retirement Timeline for SharePoint Alerts:
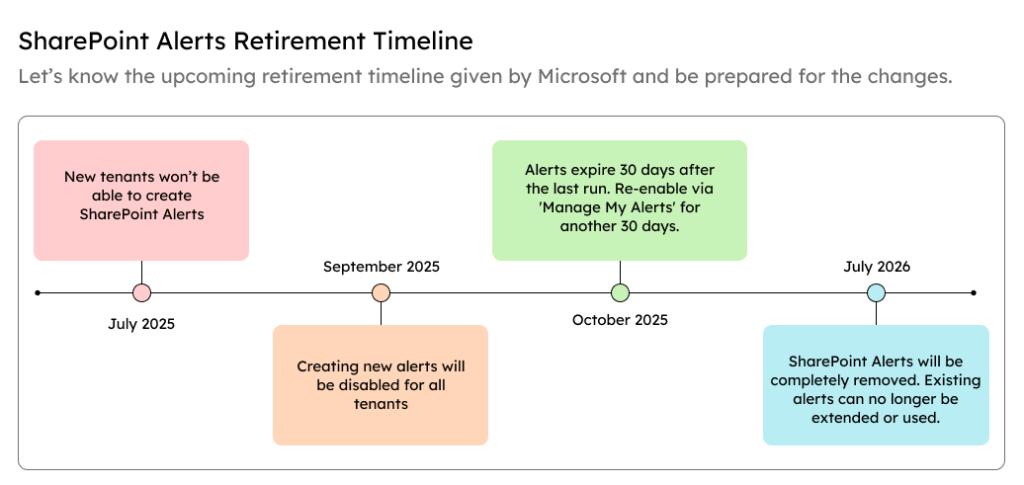
The retirement of SharePoint Alerts won’t happen overnight. Microsoft is planning a step-by-step retirement process, allowing admins and users to take time to adjust and adopt alternative solutions. Below is the timeline of when the SharePoint Alerts feature will begin to phase out and eventually be removed from Microsoft 365.
Now, it’s more important than ever to understand the impact of this change and prepare users accordingly.
SharePoint Alerts Retirement: Impact and Challenges
Below are some of the key impacts and challenges organizations may encounter during and after the phase-out of SharePoint Alerts.
- Organizations that relied on email alerts for file or list updates may experience workflow disruptions, affecting productivity until new solutions are adopted.
- Sudden removal of familiar tools can lead to confusion or pushback from employees, especially if no clear replacement is provided early.
- Without timely notifications, users might miss important updates, such as document approvals or modifications, impacting decision-making.
- Some alternatives may require premium licenses or additional permissions, limiting availability for all users across the organization.
Recommended Alternative Solutions for SharePoint Alerts
As organizations prepare for the retirement of SharePoint Alerts, it’s important to first understand how alerts are currently being used before moving to alternatives.
To do this, you can run the Microsoft 365 Assessment Tool to identify which SharePoint sites and libraries are currently using alerts and gain insight into their usage patterns. This provides a strong foundation for informed decision-making. Once you have this visibility, apply suitable alternatives that help maintain user awareness without disruption.
To help organizations navigate the transition, we have outlined some recommended alternatives that can effectively replace SharePoint Alerts.
1. Create SharePoint Rules in a Document Library
Apart from Alerts, SharePoint Online also offers another built-in feature for managing notifications, such as SharePoint rules in a document library.
SharePoint library rules provide a simple and effective way to notify users about changes in libraries, such as when a new item is created or modified. This feature works directly within the SharePoint interface. The rules are stored within the specific list or library where they are created. As a bonus, it does not require any additional licensing.
As SharePoint Alerts head toward retirement, users can rely on SharePoint library rules to stay informed about updates in a more modern and integrated way.
Follow the steps below to create a rule in a SharePoint Online document library:
- Sign in to SharePoint and navigate to the desired site.
- Open an existing document library or create a new one.
- At the top of the library, click on Automate, then select Rules > Create a rule.
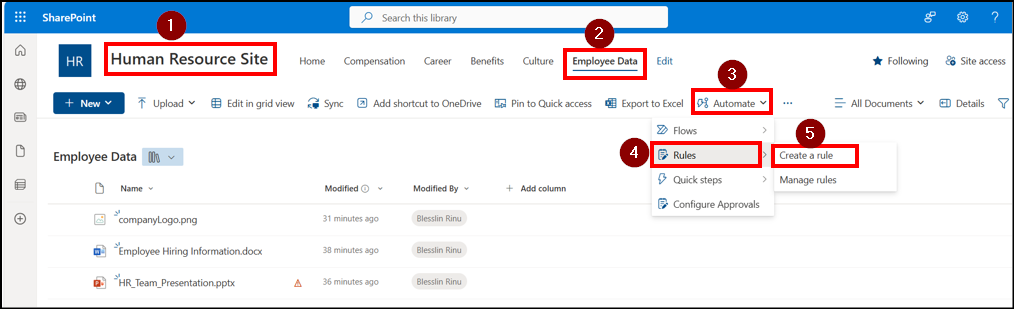
- Choose your preferred condition from the available options:
- A file or metadata is modified
- A new file is added
- A file is deleted
- A date approaches
- Select the user(s) who should receive the notification email.
- Click Create to finalize the rule.
For example, we’ve created a rule that sends the site owner an email when a file is modified, as shown below:
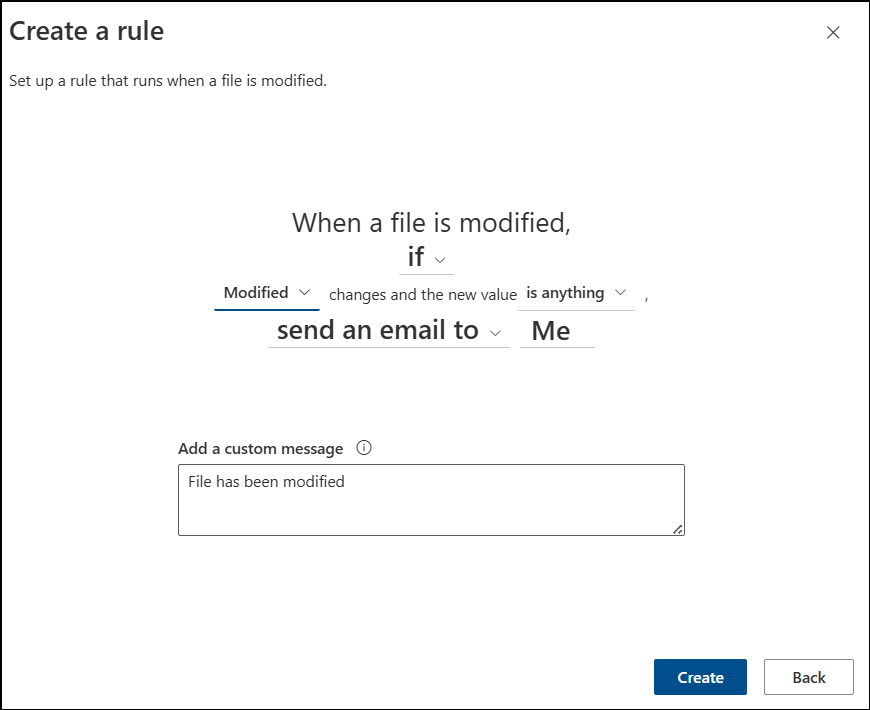
Once created, the rule will automatically notify the selected users whenever the specified action occurs in the document library.
Below is a sample email received by the site owner regarding a file modification.
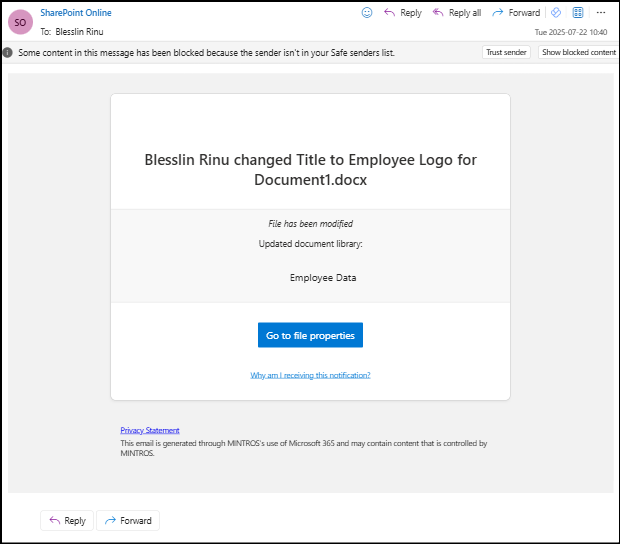
This method is user-friendly and requires no technical skills, making it ideal for personal use or small teams. However, it’s important to note that SharePoint Rules are limited to document libraries, offer only basic conditions, and lack advanced filtering or customization options.
For more complex automation needs, tools like Power Automate may be more suitable.
2. Set Runtime Notification Using Power Automate
Power Automate offers a more advanced and flexible solution compared to SharePoint library rules. It enables automation between SharePoint and numerous other Microsoft or third-party services. This makes it ideal for complex notification setups, approval workflows, handle reminders, saving email attachments, and more.
To create a notification flow in Power Automate, follow the steps below:
Choose a SharePoint Template in Power Automate
- Sign in to Power Automate using your Microsoft 365 account.
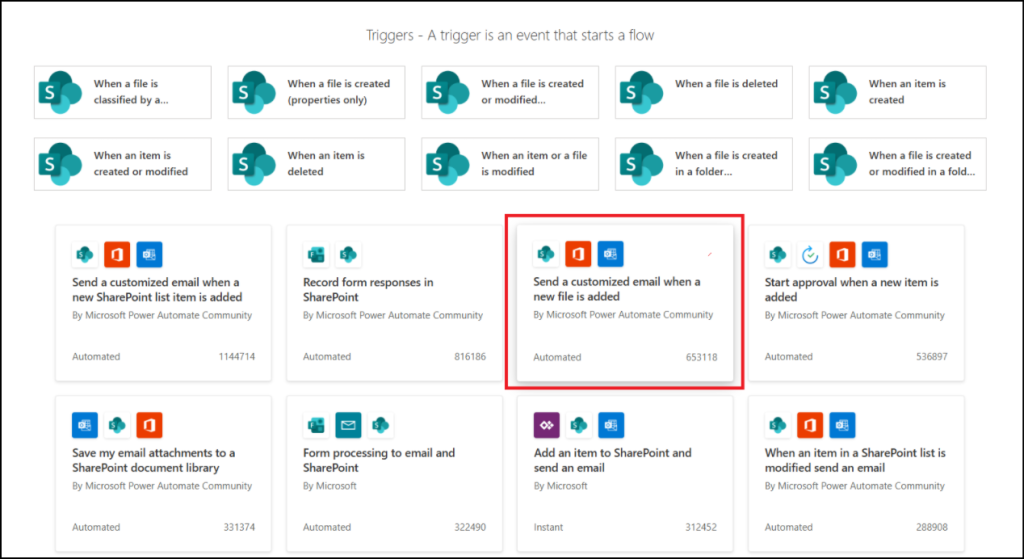
- Navigate to Connectors from the left navigation panel and choose SharePoint from the list of available connectors.
- You’ll see a variety of ready-to-use templates, including SharePoint notifications for an added, deleted, or modified file/folder.
- Choose a relevant trigger. Example: Send a customized email when a new file is added.
- This will display the connectors and the recipient email address. You can use the default signed-in user’s email. To switch accounts, click the three dots (…), select Add new connection, and sign in with another account.
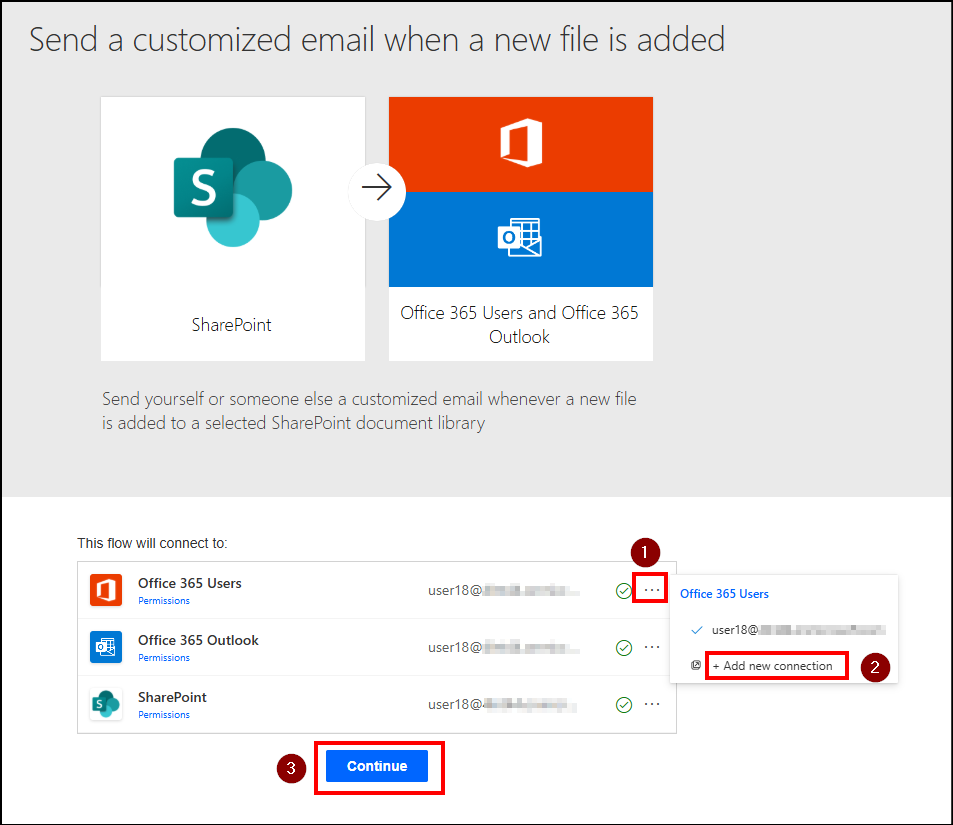
- Click Continue to proceed to the next step.
Set Alerts for an Added Item in Document Library
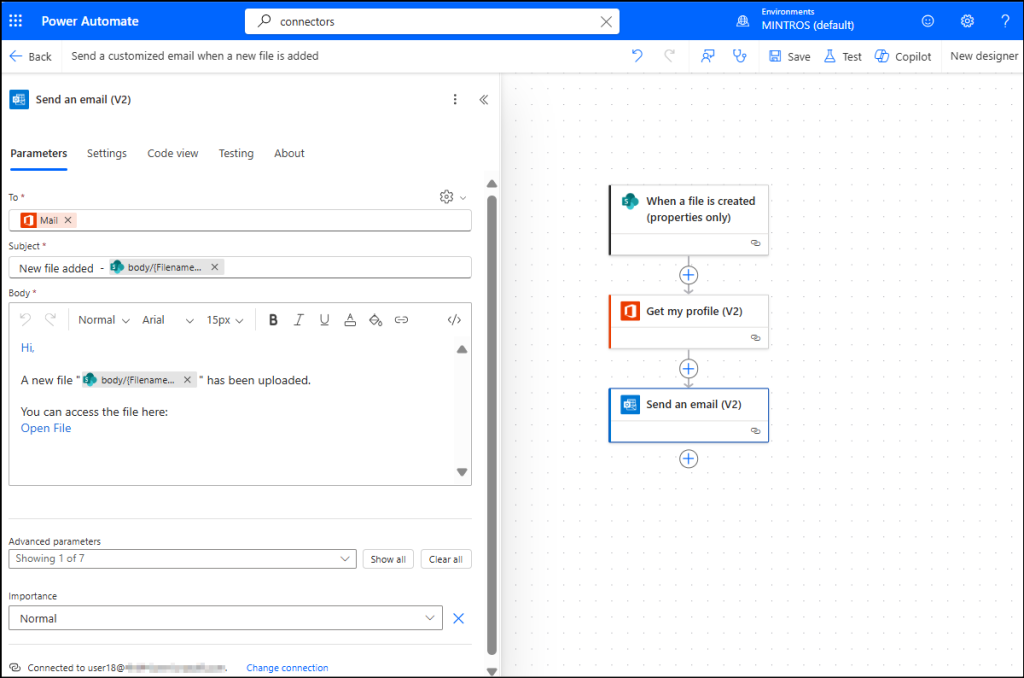
In the flow designer, you’ll see actions that make up your flow.
Action 1: When a file is created (properties only)
- Choose the desired SharePoint site and document library/list for which the notification should be triggered.
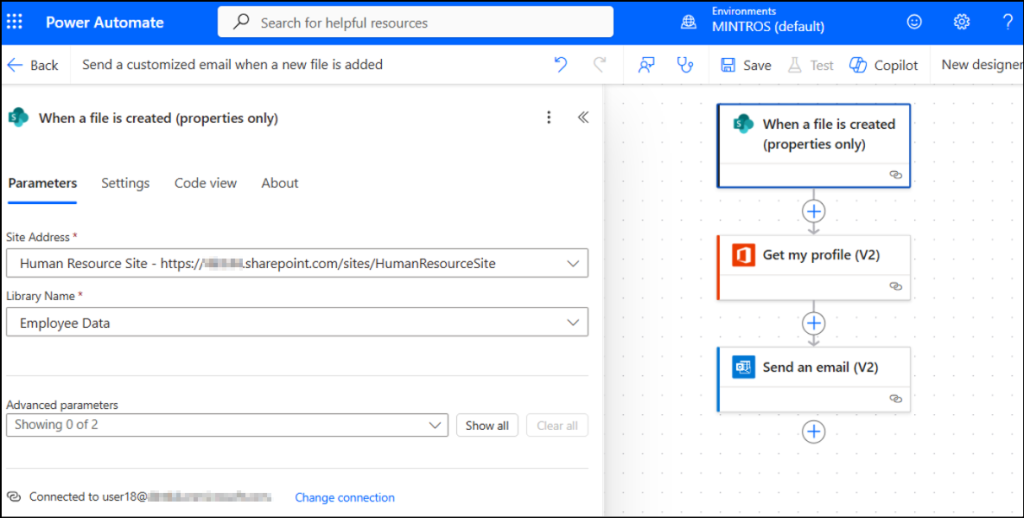
Action 2: Get my profile (V2)
- This action is useful for including user details like department, job title, etc., in emails or conditions.
- To configure it, just check Select Fields under Advanced parameters and enter the desired fields as comma-separated values (e.g., department, jobTitle, userPrincipalName). This action is optional, and you can also leave it as it is.
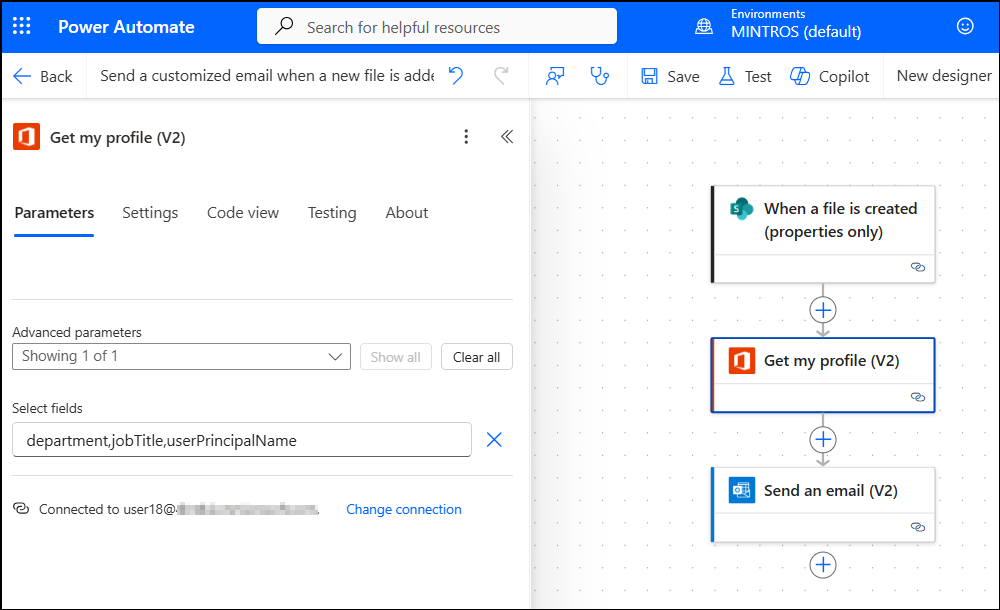
Action 3: Send an email (V2)
- A default email template will be displayed. You can customize the recipient list and subject line as needed.
Note: To insert dynamic values into any part of the email, click the Dynamic content icon (above “fx” icon) and select the desired field from the list.
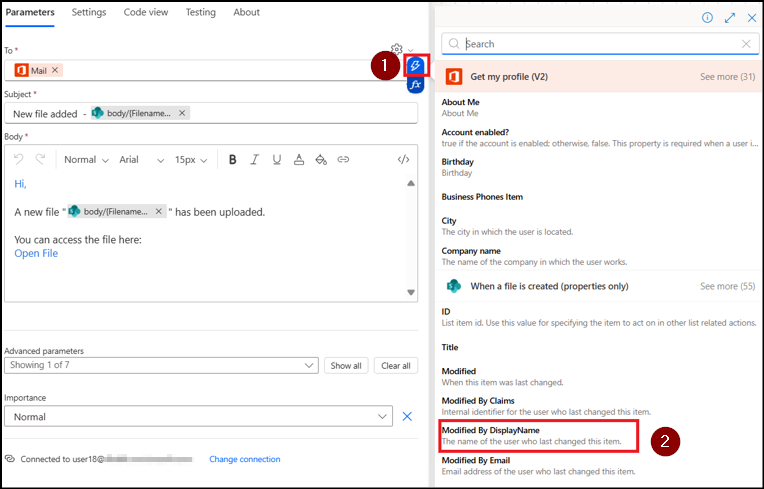
- You can keep the default email body. If you need more customization, switch to the code view of the email body and paste the following code to include a direct link to the uploaded file. This allows recipients to quickly access the document.
<p class=”editor-paragraph”>Hi,</p>
<p class=”editor-paragraph”>A new file “@{triggerOutputs()?[‘body/{FilenameWithExtension}’]}” has been uploaded.</p>
<p class=”editor-paragraph”>You can access the file here:
<a href=”@{triggerOutputs()?[‘body/{Link}’]}” class=”editor-link”>Open File</a></p>
- Once added, your email body will appear as shown in the image below. You can also set the importance of the email to High, Normal, Low, or specify a custom value.
In addition, you can optionally send a Teams message along with the email notification by adding the step below:
Action 4: Send a Message to Teams Chat
- Add an action in parallel by selecting the action named “Post message in a chat or channel” and configure the parameters.
- Select Post as (e.g., Flow bot or another option). Set the Post in field. Here, I’ve chosen Chat.
- Then, select the recipient, and enter the body of the Message you want to send.
- Once done, click Save and run a Test to check errors.
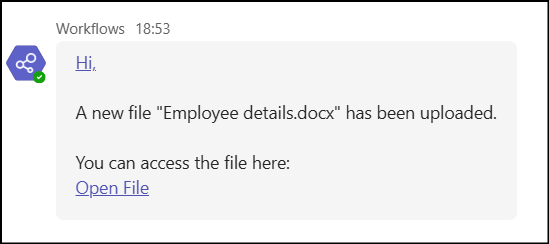
- The recipient will receive an email in the following format:
Similarly, you can add as many actions as needed based on your organization’s requirements. Power Automate offers a wide range of standard actions, and for more advanced scenarios, you can leverage premium features. However, these premium capabilities may involve additional licensing costs depending on your Microsoft 365 subscription.
Easily Get Alerts for SharePoint Activities with AdminDroid!
Even though Power Automate can notify you about SharePoint actions, configuring them is often tedious and complicated 😓. Looking for a faster and easier way to stay on top of SharePoint Online activities? AdminDroid has you covered. 😉
With AdminDroid’s Alerting tool you can set up alerts for 125+ SharePoint Online activities. Some of the major activities you can monitor include:
- File creations and modifications
- File deletions and downloads
- File sharing and access
- External file sharing
- SharePoint site permission changes
- Sensitive files accessed
- Anonymous link creations and sharing
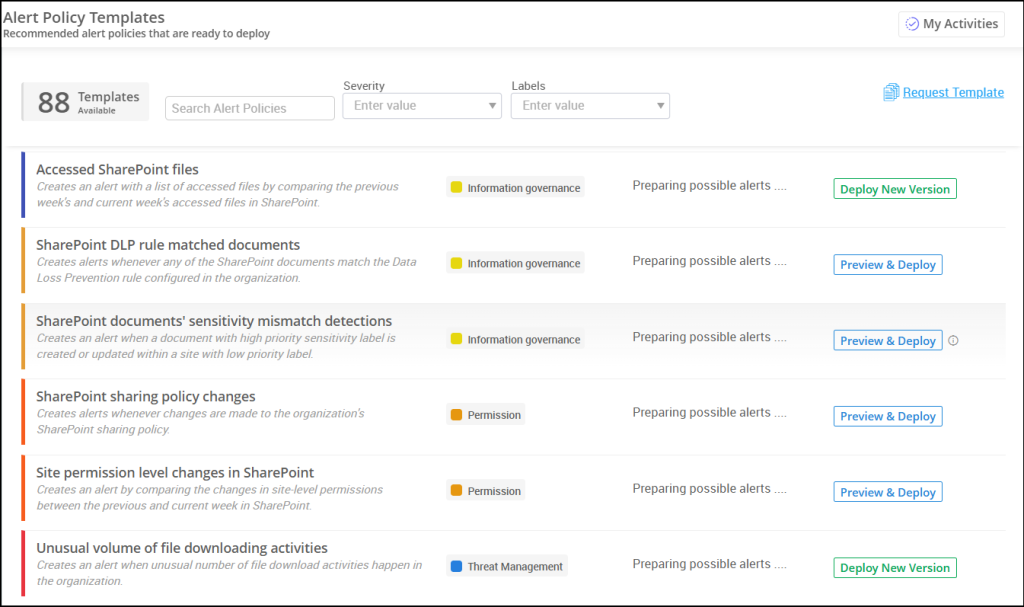
AdminDroid also provides ready-to-deploy alert policies to track must-watched and abnormal SharePoint activities such as:
- Unusual volume of file deletions
- Anonymous link creations
- Unusual volume of external file sharing
- Unusual volume of files deleted by external users
- Unusual external user file access activity
- Unusual number of site invitations shared to external users
- Abnormal number of accessed SharePoint files
- SharePoint sharing policy changes
- Unusual volume of file downloading activities
And that’s just the start. You can access to 80+ pre-built alert policy templates to simplify and strengthen your Microsoft 365 administration.
Need something more specific? You can easily create your own custom alerts for activities such as changes in SharePoint document libraries, modified folders, updated anonymous links, and more. Creating one is quick and intuitive!
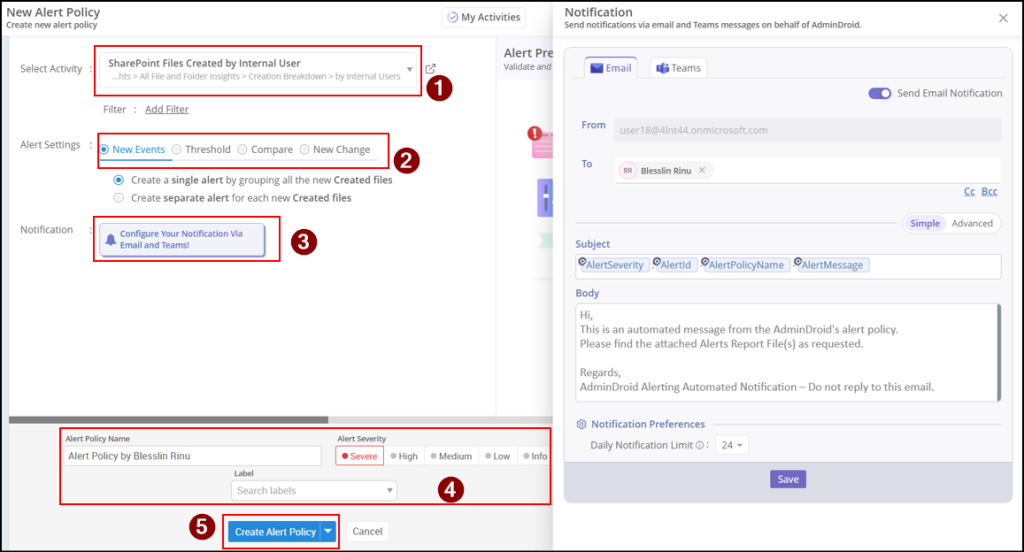
- Navigate to the Alerts page and click + Add Alert Policy.
- Select your desire report from the dropdown, alert type and filters if required. Alert types include:
- New event – Triggers an alert whenever a new event occurs.
- Threshold – Sets a threshold for the number of events that should trigger an alert.
- Compare – Compares activity trends with the previous period for better analysis.
- New change – Triggers an alert when a specific property changes or changes to a specific value.
- Choose the users who should receive notifications via email.
- Define the alert severity, add relevant labels and save your alert policy.
That’s it! Your alert is ready in just 4 simple steps, saving you time and effort. Want notifications in Teams? You can configure that too.
Beyond alerts, AdminDroid Microsoft 365 Management tool offers 3000+ pre-built reports and 100+ interactive dashboards across Microsoft 365. You also get capabilities for scheduling, alerts, delegation, and automated management 📊.
Download AdminDroid today and take control of your Microsoft 365 environment with powerful alerting and monitoring tools ⚡.
Wrapping Up
As SharePoint Alerts approach their end of life, it’s important to take proactive steps to evaluate current usage and implement effective alternatives. By leveraging tools like the Microsoft 365 Assessment Tool and transitioning to options such as SharePoint Library Rules or Power Automate, your organization can continue receiving timely updates without compromising organizational security.
We hope this blog helped you identify suitable alternatives to SharePoint Alerts. If you have any questions or need further assistance, feel free to reach out in the comments below!


