On Day 4 of Cybersecurity Awareness Month, we’re excited to share 6 impactful SharePoint Online recommendations that can boost your Microsoft Secure Score by 16 points. Stick around for more fire tips in our Cybersecurity blog series.
Microsoft Secure Score offers a wealth of recommendations spanning various services, including Microsoft Entra ID, Exchange Online, Microsoft Teams, and SharePoint Online. These settings give you a solid starting point to lock down attack surfaces for each product. But, SharePoint Online, the go-to for collaboration, needs some extra attention 💯. As one of the most exposed tools in the collaboration world, it’s a favorite hangout for attackers.
In this blog, we’ll explore 6 key SharePoint Online recommendations to help you strengthen your defenses and increase your Secure Score by 16 points.
6 SharePoint Online Secure Score Recommendations
Here are the 6 recommended actions to improve SharePoint Online Secure Score. Some of these recommendations may require additional licensing.
- Turn on Microsoft Defender for Office 365 in SharePoint, OneDrive, and Microsoft Teams
- Ensure that SharePoint guest users cannot share items they don’t own
- Ensure SharePoint external sharing is managed through domain allowlists/blocklists
- Block OneDrive for Business sync from unmanaged devices
- Sign out inactive users in SharePoint Online
- Ensure modern authentication for SharePoint applications is required
Let’s explore each of these in detail.
1. Turn on Microsoft Defender for Office 365 in SharePoint, OneDrive, and Microsoft Teams
✅ Secure Score Points Gained: 5
Why Microsoft Recommends This Action:
Organizations face constant threats from malicious files that can slip through traditional defenses. Attackers often use these files to gain unauthorized access or cause harm.
To combat this, Microsoft Defender for Office 365 offers Safe Attachments for SharePoint, OneDrive, and Microsoft Teams. Here’s how safe attachments in Microsoft 365 Defender works:
- This feature provides an extra layer of protection by scanning files for malware.
- After initial virus scans, it goes further by opening files in a secure virtual environment to test for hidden threats, including checking password-protected files against patterns used by attackers.
How to Turn on Safe Attachments for SharePoint, OneDrive, and Microsoft Teams?
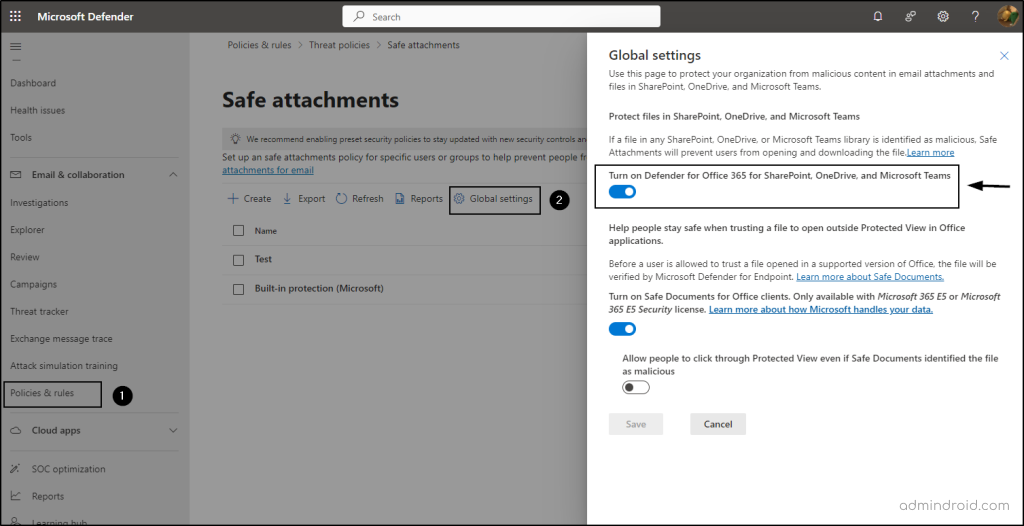
To ensure the Safe Attachment policy is enabled in SharePoint, follow the steps below.
- Go to the Microsoft Defender portal.
- Navigate to ‘Policies & rules’ under ‘Email & collaboration’.
- Select, Threat policies -> ‘Safe Attachments’.
- Click on ‘Global settings’. A flyout page will appear.
- On that page, ensure that the ‘Turn on Defender for Office 365 for SharePoint, OneDrive, and Microsoft Teams’ is toggled on.
Enable O365 ATP for SharePoint, OneDrive, and Microsoft Teams Using PowerShell
After connecting to Exchange Online PowerShell, you can enable Safe Documents and Safe Attachments for SharePoint, OneDrive, and Microsoft Teams using the following cmdlet.
|
1 |
Set-AtpPolicyForO365 -EnableATPForSPOTeamsODB $true |
2. Ensure That SharePoint Guest Users Cannot Share Items They Don’t Own
✅ Secure Score Points Gained: 3
Why Microsoft Recommends This Action:
Allowing guest users to re-share items they don’t own increases the risk of unauthorized access and data leaks. External collaborators may unknowingly or deliberately share sensitive files, folders, or site collections with others who shouldn’t have access.
By default, Microsoft 365 guest sharing settings allow guests to share files in SharePoint they don’t own. To prevent external users from sharing in SharePoint, Microsoft Secure Score recommends restricting this ability. This way, organizations can prevent accidental data exposure while still allowing external collaboration. This is one of the best possible ways to limit external sharing in SharePoint Online.
How to Prevent Guests from Re-sharing Items They Don’t Own?
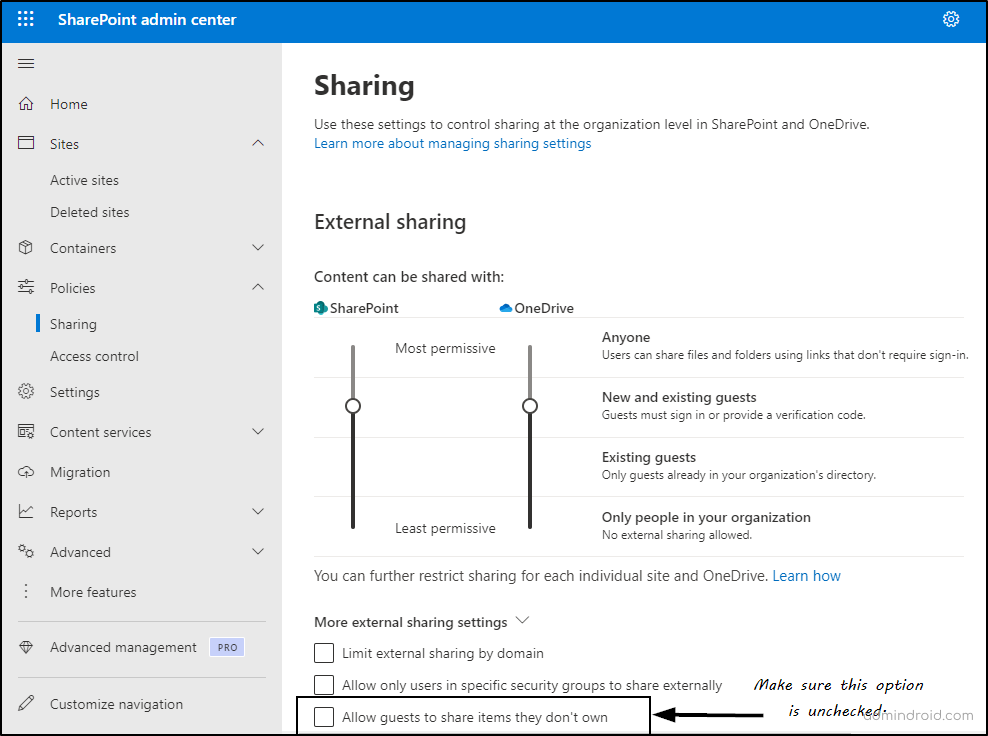
To stop re-sharing of content for external users in SharePoint Online and OneDrive,
- Open the SharePoint admin center.
- Under Policies, select ‘Sharing’.
- Locate ‘More external sharing settings’ dropdown.
- Uncheck the ‘Allow guests to share items they don’t own’ option -> Then, save.
Also, it is a best practice to configure site-level external sharing by allowing Anyone sharing for needed SharePoint sites, while restricting it for others.
Prevent External Users from Sharing Items They Don’t Own Using PowerShell
To not allow external users to share files and folders that they don’t own using PowerShell, run the below cmdlet after connecting to SharePoint Online PowerShell.
|
1 |
Set-SPOTenant -PreventExternalUsersFromResharing $True |
3. Ensure SharePoint External Sharing Is Managed Through Domain
✅ Secure Score Points Gained: 3
Why Microsoft Recommends This Action:
SharePoint’s flexible sharing capabilities can lead to unintended risks. Without proper management, documents can be shared with unauthorized external parties, compromising sensitive data. This can result in data breaches, compliance violations, and reputational damage.
To mitigate these risks, Microsoft recommends restricting domain sharing in SharePoint and OneDrive. This approach provides granular control over who can access your organization’s documents. Blocking specific domains or allowing sharing only with approved ones reduces the risk of sharing sensitive information with unintended recipients.
How To Limit Domain Sharing in SharePoint Online?
To restrict external sharing by domain, follow the steps below.
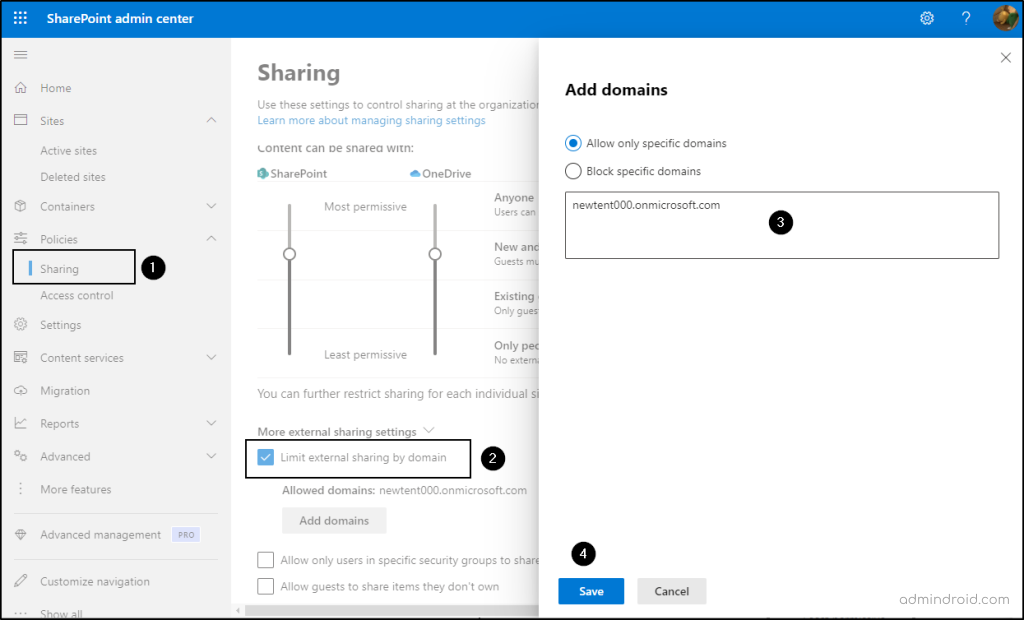
- Visit the SharePoint admin center.
- Go to Policies and choose ‘Sharing’.
- Expand the section labeled ‘More external sharing settings’ and enable the option ‘Limit external sharing by domain’.
- Click on ‘Add domains’ to create a list of allowed domains/blocked domains.
- Finally, click Save at the bottom of the page.
Limit Domains at the Tenant Level Using PowerShell
To configure document sharing restrictions by domains using PowerShell, run the below cmdlet.
|
1 |
Set-SPOTenant -SharingDomainRestrictionMode AllowList - SharingAllowedDomainList "domain1.com domain2.com" |
Replace domain1.com, domain2.com with the respective domains you would like to allow.
You can also restrict domain sharing at the site level in SharePoint Online. The SharePoint site collection allowlist is always a subset of the organization-wide allowlist. This means that if you’re setting an org-wide allowlist, you can only implement an allowlist at the site level.
4. Block OneDrive for Business Sync from Unmanaged Devices
✅ Secure Score Points Gained: 3
Why Microsoft Recommends This Action:
When users sync their OneDrive accounts to unmanaged devices, such as personal laptops or desktops, it poses significant security risks. These devices often lack the necessary security measures enforced by the organization, making them vulnerable to data breaches. Since the organization has no control over these devices, sensitive data can be unintentionally leaked or maliciously shared.
To protect organizational data, it’s crucial to block unmanaged devices from accessing SharePoint and OneDrive. By restricting syncing on computers connected to specific domains, organizations can enhance their control over data security and prevent non-compliant devices from accessing sensitive corporate information.
How To Block OneDrive Sync on Unmanaged Devices?
To block desktop sync for OneDrive/SharePoint sites from unmanaged devices, follow the steps below.
- Sign in to the SharePoint admin center.
- Navigate to Settings -> ‘OneDrive (sync)’.
- Check the ‘Allow syncing only on computers joined to specific domains’ option.
- Enter the domain GUIDs you want to allow -> Then, click Save.
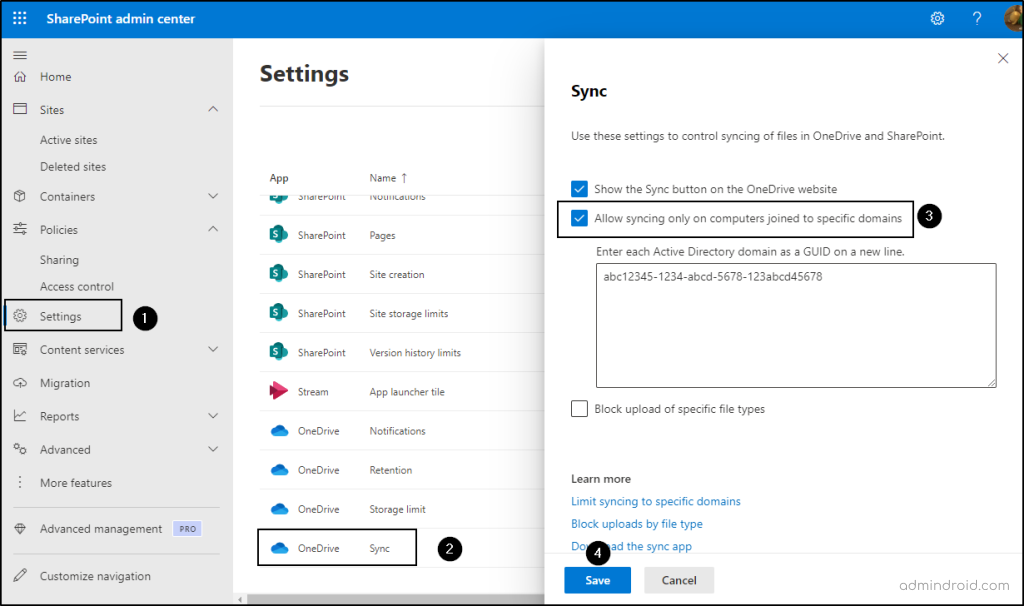
Note that this setting applies specifically to Active Directory domains in a hybrid configuration and does not affect Microsoft Entra ID domains. For Entra ID-only devices, consider using a Conditional Access Policy to manage access effectively.
Limit OneDrive Sync Only to Managed Devices with Conditional Access
To block SharePoint/OneDrive for Business sync to personal devices using Conditional Access policy, follow the steps below.
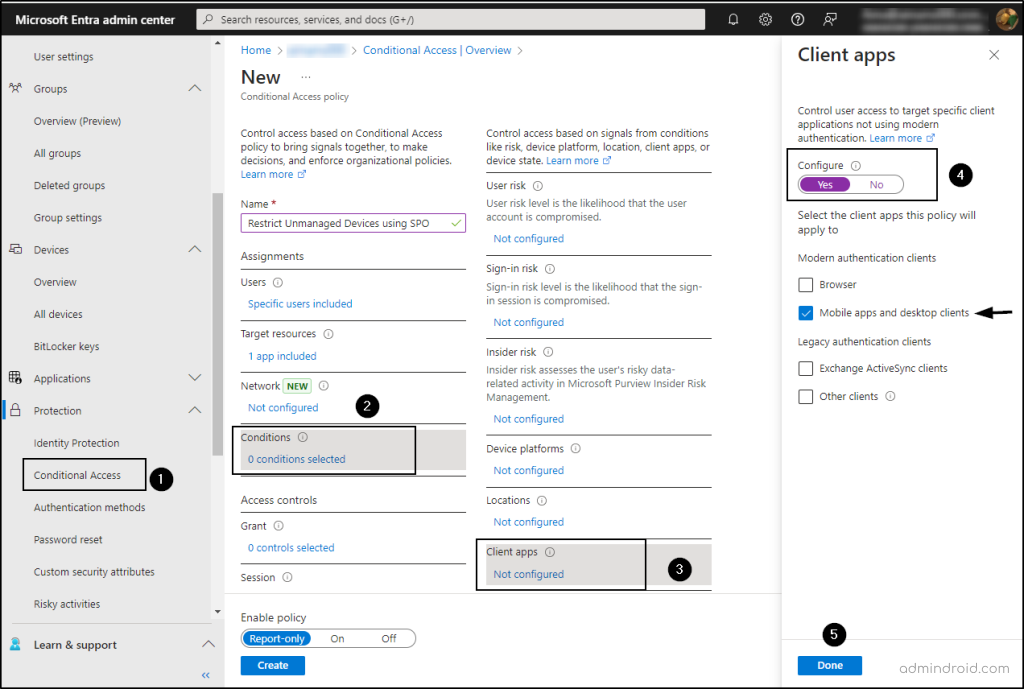
- Navigate to the Microsoft Entra admin center -> Protection -> Conditional Access.
- Create a new policy by naming it and adding users or groups as needed.
- In the Target Resources section, select and include Office 365 SharePoint Online.
- In the Conditions tab, select Client Apps and toggle Configure to Yes.
- Under Select the client apps this policy will apply to, check Mobile apps and desktop client and leave the other options unchecked, then click Done.
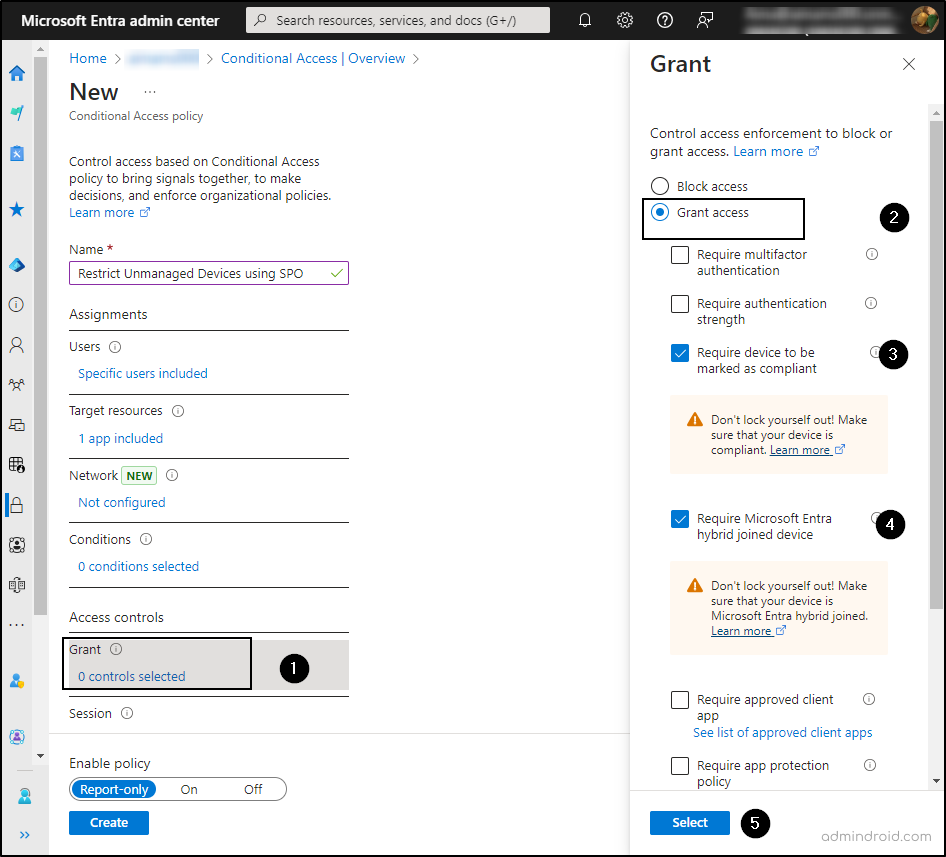
To grant access control, follow these steps:
- Select Grant and then click Grant access in the pop-up.
- Check the boxes for Require device to be marked as compliant and Require Hybrid Azure AD joined device.
- For multiple controls, choose Require one of the selected controls.
- Finally, click Select.
- Turn the Enable policy toggle to On, then hit Create.
Block OneDrive Sync Using PowerShell
To allow specific domains to sync OneDrive and SharePoint, run the following cmdlet by replacing the domain GUIDs.
|
1 |
Set-SPOTenantSyncClientRestriction -Enable -DomainGuids "786548DD-877B-4760-A749-6B1EFBC1190A; 877564FF-877B-4760-A749-6B1EFBC1190A" |
5. Sign Out Inactive Users in SharePoint Online
✅ Secure Score Points Gained – 1
Why Microsoft Recommends This Action:
When users remain logged in without activity, there’s a chance that their accounts could be accessed by others, putting your organization’s information at risk.
To enhance security, implement the Idle session timeout for Microsoft 365. This policy allows you to set a specific period of inactivity after which users will receive a warning notification. If they do not click “Continue,” they will be automatically signed out of SharePoint and OneDrive.
By using this feature, you can effectively sign out inactive users in SharePoint and restrict how users access content in SharePoint and OneDrive. This ensures that your data remains safe, regardless of where users access it from or what devices they are using. This not only protects your information but also contributes to your Secure Score, earning you an additional point for implementing this security measure.
How To Automatically Sign Out Inactive Users in SharePoint Online?
To enable idle session timeout in SharePoint and OneDrive, follow the steps below.
- Sign in to the SharePoint admin center.
- Navigate to Policies and then select ‘Access Control’.
- Click on ‘Idle Session Sign-Out’.
- Enable the option ‘Sign Out Inactive Users Automatically’.
- Specify your preferred time for automatic sign-out and set the notification period for users.
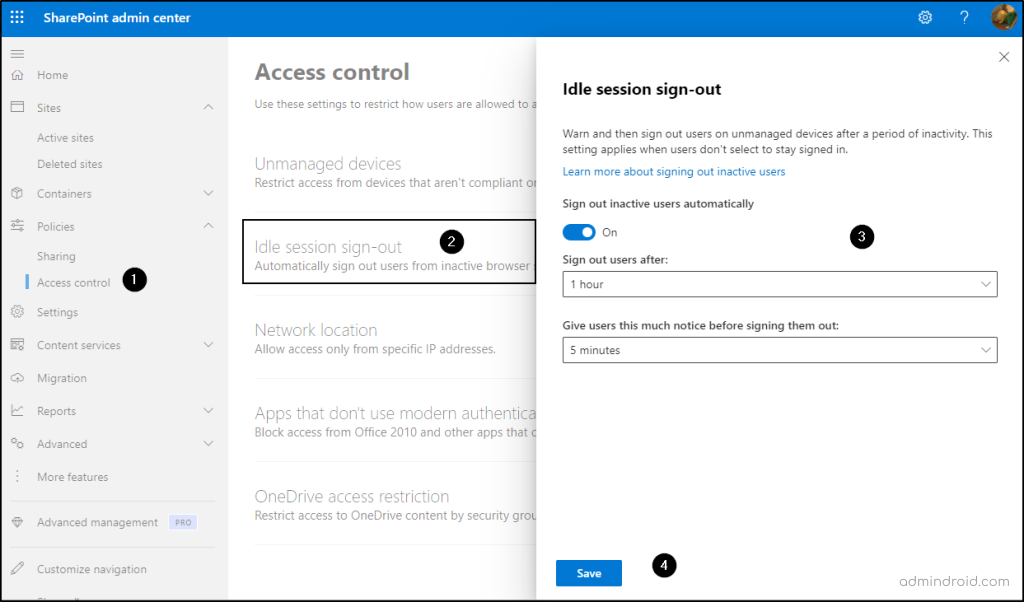
Note: Microsoft suggests setting ‘Idle session sign-out’ to ‘3 hours (or less)’ for unmanaged devices.
Specify Idle Session Sign-out Settings Using PowerShell
To enable idle session sign-out for SharePoint using PowerShell, run the following cmdlet.
|
1 |
Set-SPOBrowserIdleSignOut -Enabled $true -WarnAfter (New-TimeSpan -Seconds 2700) -SignOutAfter (New-TimeSpan -Seconds 3600) |
This automatically signs out users on unmanaged devices after a set period of inactivity.
6. Ensure Modern Authentication for SharePoint Applications Is Required
✅ Secure Score Points Gained – 1
Why Microsoft Recommends This Action:
Using basic authentication for SharePoint applications may allow attackers to bypass strong authentication controls, such as multifactor authentication (MFA).
To enhance security, it’s crucial to require modern authentication for SharePoint applications. Modern authentication supports advanced features, including:
- Multifactor Authentication (MFA): Adds an extra layer of security by requiring more than just a password.
- Certificate-Based Authentication (CBA): Uses digital certificates for secure user identification.
- Third-Party SAML Identity Providers: Allows integration with other identity management systems.
By enforcing modern authentication, organizations can ensure that strong authentication mechanisms are used for user sessions, effectively protecting against unauthorized access and enhancing overall security. This action is recommended by Microsoft and can earn you 1 Secure Score point.
How To Implement Modern Authentication for SharePoint Online?
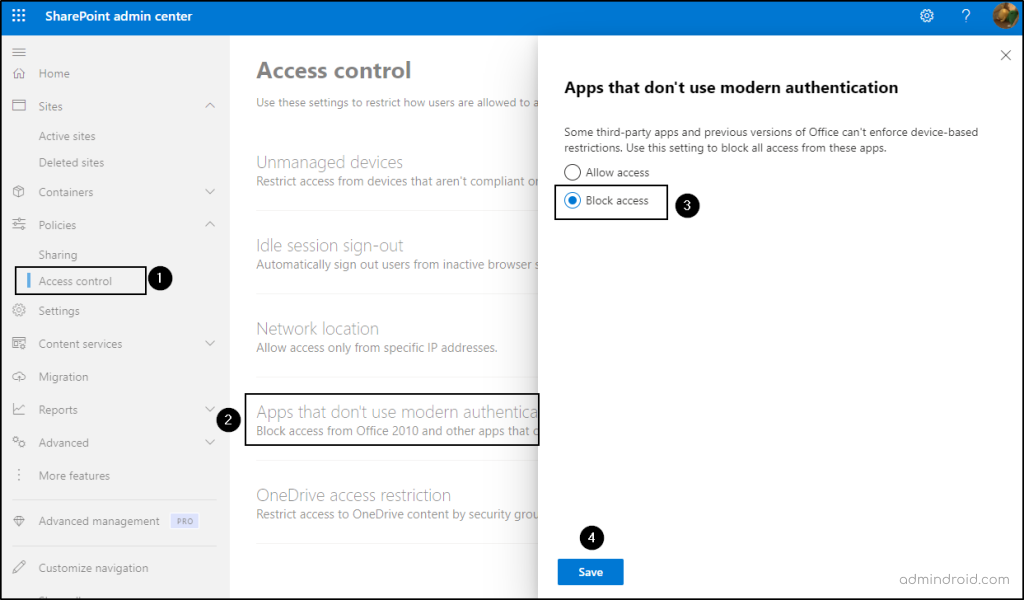
To set up SharePoint modern authentication, follow the steps below.
- Navigate to the SharePoint admin center.
- Expand the Policies section and choose ‘Access control’.
- Click on ‘Apps that don’t use modern authentication’.
- Select ‘Block access’ -> Click ‘Save’.
We hope this blog has helped you discover new ways to enhance your Secure Score for SharePoint and implement SharePoint Online security best practices. Be sure to check back for our upcoming blog series—we’re eager to share more knowledge soon!


