Day 1 of the Microsoft Entra Practitioner Series sets the stage with a powerful realization — the future of secure access lies in uniting identity and network access under one cohesive framework.
Missed it? No worries! here’s your complete catch-up!
Day1: Unify Identity and Network Access for Zero Trust Security
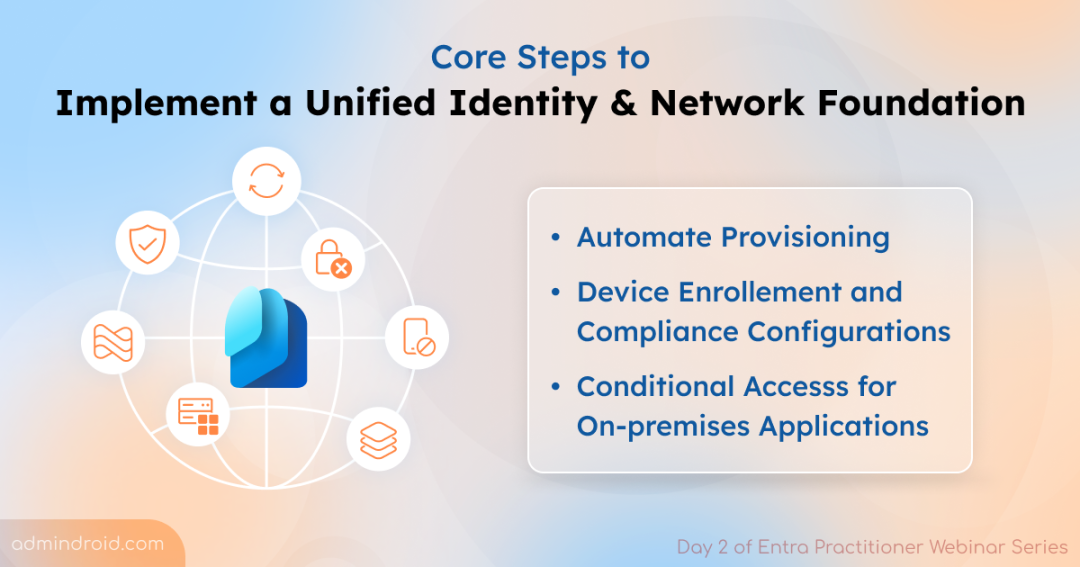
On Day 2, Merill Fernando dove from why into the how, breaking down the foundational steps for setting up unified identity and access management. These steps aren’t just technical checkboxes; they’re the blueprint for a seamless Microsoft Entra Suite deployment. Here are those three foundational steps to get Microsoft Entra Suite ready:
A) Automated Provisioning — Keep Access Right-Sized from Day One
B) Secure Device Onboarding & Compliance — Enable Trusted Access
C) Replace Legacy VPNs — Secure On-Prem Access with Conditional Access
You can already get a sense of their importance from the titles — but let’s dive deeper and explore what those foundational steps are and walk through the highlights from the demo sessions that showed exactly how to set them up in action.
Task 1: Streamline User Onboarding and Identity Lifecycle in Microsoft 365
Motto: Give the right users, the right access, at the right time.
Why it matters?
This approach ensures users are properly provisioned from day one. No manual account setup, no delays, no extra permissions lying around. It’s the foundation for secure, compliant, and efficient identity management.
What the Demo Covered?
- Direct API-based integration with any system of record for user onboarding.
- End-to-end joiner, mover, and leaver (JML) automation.
- Manage secure access to resources with access packages.
- Entra access reviews to validate permissions.
1. Enable HR Driven Provisioning in Entra
To start, Jorge Lopez explained how to get identity data from HR systems to kickstart the user onboarding process. Here’s how he suggested setting up the process:
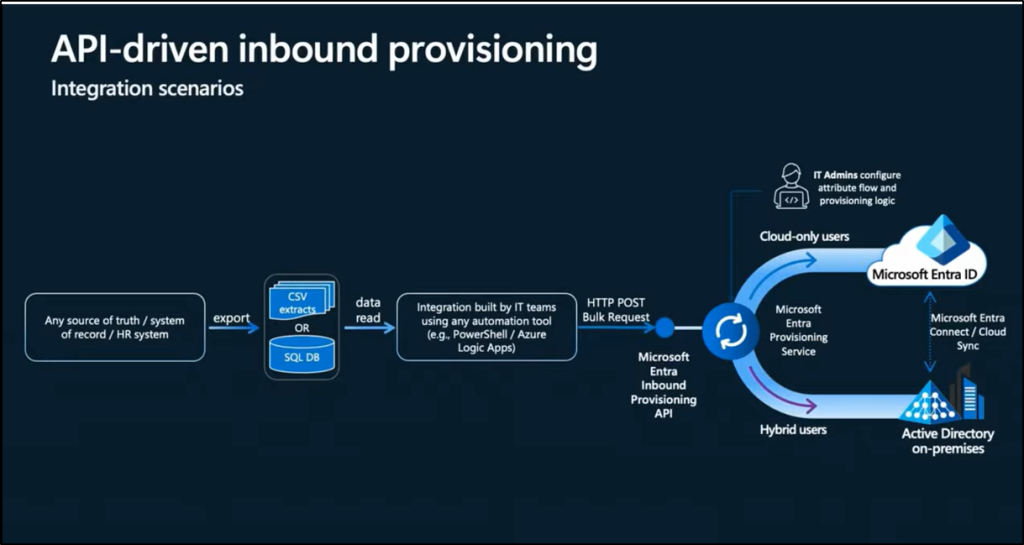
Step 1: Start from the Source of Truth
The authoritative identity source (e.g., HR system) contains the up-to-date user information. The goal is to synchronize this data into Microsoft Entra ID or on-premises Active Directory.
Step 2: Configure the Provisioning App in Microsoft Entra
IT Admin selects and configures an API-driven inbound provisioning app from the Microsoft Entra Enterprise App gallery. The admin specifies the target system for user provisioning:
- On-premises Active Directory for hybrid users.
- Microsoft Entra ID for cloud-only users.
Then, the admin grants the necessary access permissions and provides the API endpoint and authentication details to the API developers.
Step 3: Build the API Client
The API developer creates an API client (PowerShell scripts, Logic apps) to read identity data from the authoritative source.
Step 4: Send Data to Microsoft Entra
- The API client sends a POST request to the API endpoint of the provisioning app.
Step 5: Provisioning Service Processes the Data
- The Microsoft Entra provisioning service processes the data received, applies the attribute mapping rules, and completes user provisioning. Attribute mappings are nothing but defining how attributes from a source system (like an HR system) are mapped or transformed to corresponding attributes in the target system (like Microsoft Entra ID or on-premises AD). Here’s the attribute mapping example:
| Source Attribute (HR System) | Target Attribute (Entra ID) |
| department | department |
| managerId | manager |
| employeeId | externalId |
Step 6: Finally, users are provisioned either into On-premises Active Directory or Microsoft Entra ID
Now that the users are created, the speaker moved on to the next part — lifecycle workflows.
2. Create Automated User Lifecycle Management
Jorge walked us through how lifecycle workflows in Entra automate the joiner, mover, leaver (JML) processes. He highlighted that this automation reduces manual work and ensures the right access at the right time. Key features in lifecycle workflows that balance security and time:
- Pre-built templates are available for common tasks like onboarding new employees, department changes, and offboarding.
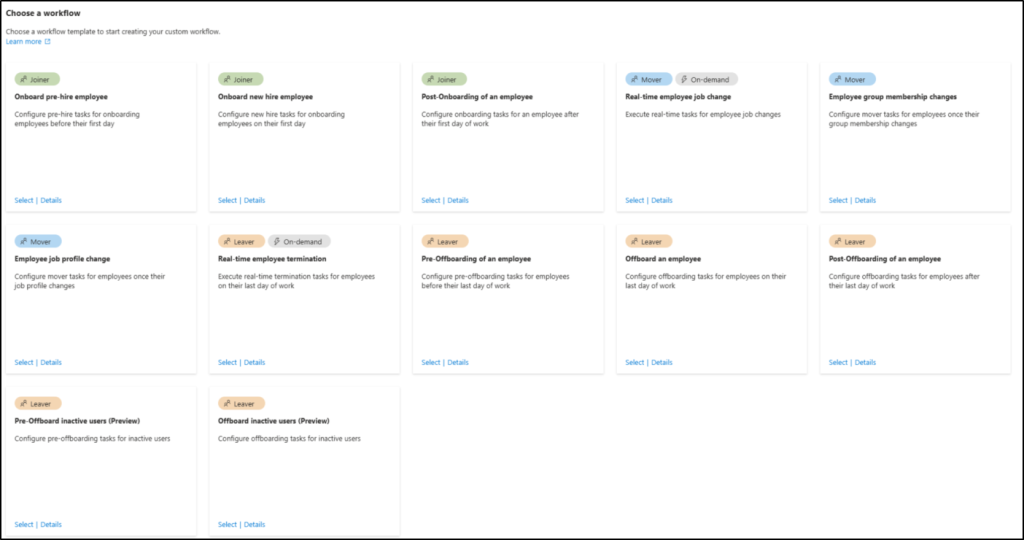
- Admins can schedule tasks to run before, during, or after a user joins or leaves.
- Workflows can be extended to trigger third-party actions, such as requiring MFA, or running custom Logic Apps.
Example Jorge shared:
Imagine a user moves to a different department. Using the mover lifecycle workflow template, we can automatically trigger access updates based on the ‘Department’ attribute changes. The workflow adds the user to the appropriate groups and removes them from those no longer relevant — ensuring their access always reflects their current role, without any manual intervention”
3. Manage Secure Access to Resources with Access Packages in Entra
Next, Jorge explained Access packages in Entitlement management, which help ensure only the right users get the right resources. He made it clear how this ties back to the moto:
- Users can request access via self-service, while admins automate approval workflows, reviews, and expirations.
- Multi-stage approvals can be configured for sensitive resources.
- Access can be time-bound, giving just-in-time permissions.
- With auto-assignment capabilities, admins can simplify access management, ensuring users get access automatically, but only when every defined condition is satisfied.
- For example, you can create an auto-assignment policy inside an access package with a dynamic rule — let’s say department = Finance. This access package will then be automatically assigned to users of the finance team. When they change departments, access will be revoked automatically.
- Privileged resources are governed with access reviews to reduce the risk of excessive or misused access.
4. Configure Access Reviews for Continuous Access Governance
Finally, Jorge talked about Access Reviews in Entra, which are essential for continuous access governance. He asked admins to configure access review by emphasizing the below points:
- Access reviews periodically help admins check whether users still need access to resources.
- Access can be automatically revoked for those who no longer meet the criteria.
- Reviews provide insights into access patterns, helping admins identify risky or unused permissions.
- And importantly, Access Reviews supports audit and compliance reporting.
Task 2 – Device Onboarding and Compliance in Microsoft 365
Motto: Allow Trusted Users with Compliant Devices to Access Resources
Why Do It?
Onboarding devices and enforcing compliance ensures that only secure, trusted, and policy-compliant endpoints can connect to your organization’s resources. This minimizes the attack surface, protects sensitive data, and strengthens your Zero Trust posture — where access is granted only when identity, device, and context all align.
What the Demo Covered?
- Manage Device Settings in Entra ID
- Configure Device Enrollment Restrictions in Intune Admin Center
- Configure Compliance Policies in Intune
- Create Device-based Conditional Access Policies
Nathan McNulty led the demo session and walked through each of these configurations in detail. His key insight:
For optimal security, admins need to control the entire device lifecycle — from purchasing and provisioning to enforcing compliance policies and deploying endpoint protection tools like Microsoft Defender for Endpoint.
Let’s break down the configurations he highlighted for enabling trusted access.
1. Manage Device Identity Settings in Entra ID
Admins should configure device identity settings in Entra based on organizational requirements. Nathan explained the key difference between the two settings “Entra Join” and “Entra Register” in crisp:
- Microsoft Entra Registered devices: Typically, personal devices. They are registered but not fully managed, enabling conditional access, compliance checks, and secure access to corporate apps without full device control.
- Microsoft Entra Joined devices: Fully joined to Entra ID, usually corporate-owned. Users sign in with their work account, and IT has full management capabilities, including policy enforcement, Single Sign-On, and device security.
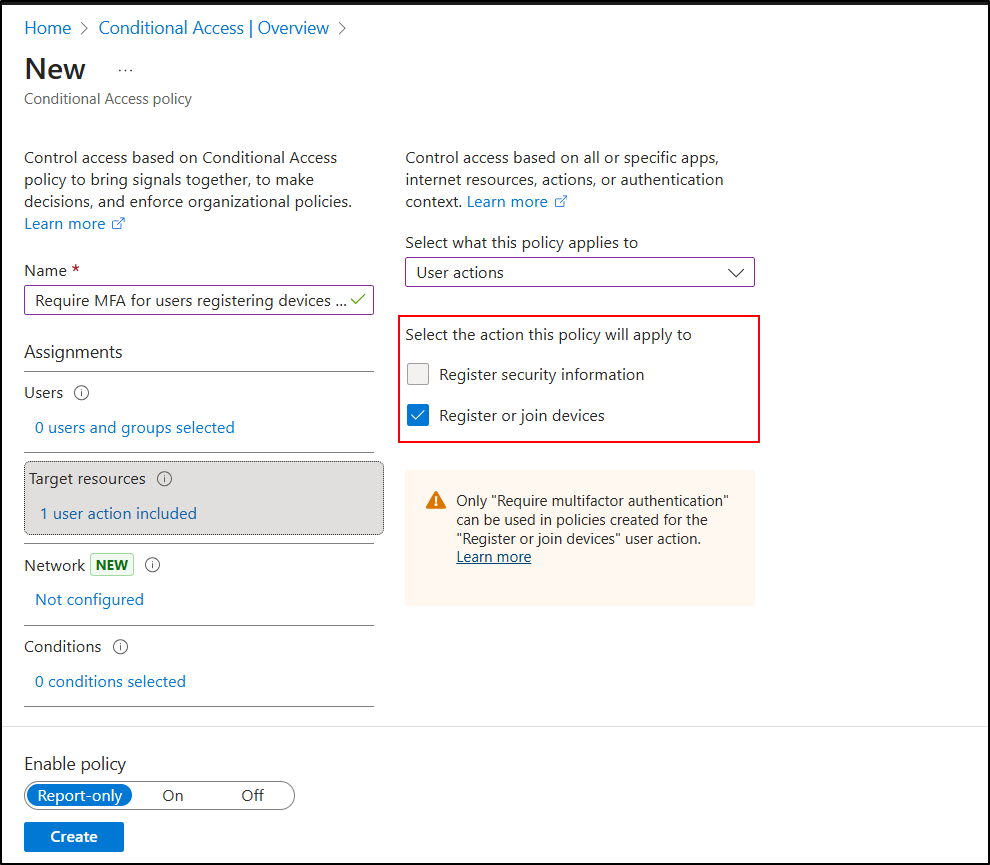
Admins must decide who can join or register devices and whether to allow all users, only specific users, or none. Added to this, Conditional Access policies play a key role here:
- While Microsoft provides a default option to “Require MFA to register or join devices,” it’s a one-size-fits-all approach.
- Nathan recommends creating Conditional Access policies to include additional checks like location, risk level—ensuring that only trusted users can join or register devices.
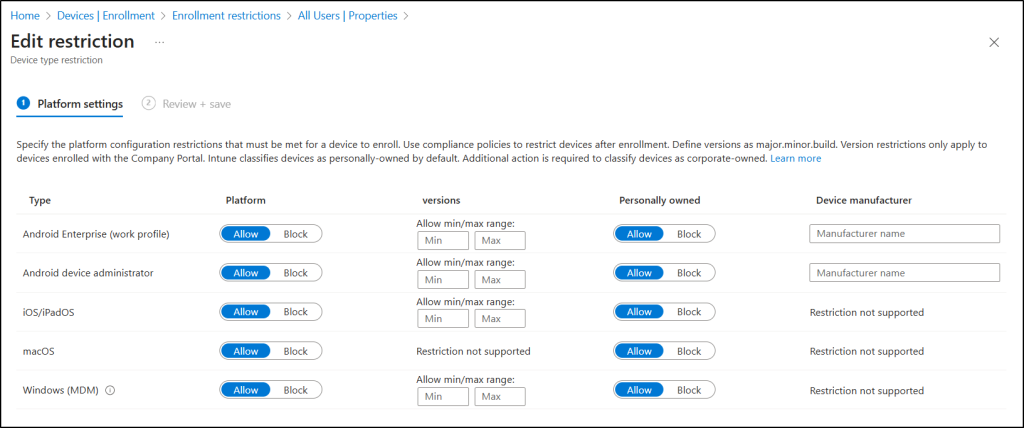
2. Configure Device Enrollment Restrictions in Intune Admin Center
The next step is managing enrollment through Microsoft Intune. Nathan demonstrated how device enrollment restrictions provide another gatekeeper layer to ensure only approved devices enter your organization. The two crucial restrictions admins must configure are:
- Device Enrollment Restrictions
- Define which platforms (Windows, macOS, iOS, Android) are allowed to enroll.
- Specify OS version minimums or restrict unapproved device types.
- Example: Allow only Android devices with version 5.0 or above and disallow personal macOS devices.
- Device Limit Restrictions
- Control how many devices a user can enroll — critical for BYOD environments.
- Example: Set a limit of 2 devices per user, ensuring each user can only register a small number of managed endpoints.
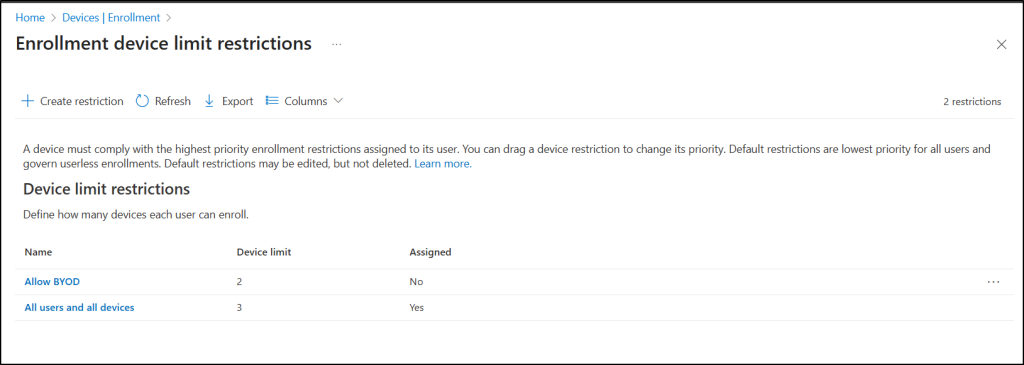
Together, these restrictions help reduce shadow IT and maintain visibility over every device accessing corporate resources.
3. Configure Device Compliance Policies in Intune
This is the heart of the device trust model. Even after devices are enrolled, their security posture must be validated to ensure they stay compliant with your organization’s standards. Create device compliance policy to meet requirements like,
- Firewall must be enabled
- Antivirus must be installed, active, and up to date
- Minimum OS version requirements
- BitLocker encryption enabled for Windows devices
- Defender for Endpoint status healthy
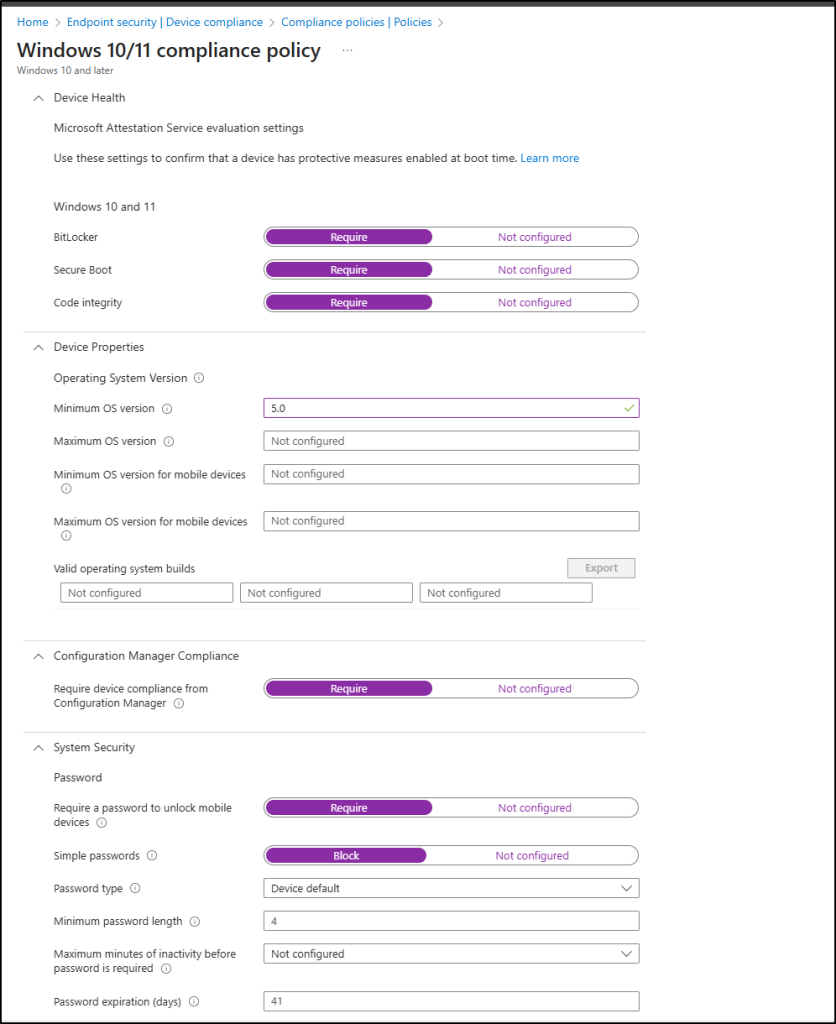
When a device meets all requirements, it is marked as Compliant. If not, it is flagged as non-compliant. Nathan emphasized that admins could define automated remediation action, like automatically retire or block non-compliant devices after a set period.
4. Integrate Compliance with Conditional Access
Finally, the compliance signals collected in Intune are what makes Conditional Access truly powerful. When creating a device-based Conditional Access policy in Microsoft Entra, admins can include the control “Require device to be marked as compliant” check.
Here’s what happens behind the scenes:
- The user attempts to access a protected resource (like SharePoint, Outlook, or Teams).
- Entra ID checks the device’s compliance state from Intune in real-time.
- If the device is marked as Compliant, access is granted.
- If it’s non-compliant, the policy can automatically block access, require MFA, or direct the user to remediation.
This tight integration enforces your motto:
✅ Only trusted users, using compliant and secure devices, can access organizational resources.
Task 3: Replace Legacy VPNs with Conditional Access and Global Secure Access
Motto: Never Trust by Default — Always Verify.
Why Do It?
In today’s hybrid and remote work environment, users connect from anywhere — home networks, personal devices, and public Wi-Fi. So, organizations need to enforce Zero Trust network access (ZTNA) principles — verifying every user, every device, and every session before granting access.
What’s Inside the Demo?
- Protect Access to All Private and Internet Resources
- Use GSA and Conditional Access Policies to Secure On-Premises Resources.
- Scale Conditional Access Policies with Custom Security Attributes
1. Protect Access to All Private and Internet Resources
Marilee began by addressing the modern security challenge — remote work and hybrid connectivity. Many organizations still host sensitive applications on-premises, relying on legacy VPNs to provide access.
She highlighted the core issue:
VPNs don’t offer granular, application-level control. Once users connect, they often have visibility to more than they should — that’s a risk we can’t afford anymore.
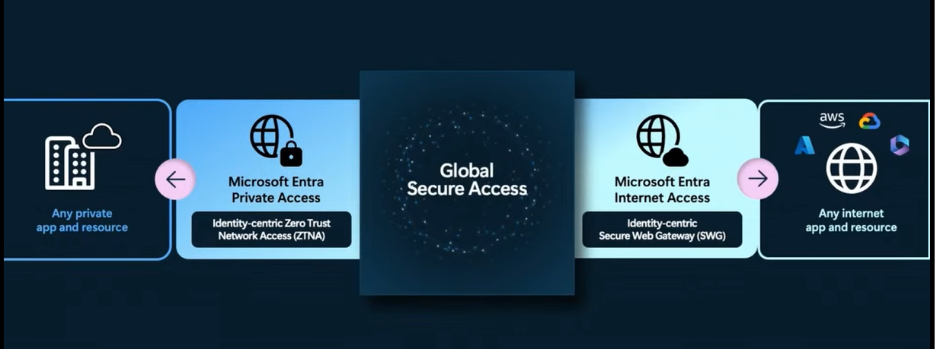
The solution: Microsoft Entra Suite, powered by Global Secure Access (GSA).With Entra’s unified identity and access controls for secure access to applications. Admins can:
- Enforce per-application access policies for both private and SaaS resources.
- Manage access to private apps and internet destinations using a single control plane.
- Continuously enforce Conditional Access policies and monitor user behavior in real-time.
2. Use GSA and Conditional Access Policies to Secure On-Premises Resources
To bring Zero Trust principles to on-premises environments, admins need to transition from network-based trust (VPN) to identity-based trust (Conditional Access + GSA). However, simplicity and scalability are key. Instead of managing hundreds of fragmented Conditional Access policies, Microsoft now offers enhanced Target Resource options in Conditional Access.
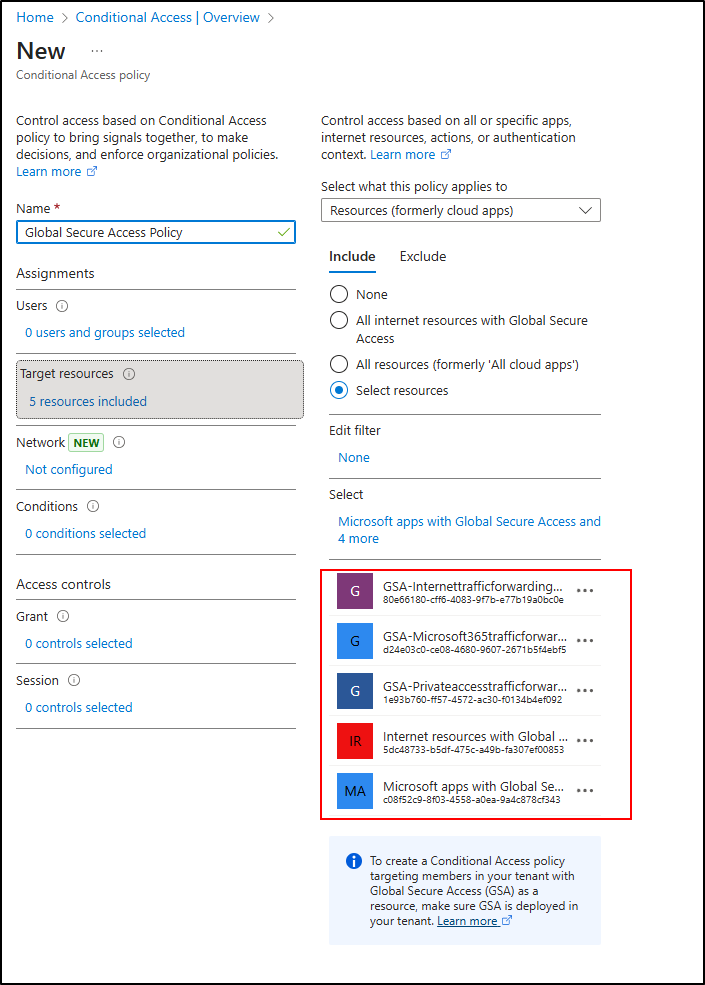
These allow admins to create global-to-granular Conditional Access policies for on-premises and cloud apps with better control and fewer redundancies. Marilee broke down the new Global Secure Access target resource options and how to use them effectively:
| Target Resource | Purpose | Example Use Case |
| Microsoft apps with Global Secure Access | Applies at GSA client initiation during initial tunnel connection. | Require MFA when users attempt to connect to the GSA client. |
| GSA – Private Access Traffic Forwarding Profile | Applies when users access private/on-premises apps through the GSA tunnel. | Trigger MFA for risky users accessing internal apps. |
| GSA – Internet Traffic Forwarding Profile | Applies to outbound traffic to SaaS or public internet apps. | Block access to SaaS apps when sign-in risk is high. |
| GSA – Microsoft 365 Traffic Forwarding Profile | Applies when connecting to M365 resources via GSA. | Block M365 apps access, unless the connection is made via Global secure access tunnel |
| Global Secure Access Enterprise Applications | Applies Conditional Access to individual enterprise apps. | Require FIDO2 authentication for sensitive apps. |
| Groups of Enterprise Applications | Apply shared policies to groups of apps using custom attributes. | Enforce consistent MFA or device compliance rules for all specific apps. |
| Global Secure Access Web Content Filtering | Integrates web filtering to block risky or unwanted sites. | Block AI or unapproved web tools for privileged users. |
Marille also emphasized risk-based protection for private apps, a capability that allows Entra to factor in user and sign-in risk directly at the network layer. This means:
- Password spray attacks and leaked credentials can be mitigated early.
- Access to private apps is blocked for users flagged as high-risk.
- Security posture is dynamically enforced based on real-time intelligence from Microsoft Entra ID Protection.
“It’s an easy win for identity admins — securing private access without overhauling your entire network,” she added.
3. Scale Conditional Access Policies with Custom Security Attributes
The highlight of Marille demo was how Custom Security Attributes can simplify and scale Conditional Access policies — a game changer for large environments managing hundreds of apps. Instead of creating separate Conditional Access policies for each app, admins can use Custom Security Attributes to tag applications with specific policy requirements.
For example:
- Create a custom attribute set named AppCustomAccess.
- Define an attribute called PolicyRequirements with values like:
- requireMFA
- requireCompliantDevice
- blockHighRiskSignIns
Then, add your enterprise apps with these values. Now, a single Conditional Access policy can apply to all apps with a specific attribute. For instance:
- Apps tagged with PolicyRequirements = requireCompliantDevice will include all the application assigned with this attribute
- When a new app is onboarded, simply tag it with the same attribute — no extra setup or duplication required.
Live Q & A Session in the Webinar
After the live demo sessions, the speakers set the stage for an engaging Q&A segment and some of the questions that truly grabbed my attention were:
- What’s the one metric you track weekly that proves foundations are working—and what do you look for in the trend?
- What are some of the most common mistakes people make when starting out with Conditional Access?
- BYOD — bring your own device — is unavoidable and a standard part of how our company operates. How do we handle these situations?
- What’s the most important mindset or principle that practitioners should embrace as they start their Zero Trust and identity journey?
- How does Entra Suite work with on-prem domain controllers?
- If we’re replacing VPN, what private app or apps we should onboard to Entra Private Access first? Which Conditional Access controls do you pair with it on day one
To hear the experts’ answers and insights, watch the full video!
That’s the summary! You’ve now seen the three foundational steps to prepare for a smooth Microsoft Entra Suite deployment. The third session dives even deeper into best practices for designing, planning, and deploying Entra Suite’s advanced features through a dedicated Microsoft Entra Suite workshop.
Don’t miss them! We’ll be publishing a detailed blog on each of these configurations after our Cybersecurity Series 2025 — so stay tuned!


