
Shifting priorities, evolving projects, and scaling user performance all call for real-time adjustments in Microsoft 365 employee roles. During this mover phase, numerous tasks need attention, ranging from assigning group memberships to configuring access permissions in Microsoft 365.
While handling the task manually for a few users might be easy, dealing with bulk user role changes can become a cumbersome process. What if these processes could be automated with just a click? Well, don’t worry! An automated Microsoft built-in feature comes to the rescue- Entra ID’s lifecycle workflow. They have a pre-defined template to easily manage role changes in Microsoft 365.
Let’s see how to create role-driven lifecycle workflows in Microsoft Entra ID.
How Frequent Microsoft 365 User Role Changes Happen?
In organizations, role changes may be necessary, driven by factors like an individual’s performance, organization’s needs and more.
- As individuals transition from their internship phase to becoming official employees within the organization, their access privileges should be extended. It reflects their new status as official employees and facilitates a smooth start to their professional journey.
- For example, if a Microsoft 365 user excels in their responsibilities or gains expertise in handling sensitive information, they may be promoted to a role with higher confidentiality requirements. When the role changes, so do the access privileges that should be assigned.
- Similarly, in scenarios where an employee transitions to another department, like moving from sales to the marketing department, there’s a need to seamlessly integrate them into the relevant groups and Teams.
In these situations, Microsoft 365 tasks associated with role changes should be executed seamlessly and at the right time to ensure a smooth transition. However, manual execution of these tasks comes with the risk of errors in configuring permissions and managing group memberships. How do you overcome this challenge? Find the solution in the following section.
Lifecycle Workflows in Microsoft Entra ID
To streamline and automate mover processes without manual effort, lifecycle workflows step in! Like how you can automate Microsoft 365 onboarding using lifecycle workflows, it’s your go-to for managing the mover phase too.
Lifecycle workflows is a key Entra ID Governance feature designed to streamline user management within Microsoft 365. This capability enables the automation of tasks throughout the entire joiner-mover-leaver (JML) cycle, ensuring efficient Identity and Access Management (IAM).
Many of us move to automate user onboarding using Power Automate and handle offboarding and mover phase tasks using PowerShell. However, it not only consumes valuable time but also poses a potential security risk due to misconfigurations. Such issues can be mitigated by implementing lifecycle workflows.
When coming to mover phase, you can configure access rights, add users to Teams, and remove users from Microsoft 365 groups—all effortlessly with an automated lifecycle workflow. In this sense, lifecycle workflows give you a pre-defined template for effective mover automation. Let’s delve into it!
Manage Microsoft 365 User Role Changes with Workflows Template
The mover template is one of eight pre-made templates in Microsoft Entra lifecycle workflows. It’s there to automate tasks when an employee switches roles or moves to a different department in your organization. This covers various tasks such as:
- Send email to the manager about the user’s role change.
- Request user access package assignment.
- Add user to Microsoft 365 groups.
- Remove users from Microsoft 365 groups.
- Add user to new Teams.
- Remove user from Teams .
Benefits of Using Lifecycle Workflows to Manage Microsoft 365 User Role Changes
- Save Time and Centralized management: Consider a scenario where Sam and his team are temporarily assigned to a new product launch project. As an admin, you would typically need to switch between tabs to do tasks like assigning access permissions and adding them to the relevant Microsoft 365 Teams. However, this workflow template automates the process during the mover phase, saving you time and providing centralized management of tasks.
- Reduced Manual Errors: Consider a scenario where you notice any suspicious activities within specific department-related accounts. So, to mitigate potential risks during the investigation, reducing their access rights becomes essential. However, manually managing these limitations during busy periods could result in granting unintended higher privileges, posing a security risk. Implementing automated lifecycle workflows can efficiently handle such situations effectively, ensuring security while investigations proceed.
- Streamlined User Experience: Think, you have changed Sam to the IT department but forgot to grant the necessary access. As a result, Sam is left waiting for you to manually grant access to Microsoft 365 resources and tools. In such cases, the process can be automated with workflow for a better user experience.
Are you ready to experience all of these benefits? Let’s see how to deploy a lifecycle workflow for automated employee department changes management in the organization.
Set Up Lifecycle Workflow for Real-time Employee Changes
Imagine a scenario where a user transitions from the ‘Testing’ role to a ‘Developer’ role. With this significant shift, there’s a need to carry out specific tasks to ensure seamless user access in Microsoft 365. This includes,
Task 1: Remove them from their existing Microsoft 365 Teams.
Task 2: Take them out of the existing Microsoft 365 group.
Task 3: Put them into the new Microsoft 365 group.
Task 4: Add them to the new Teams.
Task 5: Cancel their existing Microsoft 365 access package.
Task 6: Send an email to the manager about the user’s move.
Before moving further, make sure you learn to create automated lifecycle workflows for a better understanding of the template configurations in Entra ID. With Microsoft Entra lifecycle workflows, you can,
- Create, delete, and manage up to 50 workflows.
- Schedule or run on-demand workflows.
- Create 100 custom task extensions in the workflows.
- Manage and configure Microsoft 365 tasks based on the JML cycle.
License: To create a lifecycle workflow, you will need a Microsoft Entra ID Governance license. The Entra ID Governance license is available for the cost of $7 per user/month.
- You can also purchase the Entra ID Governance for business guests at a reduced cost of $0.75 per user/month.
- Also, if you are an Entra ID P2 customer, you can purchase the MS Entra ID Governance license at special pricing.
- If not, you can try a free Microsoft Entra ID Governance license trial to test it out in your organization.
Roles: Ensure that you hold the necessary permissions, either as a global administrator or a lifecycle workflows administrator, to effectively configure and implement lifecycle workflows within Entra ID.
Now, let’s get started to configure lifecycle workflow with mover template in Entra ID.
1. Sign into the Microsoft Entra admin center.
2. Navigate to Identity Governance and select Lifecycle Workflows.
3. Click on “+Create Workflow” and choose the Real-time employee job change workflow template.
Here, configure the below three tabs respectively.
4. Configure the “Basic” tab in lifecycle workflows:
- Workflow details: Configure a suitable name and description for the workflow.
- Trigger details: It is preset as “On-demand”. This template operates on-demand since there are no attributes such as “employeeHireDate” and “employeeLeaveDate” to automatically trigger its execution. It allows flexibility for manual initiation as needed.
5. Click “Next: Review tasks”.
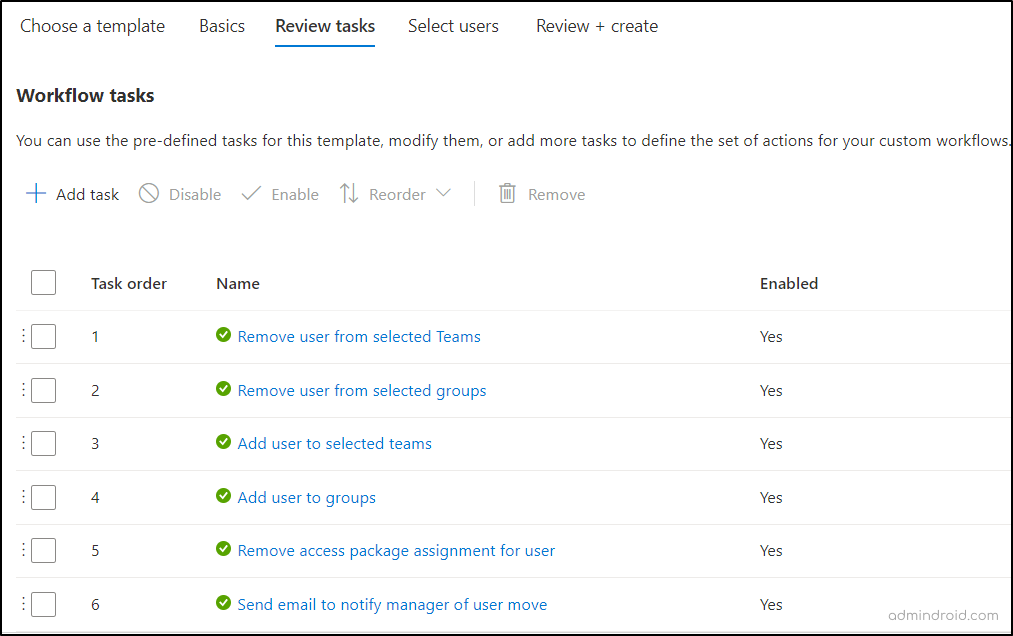
6. Set the “Review tasks” tab in lifecycle workflows:
The default setting is the “Run a Custom Task Extension” task, which can be enabled if you have already configured a custom task extension in Entra ID to perform tasks beyond the pre-defined ones in the template. To add the following tasks, you can use the “+ Add task” option.
- Task 1: Remove user from selected Teams.
- Task 2: Remove user from selected groups.
- Task 3: Add users to selected Teams.
- Task 4: Add users to groups.
- Task 5: Remove access package assignment for user.
- Task 6: Request user access package for resources including groups, application, and SharePoint sites.
Upon adding each task, it is essential to configure them individually. For instance, after adding the “remove user from selected groups” task, you must proceed to configure the specific groups within the task to define from which groups the users should be removed.
7. Click “Next: Select users”.
8. Configure the “Select users” tab on lifecycle workflows:
Since the workflows operate exclusively on demand, it’s necessary to manually select the specific users for whom you want the mover tasks to be executed. This user selection initiates the flow, ensuring that the designated tasks are carried out as needed.
User selection: When creating the workflow, you have two options for managing user selection:
- Create the workflow and select users later: Choose this option if you prefer to select users at a later time, possibly during the workflow execution.
- Select users now and run workflow after you create it: Enable this option if you want to specify users within the workflow itself. Once enabled, you can define the users using the “+ Select users” feature during the creation process.
9. Click “Next: Review +Create.”
10. Finally, review all the workflow settings and proceed to create the workflow.
Furthermore, if desired, you have the option to set up the workflow to run automatically at regular intervals using the “Schedule workflow” feature.
Monitor Lifecycle Workflow Execution in Microsoft Entra ID
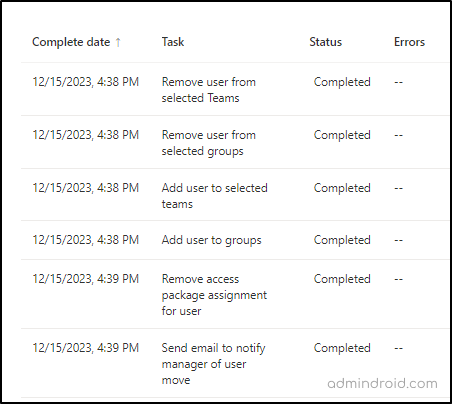
After configuring the workflow, you’ll need to manually execute it in Entra ID. To do so, go to the “Overview” page of the workflow and click “Run On-demand”. The workflow will be initiated, and you can monitor its execution progress by checking the “Workflow history”. This allows for flexibility and control over when the transition tasks are executed.
If you are not satisfied with the above built-in mover lifecycle management template, you can create a custom workflow using Graph API.
Effectively Manage Microsoft 365 User Role Changes with Workflows!
Finally, it would be cool if you had an assistant to help you in your common HR process, right? Well, that’s precisely what the lifecycle workflows act as – your dedicated assistant managing all the employee quick setup tasks during the mover phase without needing your direct intervention.
Take a leap and deploy the employee role changes template to effortlessly navigate and perfect the role change management in Microsoft 365. In addition to the mover phase, automate Microsoft 365 offboarding tasks with lifecycle workflows for effective user management.
I hope this blog brings you more information about how effectively you can make mover automation in Entra ID. Furthermore, if you have queries, you can reach us through the comment section! Thanks for reading!


