As Microsoft 365 becomes an AI-first productivity platform in 2025, security extends far beyond protecting mailboxes or endpoints. With Copilot, agents, and intelligent automation embedded across the tenant, even minor misconfigurations can lead to serious security, privacy, and compliance risks.
Microsoft has introduced several new security controls and enhancements in 2025 to address evolving threats, AI misuse, and external collaboration risks. This blog provides a practical checklist of the key Microsoft 365 security settings, highlighting what to enable, what to disable, and what are already secured by default.
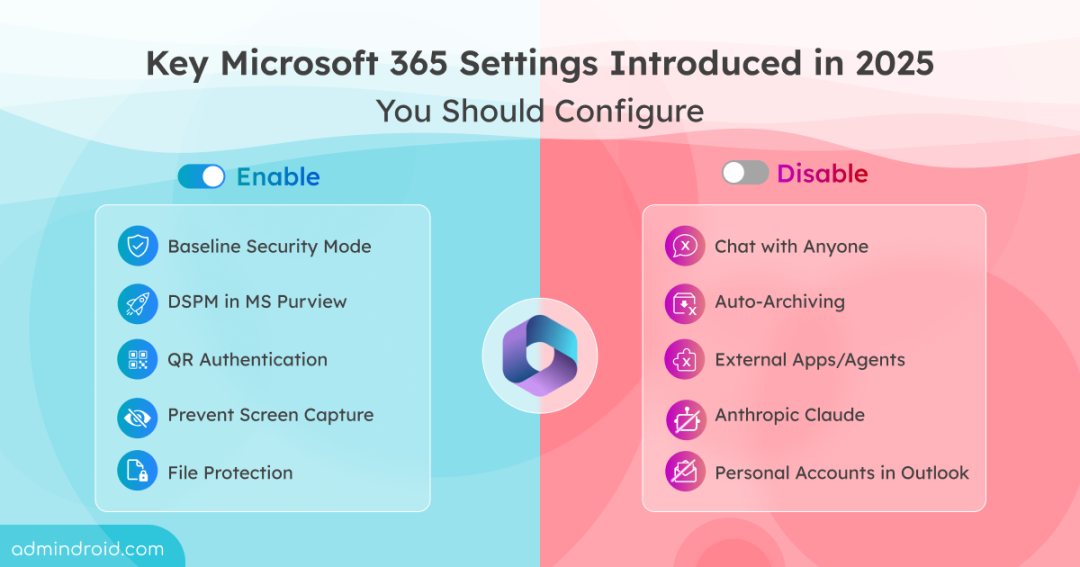
Enable Top Security Recommendations in Microsoft 365
Review and enable the following key Microsoft 365 settings to improve your Microsoft 365 security posture.
- Baseline Security Mode (BSM)
- Reject direct send in Exchange
- QR code authentication method in Microsoft 365
- Prevent screen capture in Teams meetings
- Granular external access control in MS Teams
- File protection in Microsoft Teams
- Malicious URL protection for Teams chats & channels
- Content security policy in SharePoint Online
- DSPM in Microsoft Purview
- Enable Knowledge Agent in SharePoint Online
Don’t have time to dig through pages of documentation? This quick cheat sheet breaks down all the essential email security settings. Easy to scan and use anytime you need it!
Download Cheat Sheet: 15+ Critical Microsoft 365 Security Settings.pdf
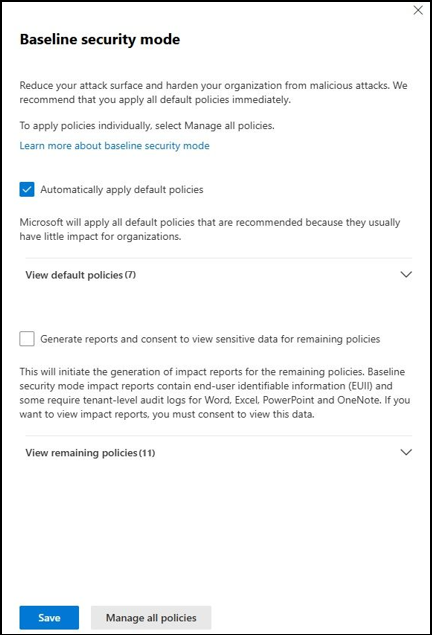
1. Turn on Baseline Security Mode
Microsoft Baseline Security Mode (BSM) provides a tenant-wide framework of recommended security settings in Microsoft 365. It automatically enforces Microsoft’s best security practice configurations, eliminating the need for administrators to configure every control manually from day one. In its initial rollout, BSM includes 20 baseline policies across five core Microsoft 365 services such as Office, Exchange, Teams, SharePoint/OneDrive, and Entra.
Required Admin Roles: Security Administrator or Global Administrator.
License Requirement: Available across all Microsoft 365 subscriptions and plans.
To enable Baseline Security Mode in Microsoft 365 Admin Center, do the following.
- Sign in to the Microsoft 365 admin center.
- Navigate to Settings > Org settings > Security & Privacy.
- Click Baseline Security Mode. You will see two options:
- Automatically apply default policies – This immediately applies 7 low-impact baseline controls. (Do not require review)
- Generate report and consent to view sensitive data for remaining policies – This runs the remaining 11 policies in simulation mode and generates an impact report. (Requires consent)
- Choose the option you prefer and click Save to apply the changes.
2. Enable Reject Direct Send in Exchange Online
Direct Send in Exchange Online lets on-premises devices and applications send emails from your organization’s own domain to your mailboxes without requiring authentication. By default, Microsoft 365 allows Direct Send from accepted domains. Earlier, admins had no direct way to turn this off, which raised security concerns. With the new Reject Direct Send feature, organizations can now block unauthenticated Direct Send traffic across the tenant.
Required Admin Roles: Exchange Administrator or Global Administrator.
License Requirement: Exchange Online P1 or P2, Microsoft 365 Business Basic/Standard/Premium, Enterprise E1/E3/E5)
Connect to the Exchange Online PowerShell module and run the following cmdlet to enable ‘reject direct send’ in Exchange Online.
|
1 |
Set-OrganizationConfig -RejectDirectSend $true |
Note: The change will take up to 30 minutes to take effect across all Microsoft cloud servers. Once enabled, Reject Direct Send will block unauthenticated emails sent directly to your tenant.
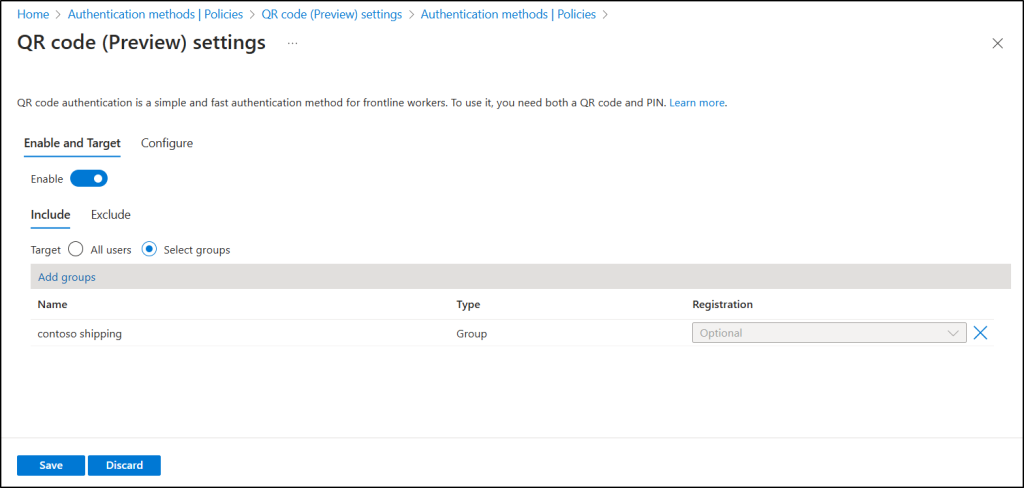
3. Enable QR Code Authentication Method in Microsoft Entra
With Entra ID, admins can enable QR authentication to simplify sign-ins for Microsoft 365 users. By using a QR code and PIN instead of traditional usernames and passwords, workers can authenticate quickly and securely. This encrypted approach strengthens first-factor authentication and helps protect against threats like credential theft, password spray attacks, more.
Admin Roles: Authentication Policy Administrator or higher.
License Requirement: Microsoft 365 F1/F3/E3/E5, Entra ID P1/P2, EMS E3/E5, Office 365 F3
To configure QR code authentication in Entra ID:
- Sign in to the Microsoft Entra admin center.
- Navigate to Entra ID > Authentication methods > Policies > QR code.
- Under the Enable and Target tab, toggle Enable, and then select the users or groups who should sign in with a QR code.
- To modify default settings, switch to the Configure tab, adjust QR PIN length and lifetime options as needed, and click Save.
4. Enable Prevent Screen Capture in Teams Meetings
Prevent Screen Capture in Microsoft Teams ensures that sensitive information shared during meetings stay protected. When enabled, it blocks participants from taking screenshots or recording the screen using device-native features, reducing the risk of content being copied.
License Requirement: Microsoft Teams Premium
The feature is disabled by default and must be enabled by the meeting organizer or co-organizer for each meeting. After scheduling the meeting, enable it from:
Meeting Options → Advanced Protection → Prevent Screen Capture
Be sure to inform meeting organizers as well as security and compliance teams about the feature’s purpose and guide them on how to enable it using the steps above.

5. Enable Granular External Access Control in MS Teams
By default, external access settings in MS Teams apply to the whole tenant. With the recent update, Teams now supports custom federation, making it possible to set granular external access rules for selected users or groups.
Required Admin Roles: Teams Administrator or Global Administrator
License Requirements: Microsoft 365 F1/F3/E3/E5, Entra ID P1/P2, EMS E3/E5, Office 365 F3
Use the command below to allow a custom external access domain policy.
|
1 |
Set-CsTenantFederationConfiguration -ExternalAccessWithTrialTenants "Allowed" |
After enabling this, you can create and assign as many custom policies as needed to users or groups in your tenant.
Note: For now, the configuration must be done only through PowerShell. After general availability, the same settings can be managed from the Teams admin center.
6. Enforce File Protection in Microsoft Teams
Microsoft Teams now includes enhanced security to keep chats and channels safe from risky attachments. When a user tries to send a message with a potentially unsafe file type, Teams automatically scans the file.
If the attachment is flagged as dangerous, the message is blocked and notifications are sent to both the sender and the recipients. This feature helps organizations prevent file-based attacks, reduce security risks, and maintain safe collaboration.
Required Admin Roles: Teams Administrator or Global Administrator
License Requirements: Microsoft 365 F1/F3/E3/E5, Entra ID P1/P2, EMS E3/E5, Office 365 F3
To enable file protection in Microsoft Teams admin center, do the following.
- Sign in to the Microsoft Teams admin center.
- Navigate to Messaging > Messaging settings > Messaging safety.
- Toggle the setting “Weaponizable file protection”.
- Click on Save.
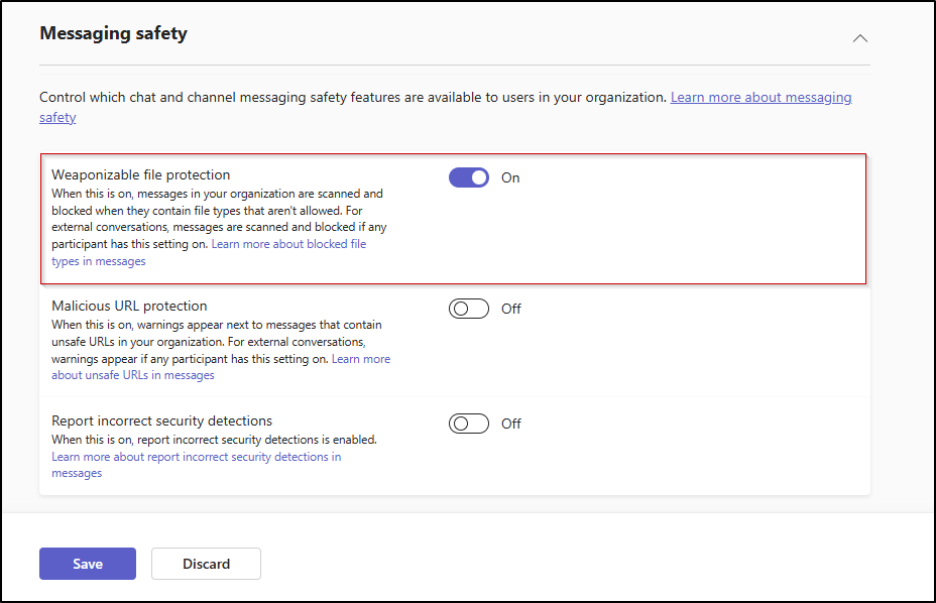
7. Malicious URL Protection for Teams Chats & Channels
Phishing links can look harmless, often appearing to come from trusted senders or familiar URLs. In the fast pace of daily work and constant Teams notifications, users may click links without realizing the risk. A single click can expose sensitive data or introduce malware.
To reduce this threat, Microsoft Teams includes malicious URL protection. Using Microsoft Defender’s reputation-based scanning, Teams automatically detects suspicious links in chats, channels, and meeting messages.
Required Admin Roles: Teams Administrator or Global Administrator
License Requirements: Microsoft 365 or Office 365 Enterprise (E3, E5, A5) or Business (Basic, Standard, Premium) license.
Follow the steps below to enable malicious link protection in Microsoft Teams.
- Sign in to the Microsoft Teams admin center.
- Navigate to Messaging > Messaging settings > Messaging safety.
- Toggle on the setting “Malicious URL protection”.
- Click on Save.
8. Enable Content Security Policy in SharePoint Online
SharePoint Online Content Security Policy (CSP) enforcement helps browsers decide which content a webpage is allowed to load. If a script or resource isn’t trusted, it gets blocked, reducing the risk of attacks like XSS and malicious code injection. With CSP now fully enforced in SharePoint Online, all scripts are checked against strict rules. This affects custom scripts, SPFx solutions, and third-party tools used across SharePoint.
Admins who want to enable CSP enforcement ahead of Microsoft’s automatic rollout can do so manually using a tenant-level setting. CSP enforcement is currently disabled by default but will be automatically enabled starting March 1, 2026.
Required Admin Roles: SharePoint Administrator or Global Administrator
License Requirements: Microsoft 365 or Office 365 Enterprise (E3, E5, A5) or Business (Basic, Standard, Premium) license.
To enable it manually, run the following PowerShell command.
|
1 |
Set-SPOTenant -EnforceContentSecurityPolicyConfiguration $true |
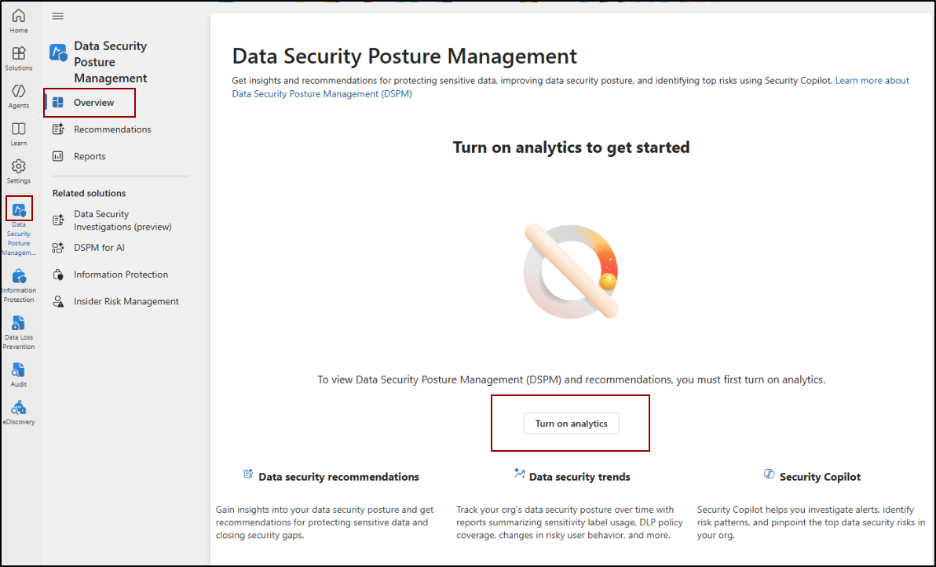
9. Turn on DSPM Analytics in Microsoft 365
Data Security Posture Management (DSPM) in Microsoft Purview provides a centralized view of data security by identifying unprotected sensitive data, risky user activity, and policy gaps. It correlates insights from DLP, Information Protection, Insider Risk Management, and Adaptive Protection to deliver actionable recommendations. For new tenants, DSPM can auto-configure policies; for existing ones, it quickly highlights gaps.
Required admin roles: Data Security Management role group/Data Security Viewer role/Insider Risk Management Admin role/Microsoft Entra ID Global Administrator role/Microsoft Entra Compliance Administrator role
License requirement: Microsoft 365 E5 or a Microsoft 365 E5 Compliance (Microsoft Purview Suite) subscription
To turn on analytics from the DSPM page, navigate to,
Microsoft Purview portal -> Solutions -> Data Security Posture Management -> Overview -> Turn on analytics.
10. Enable Knowledge Agent in SharePoint Online
Knowledge Agent in SharePoint helps administrators and site owners improve content governance and Copilot readiness by applying AI-driven insights across SharePoint sites. It analyzes site content to surface gaps, recommends metadata, and enable contextual Q&A, ensuring information remains accurate and up to date.
Knowledge Agent operates at both tenant and site level, giving admins centralized control and site owners flexibility to enable it where required.
Required admin roles: Microsoft Entra Global Administrator or SharePoint Administrator
License requirement: Microsoft 365 Copilot license
To enable Knowledge Agent for all SharePoint sites, connect to SharePoint Online PowerShell module and run the below commands.
|
1 |
Set-SPOTenant -KnowledgeAgentScope AllSites |
Likewise, execute the below to enable Knowledge Agent on all sites except specified sites.
First, set Knowledge Agent to be available on all sites, except the ones you choose to exclude.
|
1 |
Set-SPOTenant -KnowledgeAgentScope ExcludeSelectedSites |
Next, specify the list of sites you want to exclude from Knowledge Agent.
|
1 |
Set-SPOTenant -KnowledgeAgentSelectedSitesList @("https://contoso.sharepoint.com/sites/site1", https://contoso.sharepoint.com/sites/site2) |
Microsoft 365 Settings Admins Should Disable
The settings outlined below are recommended to be disabled as part of Microsoft 365 security best practices.
- Chat with anyone feature in Microsoft Teams
- Adding personal accounts in Outlook
- Auto-archiving in Exchange Online
- Apps and agents built by external publishers
1. Disable Chat with Anyone Feature in Microsoft Teams
Teams now allows users to chat with anyone using just an email address. While this makes connecting outside your organization easier, it also bypasses traditional controls, which could expose sensitive information. If your organization requires stricter control over external collaboration, you can turn off this feature using PowerShell.
|
1 |
Set-CsTeamsMessagingPolicy -Identity Global -UseB2BInvitesToAddExternalUsers $false |
This command disables the feature by setting the UseB2BInvitesToAddExternalUsers option to false in the Teams messaging policy.
2. Prevent Users from Adding Personal Accounts to Outlook
While Outlook simplifies managing multiple email accounts, linking personal accounts may compromise privacy and organizational security. Admins can prevent users from adding personal accounts in Outlook using Exchange Online PowerShell.
After connecting to the Exchange Online PowerShell module, run the cmdlet below to restrict users from adding personal accounts in Outlook.
|
1 |
Set-OwaMailboxPolicy –Identity "<PolicyName>" -PersonalAccountsEnabled $false -PersonalAccountsCalendarEnabled $false |
Note: This only blocks new personal accounts; existing accounts remain unaffected. Microsoft is working to include previously added accounts.
3. Disable Auto-Archiving in Exchange Online
Managing mailbox storage in Exchange Online can be challenging, as mailboxes may quickly hit their limits, affecting email delivery and user productivity. Auto-Archiving in Exchange Online helps by automatically moving older items to the archive once mailbox usage exceeds 96%, ensuring smooth operations.
However, there are situations where disabling Auto-Archiving is necessary:
- Users require all emails in the primary mailbox for compliance or auditing.
- Auto-Archiving may conflict with backup or migration processes.
To disable Auto-Archiving for a mailbox, connect to Exchange Online PowerShell and run:
|
1 |
Set-Mailbox <user-smtp-address> -AutoArchivingEnabled $false |
You can replace <user-smtp-address> with the actual user’s email address.
Note: Auto-Archiving can only be disabled on a per-mailbox basis.
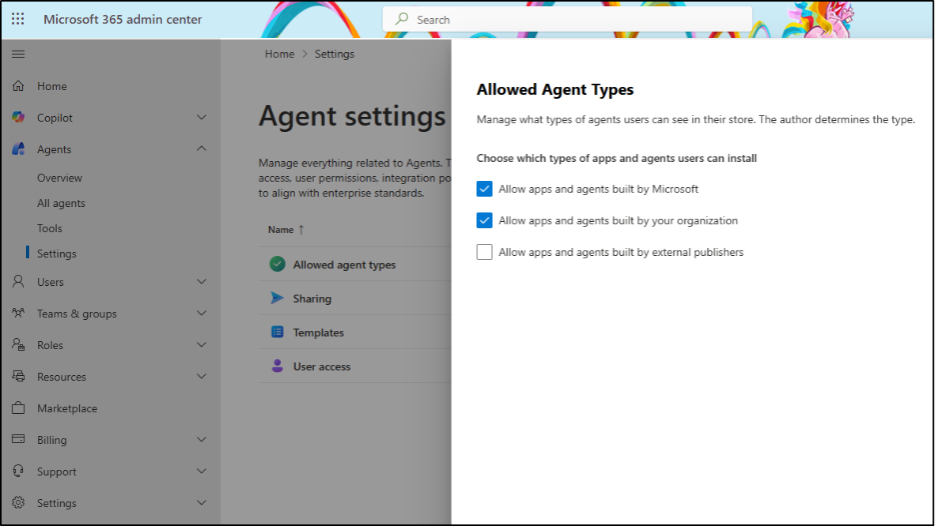
4. Disable Apps and Agents Built by External Publishers
Allowing apps and agents built by external publishers can introduce security, privacy, and compliance risks, as these solutions operate outside your organization’s direct control. External agents may access sensitive data, execute actions on behalf of users, or rely on third-party data handling practices that do not align with your internal security policies.
Disabling this setting helps ensure that only Microsoft-verified or organization-approved apps and agents are used, reducing the risk of data leakage.
- After signing into the Microsoft 365 admin center, navigate to Agents > Settings > Allowed Agent Types.
- Uncheck the option “Allow apps and agents built by external publishers”.
- Click on Save.
Microsoft 365 Security Settings Enabled by Default
The following security features are enabled by default in Microsoft 365 to provide baseline protection without requiring administrator action.
- AI providers for other large language models
- Sensitive content detection in Teams meetings
- Microsoft Graph-based What If tool for Conditional Access
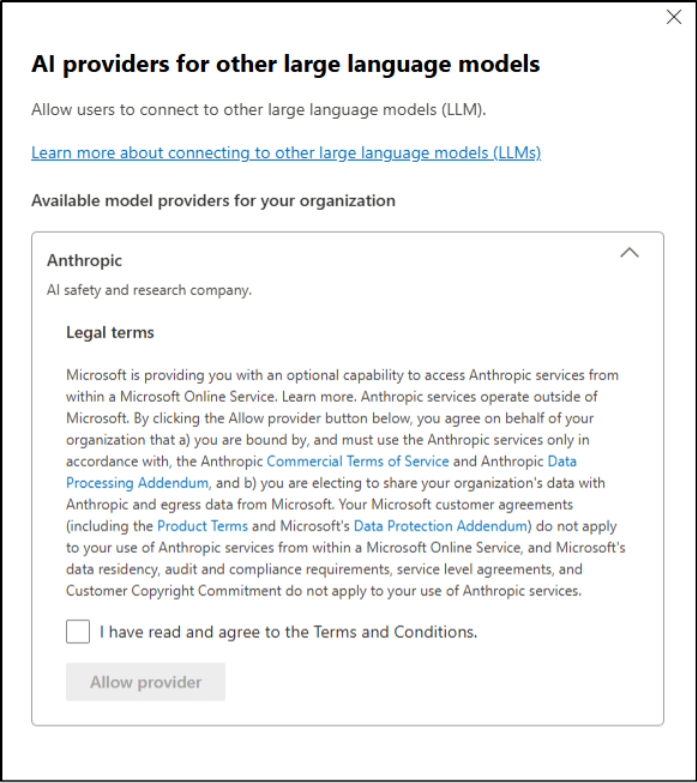
1. Disable Anthropic Claude in Microsoft 365
Microsoft 365 Copilot now includes Anthropic’s Claude models, Claude Sonnet 4 and Claude Opus 4.1, in addition to OpenAI’s ChatGPT models. While this provides more AI model options, Anthropic models are hosted outside Microsoft-managed environments and are subject to Anthropic’s Terms of Service.
Even though Anthropic models are disabled by default, you can ensure the configuration by navigating to Copilot > Settings > Data access > AI providers for other large language models in the Microsoft 365 admin center.
2. Sensitive Content Detection in Teams Meetings
Microsoft Teams meetings simplify collaboration with internal and external users, but screen sharing can sometimes lead to accidental exposure of sensitive data. To prevent this, Microsoft Teams uses predefined Sensitive Information Types (SITs) to detect such data. Organizations can also create custom SITs and use best practice configurations and Teams client health dashboards to keep meetings secure.
Sensitive content detection in meetings is a Microsoft Teams Premium feature and is enabled by default.
You can check the setting under Meetings > Meeting Policies > Select Policy > Content Protection > Detect sensitive content during screen sharing in the Microsoft Teams admin center.
3. Microsoft Graph-Based What If Tool to Test Conditional Access
Testing Conditional Access policies is essential to ensure secure and uninterrupted access. To support this, Microsoft Entra ID now includes a Graph-based “What If” Conditional Access tool, enabled by default, and powered by the What If evaluation API. While the legacy What If tool remains available, this new Graph-based version offers enhanced condition evaluation and full API integration.
You can ensure it under: Entra ID > Conditional Access > Policies > What If > Preview features > Enhanced ‘What If’ evaluation experience in Microsoft Entra admin center.
I hope this guide helped you understand the key Microsoft 365 settings to enable or disable in 2025. As Microsoft continues to introduce new capabilities and change default behaviors, staying informed is critical. Drop a comment if there’s anything we should add.


