
Microsoft 365 users use signatures in Outlook for representing company branding, professionalism, identity, and compliance in messages. Users can create signatures in Outlook clients in their own style to include logo, name, department, job title, contact details, and more. Multiple users creating different signatures often results in inconsistent formats across the organization.
To maintain a consistent and standard signature style across organization, admin can centrally deploy and enforce organization-wide signatures in Microsoft 365. Instead of relying on plain text signatures, using HTML signatures allows admins to display logos, apply rich formatting, include clickable links, and ensure a uniform appearance across all Outlook clients.
In this blog, we’ll walk you through different methods and detailed steps to create html signature in Microsoft 365.
Create HTML Signature in Microsoft 365
Admins can setup HTML signatures to maintain consistent style and professional formatting. It can be done through:
1. Create HTML Signature Using Disclaimer
In scenarios where organizations need to append a uniform signature to every outbound email, such as adding basic branding, social media links, company logo, etc – mail flow disclaimers can be an effective option. This method is useful when signatures must be applied consistently, regardless of the Outlook client or device used to send the message.
Using the ‘Apply disclaimers’ option in Exchange Online mail flow rule, admins can use their generated html code for email signatures in their M365 environment. It can be done via both Exchange Admin Center and PowerShell.
Follow the steps below to create org-wide HTML signature using disclaimers via Exchange admin center.
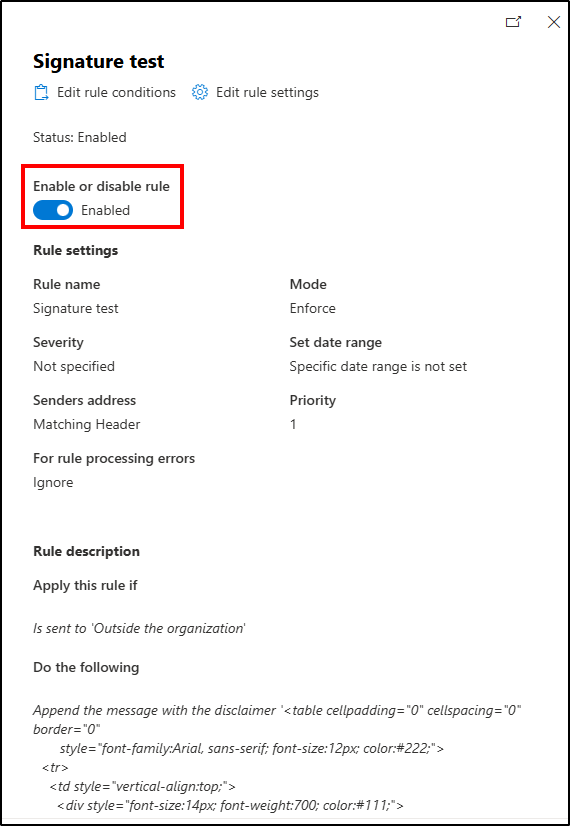
- Navigate to Exchange Admin Center –> Mail Flow –> Rules.
- Click on ‘Add a rule’ –> Apply disclaimers.
- Name your rule. Click on the dropdown under ‘Apply this rule if’ and choose ‘Apply to all messages’.
- Under ‘Do the following’, the dropdowns are configured automatically. Select ‘Enter text’ and paste your HTML code for the signature. Click Save.
- Then, click on ‘Select one’ option and select the dropdown to choose the fallback option. Click Save.
- Click ‘Next’ to configure the rule settings.
- Choose Rule mode as ‘Enforce’ and specify the Severity as you wish.
- Click ‘Next’.
- Review the rule conditions and settings. Click ‘Finish’.
- The rule will be created and listed in the mail flow rules list. Click on the rule and move the toggle to ‘Enable’ the rule.
Sample HTML Code:
|
1 2 3 4 5 6 7 8 9 10 11 12 |
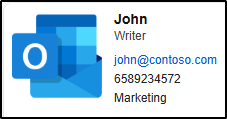
<table cellpadding="0" cellspacing="0" border="0" style="font-family:Arial, sans-serif; font-size:12px; color:#222;"> <tr> <td style="vertical-align:top;"> <div style="font-size:14px; font-weight:700; color:#111;"> %%DisplayName%% </div> <div style="color:#444; margin-top:2px;"> %%Title%% | %%Company%% </div> <div style="margin-top:8px; line-height:1.6;"> <div><a href="mailto:%%WindowsEmailAddress%%" style="color:#0b57d0; text-decoration:none;"> %%WindowsEmailAddress%% </a></div> <div> %%MobilePhone%%</div> <div> %%Department%%</div> </div> </td> </tr> </table> |
Sample Output:

Admins can also use the ‘New-TransportRule’ cmdlet to configure a HTML signature in Microsoft 365. Use the below steps to create a HTML signature that are applied when the message is sent to outside the organization.
|
1 2 3 |
Connect-ExchangeOnline $html = <use the above sample HTML code here> New-TransportRule -Name "<PolicyName>” -SentToScope NotInOrganization -ApplyHtmlDisclaimerLocation Append -ApplyHtmlDisclaimerText $html -ApplyHtmlDisclaimerFallbackAction Ignore |
Replace <PolicyName> with the required policy. If needed, you can customize the scope settings and fallback action.
Limitations of Creating Signatures Using Disclaimer Feature:
- If a signature is created using disclaimer, the signature won’t be visible directly while composing emails in Outlook clients.
- Email senders can’t view the signature in the Sent Items folders. Only the recipients can view the configured signature.
- If admins deploy a html signature and a user creates one in their Outlook, both the signatures will be displayed to the recipient. Multiple signatures in the email look unprofessional.
- If more mail flow rules are created related to the disclaimer and signature, the rule processing and the outcome will be impacted.
2. Create HTML Signature Using Exchange Online PowerShell
Creating signatures using mail flow disclaimers has several limitations, which makes it less ideal for applying a consistent, user-visible signature in Outlook. To overcome this challenge, admins can use the Exchange Online PowerShell cmdlet ‘Set-MailboxMessageConfiguration‘. This method allows signatures to be configured at the mailbox level and visible in Outlook, providing better user experience.
Before proceeding, admins must disable roaming signatures by setting the PostponeRoamingSignaturesUntilLater property. This prevents signature syncing across multiple devices and Outlook clients.
First connect to Exchange Online and run the below code. The provided sample code is for applying signature to user mailboxes and will display the company logo, username, job title, company name, email address, mobile phone, office phone, and department of a user.
|
1 2 3 4 5 6 7 8 9 10 11 12 |
$Sign = Get-Content “<HTML template file path>” -Raw $mailboxes = Get-Mailbox -RecipientTypeDetails UserMailbox -ResultSize Unlimited foreach ($mbx in $mailboxes) { $users = Get-User -Identity $mbx.Identity $HTMLsig = $Sign -replace ‘{DisplayName}’, $displayName = $mbx.DisplayName -replace ‘{Email}’, $email = $mbx.PrimarySmtpAddress.ToString() -replace ‘{JobTitle}’, $title = $user.Title -replace ‘{Deparment}’, $department = $user.Department -replace ‘{MobilePhone}’, $mobilePhone = $user.MobilePhone Set-MailboxMessageConfiguration -Identity $mbx.Identity -SignatureHtml $HTMLsig -AutoAddSignature $true -AutoAddSignatureOnReply $true } |
The above code inserts the configured user fields into the signature for all user mailboxes. You can customize the user properties as needed. Additionally, you can modify the PowerShell code to apply the signature to all mailboxes or restrict it to specific mailbox types.
Sample Signature:
Download the sample HTML code for the above signature outcome here.
Limitations of Creating Signature Using PowerShell
If admins want to change or replace the user attributes, they need to manually update the code by replacing the required attributes everytime which is time consuming and inefficient.
3. Add HTML Signature Using PowerShell Script
Generating signatures using disclaimers has several disadvantages that are challenging and less efficient approach. Using the PowerShell cmdlet ‘Set-MailboxMessageConfiguration’, you can overcome the challenges, but it requires more manual coding which is time consuming.
To resolve such challenges and make admin task efficient, we have created a script that applies HTML signatures to all mailboxes or specific mailboxes and verifies their deployment status.
Script Highlights:
- The script automatically verifies and installs the Exchange PowerShell module (if not installed already) upon your confirmation.
- Provides the option to create email signatures using HTML templates.
- Provides the option to use default or customized fields and templates.
- Allows to create an email signature for all mailboxes.
- Allows to filter and set up email signatures for user mailboxes alone.
- Allow to set up an email signature for bulk users.
- Exports signature deployment status to a CSV file.
- Supports certificate-based authentication (CBA) too.
Download Script: ConfigureHTMLEmailSignature.zip
Script Execution Steps
Run the below to execute the script:
|
1 |
./ConfigureHTMLEmailSignature.ps1 |
After connecting to Exchange Online, the script verifies the ‘Postpone roaming signature’ status in your organization to make the ‘Set-MailboxMessageConfiguration’ cmdlet work properly. If roaming signatures is enabled, the script will request to disable it using ‘PostponeRoamingSignatureUntilLater’ parameter.
Then you will be prompted to choose signature deployment using the in-built or custom template.
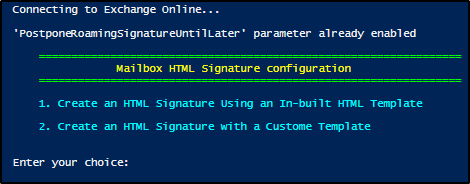
You can type 1 or 2 based on your choice and proceed with the steps for generating HTML signature.
Method 1: Setup HTML Signature Using In-built Template
While downloading the script, a HTML file will also be downloaded and saved. You can use this default HTML template to create the signature. Later, you’ll have the option to apply the signature org-wide, to user mailboxes only, or to a specific list of mailboxes provided via a CSV file.
Sample in-built HTML template:
Admins can use the above in-built template to deploy consistent signature within the organization. Respective user details will be included while setting up the signature and users can view it in Outlook.
You can view the preview of signature and provide confirmation for deployment. Enter the values for signature fields like logo, social media links, and website link.

Sample Output:

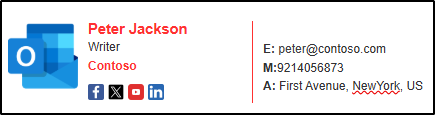
Method 2: Configure HTML Signature Using Custom Template
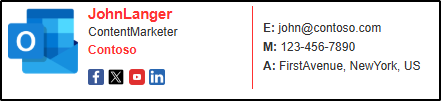
If you want to use the customized HTML signature with various styles and formatting, you can generate a HTML code or use any downloaded template. You must save the customized template file in the same location where the script is downloaded and saved. Ensure you have configured the customized template with the real organization details like username: JohnLanger, job title: marketer, company name: Contoso, etc., as shown below.
Sample custom HTML template:

You can download the custom HTML code for the above signature outcome.
While script execution, you should give the custom HTML file path and you can choose the desired user properties to map the exact values in your customized template.

You need to enter the values of the selected properties as available in the custom signature file. So, the dynamic user values in Microsoft Entra will be displayed in the exact place in the signature. Remaining properties in your customized HTML template remain same.
Sample Output:
Here, the username, email address, mobile phone, and department will have dynamic user values and other values remain same.
Add Email Signature for Microsoft 365 Mailboxes
Using this script, you can add signature to all mailboxes, bulk mailboxes, or user mailboxes as per your requirement. After entering the values for the signature fields, you will be prompted to choose signature deployment for mailboxes.
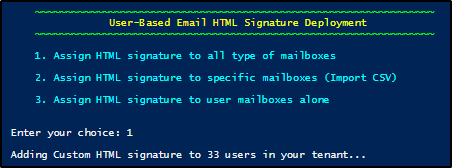
You can enter your choice, and the signature deployment will begin immediately for your tenant.
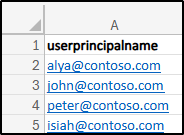
For bulk mailboxes (choice 2), You will be asked to provide the input CSV file path. Create a CSV file with the required users as shown below.
Sample Input:
Advantages of Using PowerShell Script:
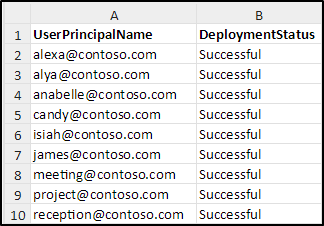
- You can view the deployment status report to identify whether the signature is deployed successfully or not.
- The configured signature will be viewed by users while composing email in Outlook.
- Easily configure and customize signature fields by simply selecting and providing the values, reducing manual effort.
- Once the script is executed successfully, it exports the email signature deployment status report automatically as a CSV file.
What if Your HTML Email Signature Not Displaying Correctly?
For various reasons, your html email signature will not be displayed properly, especially images. It might be due to any of the below:
- If the sender is not in the recipients’ Safe senders list, the image will not be shown by default. Once the recipient confirms to view the image or adds the user in their safe senders list, the image will be displayed in Outlook.
- If the user properties used in the signature has no value for a user, the signature might not be displayed as you expected. It will show with unwanted blank spaces.
- If the user uses the older versions of Outlook clients, the HTML signature might not be displayed properly.
I hope this blog helps admins to understand several ways of creating signature along with their pros and cons. Let us know how you configured signature in your organization and what is your go-to method through the comments section.


