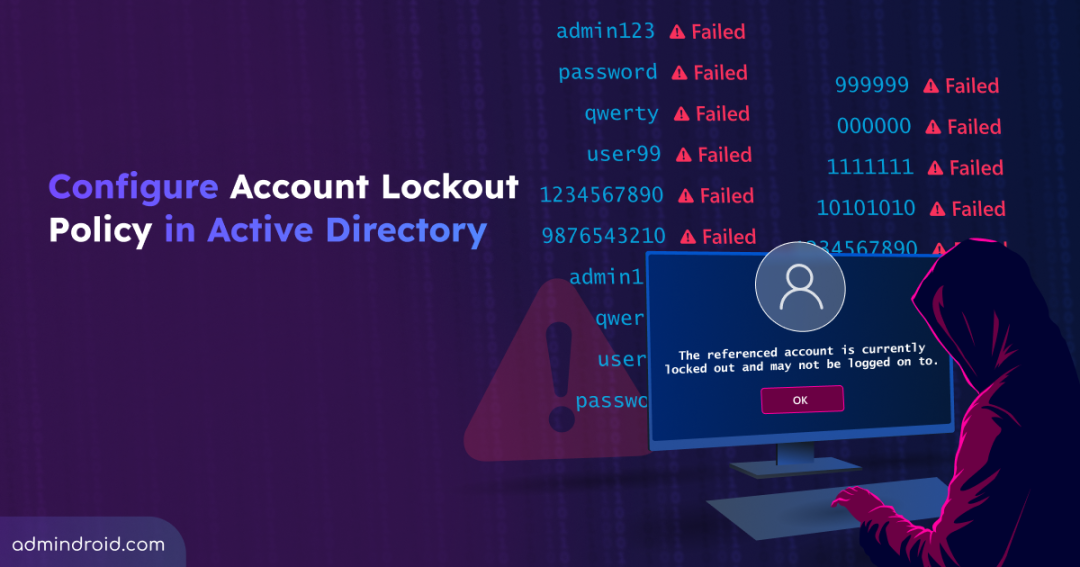
In Active Directory environments, authentication happens constantly—users signing in to their devices, accessing file servers, or connecting to business applications. Every sign-in attempt is a trust decision, and when those attempts fail repeatedly, it’s often a sign that something isn’t right.
Sometimes, the cause is harmless—users forgetting passwords and retrying multiple times. In other cases, it’s far more concerning. Attackers may attempt to crack accounts using common password patterns, username variations, or previously leaked credentials. Without a mechanism to stop repeated authentication failures, attackers are given unlimited time to guess passwords, allowing unauthorized access to occur quietly and quickly.
That’s where the Active Directory Account Lockout Policy plays a critical role. By temporarily locking accounts after a defined limit of failed sign-in attempts, it cuts off attack paths before credentials can be guessed.
In this blog, let’s take a closer look at the Active Directory Account Lockout Policy and how to configure it effectively to prevent brute-force attacks.
What is an Account Lockout Policy in Active Directory?
An Account Lockout Policy in Active Directory is a built-in security policy that defines when and for how long a user account should be locked out after repeated failed sign-in attempts. It controls how the system responds when an incorrect password is entered, based on the configured lockout threshold.
By limiting the number of allowed logon failures, the policy helps prevent potential attacks such as credential stuffing, dictionary attacks, password spraying, and rainbow table attacks where attackers try to crack user’s password. Once the defined threshold is reached, the account is temporarily locked, stopping further sign-in attempts and reducing the risk of unauthorized access.
Additionally, account lockouts can also act as an early warning sign. When a legitimate user encounters an unexpected locked out, it may indicate suspicious or malicious activity, prompting administrators to investigate a potential attack.
The Account Lockout Policy is controlled by a set of four key settings. These policy settings determine when an account is locked, how long it remains locked, and how failed sign-in attempts are tracked. By configuring the following policy settings, you can balance user convenience with protection against brute-force attacks.
- Account lockout threshold
- Account lockout duration
- Reset account lockout counter after
- Allow Administrator account lockout
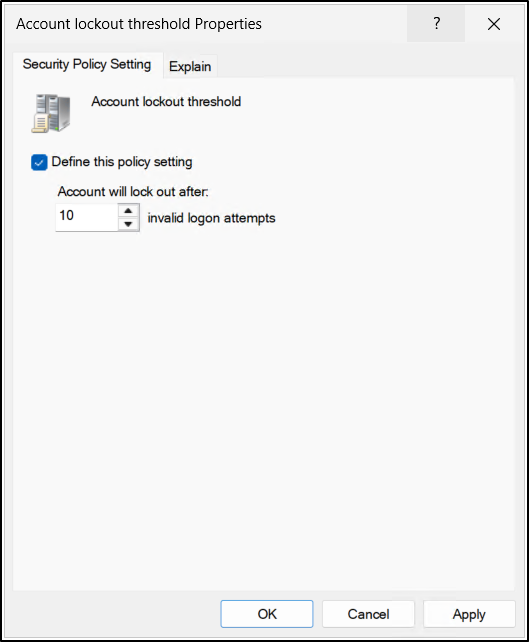
Account Lockout Threshold
This security setting determines how many consecutive failed sign-in attempts are allowed before a user’s account is locked. The lockout threshold can be set to any value between 0 and 999.
Setting the threshold to 0 disables account lockout entirely, meaning the account will never be locked regardless of how many incorrect passwords are entered.
Each unsuccessful logon increments the badPwdCount attribute on the user object. When the number of failed attempts reaches the configured Account lockout threshold, the account is automatically locked. Once locked, the account cannot be used to sign in until the lockout duration expires, or an administrator manually unlocks it.
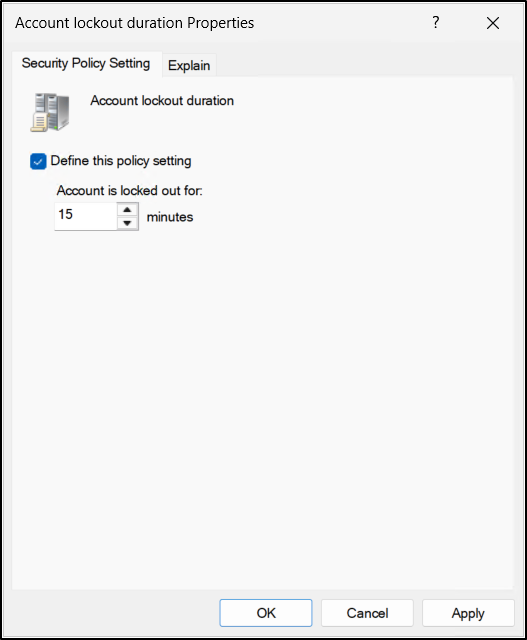
Account Lockout Duration
This policy setting defines how long a user account remains locked after it exceeds the configured number of failed sign-in attempts. The duration is measured in minutes and can be set anywhere between 0 and 99,999 minutes.
When the Account lockout duration policy setting is configured with a value greater than 0, the account is automatically unlocked once the specified time has passed. However, setting this value to 0 disables auto release capability, requiring an administrator to manually unlock the account.
This policy setting is dependent on the Account lockout threshold policy setting that is defined. In addition, the lockout duration must be greater than or equal to the value specified for the Reset account lockout counter after setting. This ensures that the account remains locked long enough for failed sign-in attempts to be properly evaluated.
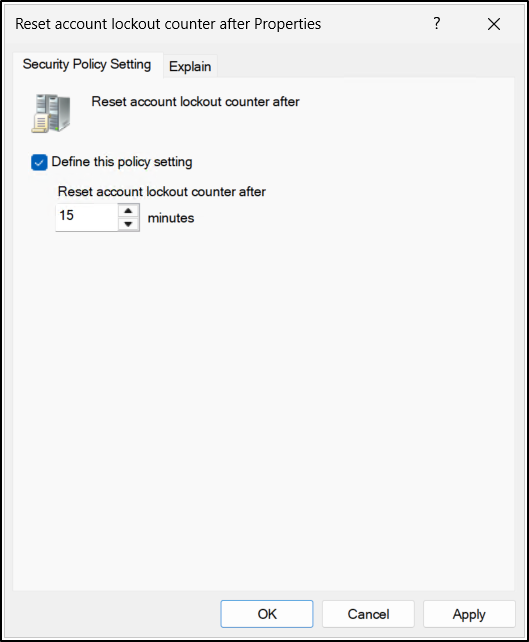
Reset Account Lockout Counter After
This security setting controls how long Active Directory waits before clearing the failed sign-in counter after an unsuccessful logon attempt. The timer starts after the last failed sign-in, and once the specified period has passed, the failed logon count is reset to zero. The value for this setting can be configured between 1 and 99,999 minutes.
When the threshold is configured, the value specified for Reset account lockout counter after must be less than or equal to the configured Account lockout duration. If the lockout duration is set to a value that is too high relative to the lockout threshold, users who reach the threshold may be locked out for an unnecessarily long period.
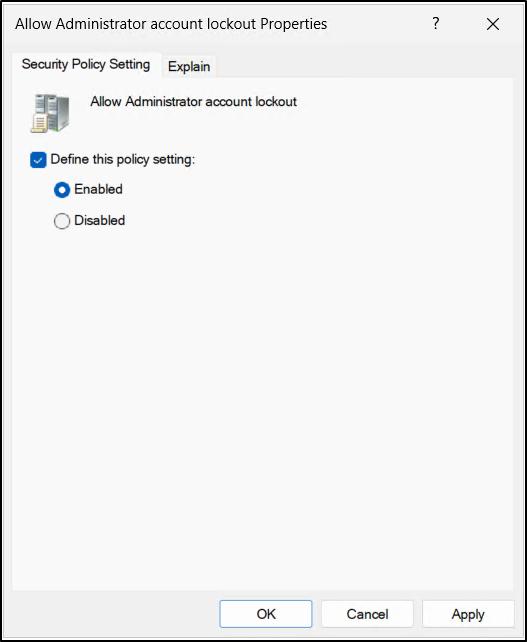
Allow Administrator Account Lockout
For a long time, the built-in local Administrator accounts on workstations and member servers was excluded from account lockout policies by design. While this ensured that administrators were never locked out, it also created a serious security gap, leaving the most privileged local account vulnerable to unlimited brute-force password attempts.
To address this risk, Microsoft introduced the Allow Administrator account lockout policy setting in the October 11, 2022 or later Windows cumulative updates. When enabled, this setting brings the built-in Administrator accounts under the same domain or local account lockout policy as other users.
For environments running new installations of Windows 11, version 22H2 or later, this protection is enabled by default. This helps organizations strengthen their baseline security posture without additional configuration.
The Account Lockout Policy settings discussed above are closely interrelated, and the behavior of each setting often depends on the values configured for the others. Therefore, the following table provides a summary of the dependency between these policy settings.
| Policy Setting Name | Logic Requirement |
| Account lockout threshold | Must be set to a value greater than 0 to enable account lockout. This setting is the prerequisite for the other lockout settings. |
| Account lockout duration | Account lockout threshold policy setting should be defined. This policy value must be greater than or equal to the Reset account lockout counter after value. |
| Reset account lockout counter after | Applies only when the lockout threshold is configured. The value must be less than or equal to the Account lockout duration value. |
Prerequisites to Configure Active Directory Account Lockout Policy
Before setting up the Account Lockout Policy in Active Directory, make sure the following requirements are in place:
- You must have sufficient privileges to manage Group Policy Objects. Typically, users who belong to the Domain Admins or Enterprise Admins groups already have the necessary permissions.
- You also need access to a domain controller or a member server/workstation that has the Group Policy management tools installed.
- On workstations, this requires installing the RSAT package with the Group Policy Management feature enabled.
- On member server systems, the Group Policy Management tools can be added through Server Manager.
How to Manage Account Lockout Policy in Active Directory
You can manage Account Lockout Policy settings using any one of the following methods.
Set Account Lockout Policy Using Group Management Console
You can enable and modify the Account Lockout Policy settings in a domain using the Group Policy Object (GPO). Follow the steps to enable Account Lockout Policy on your domain.
- Open Server Manager and navigate to Tools → Group Policy Management, then expand the forest node.
- Choose the domain where you want to configure the account lockout settings and expand it to view the linked Group Policy Objects (GPOs).
- Right-click on the Default Domain Policy and select Edit to open the Group Policy Management Editor.
- In the GPM editor, navigate to Computer Configuration → Policies → Windows Settings → Security Settings → Account Policies → Account Lockout Policy.
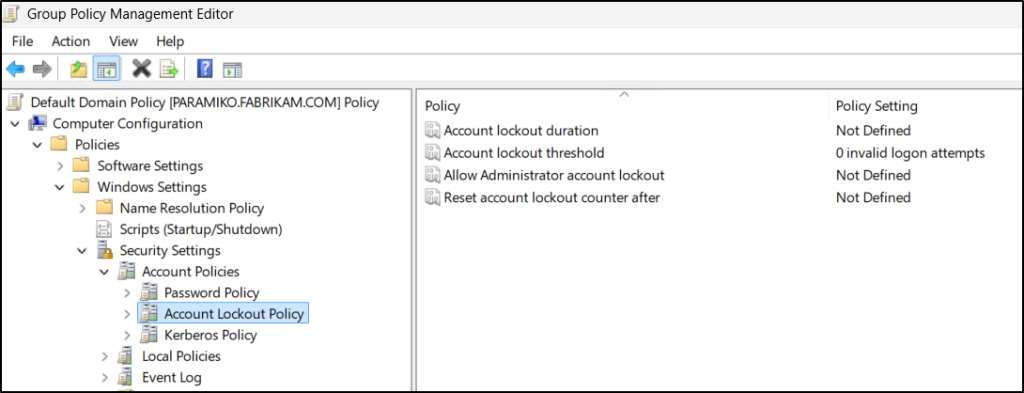
- Double-click the Account lockout threshold setting. Then, under Security Policy Setting tab, select Define this policy setting, enter the required no. of invalid logon attempts you wish to configure, and click Apply.
- Once you click on apply, a pop-up will appear, suggesting values for other policy settings like lockout duration, lockout counter after, and admin account lockout.
- Click OK to accept the suggested values for these remaining policy settings and again click OK to close this setting window.
- Similarly, you can change the remaining settings from suggested values to your organization’s requirements.
Note: If you don’t want to modify default domain policy, you can create a GPO at the domain level and enable the Account Lockout Policy settings.
If you’re configuring in a hybrid identity environment, align your Active Directory lockout settings with Microsoft Entra ID Smart Lockout. Set the Active Directory Domain Services (AD DS) lockout threshold higher than the Entra ID threshold (for example, 10–15 in AD DS if Entra ID is 5). Also, ensure the Entra ID lockout duration is longer than the on-premises AD DS duration to prevent repeated attack attempts from reaching Active Directory.
Modify Account Lockout Policy Using PowerShell
When configuring Account Lockout Policy through Group Policy Editor, applying changes to one setting triggers automatic suggested values for the other settings. This can make the process time-consuming, as you must repeatedly edit those suggested values as well.
To avoid this, you can use the following cmdlets to simply update each policy setting directly.
Before making any changes, verify the existing Account Lockout Policy settings by running the cmdlet below, replacing <YourDomain> with your actual domain FQDN.
|
1 |
Get-ADDefaultDomainPasswordPolicy -Identity "<YourDomain>" | Select-Object LockoutObservationWindow, LockoutDuration, LockoutThreshold | fl |
Use the following PowerShell command to configure the Account lockout threshold, Lockout Duration, and Reset Account Lockout Counter for the default domain password policy.
|
1 |
Set-ADDefaultDomainPasswordPolicy -Identity "<YourDomain>" -LockoutThreshold <ThresholdValue> -LockoutDuration (New-TimeSpan -Minutes <Duration>) -LockoutObservationWindow (New-TimeSpan -Minutes <ObservationWindowDuration>) |
Replace <YourDomain> with you domain name, <ThresholdValue> with the number of allowed failed sign-in attempts, and <Duration> with the lockout duration (in minutes). Replace <ObservationWindowDuration> with the time window (in minutes) after which failed sign-in attempts are reset.
Fine-Grained Password Policies for Account Lockout
The domain password and account lockout policy can only be defined at the domain level, which means the same rules apply to every user in the domain. While this approach is easy to manage, it doesn’t account for different risk levels. For example, privileged or service accounts often require stricter lockout controls than regular users.
Fine-Grained Password Policies (FGPPs) solves this limitation by allowing you to apply custom account lockout settings to specific users or groups. This makes it possible to enforce stricter lockout thresholds for high-risk accounts while maintaining user-friendly settings for standard users.
Unlike domain policies configured through GPOs, FGPPs can override domain lockout policy settings for specific users or groups, providing more granular control.
Fine-Grained Password Policies can be configured either in the GUI interface or PowerShell.
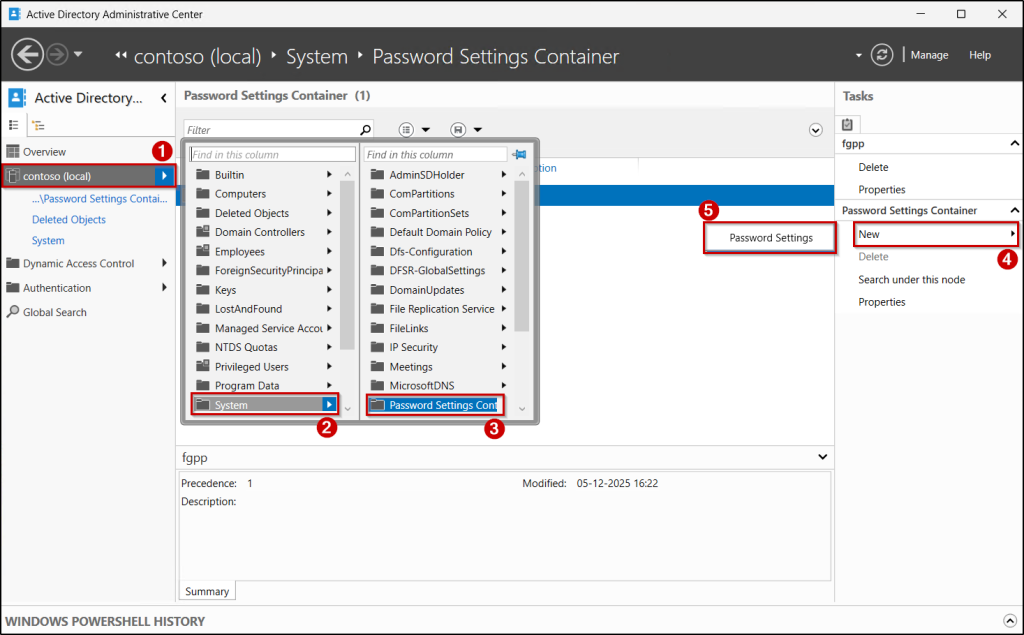
Set Account Lockout in FGPP via Active Directory Administrative Center
You can configure Fine-Grained Password Policies using the Active Directory Administrative Center (ADAC). This is done by creating Password Settings Objects in the Password Settings Container.
Follow these steps to configure role-based account lockout settings in Active Directory:
- Open the Active Directory Administrative Center (ADAC), select your domain, and go to System → Password Settings Container.
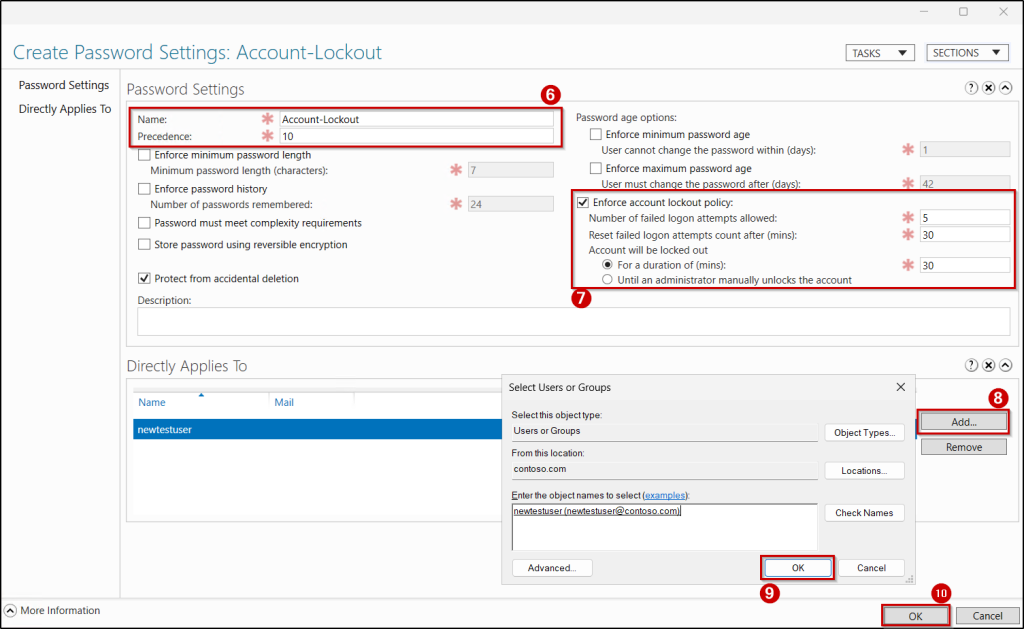
- From the top-right menu, click New → Password Settings, enter the name and precedence for your policy.
- Then, select Enforce account lockout policy in the Password Settings.
- Define the required account lockout values, such as the lockout threshold, lockout duration, and reset counter time.
- Assign the policy to the intended users or security groups by clicking Add in the Directly Applies To section.
- Finally, click OK to save and apply the policy.
Create Account Lockout in Fine-Grained Password Policy Using PowerShell
Import the Active Directory module in PowerShell and run the following command to create a fine-grained password policy focused on account lockout in Active Directory.
|
1 |
New-ADFineGrainedPasswordPolicy -Name "<PolicyName>" -Precedence <PrecedenceValue> –LockoutThreshold <ThresholdValue> -LockoutDuration (New-TimeSpan -Minutes <Duration>) -LockoutObservationWindow (New-TimeSpan -Minutes <ObservationWindowDuration>) |
To assign the policy to the specific user or group, execute the cmdlet below.
|
1 |
Add-ADFineGrainedPasswordPolicySubject -Identity "<PolicyName> " -Subjects "<UserorGroup>" |
Before executing the cmdlets, replace the placeholders with their appropriate values.
How to Find Locked Out Accounts in Active Directory
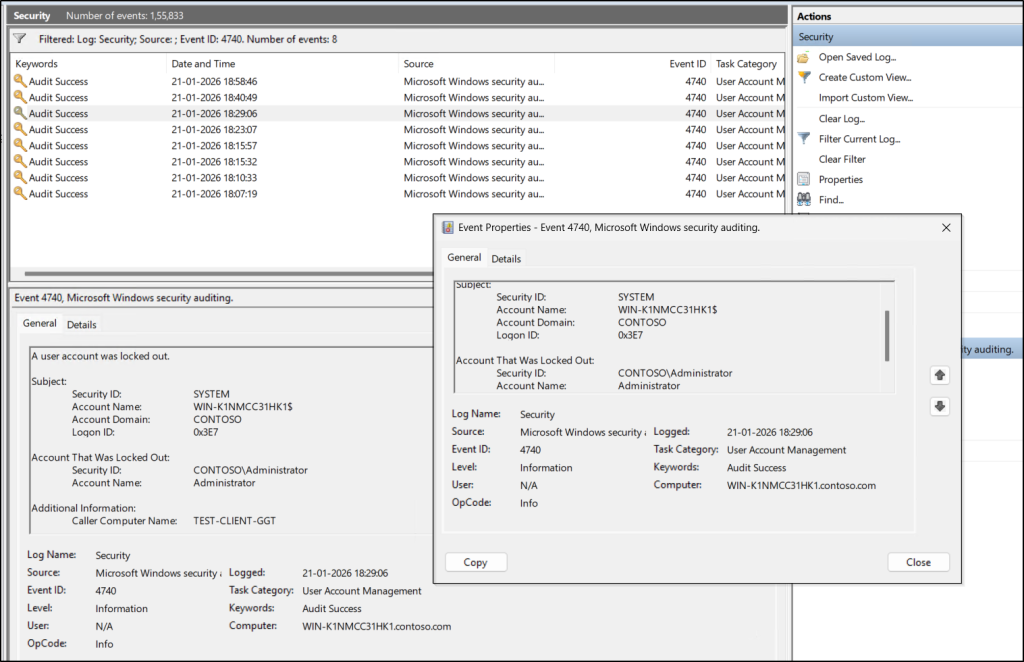
When a user account is locked in Active Directory, the event is recorded in the Security log of the primary domain controller (PDC) as Event ID 4740.
To capture these events, first ensure appropriate audit policies such as account lockout and logon/logoff are enabled in the Default Domain Controllers Policy. Then, follow the steps below to audit the account lockout events.
- Open Server Manager, go to Tools → Event Viewer and from the left pane, navigate to Windows Logs → Security.
- From the Actions pane on the right, select Filter Current Log and enter 4740 in the Event Id field, and click OK.
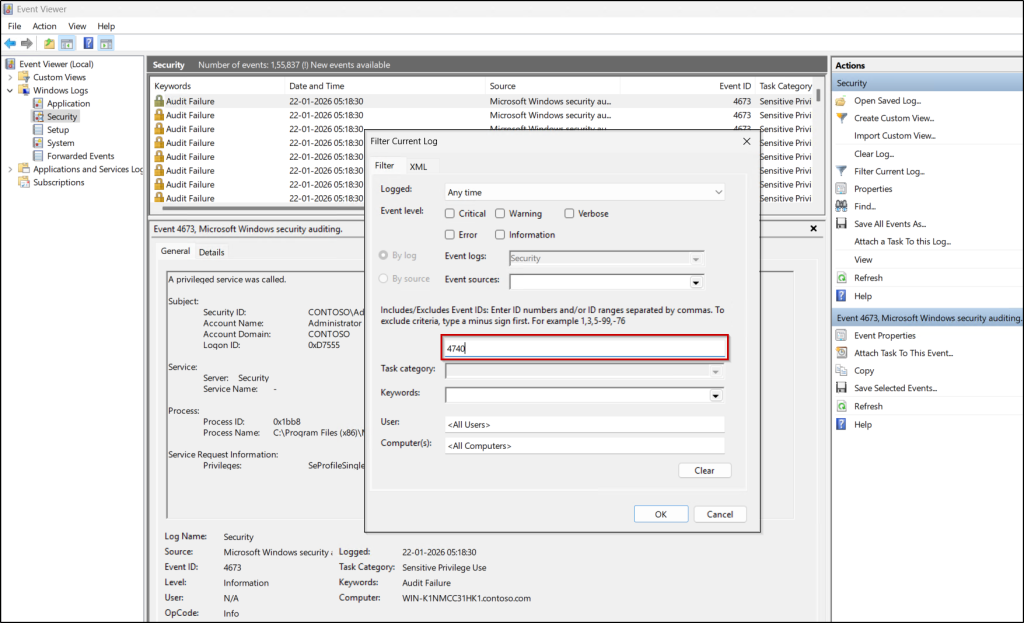
It will list all account locked events in Active Directory. Click on any event to view more details, such as the caller computer name and username, then investigate the corresponding client computer to identify the lockout source and cause.
Instead of navigating through multiple menus, you can quickly identify all locked-out accounts in the domain by running the following PowerShell cmdlet.
|
1 |
Search-ADAccount -LockedOut | Select-Object Name, SamAccountName, DistinguishedName |
Unlock Locked Out Accounts in Active Directory
To unlock those locked out accounts, you can use ADUC console or PowerShell cmdlet.
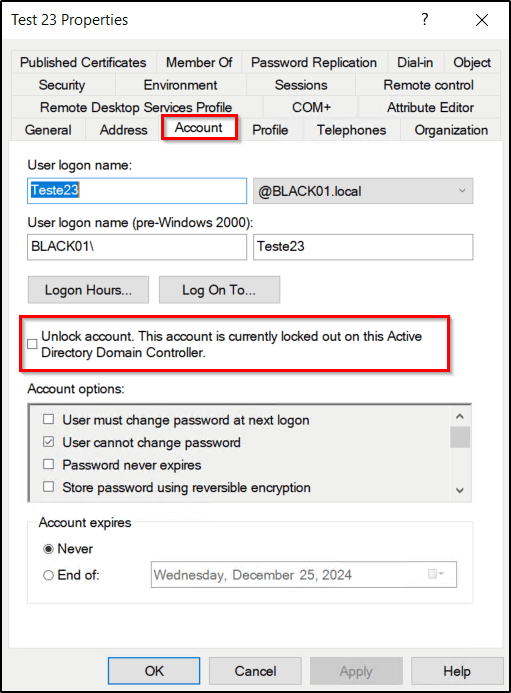
- In the domain controller, navigate to the Server Manager → Tools → Active Directory Users and Computers.
- Locate the locked user, right-click the user, select Properties → Account tab.
- Here, select the “Unlock account. This account is currently locked out on this Active Directory Domain Controller.” checkbox.
If you want to unlock a user using PowerShell, simply run the below cmdlet by replacing <Username> with any of his identity attribute value.
|
1 |
Unlock-ADAccount -Identity "<Username>" |
To unlock all currently locked accounts in a domain, you can use the following cmdlet.
|
1 |
Search-ADAccount -LockedOut | Unlock-ADAccount |
Best Practices for Active Directory Account Lockout Policy
While account lockout policies can protect against brute-force attacks, misconfigured settings are often exploited to create denial-of-service (DoS) attacks. For instance, attackers can intentionally submit incorrect passwords repeatedly for a specific account, triggering the lockout threshold. If the Account lockout duration is set to 0, the account remains locked until manually unlocked, potentially overwhelming admin with unlock requests.
To implement account lockout policies effectively while minimizing disruption, it is recommended to follow these best practices:
- Appropriate Account Lockout Threshold
- Avoid extremely low thresholds that lock users out after just a few failed attempts.
- Microsoft recommends 10 failed logon attempts as a balanced starting point.
- Thoughtful Account Lockout Duration
- Too long a duration can inconvenience users, while too short a duration may allow attackers to retry quickly.
- Microsoft recommends 15–30 minutes as a practical balance. Setting the value to 0 keeps the account locked until manually unlocked, which should only be used in very controlled scenario.
- Reset Account Lockout Counter
- A typical recommended value is 15–30 minutes, aligned with the lockout duration, to reduce accidental lockouts while still deterring brute-force attacks.
- FGPPs for privileged users
- Apply stricter policies only to high-privilege or sensitive accounts to reduce the risk of widespread lockouts affecting all users.
Conclusion
We hope this blog has helped you understand how to configure and manage Account Lockout Policies in Active Directory. By combining thoughtful lockout settings, fine-grained policies for high-risk accounts, and hybrid protections like Microsoft Entra ID Smart Lockout, organizations can significantly strengthen their identity security posture. Stay tuned for more practical guidance and best practices to help you protect your Active Directory and Microsoft 365 environments from evolving threats.


