
On Day 1 of Cybersecurity Awareness Month, discover how to boost your Secure Score by 12 points with just three easy settings. Stay tuned for more blogs in the Cybersecurity blog series.
It’s Cybersecurity Awareness Month 🛡️, and we’re kicking things off with something every organization needs: simple Microsoft 365 security configurations that deliver big results. Over the 30 days, we’ll be sharing practical tips through our Cybersecurity blog series to help secure your organization. Stay tuned and follow along as we share these essential insights!
Today, we’re starting with three quick changes to boost your Microsoft Secure Score—no heavy lifting required. Trust me, it’s as easy as flipping a switch! Best of all, these are completely free, with no additional licenses required, making them accessible even for small businesses.
Let’s break down the three easy steps to increase your Secure Score by up to 12 points.
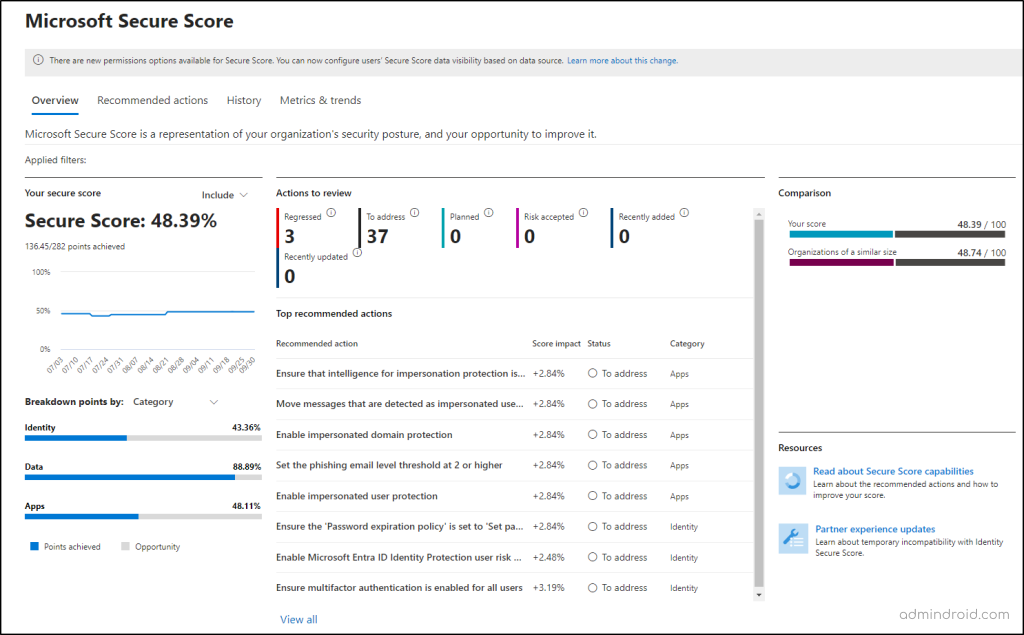
Microsoft Secure Score – A Quick Glance
Before diving into the tips, let’s give a quick overview of the Microsoft Secure Score.
- Essentially, Microsoft Secure Score in Defender is a measurement of your organization’s security posture, with points awarded for implementing security best practices.
- The higher your score, the better protected your organization is against vulnerabilities in M365.
- Each recommended action is worth up to 10 points, and completing it gives you the full score. Some actions award partial points based on how much of the task is done.
What is a Good Microsoft Secure Score?
A good Secure Score varies by user count, industry, and licenses. Microsoft recommends aiming for 80%, though small businesses may find 100% challenging without additional licenses. For example, a nonprofit with under 100 users might have an acceptable score of around 44%.
Curious about your organization’s security standing? Follow these steps to check your Microsoft Secure Score:
- Go to the Microsoft Defender portal.
- In the left navigation, select Exposure management -> Secure Score.
How to Improve Microsoft Secure Score Easily by 12 Points?
Implementing these Microsoft Secure Score recommendations is a simple way to strengthen your organization’s defenses:
- Ensure external sharing of calendars is not available
- Ensure third party integrated applications are not allowed
- Only invited users should be automatically admitted to Teams meetings
1. Ensure External Sharing of Calendars is Not Available
💻 Product: Exchange Online
✅ Microsoft Secure Score Points Gained: 5
Why Microsoft Recommends This Action:
An often-overlooked area is external calendar sharing, which can expose your organization to security risks if users share their calendar details with external parties. By default, this setting is enabled, so do not allow Exchange Online calendar details to be shared with external users to protect sensitive information and reduce potential risks.
While many organizations allow users to share calendar availability (free/busy times) externally, Microsoft’s Secure Score still flags this as a potential risk. This is because, in some cases, shared calendars may inadvertently expose more than intended, such as meeting titles or details, which could pose security threats. The recommendation to disable external calendar sharing stems from the potential exposure of sensitive information, even if only free/busy times are shared.
How to Turn Off Calendar Sharing with External Users?
To prevent external sharing of calendars, follow the steps below.
- Open the Microsoft 365 admin center.
- Navigate to ‘Org settings’ under ‘Settings’.
- Under the ‘Services’ tab, select ‘Calendar’.
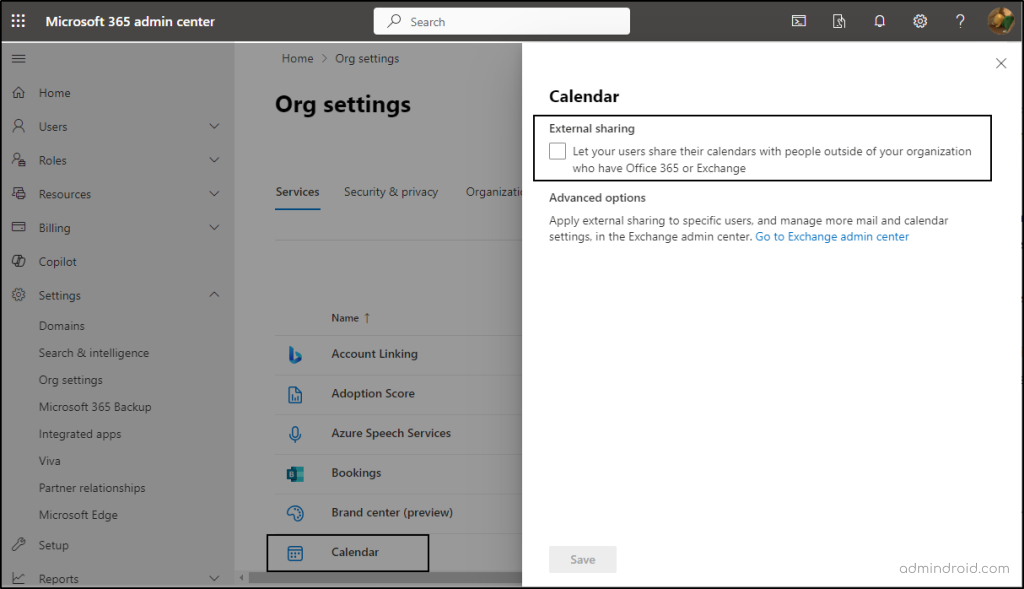
Here, uncheck the “Let your users share their calendars with people outside of your organization who have Office 365 or Exchange” option -> Then, save.
Disable External Calendar Sharing Policy Using PowerShell
Sharing policies in Exchange Online also determine how users can share their calendars with people outside your organization. If you’ve established any policies in Exchange that permit calendar sharing with external users, you can disable these policies to restrict external access.
To do this, connect to Exchange Online and run the following cmdlet:
|
1 |
Set-SharingPolicy -Identity "<Policy name>" -Enabled $False |
In certain cases, you can allow calendar sharing with specific external domains while disabling it for others. While disabling calendar sharing for external users entirely earns you full points, enabling it for specific trusted domains will still result in a slight deduction. If you want to remove calendar permissions in Outlook for specific external uses, you can use the Remove-MailboxFolderPermission command
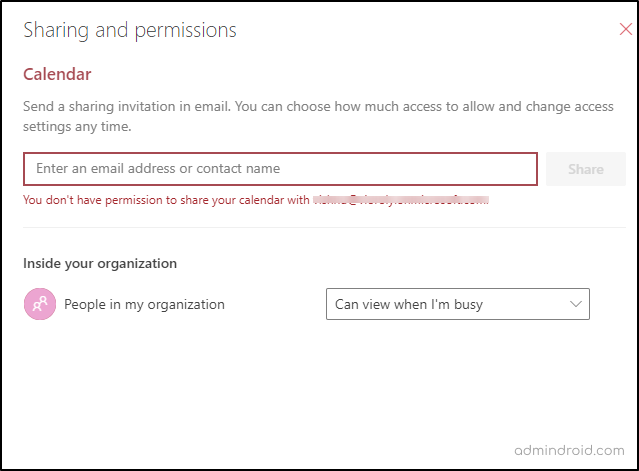
Result:
As a result, when a user in your organization tries to share a calendar with people outside the organization, they will receive the following error.
“You don’t have permission to share your calendar with user@contoso.com”
2. Ensure Third Party Integrated Applications Are Not Allowed
💻 Product: Microsoft Entra ID
✅ Microsoft Secure Score Points Gained: 5
Why Microsoft Recommends This Action:
Allowing third-party integrated applications to connect to your services poses significant security risks. While these applications can offer valuable functionality, they can also be exploited by attackers. If an attacker gains access to a compromised account, they can authorize third-party applications. This opens the door to OAuth token theft, potentially allowing the attacker to exfiltrate sensitive data from your organization.
Therefore, it’s essential to disable access for third-party applications unless there’s a compelling reason and robust security controls to manage their use. Restricting third-party app access significantly reduces the risk of unauthorized data exposure. However, it may limit integration options for users and impact usability, so this decision should be considered carefully.
How to Block Registering Third Party Integrated Applications?
To disable third party integrated applications in your organization, follow the steps below.
- Go to the Microsoft Entra admin center.
- Navigate to Users -> ‘Users settings’.
- Locate ‘Users can register applications’ option under ‘Default user role permissions’.
- Toggle the button to No. Then, save.

3. Only Invited Users Should Be Automatically Admitted to Teams Meetings
💻 Product: Microsoft Teams
✅ Microsoft Secure Score Points Gained: 2
Why Microsoft Recommends This Action:
Automatically admitting users who are not invited to a meeting can expose your organization to several security vulnerabilities. If uninvited participants gain access, they may inadvertently overhear sensitive discussions, view confidential documents, or even share inappropriate content. This could lead to data leaks and damage to your organization’s reputation.
- To control who can bypass the meeting lobby in Microsoft Teams, it’s essential to ensure that only invited users are automatically admitted to meetings.
- By placing uninvited users in a meeting lobby, the host retains the authority to decide whether to grant them access.
This additional layer of control boosts confidentiality and improves Microsoft Teams meeting security. It ensures that only authorized personnel participate in critical conversations, significantly reducing the risk of unwanted intrusions and data exposure.
How To Allow Only Invited Users to Be Automatically Admitted to Teams Meetings?
Follow the steps below to allow only invited users to be automatically admitted to teams’ meetings.
- Open the Microsoft Teams admin center.
- Select ‘Meeting policies’ under ‘Meetings’.
- Choose the group/direct policy.
- Under ‘Meeting join & lobby’, toggle ‘Who can bypass the lobby’ to ‘People who were invited’.
- Save the changes.
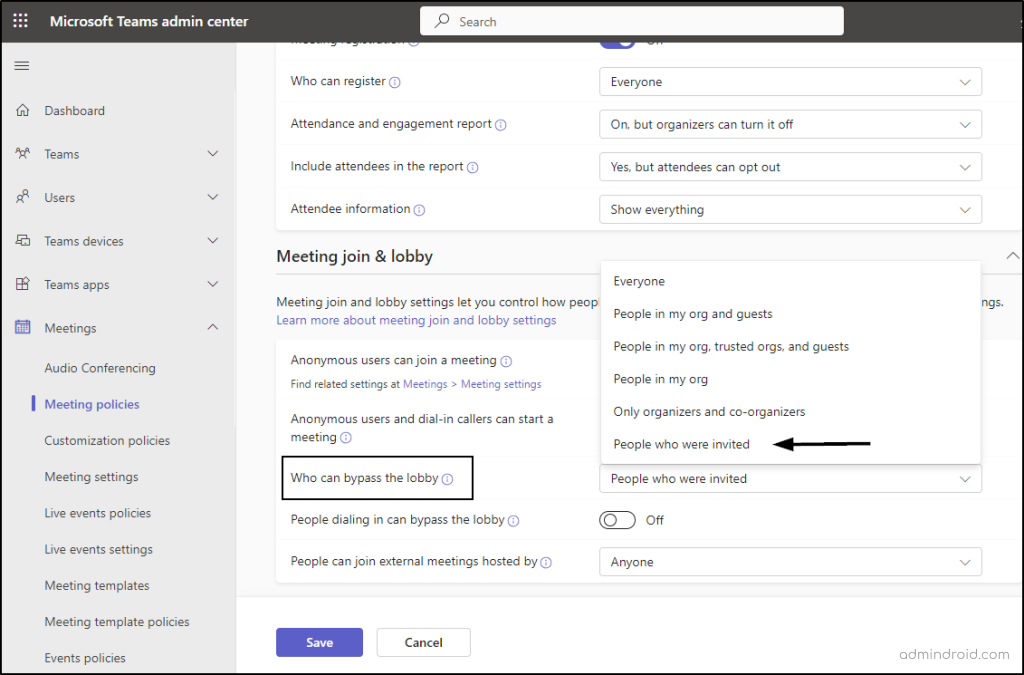
Note: Be sure to update this setting for all policies to achieve the complete score.
Automatically Allow Only Invited Users into Teams Meetings Using PowerShell
To automatically admit only invited users in Teams meetings using PowerShell, run the following cmdlet after connecting to Microsoft Teams PowerShell.
|
1 2 3 4 5 |
$policies = Get-CsTeamsMeetingPolicy foreach ($policy in $policies) { Set-CsTeamsMeetingPolicy -Identity $policy.Identity -AutoAdmittedUsers "InvitedUsers" Write-Host "Updated policy: $($policy.Identity) to AutoAdmittedUsers = InvitedUsers" } |
This cmdlet updates the value of “Who can bypass the lobby” as ‘People who were invited’ for all the custom policies created in your Teams environment.
That’s a wrap! We hope this blog has provided valuable insights to enhance your Secure Score and strengthen your Microsoft 365 security. Thank you for reading! Keep an eye out for our upcoming blog series—we’re excited to share more with you soon.
| It’s not if, but when a cyber-attack will happen! 🔐 |


