As administrators, many of us are well-acquainted with access reviews in Microsoft Entra. Access reviews in Microsoft Entra streamline the management of group memberships, access to enterprise applications, and role assignments for organizations. These reviews ensure that only authorized individuals maintain access to essential resources and applications.
Expanding on these access reviews, Microsoft introduced a significant enhancement by incorporating access reviews for Privileged Identity Management (PIM) groups. This feature is currently in preview. These reviews improve security and compliance by assessing the members of PIM groups.
In this blog, we’ll delve into the process of creating an access review of PIM for groups in Microsoft Entra ID.
Requirements to Create a PIM for Groups Access Review
To establish access reviews on PIM for groups, certain prerequisites must be met.
- Microsoft Entra ID Governance License
- One of the given roles is required to create access reviews on PIM for groups.
- Global Administrators
- Privileged Role Administrators
How to Create Access Reviews of PIM for Groups?
Access reviews for PIM groups thoroughly assess both active and eligible members within the PIM group. This includes evaluating individuals active at the time the review is initiated. The ongoing process consistently validates and revokes unauthorized access, ensuring only the right individuals have access.
Creating access reviews for PIM groups in Microsoft Entra involves three key steps:
- Create a new access review and specify the review type
- Assign reviewers to your access reviews of PIM for groups
- Configure access review settings for PIM groups in Microsoft 365
1. Create a New Access Review and Specify the Review Type
To initiate access reviews, the initial step involves selecting the review type. Creating access reviews for PIM groups involves specifying the review type as groups. Let’s explore the process using the steps provided.
- Sign in to the Microsoft Entra admin center with an Identity Governance Administrator privilege.
- Navigate to the Identity Governance section and choose “Access reviews” within that category.
- Click on the “+New access review” option.
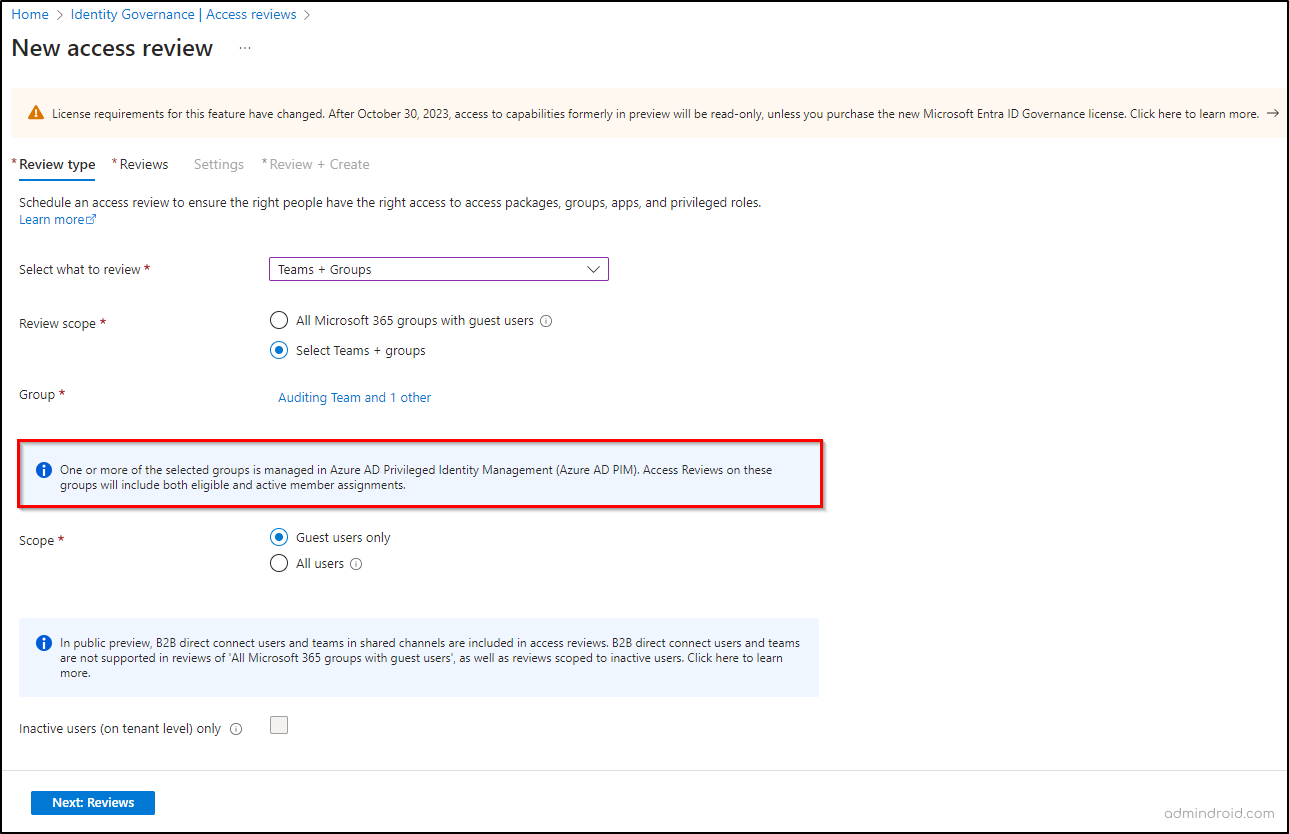
- From the “Select what to review” drop-down, opt for “Teams + Groups.”
- Next, within the “Review scope”, pick “Select Teams + groups.” This activates the ‘Group‘ option, prompting you to choose groups by clicking “Select groups.”
- After choosing your PIM-managed groups, the next step is to set the scope for the access review. Your options include:
- Guest users only: Choosing this option limits the access review to Microsoft Entra B2B guest users in your directory, offering a focused approach specifically addressing external entity access.
- All users: This choice ensures a comprehensive access review for all users linked to the resource, including both internal and external users.
NOTE: To conduct a group membership review, you can initiate access reviews for inactive users within the group. You need to simply check the ‘Inactive users (on tenant level) only‘ box within the ‘Scope’ setting. When this option is selected, the review will specifically target inactive users within the group who haven’t signed in, either interactively or non-interactively. You will also be able to pick the duration for account inactivity, with the maximum limit set at 730 days (2 years).
- Choose “Next: Reviews” to proceed.
2. Assign Reviewers to Your Access Reviews of PIM for Groups
Within the Reviews tab, you have the flexibility to create either a single-stage or multi-stage access review.
Create Single-stage Access Reviews for PIM Groups:
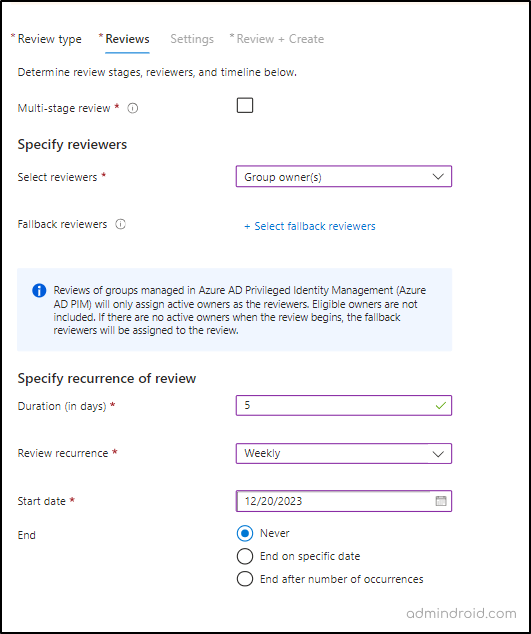
In a single-stage review, all reviewers are required to make their decisions simultaneously, and the final decision is determined by the last reviewer who submits their input. To set up a single-stage review for PIM groups, follow the steps given below.
- Navigate to the “Select reviewers” drop-down and select “Group owner(s)”.
- After selecting the reviewer type, you’ll be prompted to assign fallback reviewers.
Fallback reviewers are selected when choosing “Managers of users” or “Group owners.” These reviewers conduct the review process in situations where a user lacks a specified manager or a group owner, ensuring that access reviews can still proceed.
IMPORTANT: In Privileged Identity Management (PIM) for groups, there are two assignment types: eligible and active. When conducting access reviews within PIM for groups, only active owners serve as reviewers, while eligible owners are not considered.
Thus, it’s mandatory to designate at least one fallback reviewer for a PIM for group review. In case no active owners are available at the start of the review, the fallback reviewer is automatically assigned to conduct the review.
- In the “Specify recurrence of review” section, you can set up access review parameters such as:
- Duration (in days): Specify the number of days the review remains open for input from reviewers.
- Review recurrence: Select the review recurrence—options include once, weekly, monthly, quarterly, semi-annually, or annually.
- Start date: Define the commencement of the series of reviews.
- End: To specify the end date for the review series, choose from: “Never,” “End on a specific date,” or “End after a number of occurrences.”
- After configuring these settings, proceed to the next tab by clicking “Next: Settings.”
Create Multi-stage Access Reviews for PIM Groups:
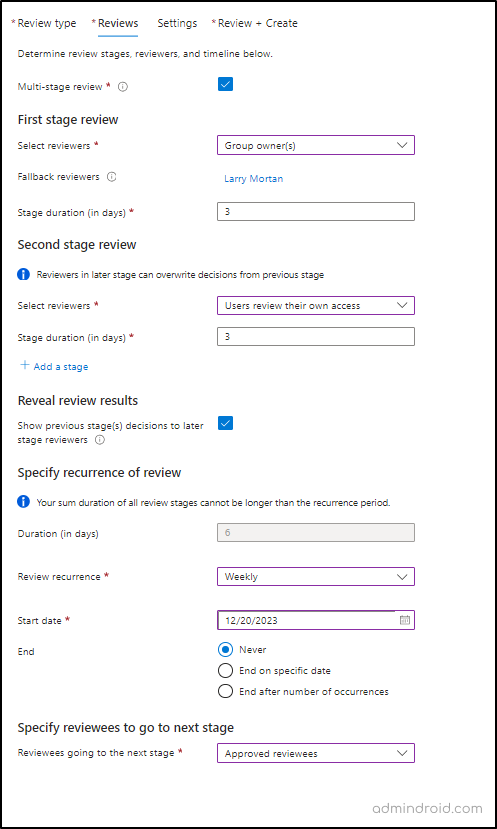
For multi-stage access reviews, admins can establish two or three sets of sequential reviewers. Each independent reviewer in their respective stage makes decisions, and the next stage follows only after the previous decision is recorded.
To set up a multi-stage review, follow these steps:
- Go to the ‘Reviews’ tab and enable the “Multi-stage review” option.
- In the First stage review section, choose:
- Select reviewers: Users review their own access.
- Stage duration (in days): Set this based on your organization’s needs.
- In the Second stage, configure the following:
- Select reviewers: Choose Group owner(s).
- Stage duration (in days): Specify the number of days.
- Check the “Show previous stage(s) decisions to later stage reviewers” checkbox.
- Specify review recurrence, start date, and end date according to your organization’s setup.
- Configure “Reviewees going to the next stage” with Reviewees marked as “Don’t know” or another option from the dropdown.
- Click ‘Create’ to finalize the configuration.
3. Configure Access Review Settings for PIM Groups in Microsoft 365
The final step involves configuring access review settings for PIM groups. Let’s check how!
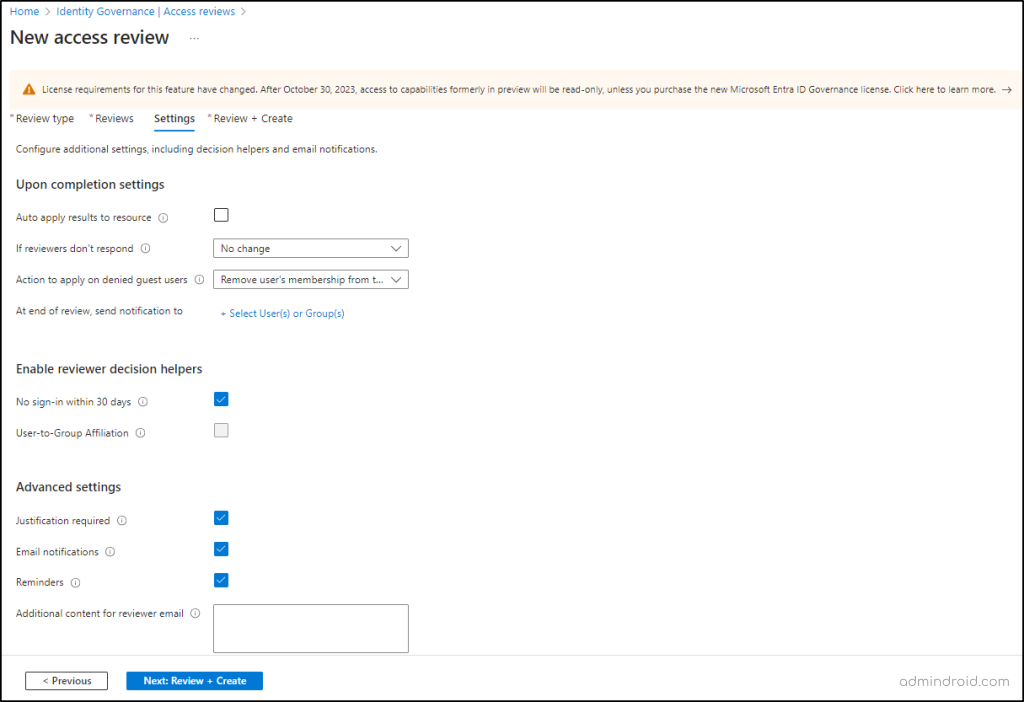
- In the “Upon completion settings” section on the ‘Settings’ tab, you can define the post-review actions as follows.
- Auto apply results to resource: Enable this option to automatically remove access-denied users at the end of the review period. Otherwise, manual handling is necessary after the review concludes.
- If reviewers don’t respond: This option serves to specify the outcome for users who are not reviewed by the assigned reviewer within the designated review period.
- NOTE: If the above setting is configured to Remove access or Take recommendations, and “Auto apply results to resource” is concurrently enabled, non-responsiveness from reviewers may lead to the revocation of all access to the resource.
- Action to apply on denied guest users: This option is available for access reviews that include guest users. It decides the outcome for guest users in case of denied access or when the “If reviewers don’t respond” settings are triggered.
- At end of review, send notification to: Use this setting to send notifications about the review process to others. Click “Select User(s) or Group(s)” to include individuals needing updates on the review progress. This allows stakeholders, besides the creator, to stay informed about the review’s status.
- Use the “Enable reviewer decision helpers” section from the settings tab to select which reviewers will get recommendations during the review process.
- No sign-in within 30 days: Users who have not logged in within the past 30 days are denied access. Moreover, when the system recommendation is enabled, reviewer suggestions rely on the user’s latest sign-in date.
- User-to-Group Affiliation: Reviewers receive recommendations based on the organization’s reporting structure in “Users-to-Group Affiliation.” Users with low affiliation, indicating significant distance from others, are automatically denied access. It’s worth noting that the ‘Manager’ attribute is crucial for this decision helper to operate effectively.
- In the “Advanced settings” section, you have the option to customize the following configurations:
- Justification required: Check this box to prompt reviewers to provide a reason for their approval or denial.
- Email notifications: Enable this option to send email notifications from Microsoft Entra ID to reviewers at the start of an access review and to admins upon its completion.
- Reminders: Select this choice to have Microsoft Entra ID send reminders of ongoing access reviews to all reviewers, even if they are halfway through the process.
- Additional content for reviewer email: Select this option to include additional details, such as review name, resource name, and due date in autogenerated emails. You can also add instructions & contact details in the box for reviewers, and these details will be included in the invitation and reminder emails.
- Select “Next: Review+Create.”
5. Then, under the “Review+Create” tab, assign a unique name and description.
6. Double-check the established settings and click “Create” to initiate the access review. That’s it!
In summary, access reviews of PIM for groups in Microsoft Entra ID are a valuable addition to the organization’s security and privileged access management. Beyond its application to PIM groups, you can also use access reviews to remove inactive guests from Microsoft 365. It automatically purges stale accounts and thereby elevates Microsoft 365 security.
We trust that this blog has simplified the implementation of access reviews for PIM groups, and we welcome your thoughts and concerns in the comments section. Thank you for your readership!


