Still keeping Microsoft Entra Connect Sync alive just because your hybrid devices depend on it?
Many organizations have already migrated users and groups to Microsoft Entra Cloud Sync. However, device synchronization has often remained the last reason to keep Microsoft Entra Connect Sync running.
As a result, admins have had to maintain an additional server, apply updates, monitor synchronization health, and troubleshoot issues just to synchronize Active Directory computer objects for hybrid device scenarios.
Microsoft has finally addressed that gap with Device Sync in Microsoft Entra Cloud Sync. It allows you to synchronize Active Directory computer objects without relying on Microsoft Entra Connect Sync. In this blog, we’ll walk you through how to enable device sync in Microsoft Entra Cloud Sync to enable seamless hybrid device management. Let’s begin.
Why Should Admins Switch Device Synchronization to Microsoft Entra Cloud Sync?
Traditionally, organizations used Microsoft Entra Connect Sync to synchronize on-premises Active Directory objects with Microsoft Entra ID. However, it relies on dedicated on-premises servers, a local SQL database, regular maintenance, and complex configuration management.
Now, Microsoft Entra Cloud Sync offers a modern, cloud-managed alternative. It uses lightweight provisioning agents instead of a full synchronization server, eliminating the need for a local SQL database and significantly reducing infrastructure and maintenance overhead. Cloud Sync also simplifies deployment, improves scalability, and provides a more flexible synchronization experience.
If you’re planning to migrate from Entra Connect Sync to Entra Cloud Sync, then enabling device sync is an essential step to ensure your on-premises Active Directory computer objects continue to synchronize with Microsoft Entra ID.
Now that you understand the basics, let’s look at the prerequisites for enabling device sync in Microsoft Entra Cloud Sync.
Prerequisites to Enable Device Sync in Microsoft Entra Cloud Sync
Before enabling Device Sync, ensure the following prerequisites are met:
- Install the Microsoft Entra Provisioning Agent: Device Sync requires the Microsoft Entra Provisioning Agent version 1.1.1107.0 or later. During installation, specify your Microsoft Entra tenant and the appropriate domain (federated domain or the primary *.onmicrosoft.com domain).
- Configure Microsoft Entra Cloud Sync: Set up Cloud Sync to provision objects from your on-premises Active Directory to Microsoft Entra ID.
- Configure a Service Connection Point (SCP): Configure an SCP in each Active Directory forest containing domain-joined devices if one doesn’t already exist. Before creating a new SCP, verify whether one is already configured. If an existing SCP points to the target Microsoft Entra tenant, you can skip this step. Otherwise, note the current azureADName and azureADId values before making changes so they can be restored if required.
How to Configure Device Sync in Microsoft Entra Cloud Sync?
To configure device sync, your account must be assigned with Hybrid Identity Administrator role in Microsoft Entra ID. Once you have the required permissions, you can enable device sync using either of the following methods:
- Enable Device Sync using the Microsoft Entra admin center
- Configure Device Sync using Microsoft Graph
1. Enable Device Sync using the Microsoft Entra Admin Center
Follow the steps below to enable Device Sync and synchronize your on-premises Active Directory computer objects with Microsoft Entra ID. You can configure Device Sync to synchronize all devices or only specific devices.
1.1: Enable Device Sync for All Devices in Microsoft Entra Cloud Sync in Entra ID
Follow the steps below to enable Device Sync for all supported Active Directory computer objects:
- Sign in to the Microsoft Entra admin center.
- Navigate to Entra ID –> Entra Connect –> Cloud sync.
- Select your existing Active Directory to Microsoft Entra ID cloud sync configuration.
- Under Properties –> Basics, verify that Device Sync is set to Disabled.
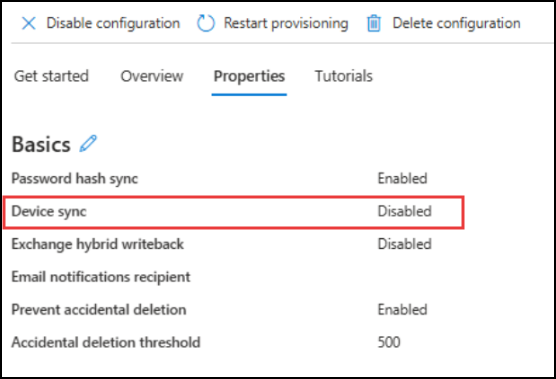
- To enable it, select the Edit icon next to Basics.
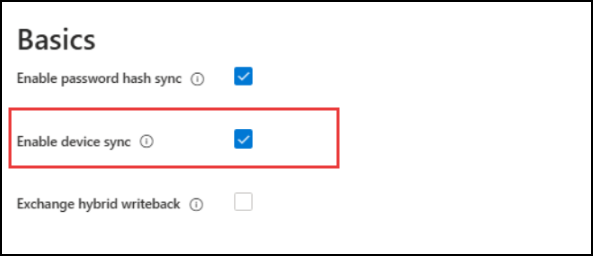
- Check the Enable device sync and click Apply. Once done, Microsoft Entra cloud sync starts synchronizing computer objects from your on-premises Active Directory to Microsoft Entra ID.
The following table summarizes the attributes that are synchronized.
| Microsoft Entra Attribute | Active Directory Attribute | Mapping type |
| AccountEnabled | userAccountControl | Expression |
| DeviceId | objectGUID | Direct |
| DeviceOSType | operatingSystem | Expression |
| DeviceTrustType | None. The value is always ServerAd. | Expression |
| DisplayName | displayName, dNSHostName | Expression |
| OnPremiseSecurityIdentifier | objectSid | Direct |
| RegisteredOwnerReference | RegisteredOwnerReference | Once |
| SourceAnchor | objectGUID | Direct |
| UserCertificate | userCertificate | Direct |
Note: The RegisteredOwnerReference mapping is applied only during the initial synchronization, when Microsoft Entra Cloud Sync first discovers the computer object in Active Directory.
1.2: Provision an Active Directory Device on Demand in Microsoft Entra
You can also use Provision on Demand to synchronize a specific Active Directory computer object immediately, without waiting for the next scheduled synchronization. Follow the steps below to provision an Active Directory device on demand.
- Sign in to the Microsoft Entra admin center.
- Navigate to Entra ID –> Entra Connect –> Cloud sync.
- Select your existing Active Directory to Microsoft Entra ID cloud sync configuration.
- Click Provision on demand and open the Device tab.
- Enter the Distinguished Name (DN) of the Active Directory computer object you want to verify.
- Click Provision to start the synchronization.
Once the provisioning completes successfully, the computer object appears in Microsoft Entra ID.
2. Configure Device Sync using Microsoft Graph
Microsoft Graph also allow admins to manage Device Sync configurations without relying solely on the Microsoft Entra admin center. Administrators can use Graph API requests to create and manage Device Sync jobs programmatically.
Before you begin, ensure that the Microsoft Graph application you use for Device Sync has the required API permissions. Depending on the authentication method, assign one of the following permissions:
- Delegated (work or school account): Synchronization.ReadWrite.All
- Application permissions: Application.ReadWrite.OwnedBy (least privileged) or Synchronization.ReadWrite.All (recommended for broader access).
Once you’ve assigned the required permissions, you can configure Device Sync using one of the following methods:
- Create and start Device Sync for all devices using Microsoft Graph
- Provision a specific device on demand using Microsoft Graph
2.1: Create and Start Device Sync for All Devices Using Microsoft Graph
You can use Microsoft Graph to create and start a Device Sync job that synchronizes all supported Active Directory computer objects.
Step 1: Create the device sync job
To create a new Device Sync job, select the POST method, enter the following endpoint, and include the JSON payload in the request body:
POST https://graph.microsoft.com/v1.0/servicePrincipals/{servicePrincipalId}/synchronization/jobs
Content-Type: application/json
{
  "templateId": "AD2AADDeviceSync"
}
Replace {servicePrincipalId} with the service principal ID of your Active Directory to Microsoft Entra ID enterprise application.
Step 2: Start the device sync job
After the job is created, select the POST method, enter the following endpoint, and send the request to start the Device Sync job:
POST https://graph.microsoft.com/v1.0/servicePrincipals/{id}/synchronization/jobs/{jobId}/start
Replace {jobId} with the ID of the Device Sync job returned by the previous request. Also, replace {servicePrincipalId} with the service principal ID of your Active Directory to Microsoft Entra ID enterprise application.
Once the job starts successfully, Microsoft Entra Cloud Sync begins synchronizing supported Active Directory computer objects to Microsoft Entra ID.
2.2: Provision a Specific Device on Demand Using Microsoft Graph
You can also use Microsoft Graph to provision a specific Active Directory computer object.
Step 1: Get the Device Sync Rule ID
First, retrieve the synchronization schema for your Device Sync job. The response contains the device sync rule ID under the synchronizationRules section. Use one of the following requests:
GET /servicePrincipals/{servicePrincipalId}/synchronization/jobs/{jobId}/schema
GET /servicePrincipals/{servicePrincipalId}/synchronization/templates/{templateId}/schema
GET /applications/{applicationId}/synchronization/templates/{templateId}/schema
Locate the ruleId for the device synchronization rule from the synchronizationRules collection.
Step 2: Provision the Computer Object
To synchronize a specific Active Directory computer object, select the POST method and send the following request:
POST https://graph.microsoft.com/v1.0/servicePrincipals/{servicePrincipalId}/synchronization/jobs/{jobId}/provisionOnDemand
Content-Type: application/json
{
  "parameters": [
    {
      "ruleId": "<RuleID>",
      "subjects": [
        {
          "objectId": "<ComputerDistinguishedName>",
          "objectTypeName": "computer"
        }
      ]
    }
  ]
}
Here, replace <RuleID> with the device sync rule ID obtained in the previous step and with the computer object’s DN from ADUC console.
Verify Device Synchronization in Microsoft Entra Cloud Sync
After enabling Device Sync, you can verify that your Active Directory computer objects are being synchronized using the steps below:
- Open the Microsoft Entra admin center.
- Navigate to Identity –> Devices –> All devices.
- If the configuration is correct, your on-premises devices should begin appearing after synchronization completes.
You can also review the provisioning logs if a device doesn’t appear as expected.
Instead of waiting for the next synchronization cycle, you can also provision a single device on demand. This is especially useful when you’re testing your Device Sync configuration, have recently created a new computer account in Active Directory, or are troubleshooting why a specific device isn’t synchronizing to Microsoft Entra ID.
What Happens If a Synced Device Is Deleted from Microsoft Entra ID?
If a synchronized device is deleted from Microsoft Entra ID, Microsoft Entra Cloud Sync does not automatically recreate it during the next synchronization cycle as long as the corresponding Active Directory computer object remains unchanged.
- A hybrid-joined device can be removed from Microsoft Entra ID for several reasons, including:
- The corresponding computer object may have been deleted from on-premises Active Directory.
- The device may have been manually removed from the Microsoft Entra admin center.
- The device has been unregistered from Microsoft Entra using the dsregcmd /leave command.
In these cases, Cloud Sync only provisions the device again when it detects a change to the corresponding computer object in Active Directory.
If you need to restore the device, recover the device with any one of the options below:
- Restore the deleted device from Microsoft Entra admin center by navigating to Identity –> Devices –> Deleted devices.
- Modify the corresponding computer object in Active Directory (for example, update an attribute) and allow the next Device Sync cycle to process the change.
- Provision the device on demand using Microsoft Graph to immediately synchronize the computer object without waiting for the next scheduled sync.
These options help restore the device’s hybrid identity and ensure it appears again in Microsoft Entra ID.
Tip: Use Device Writeback (if configured) to write device objects from Microsoft Entra ID back to on-premises Active Directory. This allows the device object to be recreated in Active Directory automatically based on the Microsoft Entra ID device object.
We hope this guide helped you understand how to configure and enable device sync in Microsoft Entra cloud sync. If you have any questions or run into issues during the setup, let us know in the comments. We’d love to help you. Stay tuned for more blogs.