For many organizations across the world, Microsoft Teams has emerged as a crucial platform for communication and collaboration. MS Teams has grown in popularity, making it a target for hackers and other cybercriminals. So, ensuring that your Microsoft Teams environment is safe and shielded from any security risks is essential. To ease admin’s work, we have compiled a list of security practices that admins can consider for enhanced Microsoft Teams security.
Security Settings to Safeguard Microsoft Teams
Here are some Microsoft Teams security best practices that can be implemented to boost your team’s security and mitigate potential security threats.
- Protect Microsoft Teams Against Phishing Attacks
- Set Up Conditional Access Policy for Microsoft Teams
- Prevent Data Leakage in Microsoft Teams with Data Loss Prevention
- Configure Teams Guest Access Settings
- Restrict Unknown Domains from Emailing to Team’s Channel Address
- Manage MS Teams Third-Party File Integrations
- Manage Meeting Policies in Microsoft Teams
- Sensitivity Labels in Meeting Invites
1. Protect Microsoft Teams Against Phishing Attacks
Microsoft Teams with Defender for Office 365 can benefit from enhanced protection specifically against malicious phishing attacks that utilize weaponized URLs. With this feature, you can take advantage of time-of-click protection for links in conversations, group chats, and channels, safeguarding your team from potential threats. Note that, to access the Microsoft Defender portal, an E5 license is required.
How to Enable Microsoft Defender for Office 365 in Teams?
Step 1: Sign into the Microsoft 365 Defender Portal.
Step 2: Navigate to Policies & rules –> Threat Policies –> Safe Attachments.
Step 3: Click on ‘Global Settings’.
Step 4: Check whether the option ‘Turn on Defender for Office 365 for SharePoint, OneDrive, and Microsoft Teams’ is turned on.
Step 5: Then, navigate to Policies & rules –> Threat Policies –> Safe Links.
Step 6: Click any policy. Keep in mind that you must complete this step for each policy if you have more than one.
Step 7: Under Protection settings–>Teams, ensure that ‘Safe Links checks a list of known, malicious links when users click links in Microsoft Teams’ is checked. Turn it on and save it if it’s not checked.

2. Set Up Conditional Access Policy for Microsoft Teams
Conditional access allows admins to control access to resources based on certain conditions. Microsoft Teams has a growing list of security and compliance capabilities, including conditional access, which can be used to restrict access to Microsoft Teams from specific locations or devices. This helps to prevent unauthorized access and reduces the risk of data breaches. To access the Microsoft Office 365 conditional access policy feature, you will need an Azure AD Premium P1 license.
How to Turn on Conditional Access Policy for Microsoft Teams?
Step 1: Log in to the Microsoft Azure portal using your administrator account.
Step 2: Navigate to Azure Active Directory –> Security.
Step 3: Click on Conditional Access in the Security menu.
Step 4: Click the + New Policy button to create a new policy.
Step 5: Give your policy a name that identifies its purpose, such as “Teams Conditional Access Policy.”
Step 6: Under Assignments, choose the users or groups to which the policy will apply.
Step 7: Under Cloud apps or actions, select “Microsoft Teams.”
Step 8: Under Conditions, select the conditions under which the policy should be enforced.
For example, you might choose “Location” to restrict access to Teams from certain geographic locations, or “Device platforms” to restrict access to Teams from specific device types.
Step 9: Under Access controls, choose the access controls to apply when the policy conditions are met. For example, you might choose to require multi-factor authentication or block access entirely.
Step 10: Save your policy.
Once your policy is saved, it will apply to the users or groups you specified under “Assignments” whenever they attempt to access Microsoft Teams.
3. Prevent Data Leakage in Microsoft Teams with Data Loss Prevention
Microsoft Purview Data Loss Prevention (DLP) allows you to define policies that prevent people from sharing sensitive information in Microsoft Teams channels or chat sessions. DLP Licensing for Microsoft Teams requires an E5 license.
How to Apply DLP Policy for Microsoft Teams?
Step 1: Sign into Microsoft Purview Compliance Center.
Step 2: Navigate to Data Loss Prevention –> Policy.
Step 3: You can either create a policy from default templates or create a customized DLP policy.
Step 4: To create a custom policy, select custom from the Categories tab and name it.
Step 5: After that, you will be redirected to Assign admin units tab which is in preview now. Select the admin units you want to assign to this policy. An admin unit is created in Azure Active Directory and restricts a policy to specific users or groups.
Step 6: Then you will be redirected to Choose locations to apply the policy. Make sure that the toggle is turned on for ‘Teams chat and channel messages’ location.
Step 7: To enjoy rich controls, define your policy settings to create and customize advanced DLP rules.
Step 8: Then create a DLP policy with conditions, exceptions, and actions based on the requirements.
Step 9: After testing the policy and reviewing it, give Submit.
Once the policy is created, it will be enforced in Microsoft Teams. Any sensitive information that matches the policy criteria will be blocked or flagged for review, depending on the actions you selected.
4. Configure Teams Guest Access Settings
You can enhance collaboration and communication with Microsoft Teams by inviting guests. However, to ensure the security and privacy of your data, it is important to configure the right guest access settings. Through the Teams admin center, you can easily tailor your guest access rules to suit your needs. By applying the appropriate policies, you can also maintain strong Microsoft Teams governance and ensure that guest access stays fully under your control.
Navigate to Microsoft Teams admin center –> Users –> Guest Access.
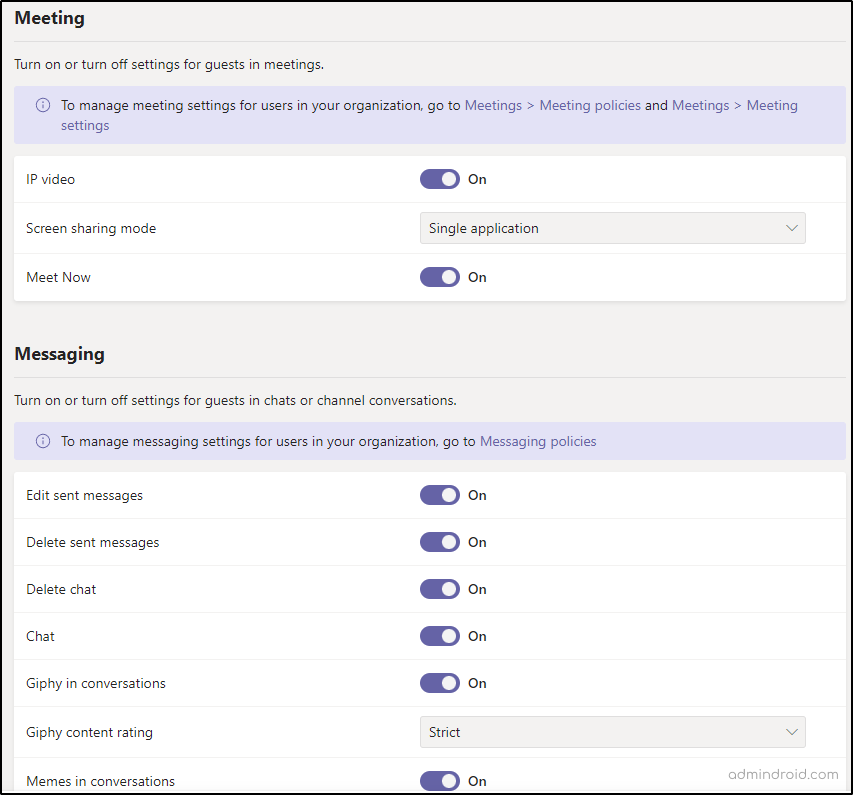
By setting up the appropriate guest access rules, you can confidently collaborate with clients and partners without compromising on data security. Plus, with the ability to disable screensharing during video meetings, you can ensure that confidential information always remains secure.
5. Restrict Unknown Domains from Emailing to Team’s Channel Address
To increase the security of Microsoft Teams’ communication channels in your organization, it’s important to restrict channel email messages to approved domains. This ensures that only trusted entities can send messages to your Teams channels, preventing potential security breaches and keeping your business communications safe.
How to Control Who Can Send Email to Team’s Channel?
Step 1: Go to the Microsoft Teams admin center.
Step 2: Navigate to Teams –> Teams settings.
Step 3: The toggle under ‘Email integration’ lets you control whether Users can send emails to a channel email address.
Step 4: If you have decided to allow users to send emails, enter the specific domains you wish to accept mail from in the ‘Accept channel email’.
Step 5: Click Save.
This ensures that only trusted sources can send emails to your channels.
6. Manage MS Teams Third-Party File Integrations
With Teams, you have the flexibility to store your files on various third-party storage like Citrix files, Dropbox, Box, Google Drive, Egnyte, etc. However, some providers may pose a risk of data leakage. To ensure your data remains secure, you have the option to disable unsupported providers.
How to Control Third Party Cloud Storage Access in Microsoft Teams?
Step 1: Go to the Microsoft Teams admin center.
Step 2: Navigate to Teams –> Teams Settings.
Step 3: Under ‘Files’, choose which storage providers you want to make available for use within the files tab in Microsoft Teams.
Step 4: Click Save.
By doing so, the admin can take control of storage options in Microsoft Teams.
7. Manage Meeting Policies in Microsoft Teams
Managing Microsoft Teams meeting settings is important as it allows you to customize the meeting experience based on your security requirements. By following a few simple steps, you can minimize the attack surface and restrict unwanted content sharing in Teams meetings.
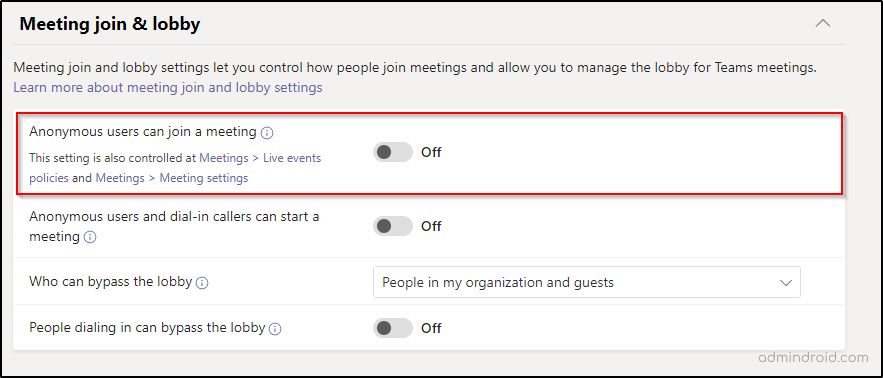
Navigate to Microsoft Teams admin center –> Meetings –> Meeting Policies –> Global Policy.
- Under the Meeting join & lobby tab, ensure that ‘Anonymous users can join a meeting’ and ‘People dialing in can bypass the lobby’ options are turned off.
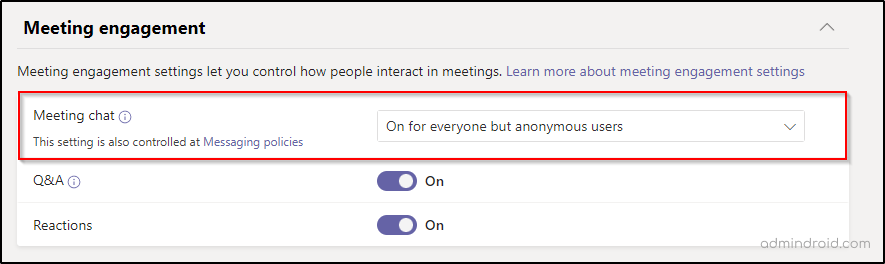
2. Under Meeting engagement, allow Meeting chat option for Everyone but anonymous users.
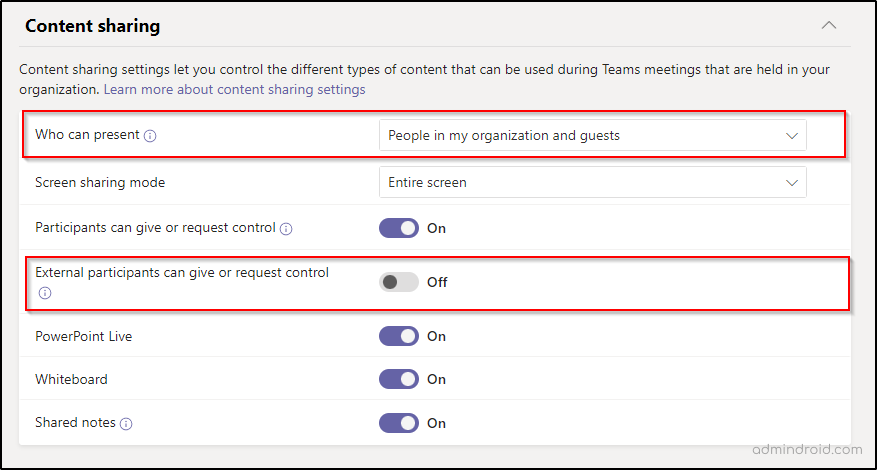
3. Turn off the ‘External participants can give or request control’ setting in Content Sharing. Further, you can restrict the ‘who can present’ option to “People in my organizations and guests” to avoid sharing inappropriate or unwanted content.
With these simple steps, you can configure your Teams meeting settings for a more secure and productive collaboration experience.
8. Sensitivity Labels in Meeting Invites
Recently, Microsoft extended applying sensitivity labels to meeting invites as well. It can protect the sensitive information discussed during the Teams meetings. Microsoft 365 sensitivity labels for Teams meetings allow users to classify the sensitivity of the information that will be discussed. Microsoft has recently enhanced controls related to the visibility of private teams within Teams, offering improved discoverability options. Additionally, they’ve introduced additional controls within the Purview Compliance portal to manage shared channels more effectively.
How to Create Sensitivity Labels for Meeting Invites?
Step 1: Sign into the Microsoft Purview compliance portal as a global administrator.
Step 2: Navigate to Information Protection –> Create a label.
Step 3: After naming and describing the label, don’t miss out to check in the Include meetings box while defining the scope of the label.
Step 4: For better protection purposes, you can mark the available three options on the Choose protection settings for labeled items page.
By enabling the third option, you can ‘configure protection settings for Teams meetings and chat’ that require a Teams Premium License.
Step 5: Edit the encryption, and content marking settings based on the requirements.
Step 6: In the next step, you can choose to apply the label automatically to content that matches the conditions of your label settings.
Step 7: You can define protection settings for groups and sites as the next step and finish creating the label. Before publishing the label, editing it can also be done.
By doing so, admins can protect sensitive data and ensure compliance with data protection regulations.
I hope this blog has given you an idea of what security settings you should focus on to safeguard Microsoft Teams. Feel free to reach us in the comments for any assistance.


