On Day 5 of Cybersecurity Awareness Month, learn how to enhance password security using Microsoft 365 Secure Score. Stay tuned for the upcoming blogs in our M365 Cybersecurity blog series.
As cyber-attacks continue to rise each year, it’s crucial for organizations to assess their security posture. One effective way to evaluate your organization’s security is through Microsoft Secure Score. In our Cybersecurity Month series, we’re committed to helping you strengthen your M365 security and enhance your Secure Score. Today, we’ll focus on Microsoft 365 password settings and best practices for effectively securing and managing your M365 environment.
Top Microsoft 365 Password Settings to Enhance your Secure Score
Here are Microsoft’s password recommendations to enhance your Secure Score:
- Ensure the ‘password expiration policy’ is set to ‘Set passwords to never expire’.
- Ensure custom banned passwords lists are used.
- Ensure ‘self-service password reset enabled’ is set to ‘All’.
- Ensure that password hash sync is enabled for hybrid deployments.
- Ensure password protection is enabled for on-prem Active Directory.
- Password recommendations for devices.
Now, let’s dive into each recommendation in detail.
1. Set Passwords to Never Expire
Frequent password changes can lead users to create guessable passwords, weakening security. In fact, 81% of account breaches occur due to poor password hygiene. Microsoft recommends using strong passwords with multi-factor authentication (MFA) and configure passwords to never expire in the password policy. By disabling password expiry, users don’t need to change their passwords frequently.
✅License Requirement: Microsoft Entra ID Free
How to Configure User Passwords to Never Expire:
You can use the Password expiration policy to set password expiry across your organization.
Steps:
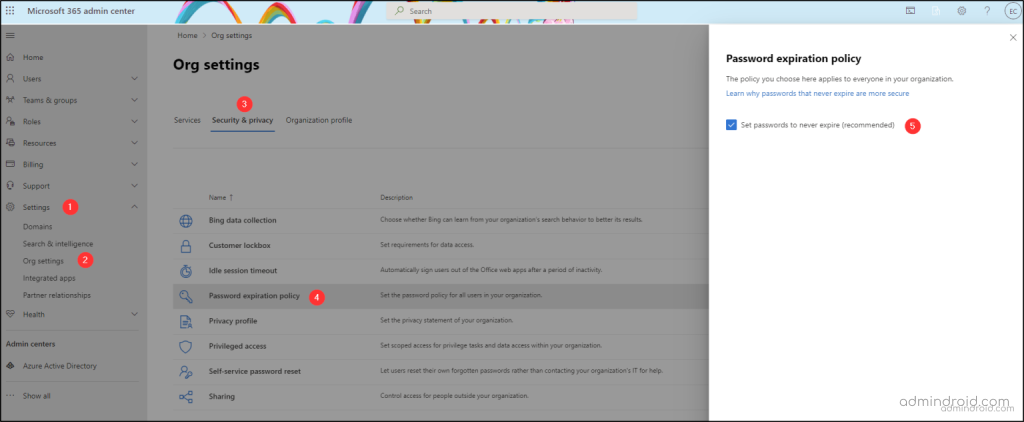
- Log in to the Microsoft 365 admin center and go to the Org Settings page.
- In the Security and Privacy tab, on the Password expiration policy page, check the box “Set passwords to never expire (recommended).”
You can also configure password policies using PowerShell, which is particularly useful for setting individual or multiple users’ passwords to never expire. To configure an individual user’s password to never expire, run the following cmdlet:
|
1 |
Update-MgUser -UserId <user ID> -PasswordPolicies DisablePasswordExpiration |
2. Configure Custom Banned Passwords Lists
By default, global banned password lists are automatically applied to all users in a Microsoft Entra ID tenant. This enhances account security by preventing the use of weak passwords. To further strengthen password protection, administrators can create a custom banned password list. This feature allows you to add specific strings that should be blocked during password changes or resets.
When users update their passwords, the system checks these banned password lists to enforce strong password policies. This is crucial in reducing the risk of using guessable passwords.
✅License Requirement: Microsoft Entra ID P1 or P2
How to Enable Custom Banned Passwords in Microsoft 365?
To block specific passwords and stop users from choosing easily guessable options, follow the below steps:
- Go to the Microsoft Entra ID admin center.
- Navigate through Identity –> Protection –> Authentication methods.
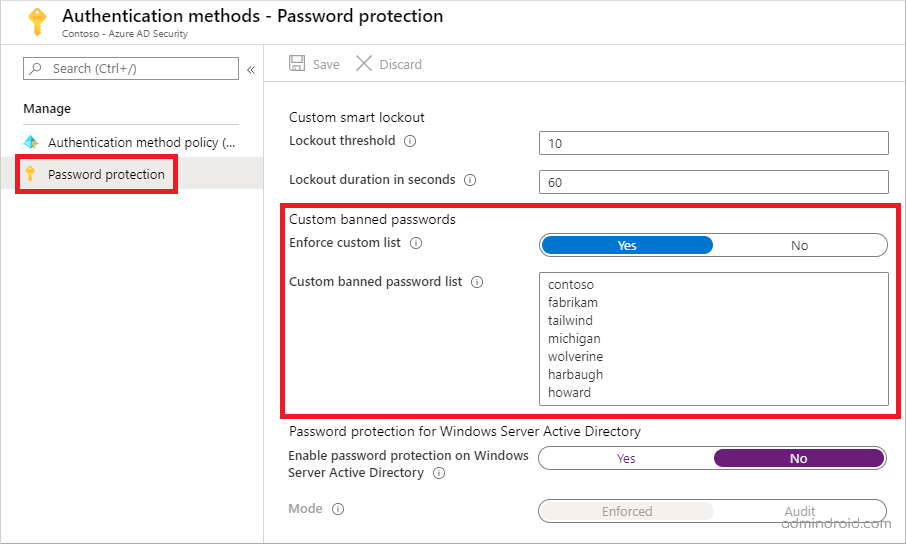
- Click on Password protection.
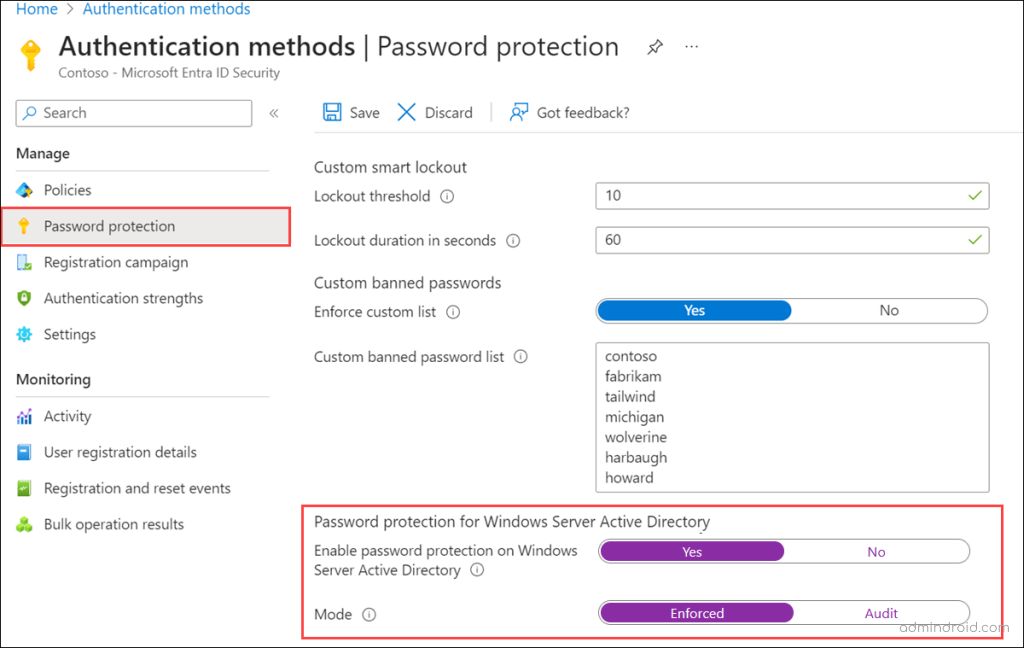
- Switch the Enforce custom list toggle to Yes.
- In the Custom banned password list, compile your list and click Save.
3. Enable Self-Service Password Reset (SSPR) for M365 Users
Implementing self-service password reset improves both security and productivity by enabling users to securely manage their own password resets through reliable verification methods. This approach reduces the risk of unauthorized access and lessens the workload for help desk teams.
Note: New passwords must adhere to Microsoft Entra ID’s banned password list, ensuring users can’t choose easily guessable passwords.
Microsoft recommends enabling SSPR for all users, but you also have the option to enable SSPR for a group of users.
✅License Requirement: Microsoft Entra ID P1 or P2
How to Enable SSPR for All Microsoft 365 Users:
To enable self-service password reset for all users, follow the steps below.
- Sign in to the Microsoft Entra admin center.
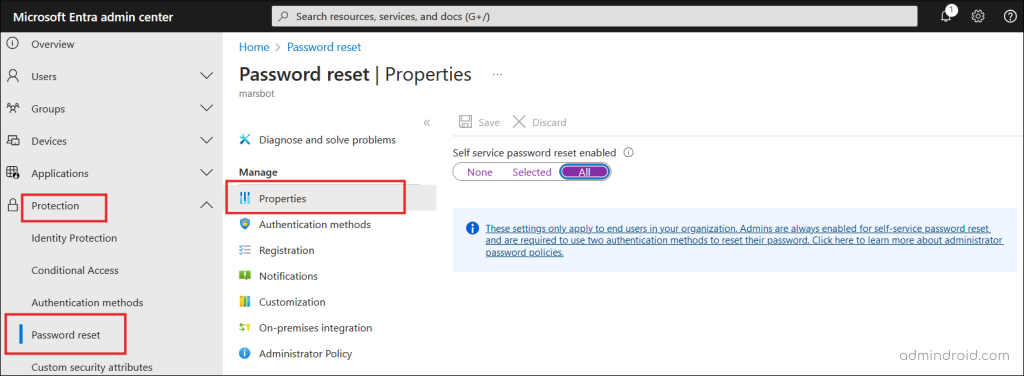
- Navigate to Protection > Password reset from the menu on the left side.
- In the Properties page, under the option ‘Self service password reset enabled’, choose All.
- Click Save.
Note: This setting applies exclusively to end users. By default, self-service password reset (SSPR) is always enabled for administrators.
After implementing self-service password reset, it’s good to check users’ SSPR status to confirm their registration and eligibility.
4. Enable Password Hash Synchronization [For hybrid environments]
If you are in a hybrid environment, enable password synchronization. This feature allows your users to maintain just one password across both on-premises and cloud environments.
A Little Background: Active Directory Domain Services store passwords as hash values. Microsoft Entra Connect synchronizes a hashed version of a stored value from the on-premises instance to the cloud instance. The SHA256 password data stored in Microsoft Entra ID (a hash of the original MD4 hash) offers greater security compared to what is stored in Active Directory. When a password is changed in Active Directory, it automatically syncs to Entra within a few minutes.
Note: The password complexity policies in your on-premises Active Directory take precedence over the complexity policies in the cloud for synchronized users. You can use all valid passwords from your on-premises Active Directory instance to access Microsoft Entra services.
✅License requirement: Entra ID Free
How to Enable Password Hash Synchronization:
To implement password hash synchronization in your organization, you need to install Microsoft Entra Connect. This tool enables synchronization between your on-premises Microsoft Entra Connect instance and your Microsoft Entra Connect cloud sync instance (i.e., syncs passwords from on-prem AD to Microsoft 365).
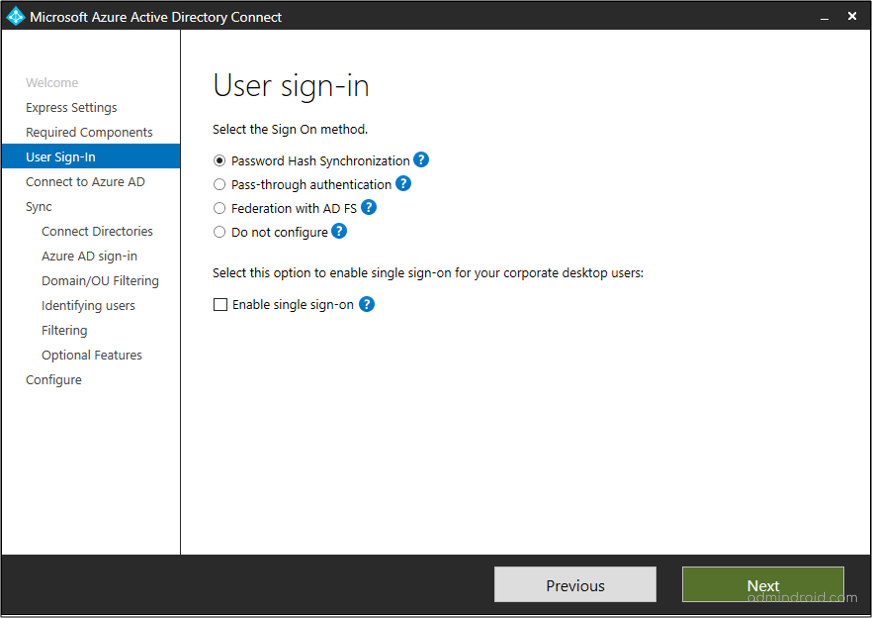
- When you install Microsoft Entra Connect using the Express Settings option, password hash synchronization is automatically enabled.
- If you choose Custom Settings during the installation, you will find the option for password hash synchronization on the User sign-in page.
5. Enable Password Protection for On-prem AD [For hybrid environments]
As mentioned earlier, password complexity policies in your on-premises Active Directory override those in Entra for synchronized users. To resolve this, configure the setting “Enable password protection on Windows Server Active Directory.”
By enabling this setting, you can stop users from using banned passwords in Entra for their on-premises accounts.
✅License Requirement: Microsoft Entra ID P1 or P2
How to Enable on-premises Microsoft Entra Password Protection
To setup Microsoft Entra ID Password Protection for on-premises AD, follow the below steps:
- Download and install the Microsoft Entra ID Password Proxies and DC Agents in your on-premises AD DS environment from the following location: https://www.microsoft.com/download/details.aspx?id=57071
- After the installation is complete, sign in to the Microsoft Entra ID admin center.
- Navigate through Protection > Authentication methods.
- Click on Password protection.
- Toggle Enable password protection on Windows Server Active Directory to Yes and Mode to Enforced.
- Click Save
6. Password Recommendations for Device Safety
In addition to securing accounts, it’s crucial to protect devices through strong configurations. If you’re managing devices using Intune, consider the following recommendations. Microsoft suggests implementing these password configurations to enhance device safety.
✅License Requirement: Microsoft Intune P1
- Ensure mobile devices require the use of a password
- Ensure that mobile device password reuse is prohibited.
- Ensure that mobile devices are set to never expire passwords.
- Ensure that mobile devices require a minimum password length to prevent brute force attacks.
- Ensure that mobile devices require complex passwords (Type = Alphanumeric).
- Ensure that mobile devices require complex passwords (Simple Passwords = Blocked).
Conclusion:
In addition to the Microsoft 365 password settings mentioned above, it’s essential to educate users about the importance of not reusing their organizational passwords elsewhere. Using organizational passwords on external websites significantly increases the risk of cybercriminals compromising these credentials.
I hope this blog has provided valuable insights into essential Microsoft 365 password settings and device configurations for protecting your organization’s sensitive information. By adopting these measures, you can strengthen security posture and reduce the risk of threats. If you have any queries, reach us through the comments section.


