
Shared mailboxes in Microsoft 365 are often used across multiple teams like support, HR, and sales for centralized email communication. But without a standard email signature in Outlook, emails can quickly become unprofessional, lack branding, and miss required legal disclaimers.
For example, imagine your organization’s support team responds to hundreds of customer queries every day. A customer reaches out expecting a professional response but receives an email with no signature and no clear identity behind the message. This may leave customers unsure about who sent the email and whether it’s trustworthy, which can impact your organization’s credibility.
To avoid these issues and streamline communication, this blog guides you on how to add a signature to Microsoft 365 shared mailboxes using different methods. Without further delay, let’s get started.
How to Set Up Email Signature for Shared Mailboxes in Microsoft 365?
In Microsoft 365, both users and Exchange admins can set up email signatures for shared mailboxes in an organization. For detailed steps and configurations, explore the sections below.
- Create email signature for shared mailboxes in Outlook
- Configure email signatures for shared mailboxes using mail flow rules
- Set up email signatures for shared mailboxes using PowerShell
Create Email Signature for Shared Mailboxes in Microsoft 365 using Outlook
Microsoft 365 users can set up an email signature for their shared mailboxes in Outlook. To do this, users can follow the steps below.
- Open the Microsoft Outlook and sign in to your primary mailbox.
- Then, click on your account in the upper right corner and select Open another mailbox.
- Now, enter the email address of the respective shared mailbox and click Open.
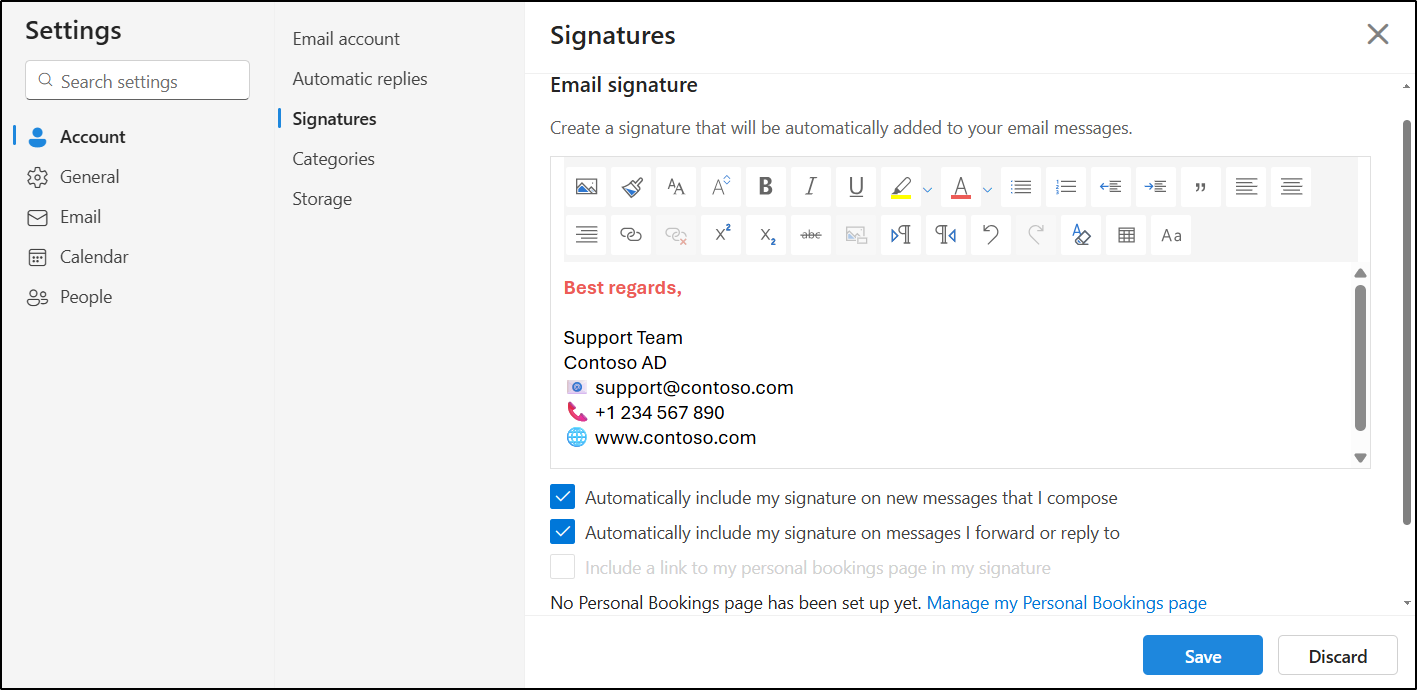
- Click on the Settings icon in the top-right corner and navigate to Accounts → Signatures.
- In the ‘Email signature’ editor, create and format your signature using your preferred font style, size, color, layout, etc.
- Choose when to automatically apply the email signature in Outlook:
- Automatically include my signature on new messages that I compose
- Automatically include my signature on messages that I forward or reply to
- Click Save once you’ve finished designing the signature.
Note: The above method is intended for user-level configuration of shared mailbox signatures in Outlook. As admins may not have access to all shared mailboxes, the mail flow rule or PowerShell method provided below can be used for centralized signature management.
Apply Email Signatures to Shared Mailboxes Using the Exchange Admin Center
As an admin, you can set up individual email signatures for your organization’s shared mailboxes using mail flow rules in the Exchange admin center. To do so, follow the steps below.
- Sign in to the Exchange admin center, go to Mail Flow → Rules.
- Click Add a rule, select Create a new rule and enter a name for the rule.
- Under Apply this rule if, select The sender, then choose is this person, and pick the respective shared mailbox.
- In the Do the following section, select Apply a disclaimer to the message and ensure it is set to ‘append a disclaimer’.
- Next, click Enter text, add your signature and click Save. You can use plain text and create HTML signature for formatting.
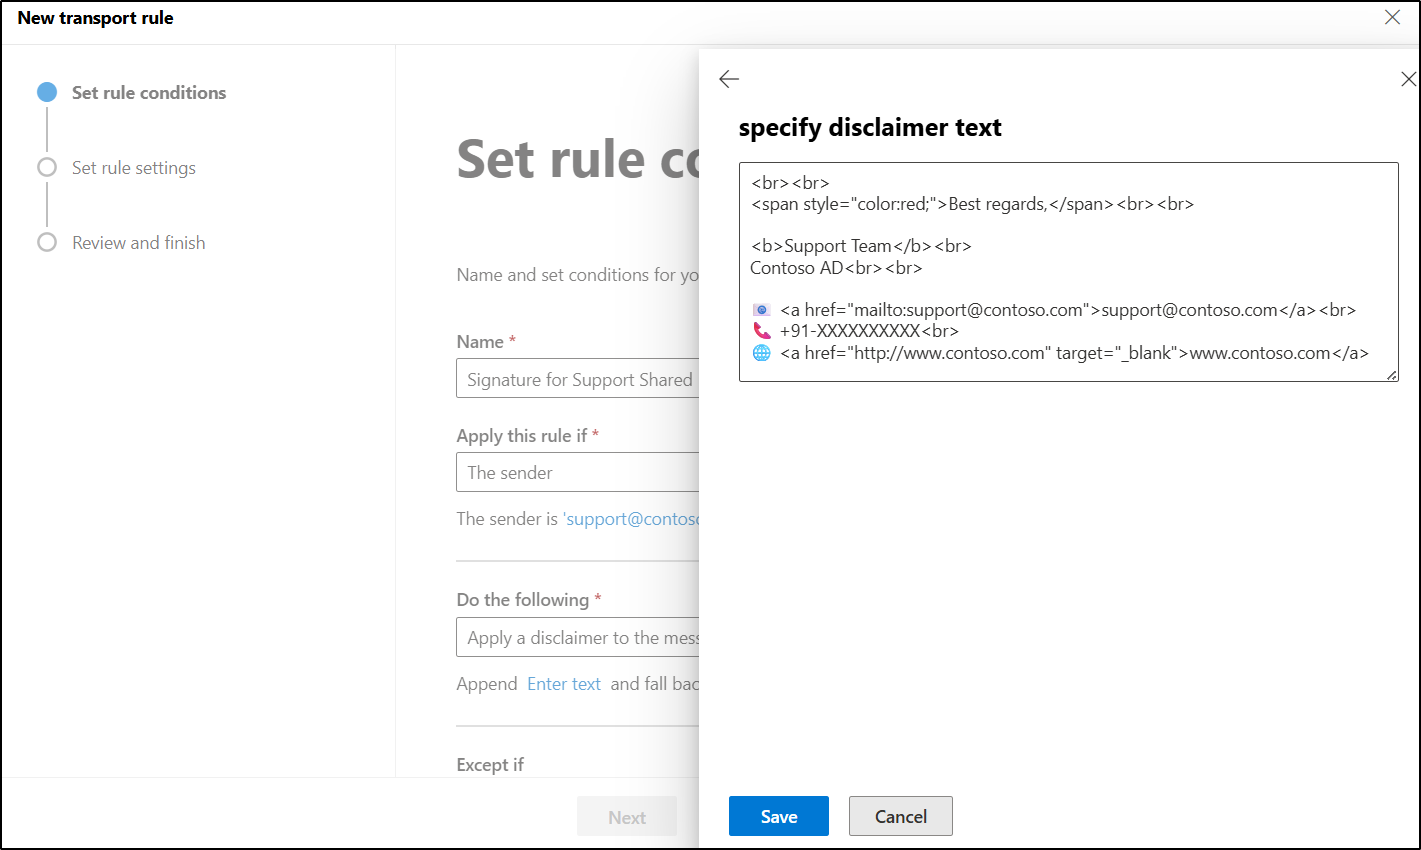
- For the fallback option, click Select one and choose Wrap to ensure the signature is added even when messages are encrypted or selection. Then click Save and click Next.
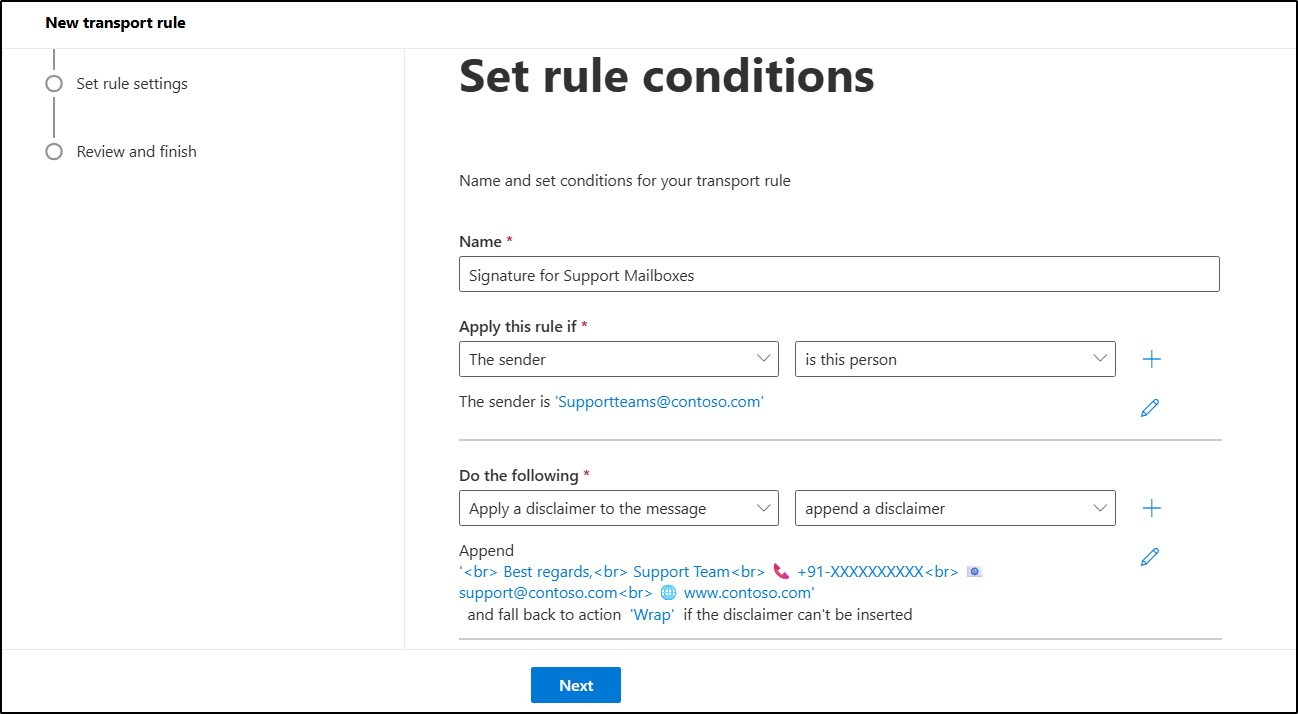
- Then configure additional mail flow rule settings based on your requirements, review the rule, and click Finish to create it.
- Once created, the mail flow rule will be in a disabled state by default. Select it from the mail flow rules list and use the toggle to enable the rule.
Disadvantages of configuring email signatures for shared mailboxes using mail flow rules
- Shared mailbox users cannot view the configured signature while drafting the email.
- Users cannot see the applied signature even in the Sent Items folder; only the recipients can see it.
- If the email signature is configured using this method, it cannot be inserted directly below the latest reply or forward emails.
- If an admin applies an HTML signature using a mail flow rule and users also have configured the signature in Outlook, both signatures will be included in emails received by recipients.
Set Up Email Signatures for Shared Mailboxes in Outlook using PowerShell
If you want to set up signatures for shared mailboxes without the limitations of mail flow rules while maintaining centralized control, PowerShell is a suitable approach. To do so, follow the steps below.
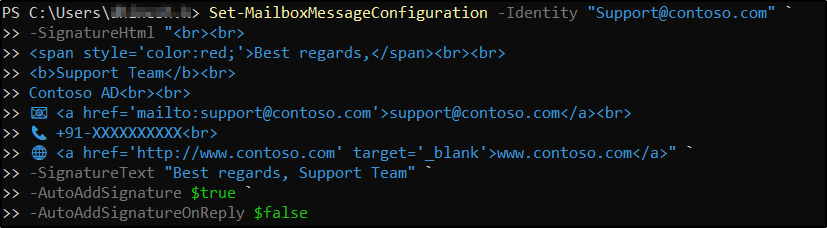
1. First, connect to Exchange Online using the cmdlet below.
|
1 |
Connect-ExchangeOnline |
2. Then, run the following cmdlet to apply the email signature to the desired shared mailbox in your organization.
|
1 2 3 4 5 |
Set-MailboxMessageConfiguration -Identity "<SharedMailboxUPN>" ` -SignatureHtml '<HTMLSignature>' ` -SignatureText "Best regards, Support Team" ` -AutoAddSignature $true ` -AutoAddSignatureOnReply $false |
Ensure that <HTMLSiganture> is replaced with your signature’s HTML code, and <SharedMailboxUPN> with the appropriate shared mailbox UPN.
Sample HTML code for email signatures
Use the following sample HTML code when configuring email signatures through mail flow rules or PowerShell:
| <br><br> <span style=”color:red;”>Best regards,</span><br><br> <b>Support Team</b><br> Contoso AD<br><br> 📧 <a href=”mailto:support@contoso.com”>support@contoso.com</a><br> 📞 +91-XXXXXXXXXX<br> 🌐 <a href=”http://www.contoso.com” target=”_blank”>www.contoso.com</a> |
User Experience After Configuring a Signature for a Shared Mailbox in M365
After setting up the email signature for shared mailboxes, the way it appears or is applied can differ depending on how it was configured. For example:
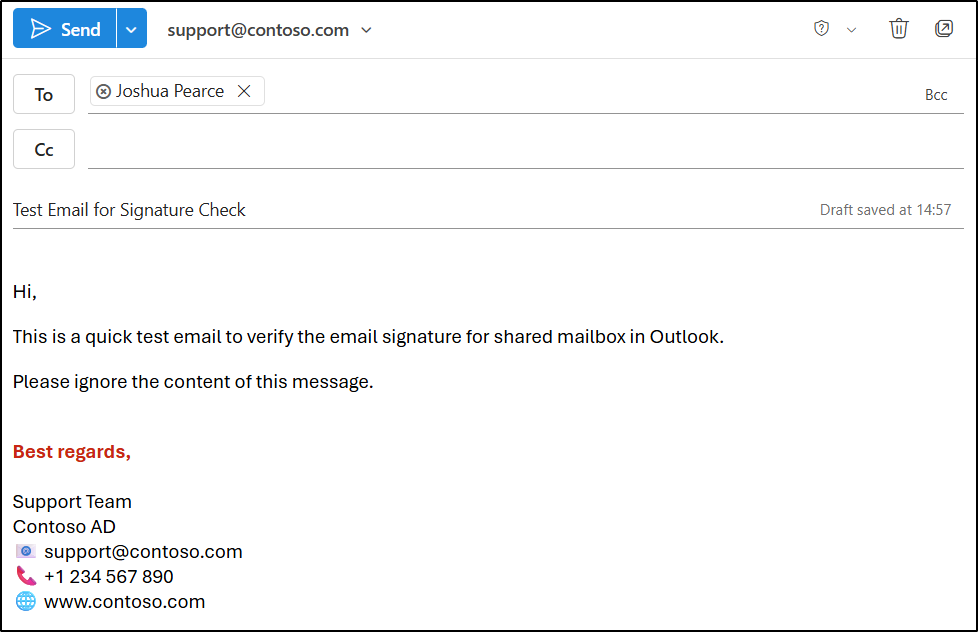
If the signature for shared mailbox is configured using Outlook or PowerShell
When a user sends an email from a shared mailbox, the created signature will be automatically added while the email is being drafted. The recipient will see a consistent, standard signature whenever they receive an email from that shared mailbox address.
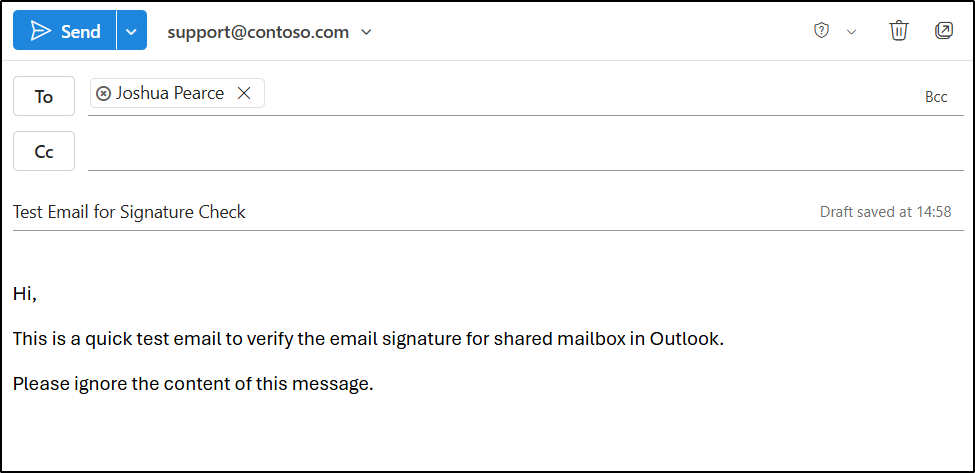
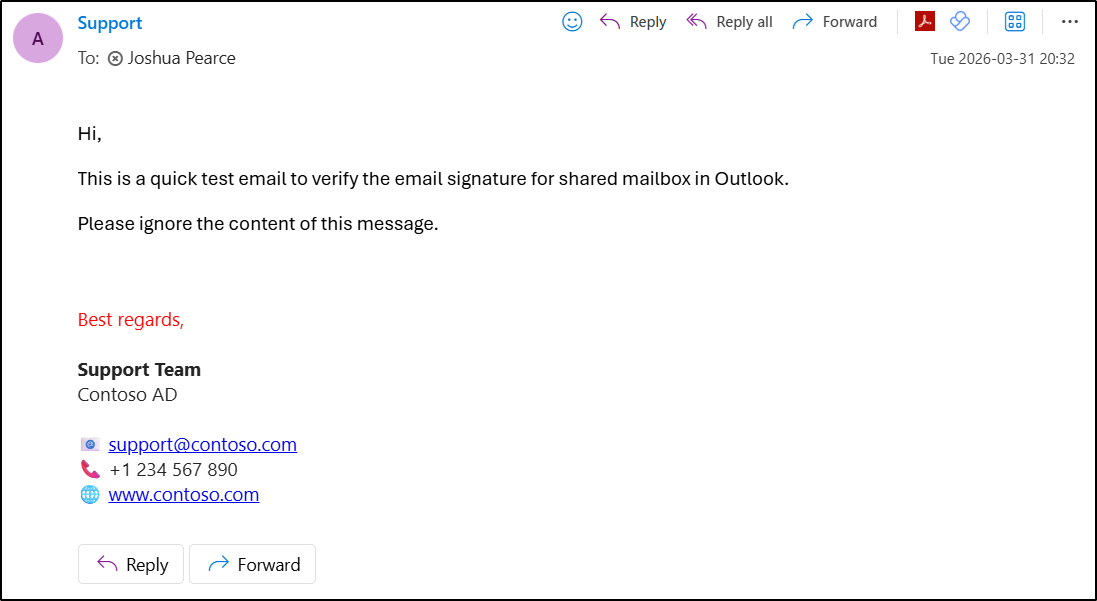
If signatures for shared mailbox are configured using mail flow rules
When an email signature is applied via a mail flow rule in the Exchange admin center, it is not visible to users during email composition or sending.
Instead, the email signature will be automatically added after the email is sent, and the recipient will see it upon receiving the message.
And that’s a wrap!
No more “forgot to add it” moments from your team. With the right setup in place, emails sent from shared mailboxes no longer rely on users to manually add signatures. I hope this blog helps you understand how to configure email signatures for shared mailboxes at both the user and admin levels.
Thank you for reading! We’d love to hear your thoughts and experiences. Feel free to share your questions or insights in the comments about the setup and its implementation.


