Many organizations struggle with accidental exposure of sensitive data due to uncontrolled external access to SharePoint Online sites.
Whether documents are submitted through Microsoft Forms, uploaded by vendors, or collected for reviews & approvals, these files often need validation before external access is granted. Without a structured process, files may be shared externally without proper review or clear visibility into who approved the access.
To address this, we built an “approval-driven Power Automate workflow” that reviews uploaded files first and creates an external sharing link only after admin approval. This ensures that every file is verified, approved, and shared externally in a controlled and auditable SharePoint Online for external access.
Now, let’s see how this workflow is built and how each step works together to control external file sharing in SharePoint Online.
SharePoint Site Configuration for Restricted External Sharing
Before implementing the approval workflow, organizations should first configure SharePoint external sharing settings and governance controls to support secure collaboration with external users. Below baseline configurations ensure that external access is restricted, auditable, and aligned with organizational policies.
1. Create a dedicated SharePoint site with no direct user access to store files collected through the workflow. Keeping these files on a separate site makes it easier to manage access and ensures external sharing is handled consistently.
2. Next, enable external sharing at the site level. This allows the workflow to generate external sharing links only after admin approval.
With the SharePoint site configured for controlled external sharing, the final prerequisite is to choose a secure method for collecting files, which the workflow will later review and process.
How to Choose a Secure File Upload Method in SharePoint
When collecting files in SharePoint Online, admins typically rely on one of the two options, but each comes with trade-offs.
- The File Request option allows anyone to upload files without signing in. While this is convenient, it offers very little control. There’s no clear way to track who uploaded the file, apply for approvals, or prevent a file from being shared before it’s reviewed.
- The Document Library upload form, on the other hand, allows uploads only from internal users and supports metadata, making it easier to track and manage files. However, even this option doesn’t include a built-in way to review and approve files before they are shared externally.
To balance security and usability, we designed a Power Automate workflow that uses the Document Library form to collect files, route them for admin approval, and create an external sharing link only after approval.
For example, when a file like Confidential.docx is submitted, it remains inaccessible to external users until an admin reviews and approves it. Once approved, the workflow securely shares the link with “Anyone” access to users.
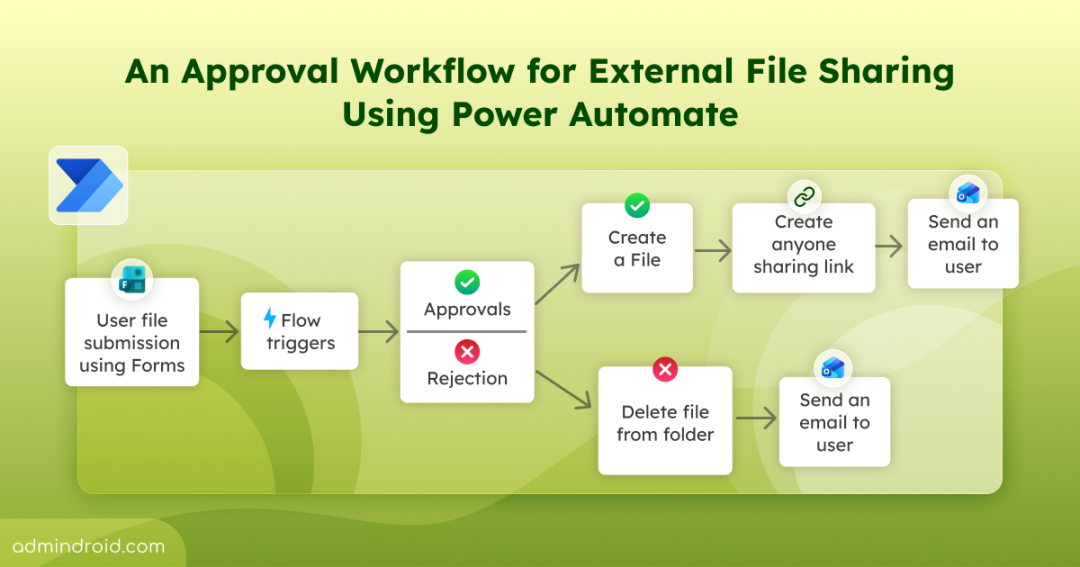
An Overview of the External File Sharing Approval Workflow Using Power Automate
This workflow is designed to review files before they are shared externally in SharePoint Online. From start to finish, it uses a single, restricted SharePoint folder to temporarily store uploaded files and manage approved files securely.
- The process begins when a user submits a file using a SharePoint document library upload form.
- As soon as the file is uploaded, it is saved to the restricted SharePoint site, which automatically triggers the approval workflow.
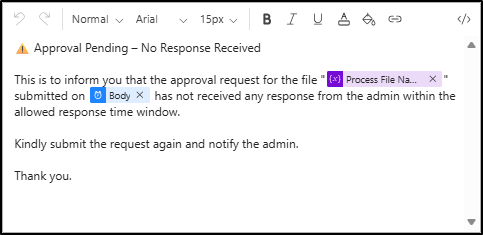
- Admins receive an approval request in Outlook or Microsoft Teams, along with details such as:
- File name
- Reason for the upload
- Whether the file is new or an updated version
- If the admin approves the request, the workflow creates an external sharing link for the file and shares it with the user.
- If the request is rejected, expires, or fails at any stage, the uploaded file is automatically deleted, ensuring unapproved files are neither stored nor shared.
Download Flow Package from GitHub: An Approval Workflow to Share Files Externally in SharePoint Online
Download the .zip package and deploy the approval workflow for SharePoint Online external sharing directly to your environment.
Import SharePoint External Sharing File Upload Approval Flow
After downloading the flow package, ensure that you have created both external sharing file upload request form and an external SharePoint Online site.
- Open Power Automate with required permissions and navigate to Solutions >> Import solution.
- Under Select a file, choose Browse, and select the downloaded zip file.
- Click Next, verify the details, and select Next to verify the connections.
- Then, select Next and replace the default environment variables with email address, SharePoint site URL, library name, and folder path.
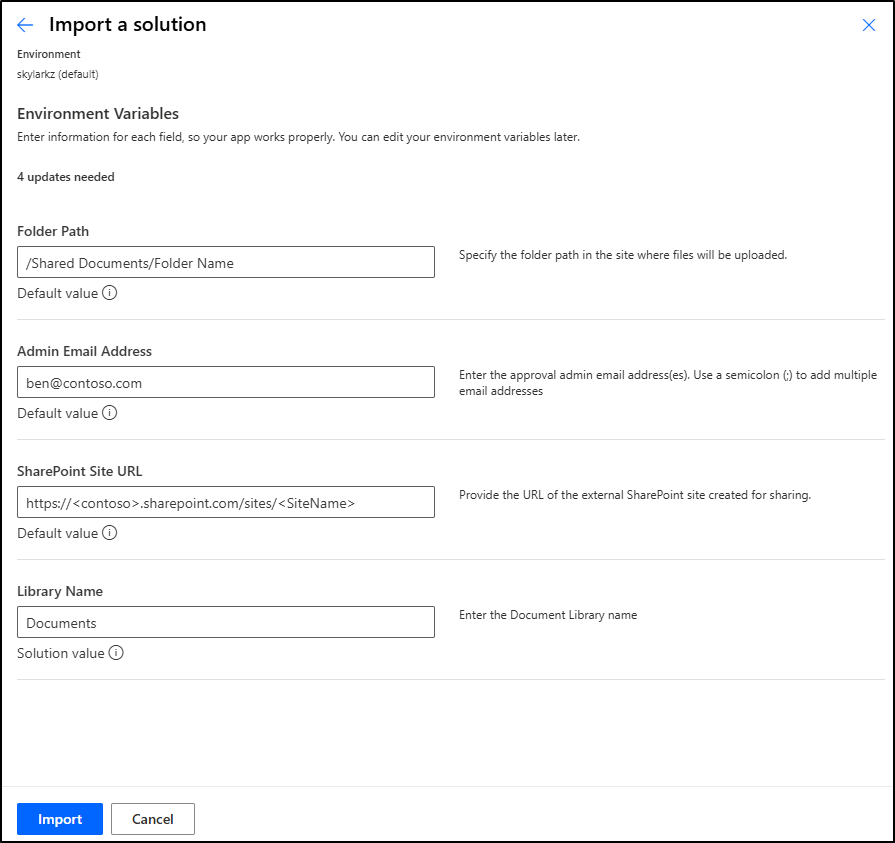
- Once you have replaced the default values, click Import to start importing the flow in solutions.
- After the import has been successful, navigate to the imported file under Solutions tab and click on the cloud flow “Approval Flow for External Sharing in SharePoint Online”.
- Once the flow import has been successful, run a test submission to check if the flow works correctly.
Important:
- If the default values are not replaced in the environment variables, then warnings will be shown and flow will not turn on in your environment.
- The Submitted By column must be available in the respective SharePoint Online folder to prevent errors during flow import. If the column is missing, the flow may be imported successfully but will not be enabled.

How to Create a SharePoint Form for File Upload in a Site
At this stage, the workflow is ready to process file submissions and automate the manual work involved in external file sharing approvals. Before testing the flow, make sure the SharePoint form used for file uploads is set up correctly.
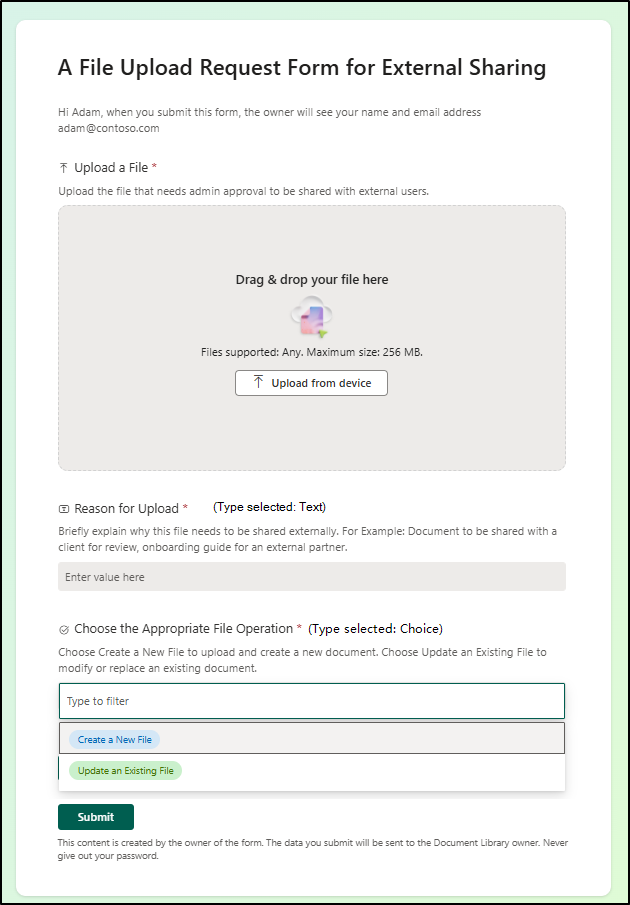
Confirm that the form includes the following fields:
- Upload a File – Allows users to attach the file they want to submit
- Reason for Upload – Helps admins understand why the file needs to be shared externally
- Choose the Appropriate File Operation – Lets users specify whether the file is a new upload or an update to an existing file. The options are Create a New File and Update an Existing File.
If any of these fields are renamed, removed, or customized, ensure the corresponding dynamic fields in the Power Automate flow are updated, so the approval process continues to work as expected.
Implement an Approval Workflow for SharePoint File External Sharing in Microsoft 365
Admins use Power Automate to automate administrative tasks such as Microsoft 365 onboarding, user offboarding, teams’ creation, and more.
Likewise, they can ensure that files are shared outside the organization only after proper admin validation using this workflow.
Before you begin, make sure the SharePoint site is properly configured, and the following prerequisites are in place.
- A dedicated SharePoint site
- SharePoint document library form with necessary fields
- Verified Power Automate connections to avoid interruptions
Now, let’s start building the flow!
Step-by-Step Guide to Create an Approval Workflow Flow for SharePoint File External Sharing Using Power Automate
Follow the steps below to create an approval workflow for SharePoint file external sharing using Power Automate.
Step 1: Configure the Trigger and Initial Actions
Step 2: Process File Names and Detect Duplicates
Step 3: Set Up Approval and Handle Approval Outcomes
Step 4: Handle Approved Files and Create Sharing Links
Step 5: File Approval Rejection After Review & Timed-Out
Step 1: Configure the Trigger and Initial Actions
The flow begins when a file is uploaded to a specific folder in SharePoint.
- Login into your Power Automate portal, click on the ‘+ Create’ tab and select Automated cloud flow.
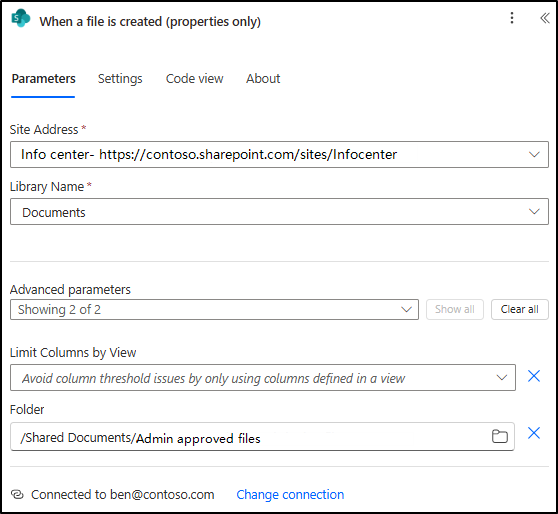
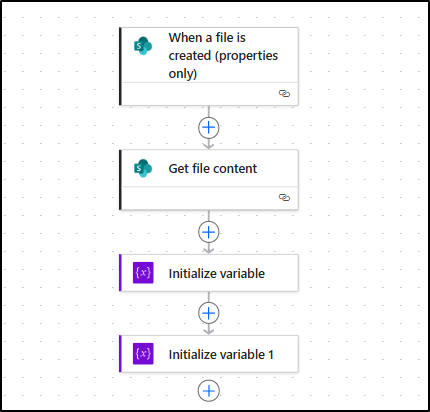
- In the Build an automated cloud flow pane, provide a flow name, search & use for the trigger “When a file is created (properties only)”.
- Select the restricted SharePoint site address & document library from the dropdown and add the appropriate folder name under the ‘Advanced parameters’.
- Next, search and add the action Get file content from the “SharePoint” connector to retrieve the uploaded file for approval.
- Use the previous used site address for all the actions and select Identifier for File Identifier field from dynamic content under When a file is created (properties only).
- Then, add the Initialize variable action to store the user’s selected file operation value (create a new file or update an existing file).
- Name: Store File Operation
- Type: String
- Value: Choose the dynamic content ‘Choose an Appropriate Operation Value’ that contains the file operation from the trigger.
- Again, add another initialize variable (Initialize variable 1), which will store the original file name with extension.
- Name: Process File Name
- Type: String
- Value: Choose the dynamic content ‘File name with extension’ from the trigger.
Step 2: Process File Names and Detect Duplicates
SharePoint automatically renames duplicate files (for example, Confidential(1).docx). To handle this correctly, add the steps below.
- Add the Set variable action to update the value for duplicate uploads.
- Name: Process File Name
- Value: Paste the below expression to remove appended version numbers.
|
1 2 3 4 5 6 7 8 9 10 11 12 |
if( contains(triggerBody()?['{FilenameWithExtension}'], ' ('), concat( substring( triggerBody()?['{FilenameWithExtension}'], 0, lastIndexOf(triggerBody()?['{FilenameWithExtension}'], ' (') ), '.', last(split(triggerBody()?['{FilenameWithExtension}'], '.')) ), triggerBody()?['{FilenameWithExtension}'] |
- Next, add Get Files (properties only) to filter the files from the SharePoint folder.
- Enter the Site Address and Library Name from the drop down.
- Under Show all, add as follows:
- Limit entries to folder: Same folder as trigger
- Filter Query: Add below expression that matches both original and duplicate file names
|
1 2 3 4 5 6 7 |
concat( 'FileLeafRef eq ''', variables('Process File Name'), ''' or FileLeafRef eq ''', triggerBody()?['{FilenameWithExtension}'], '''' ) |
- Then, add the Initialize variable (Initialize variable 2) to get the length(count) of the files filtered.
- Name: Total File Count
- Type: Integer
- Value: length(body(‘Get_files_(properties_only)’)?[‘value’])
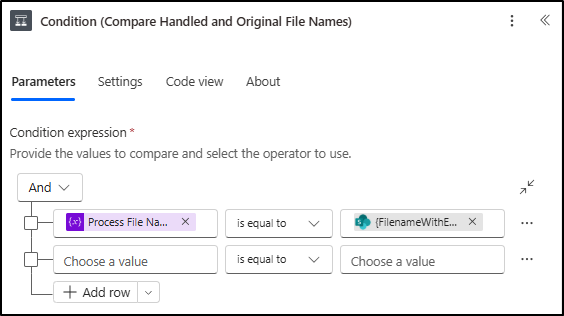
- Now, add a Condition (Name as: Compare Handled and Original File Names), set the values from the table below to compare the processed file name with the original file name.
| Dynamic content “Process File Name” from Variables. | is equal to | Dynamic content “File name with extension” from trigger |
- If the condition is True: This means the file is being uploaded as a new file and the names match.
- Add a Compose action.
- Use the expression below to reduce the file count by 1.
|
1 |
sub(variables('Total File Count'), 1) |
- If the condition is False: This means the file is being updated.
- Add a Compose action. Set the input to the dynamic content “Total File Count” (no adjustment needed).
- Next, add another Compose action (Compose 2) to prepare the value for the Submitted By column (Person type). Use the following expression in the Inputs field:
|
1 2 3 |
{ "Claims": "i:0#.f|membership|<CreatedByEmail>" } |
Replace the <CreatedByEmail> with the dynamic content “Created By Email” from the trigger.
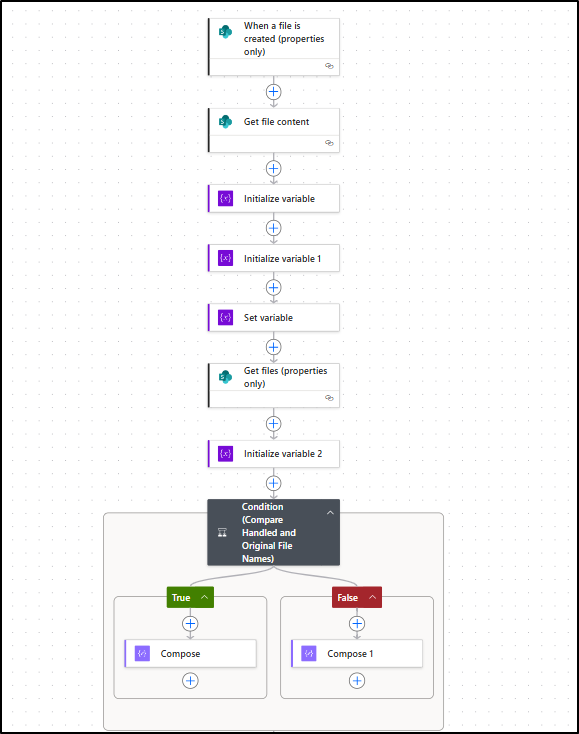
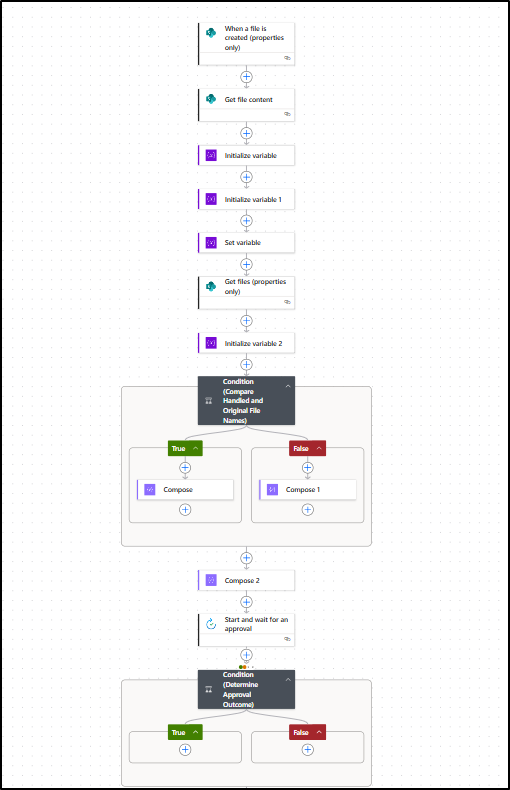
Now that you have built the initial actions and built the file name handling actions. Now, your flow should look like this.
Step 3: Set Up Approval and Handle Approval Outcomes
This step sets up admin approval, and the flow moves forward depending on the approval result. Follow the steps below to add the necessary approval actions.
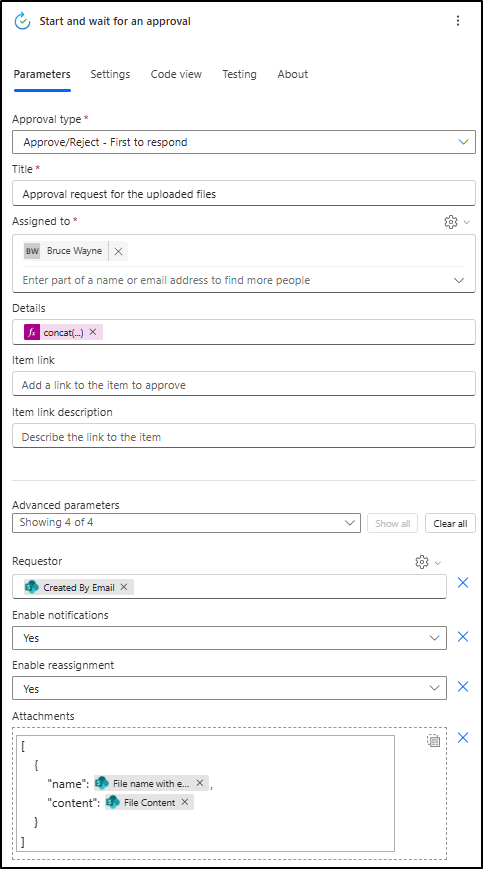
- Add Start and wait for an approval from “Standard approvals”.
- Select Approval type: Approve/Reject – First to respond
- Title: Approval request for uploaded file
- Assigned to: Admin email addresses (semicolon-separated)
- Details: Paste the below expression that will show details like reason for the upload, duplicate detection, file operation selected, and action time out reminder for admin.
|
1 2 3 4 5 6 7 8 9 10 11 12 13 14 15 16 17 |
concat( 'Reason for upload: ', triggerBody()?['Reason'], decodeUriComponent('%0A'), 'File operation selected: ', triggerBody()?['Choose_x0020_the_x0020_Appropriate_x0020_File_x0020_Operation/Value'], decodeUriComponent('%0A'), 'Duplicate: ', if( contains(triggerBody()?['{FilenameWithExtension}'], '(1).'), 'Yes', 'No' ), decodeUriComponent('%0A%0A'), 'Note: This approval request will expire 2 days from the date it was submitted. ', 'After expiration, no further action will be taken, even if it is approved or rejected.' ) |
- Under Advanced options:
- Enable reassignment: No
- Enable notifications: Yes
- Requestor: Dynamic content ‘Created By Email’ from the trigger
- Add Attachments:
- Name: Dynamic content ‘File name with extension’ from the trigger
- Content: Dynamic content ‘File content’ from the Get file content action
- In Settings, set Action timeout: P2D (2 days)
Note: Above values are based on the SharePoint forms fields. If you change field names, use the exact phrase here.
- Next, add a Condition (Determine Approval Outcome) below that uses approval outcomes and handles timeout automatically.
| coalesce(outputs(‘Start_and_wait_for_an_approval’)?[‘body/outcome’], ‘TimedOut’) | is equal to | Approve |
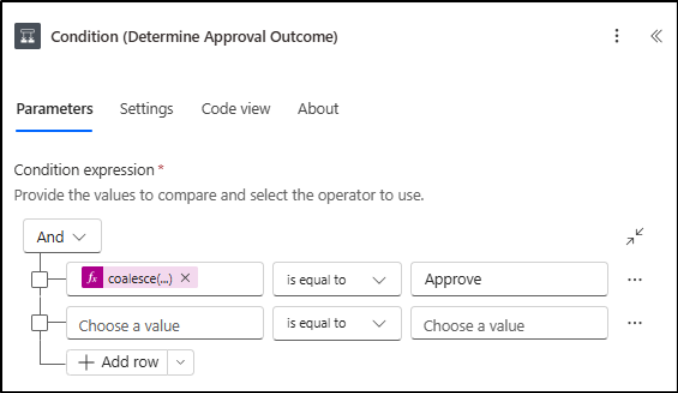
This expression retrieves the approval outcomes in the flow, and if no outcome is received, it passes the value as “TimedOut”.
Click Settings, under Run after, mark the below operations:
- Is successful
- Has timed out
Now, the flow should appear as shown below.
After completing this step, the flow will be extended to handle cases separately. There are three possible outcomes: the admin approves the file, the admin rejects it, or the approval action times out. Let’s proceed to the next step, where the admin approves the attachments.
Step 4: Handle Approved Files and Create Sharing Links
Since there are multiple conditions after approval, here are the simplified steps to understand how this part actually works and what actions are used.
If approval is granted, the flow proceeds based on the user’s selected operation.
1. If “Create a New File” is selected:
- Add ‘Update file properties’ action to set metadata (Reason, Submitted By).
- Add ‘Create sharing link for a file or folder’ action and add the below:
- Link type: View only
- Link scope: Anyone with the link, including anonymous
- Link expiration: Use the following expression to configure the link to expire after 30 days.
|
1 |
addDays(utcNow(), 30) |
- Add ‘Send an email (V2)’ action to share the link with the user.
2. If “Update an Existing File” is selected:
- Add ‘Get files (properties only)’ action to locate the original file.
- Add ‘Update file’ action to replace content.
- Update file properties to replace the “Submitted By” value using ‘’Get file meta data’ and ‘Update file properties’ action.
- Notify the user by email by adding Send an email (V2).
- Delete the temporary uploaded file using the ‘Delete file’ action.
- If a duplicate is detected:
- Notify admin and user via Teams and Email.
- Add Delete file action to remove the uploaded copy.
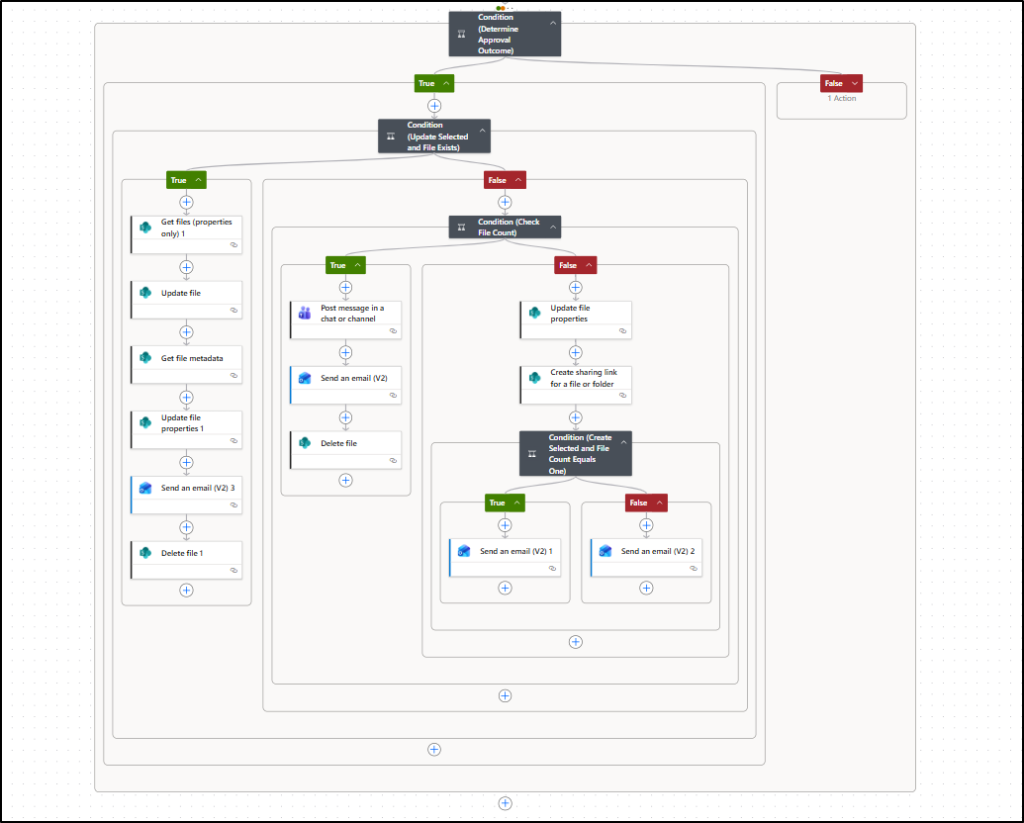
With this, the entire True path of the admin approval under Condition (Determine Approval Outcome) is complete and should appear as shown below.
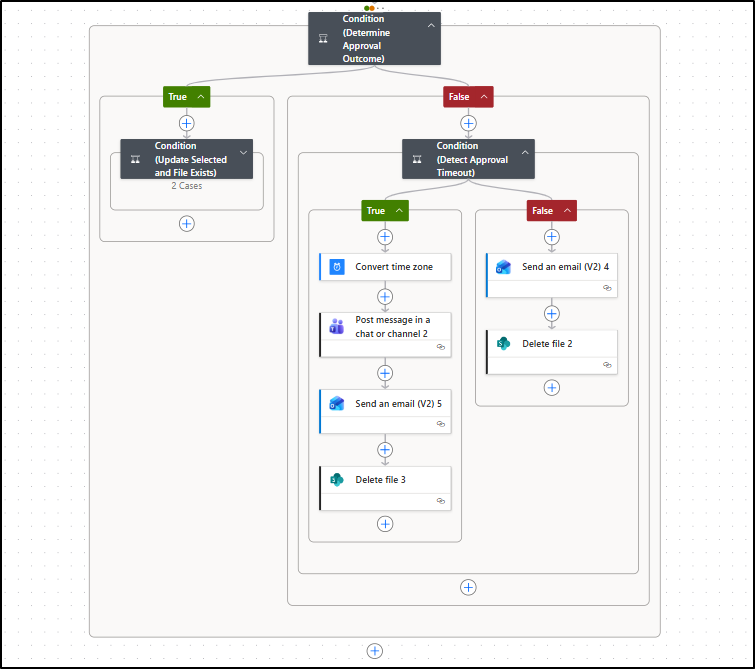
Step 5: File Approval Rejection After Review & Timed-Out
If the admin rejects the approval, i.e., if the condition (Determine Approval Outcome) is False, follow the below steps:
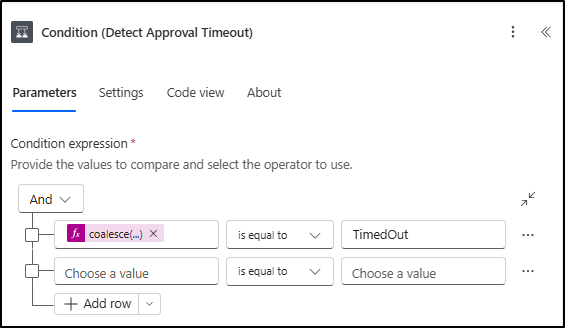
- Add a new Condition (Detect Approval Timeout (Case 5)) using the expression below to check whether the approval request has timed out:
| coalesce(outputs(‘Start_and_wait_for_an_approval’)?[‘body/outcome’], ‘TimedOut’) | is equal to | TimedOut |
- If the condition (Detect Approval Timeout) is True: Convert submission time using Convert time zone.
- Then, add the Post message in a chat or channel & Send an email (V2) to notify the user about the timed-out action.
- Finally, add Delete file action to remove the file from the SharePoint site folder automatically.
- If the condition (Detect Approval Timeout) is False:
- Add Send an email (V2) to notify the user about the file rejection with approver comments.
- Then, add Delete file to remove the file from the SharePoint site folder automatically.
After completing these steps, the flow will appear as shown below.
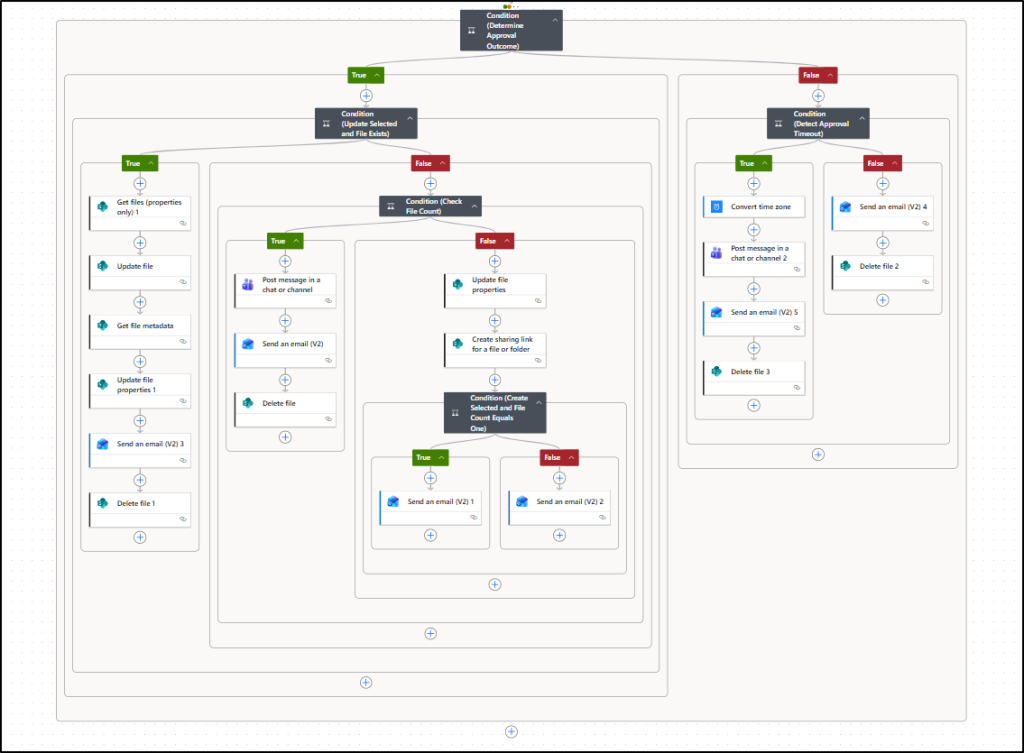
That’s it! The flow is now complete. Turn on the flow and test it in a test environment. Final flow image has been attached for your reference.
How the Approval-Based External Sharing Flow Works in Different Scenarios
Once a file is submitted, the flow pauses at the approval stage and waits for an admin decision. Based on the outcomes, such as approval, rejection, or timeout, the flow continues accordingly.
The following scenarios explain how the workflow behaves in common real-world situations.
Case 1: When a new file has to be created and no duplicate file is found with the same name.
A user submits a file named Confidential.docx, and the admin approves it.
- The file is stored in the SharePoint folder.
- File properties, including Submitted By, are updated.
- Since no file with the same name exists, a sharing link is created.
- The sharing link is emailed to the user for external sharing.
Case 2: When a created file needs to be updated in the SharePoint site.
A file named Confidential.docx already exists and has an active sharing link.
- The user uploads an updated version of the same file.
- SharePoint temporarily saves it as Confidential (1).docx.
- After admin approval:
- The original file content is updated.
- The existing sharing link remains valid.
- Users continue accessing the latest version using the same link.
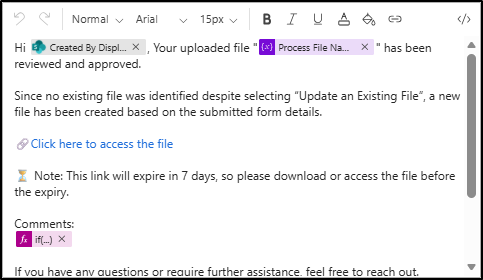
Case 3: When a new file has to be created but the user selects the update file option.
Assume there is no file named “Confidential.docx” in the folder.
- A user uploads a file with the same name and selects ‘Update an Existing File’.
- After admin approval, the flow creates a new file because no existing file with that name is found.
- A sharing link is then generated and sent via email, informing the user that a new file was created since no previous file existed.
Case 4: When a file has to be updated, but the user selects the create file option.
A file named Confidential.docx already exists.
- The user selects Create a New File instead of Update an Existing File.
- Even if the admin approves:
- The flow detects a duplicate.
- The file is not updated or created.
- The admin receives a Teams notification about the duplication.
- Also, the user receives an email asking them to rename the file and resubmit it.

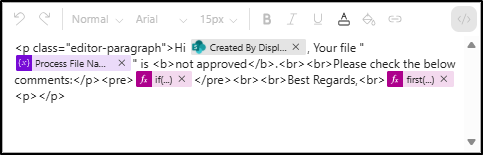
Case 5: When the admin rejects the file.
The admin reviews Confidential.docx and rejects it.
- The user receives an email with the admin’s comments.
- The uploaded file is deleted from the SharePoint folder.
- No sharing link is created.
Case 6: When the approval action is timed out.
The admin does not respond to the approval request.
- The flow automatically treats the request as rejected.
- A Teams notification is sent to the admin.
- The user receives an email explaining the timeout.
- The file is removed from SharePoint.
Case 7: What happens when two users upload the same file at the same time.
Two users upload Confidential.docx simultaneously.
- The first file is treated as the original.
- The second upload is identified as a duplicate.
- The second request follows the same behavior as Case 4.
Case 8: What happens if the same file name existed in a different file extension.
Two files share the same name but have different extensions.
- Confidential.docx and Confidential.pdf are treated as separate files.
- Since the extensions differ, no duplicate is detected.
- Both files are processed and shared independently.
Now that you have seen how the approval-based flow behaves in different scenarios, it is important to understand the common errors that may encounter and how to resolve them effectively.
Common Errors and Fix for the Flow
- The API operation does not contain a definition for a parameter item/SubmittedBy.
This error occurs when the column “Submitted By” is not found in the folder, or a different name is used.
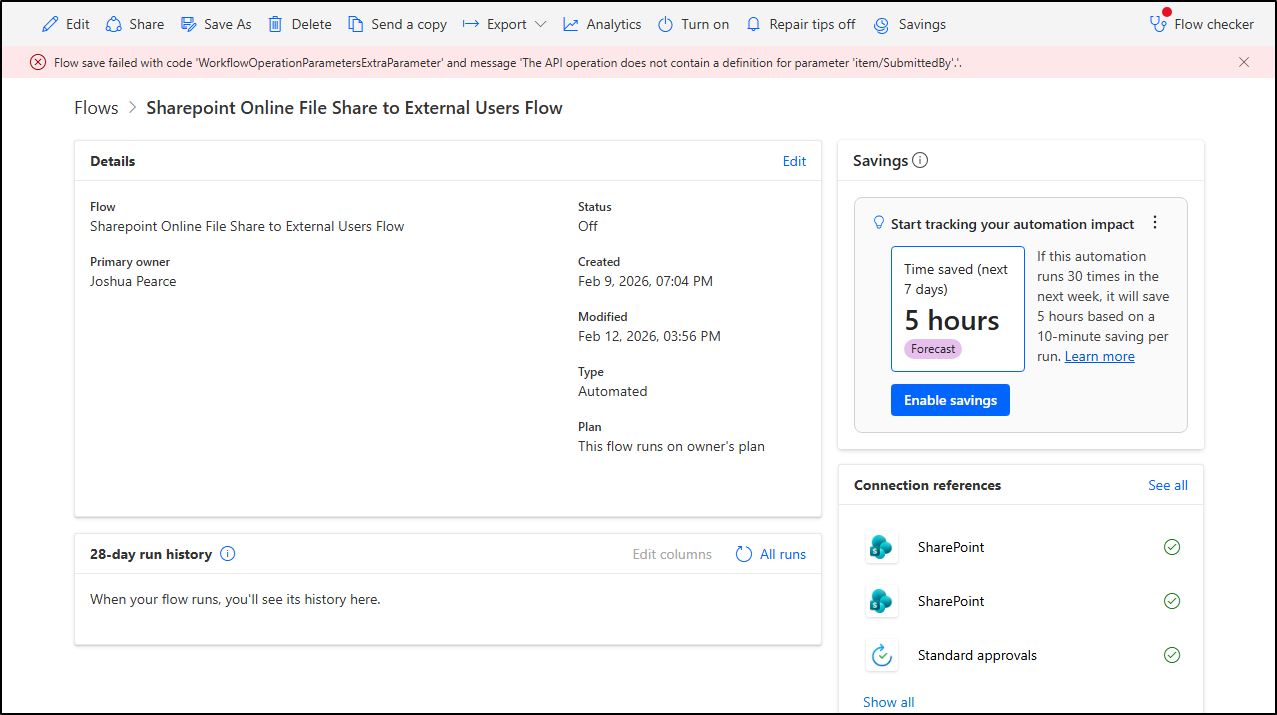
Solution: To resolve this error during flow import or in an existing flow, ensure that the SharePoint column name is exactly named as “Submitted By.”
Next, open the Update file properties action in the flow, remove the parameter Item.item/SubmittedBy, and then save the flow again.
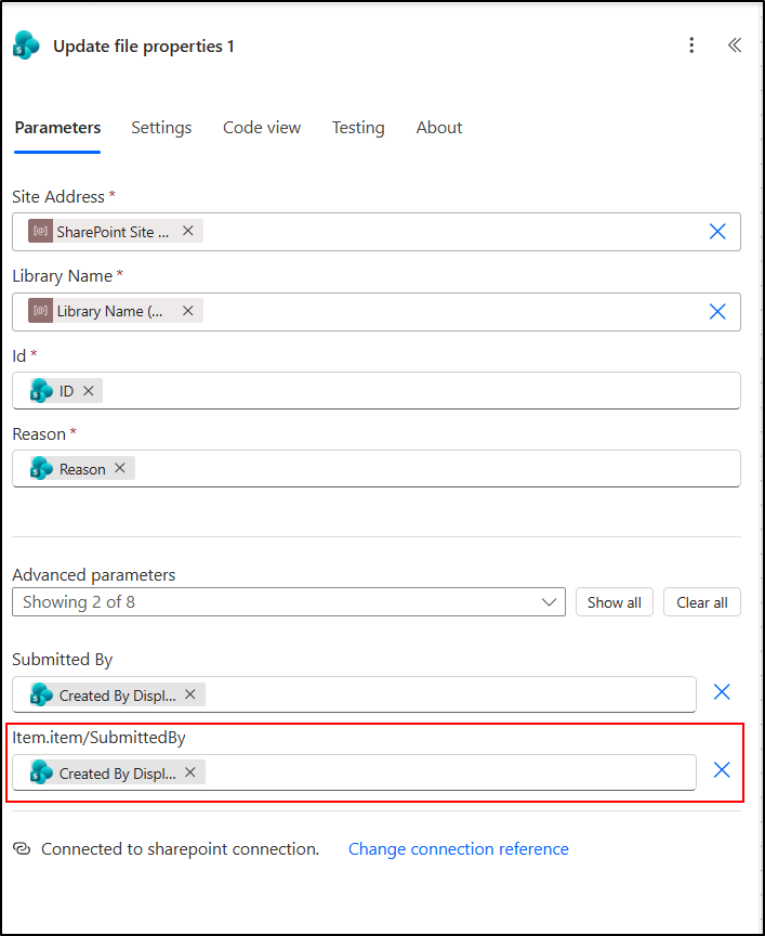
Note:
The “<SubmittedBy>” reference may vary depending on your actual SharePoint column name or its internal name, so adjust it accordingly before saving.
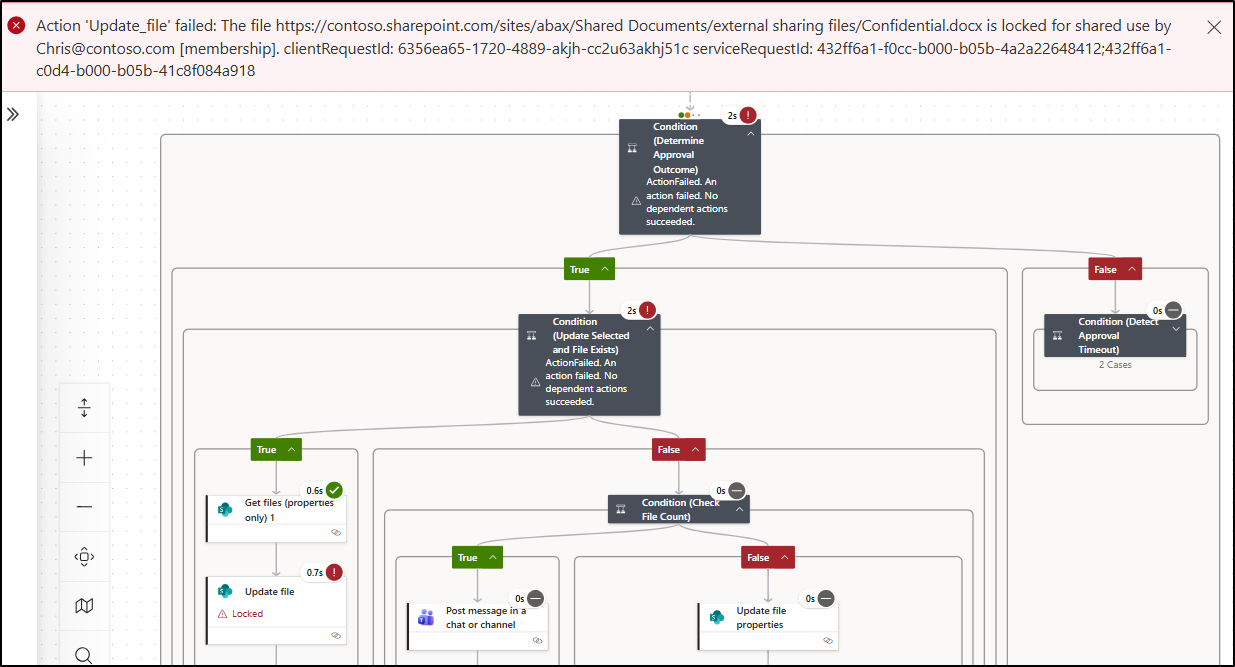
2. Action Update failed: The file <FileLink > is locked shared use by chris@contoso.com.
This error occurs when the file is opened by the user specified in the email address.
Wrapping Up
With this workflow in place, files uploaded to SharePoint are no longer shared externally by default. Every file is reviewed, approved, and shared only when explicitly authorized, ensuring consistent control without adding extra manual effort for admins.
Similarly, you can automate password-expiry notifications and automated external user invitations that makes day-to-day admin tasks easier.
Feel free to share your thoughts or questions in the comments about the flow and its implementation.


