On Day 4 of Cybersecurity Awareness Month, learn how to create and use custom Sensitive Information Types (SITs) in DLP to protect your organization’s sensitive data. Stay tuned for upcoming blogs in the Cybersecurity blog series.
Microsoft 365 already comes with built-in sensitive information types like credit card numbers, social security numbers, and passport details. But what about the data that’s unique to your organization, like Employee IDs, internal project codes, or client contract numbers? These identifiers may not look as obviously sensitive as a bank account number, yet if they’re leaked, they could expose employee records, confidential deals, or business-critical projects.
This is where custom Sensitive Information Types (SITs) become essential. By defining your own SITs in Microsoft Purview, you can extend Data Loss Prevention (DLP) to detect and block these unique patterns before they leave your environment.
In this blog, we’ll explore how to create custom sensitive information types and implement them in Purview DLP to strengthen your organization’s data protection.
What is a Sensitive Information Type (SIT) in Microsoft Purview?
A Sensitive Information Type (SIT) in Microsoft Purview is a pattern-based classifier designed to detect specific types of sensitive data within your organization’s content. These classifiers utilize patterns such as regular expressions, keyword lists, and proximity rules to identify sensitive information like social security numbers, credit card details, or bank account numbers.
Microsoft Purview offers several categories of SITs to address various data protection needs.
Categories of sensitive information types:
- Built-in Sensitive Information Types- Predefined SITs provided by Microsoft, covering common sensitive data patterns like credit card numbers and social security numbers.
- Named Entity Sensitive Information Types- SITs that detect specific entities such as person names, physical addresses, and medical terms. These are further divided into:
- Bundled: Detect all types of a category at once, useful for broad DLP policies. Ideal for identifying any physical address across multiple regions.
- Unbundled: Detect a specific type or region, useful for focused DLP policies. Suitable for detecting physical addresses only within a particular country.
- Custom sensitive information Types- Allows organizations to define their own SITs to detect unique patterns specific to their needs, offering flexibility beyond built-in options.
- Exact Data Match Sensitive Information Types- SITs created from scratch to detect items with exact values, ensuring precise identification.
Why Sensitive Information Types Matter for Data Loss Prevention (DLP)
SITs are used across various compliance solutions, including DLP, retention labels, sensitivity labels, Insider Risk Management, auto-labeling policies, and more. In DLP specifically, SITs enable policies to detect and prevent the sharing of sensitive data across Microsoft 365 services, such as Exchange, Teams, SharePoint, and OneDrive. For example, if an employee tries to share a document containing a credit card number, a DLP policy configured with the corresponding SIT will detect it. Then, it blocks the action or notifies the user, preventing potential data leakage.
Understanding the Building Blocks of SITs
Sensitive Information Types (SITs) rely on specific components to accurately identify sensitive data. Understanding these key terms helps you create precise custom SITs and enforce effective DLP policies in Microsoft Purview.
Patterns: Patterns define what a SIT detects. They consist of:
- Primary Element: The main item the SIT looks for, such as a regular expression, keyword list, keyword dictionary, or function.
- Regular Expression: A pattern-matching technique used to identify specific text strings, such as a 9-digit Social Security Number by defining a sequence of characters that form a search pattern.
- Keyword List: A collection of words or phrases that SITs use to identify sensitive information. For example, a list containing terms like “Employee ID” or “Staff Number” can help detect related data.
- Keyword Dictionary: An organized collection of keywords, often structured in a file format like CSV or TXT, that SITs reference to identify sensitive information.
- SIT Function: Predefined functions in Microsoft Purview that perform specific pattern-matching tasks, such as detecting SSN or credit card numbers.
- Supporting Elements: Additional items that act as supportive evidence to increase the confidence level of a match.
- False Positives: The system flags something as sensitive that is actually harmless.
- False Negatives: The system completely misses something sensitive, allowing a security risk to slip through undetected.
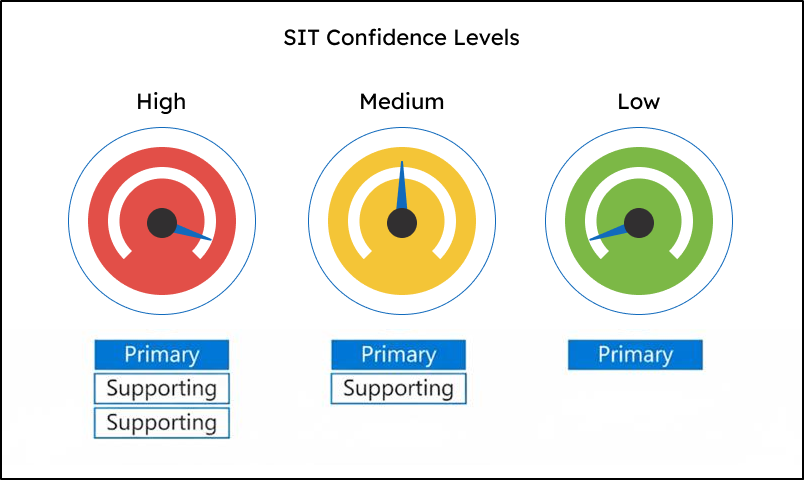
| Confidence Level | Primary Element | Supporting Elements | False Positives | False Negatives |
| High | Required | Many, in proximity | Fewest | Most |
| Medium | Required | Average amount | Average | Average |
| Low | Required | Little to none | Most | Fewest |
- Proximity: Specifies how close supporting elements should be to the primary element to be considered a valid match.
- Confidence Level: It is the measure of how certain the detected content matches sensitive information pattern. Confidence levels are categorized as High, Medium, or Low.
Create a Custom Sensitive Information Type in Microsoft Purview
License Required: Microsoft 365 Enterprise plan (E5)
You can create a custom SIT in Microsoft Purview using one of the two methods, depending on whether you want to start fresh or leverage an existing template.
1. Create a Custom SIT from Scratch in Microsoft Purview
Follow the steps below to create a custom Sensitive Information Type (SIT) from scratch in Microsoft Purview.
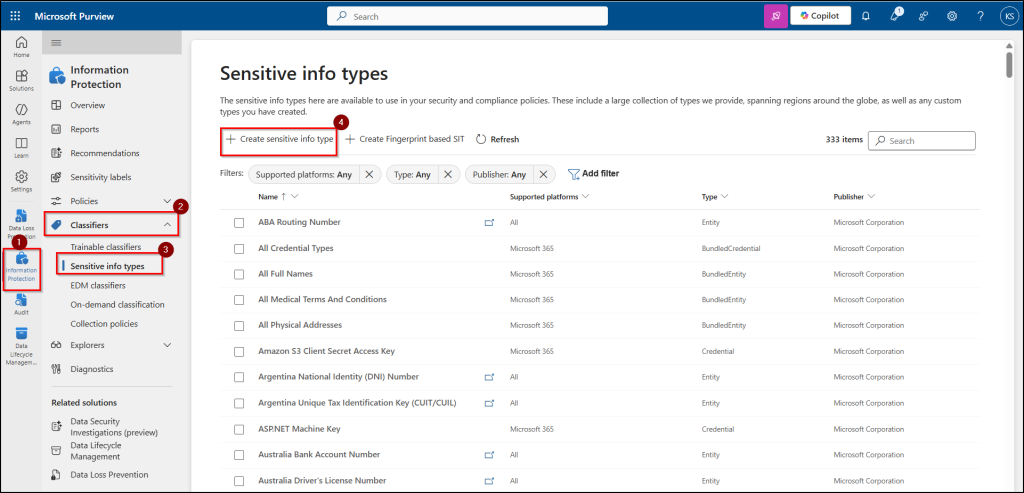
- Sign in to the Microsoft Purview portal and navigate to Solutions → Information Protection → Classifiers → Sensitive info types.
- Click on + Create sensitive info type, enter a Name and Description for your custom SIT, and click Next.
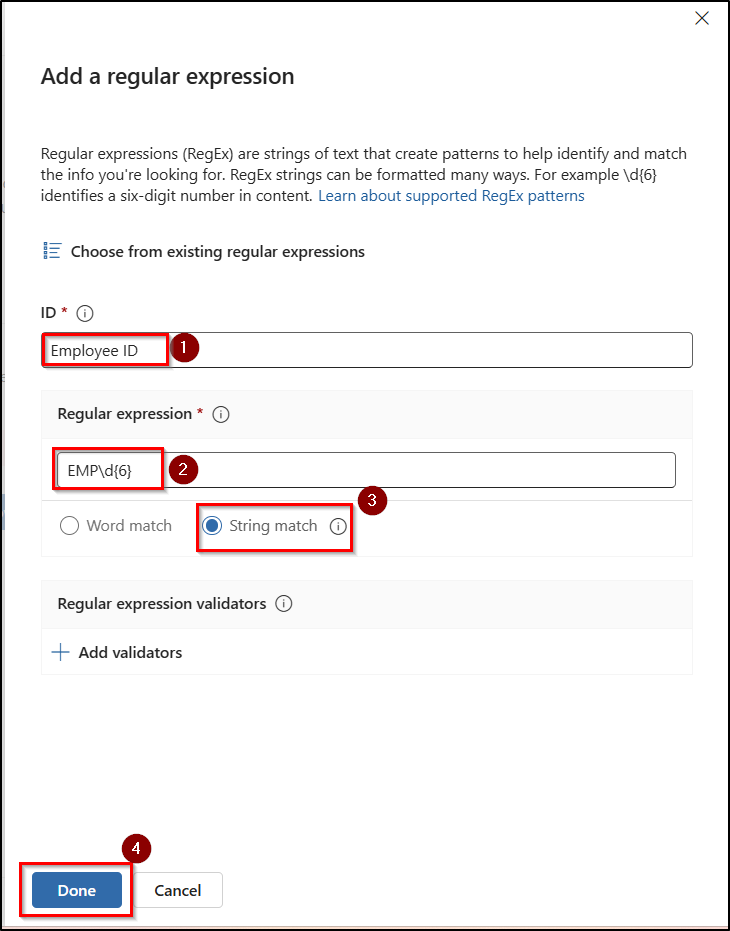
- Click on Create pattern, set the Confidence level as high, and click + Add primary element and select Regular expression.
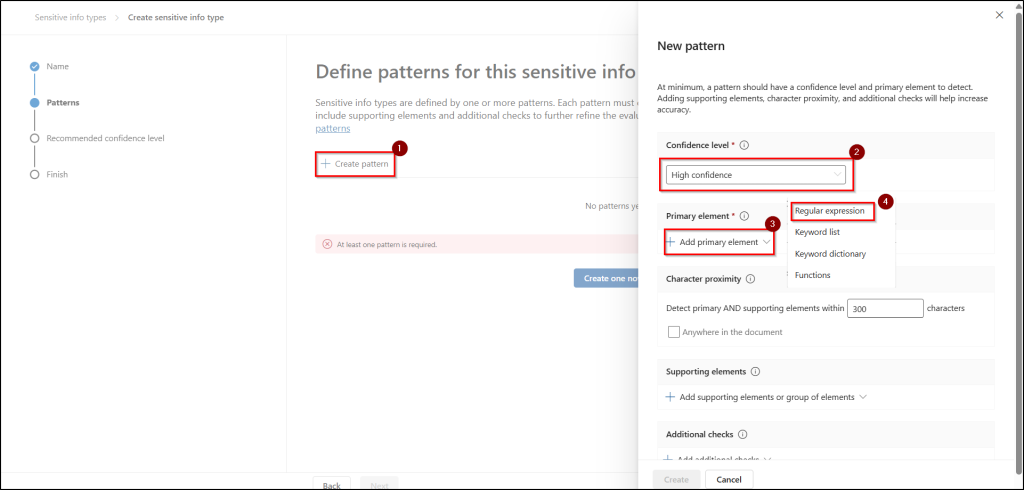
- Enter the name in the ID field, type EMP\d{6} in the regular expression field, select string match, and then click Done.
- Enter a value for Character proximity to define how close the supporting elements should be to the primary element. Alternatively, select Anywhere in the document to search the entire content for matches, allowing more precise detection regardless of distance.
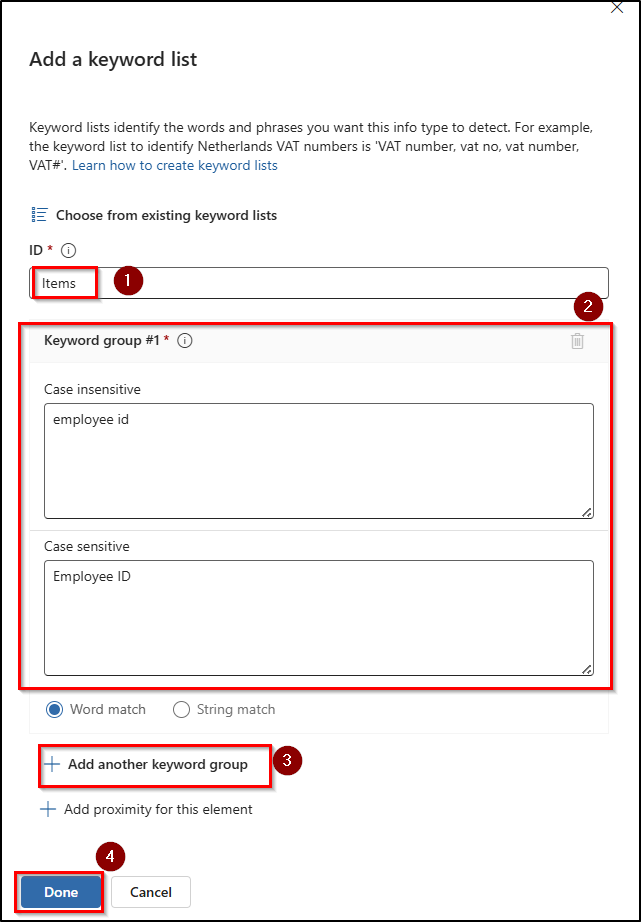
- Click on Add supporting elements or group of elements and select keyword list from the drop down.

- Enter name in the ID field and fill the case insensitive or case sensitive box with supporting words in Keyword group #1.
- Then, select Add another keyword group to include more relevant keywords like personnel ID, staff number, etc, and set as word match, click Done.
- If you want to include extra checks, select Add additional checks to further validate the presence of the sensitive information. You can choose from:
- Exclude specific values
- Starts or doesn’t start with characters
- Ends or doesn’t end with characters
- Exclude duplicate characters
- Include or exclude prefixes
- Include or exclude suffixes
- Click on Create to save the pattern and select Next.
- Review your settings and then click on Create to create the custom SIT.
Testing the Effects of Custom SIT in Microsoft Purview
Once you’ve created a custom sensitive information type, the next step is to test whether it correctly detects the data patterns you defined. For this, prepare a simple test file containing content that matches your SIT pattern. Testing ensures the SIT flags the right information without generating false positives. Follow the steps below:
- In the Purview portal, go to Solutions → Information Protection → Classifiers → Sensitive info types.
- Select the custom SIT you created.
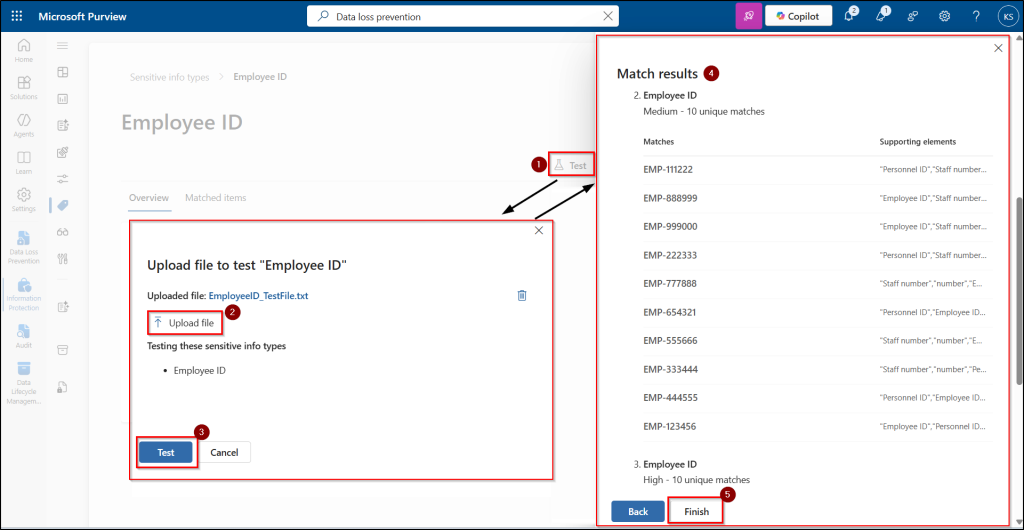
- Click Test and upload your test file containing employee ID.
- Run the test and review the results to see which content was flagged.
Optionally, try with another file containing unrelated content to make sure it doesn’t trigger a match.
2. Create a Custom SIT from an Existing SIT in Microsoft Purview
Follow these steps to use a built-in SIT as a template to create a custom SIT by modifying its patterns and supporting elements to suit your requirements.
- Sign in to the Microsoft Purview portal and go to Information Protection → Classifiers → Sensitive info types.
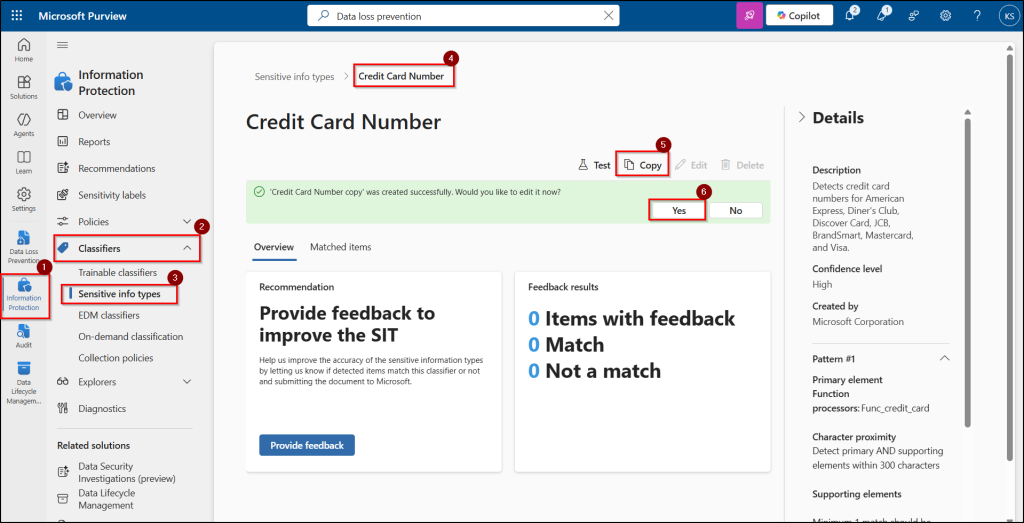
- Find and select the SIT you want to copy and on the overview page, click Copy.
- When the copy is ready, choose Yes to open it for editing.
Use the same steps followed when creating a SIT from scratch; adjust the details to fit your organization’s needs, then save your custom version.
Tip: You can refer all Microsoft built-in Sensitive Information Type (SIT) definitions and choose one SIT among them to copy and modify an existing based on your organization needs.
Configure DLP Policies with Custom Sensitive Information Types
With the custom SIT ready, let’s create a DLP policy and test how it works in action. Follow these steps to create the DLP policy with the custom SIT:
- Sign in to the Microsoft Purview compliance portal and navigate to Data loss prevention → Policies.
- Click + Create policy and choose what type of data to be protected.
- Choose a template from the Custom categories, select Custom policy, and click Next.
- Give the policy a Name, a short Description, and click Next.
- Click +Add or remove admin units, choose an admin unit you want to assign the policy to, and select Next.
- Choose the Locations to apply the policy. (e.g., Teams chat & channel messages, Exchange email, SharePoint sites, OneDrive accounts, or Endpoints).
- Now, define the policy settings by selecting Create or customize advanced DLP rules and click Next.
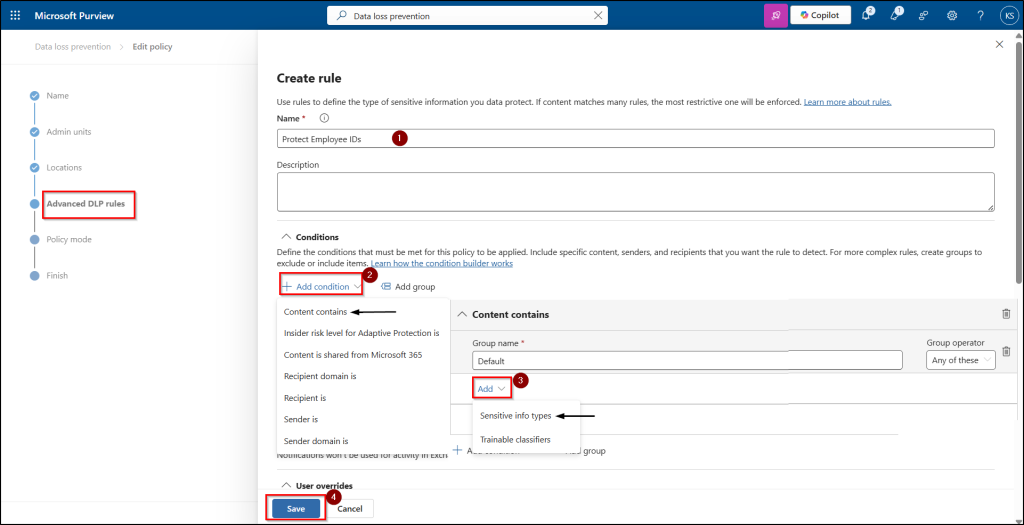
- Click +Create rule, give a name, and click +Add conditions, select Content contains →add →sensitive info types.
- Search for the created custom SIT and click Add.
- Under Actions, click +Add an action, select Restrict access or encrypt the content in Microsoft 365 locations and choose Block everyone.
- You can set up user notifications, incident reports / alerts and other additional options, then click Save.
- Choose Policy mode and click Next.
- Review all settings in the summary and click Submit to create the policy.
Testing the End User Experience with DLP Policies
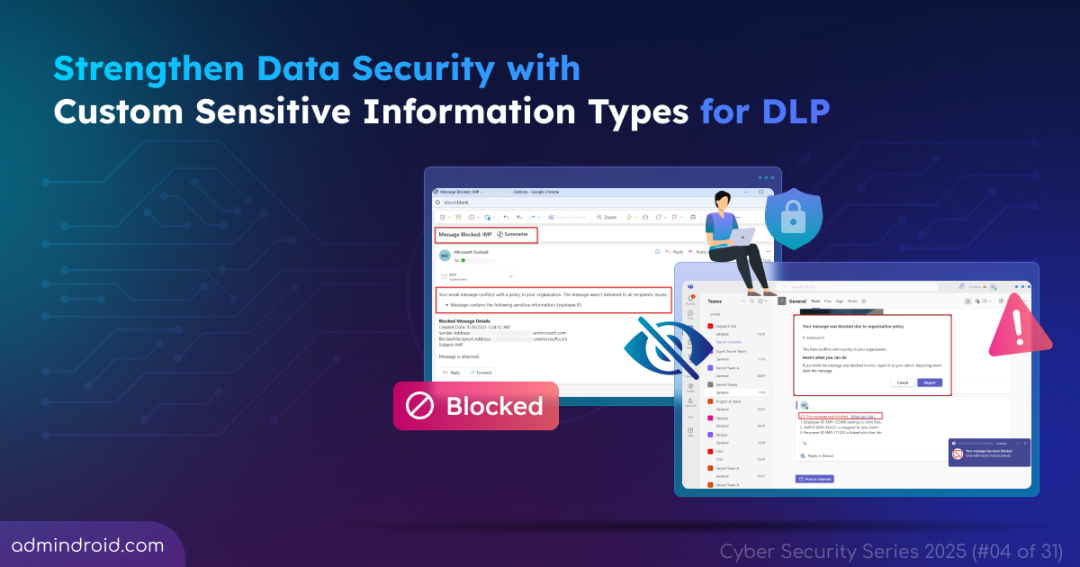
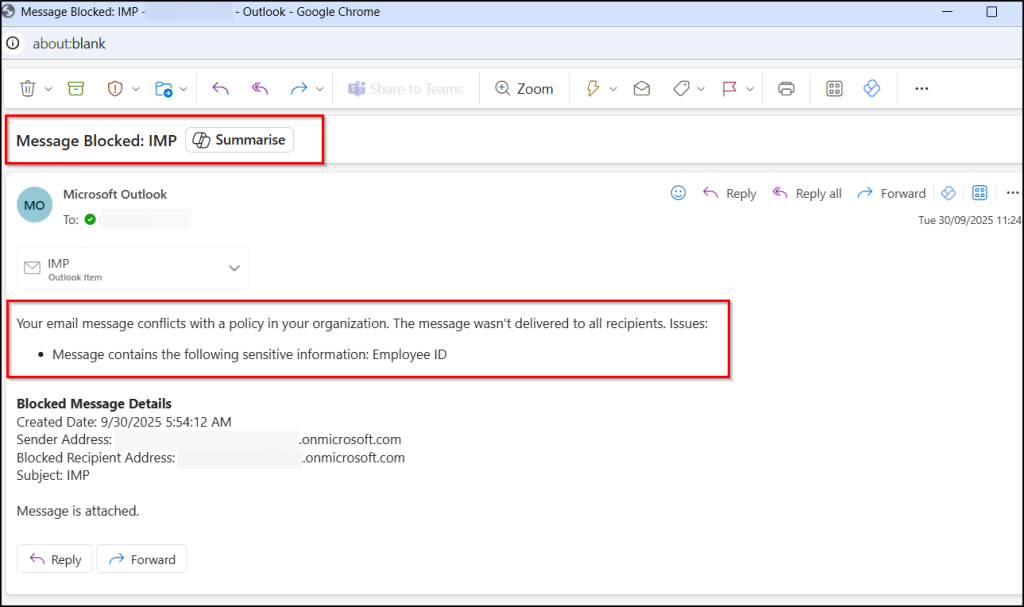
Once your DLP policy is turned on, sending a message with employee ID details triggers the policy and blocks the message.
The images below show how messages with employee IDs matching the custom SIT are blocked in Teams and Exchange.

With that, you’re all set! We’ve explored how to create custom SITs and configure DLP policies using them to effectively monitor and block sensitive content. I hope this blog empowers you to strengthen your organization’s data security. Share your thoughts or experiences in the comments. Stay vigilant and happy securing!


