
Workbooks in Entra ID are known for their versatile visual display of complex Entra ID sign-in and audit logs in an understandable way💯. So far, we have completely learned how to use Entra workbooks in Microsoft 365 and explored some of the open Workbook templates in the previous blog. 😎 Now, it’s time to step up and create your own Entra workbooks. Let’s get started! 👇
Need to Create a New Workbook in Microsoft Entra ID
Workbooks let you create interactive dashboards enriched with visually engaging charts and comprehensive reports on Microsoft 365 sign in and audit logs. This tool facilitates a deeper understanding of Microsoft 365 logs, enabling users to extract valuable insights efficiently.
Workbooks in Microsoft Entra ID are tailored for Identity and Access Management scenarios exclusively. Entra workbooks provide a range of ready-to-use templates, including:
- Authentication prompts analysis workbook
- Conditional Access gap analyzer workbook
- Sign-in failure analysis workbook
- Multifactor authentication gaps workbook
- Risk-based access policies workbook
- Sign-in analysis workbook
- Cross-tenant access settings, and more.
However, we get it – sometimes those templates need a little personal touch. But don’t worry! You have the flexibility to edit the identity workbook template and tweak them as needed. 😃
However, if you’re looking for a fully personalized Entra ID Workbook, simply updating the template might not cut it. Sure, it’s an option, but the manual process of making changes to each element in the identity Workbook can be quite time-consuming. 😕
💡Instead, opt for creating a new workbook in Entra ID! This way, you can focus on specific Entra ID sign-ins and audit logs, such as Conditional Access policies effectiveness, app sign-ins, SSPR status report, and other essential insights without the hassle of modifying existing templates. It’s a time-saving approach that guarantees a workbook perfectly aligned with your requirements.
Create New Workbooks in Entra ID
To create and work with a new workbook in Microsoft Entra ID, follow the steps below:
- Sign in to the Microsoft Entra admin center.
- Navigate to the Identity section and select “Workbooks” from the Monitoring & health section.
- On the Workbooks page, click the “+ New” option at the top.
- Now, click “+ Add” to start creating your Entra workbook.
- Once done, you’ll be shown with 6 options below, which are the building blocks needed to build an interactive dashboard with your Entra logs:
1. Configure Texts to Create New Workbooks in Entra ID
The “text” part in the workbooks helps admins to configure instructional texts in new Entra workbooks to guide users through steps, create clear section headings, add introductions and explanations to the customized Entra Workbook.
When you choose the “Text” option, you’ll see an edit box with two tabs: “Markdown Text” and “Preview.” Here, you can input your instructions using markdown, allowing you to utilize features like different headings, font styles, hyperlinks, and tables.
Let’s consider an example:
Let’s say you’re creating a workbook to monitor Conditional Access policies changes. To explain why monitoring these policies is essential, you’ll want to include an introduction section. Here’s an example of how you can structure it:
**Need to Monitor Conditional Access**
“As Conditional Access policy are essential for user access control in Microsoft 365, admins need to [link text] (link) to ensure the security of the organization”
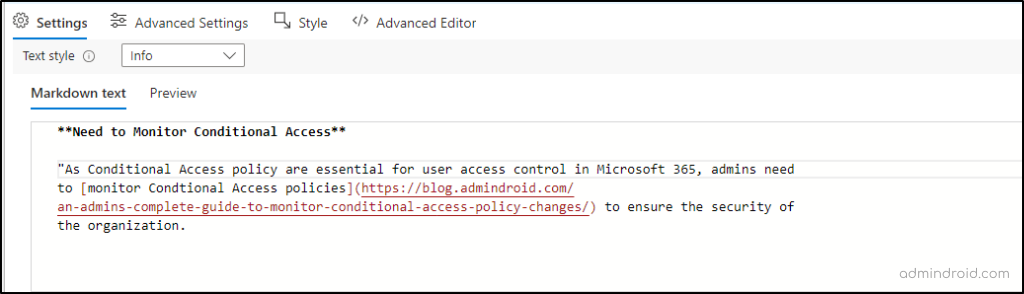
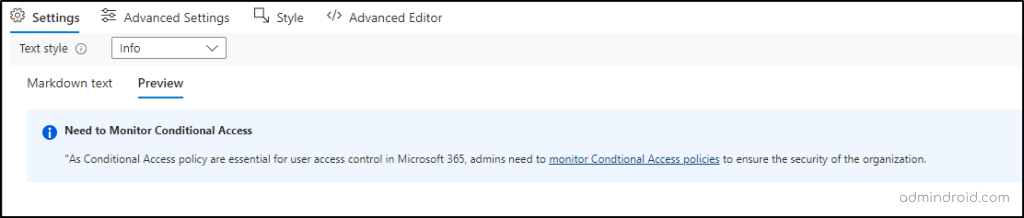
You can add links in the texts as we have shown in the example. As it is information, I styled the link as “Info“. However, you have the flexibility to modify the link style based on their significance using options like “Warning,” “Error,” or “Success.” Before finalizing your text, you can preview it using the “Preview” tab.
Furthermore, you can incorporate parameters directly into your markdown text. For instance, if you’ve set up a parameter like “ConditionalAccessCount,” you can seamlessly integrate it into your text. These parameter values dynamically change within the text according to user input, ensuring that your insights remain current without the need for manual updates.
2. Configure Queries in Microsoft Entra Workbooks
The ‘Query’ component is pivotal for accessing and analyzing Entra ID sign-in and audit logs from various Azure data sources, including Logs, Azure Resource Graph, JSON, Merge, or Azure Health. These sources form the foundation for extracting valuable insights into Entra activities.
Let’s consider an example:
Suppose you want to investigate Microsoft 365 user activities by analyzing the Entra ID audit Logs from Log Analytics workspace. Utilizing the query component, you can achieve this task effortlessly.
- To get started, click on “Add Query” among the available options on the new Workbook page.
- Then, specify “Logs” as the data source type, and the other dropdown menus will auto-fill with relevant options based on your selection.
- Next, it’s time to craft the query. Now, you’ll need to write a query to get the audit logs from Log analytics. The Kusto Query Language (KQL) is used for querying Log Analytics. Here’s a sample Kusto Query Language that retrieves the last 5 Audit Logs:
|
1 2 |
AuditLogs |take 5 |
You can also tweak the Kusto query example to take specific information from the Entra D audit logs. For example, you can get the count of Microsoft 365 user activities based on the operation name.
|
1 2 3 |
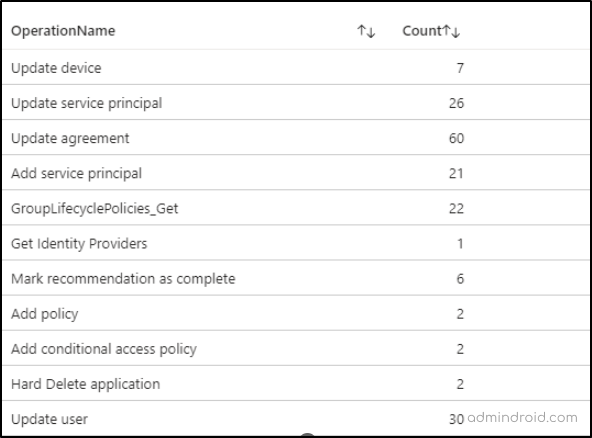
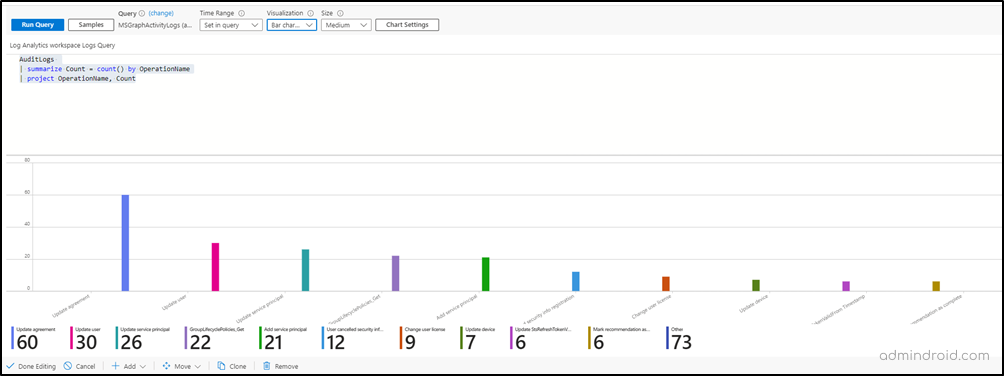
AuditLogs | summarize Count = count() by OperationName | project OperationName, Count |
This query retrieves the count of user operations grouped by the OperationName field and then projects only the OperationName and Count columns in the results.
For enhanced presentation and instant understandable insights, you can use the “Visualization” options like bar charts, pie charts, etc. Here, I’ve opted for a bar chart (unstacked), but you can choose based on your requirements. Once done, click ‘Done Editing’. After that proceed to save or continue building the workbook.
3. Add Parameters to Create New Workbooks in Entra ID
Admins can use parameters in Entra Workbooks to get users’ input data for acquiring insights. This is just as creating a common ‘filter’ option for the workbook. These parameters play a crucial role in narrowing down the scope and facilitating the retrieval of precise Entra ID sign-ins, SSPR status, CA policies insights, and other relevant data points.
Parameters aren’t confined to specific sections; they can be applied throughout the workbook once set up. For example, they seamlessly integrate into the Query component, allowing Entra data retrieval directly via parameters. This flexibility ensures that administrators can gather precise insights efficiently, enhancing the overall functionality of the Workbook.
To integrate a parameter into an Entra Workbook:
- Click “Add Parameter” among the available options on the new Workbook page.
- Then, click “Add Parameter” from the parameter editing page to create a new one.
- Provide the following details based on the parameter you are creating.
- Parameter Name: Provide a suitable name for the parameter.
- Display Name: Provide a suitable display name for the parameter.
- Parameter Type: Choose from options like text, time range picker, resource picker, etc.
- Required?: Enable if the parameter selection is compulsory.
- Allow Multiple Selections: Enable to permit users to select more than one item.
- Explanation: Provide a suitable description to clarify the parameter’s purpose.
- Hide Parameter in Reading Mode: Enable to hide the parameter in read-only mode.
- Get Data From: Select the data source for the parameter.
Let’s consider an example:
Let’s say you need to collect input for both time range and Conditional Access policy names from admins, which can be used in other sections of the customized Entra Workbook. To achieve this, you need to create two parameters as described below:
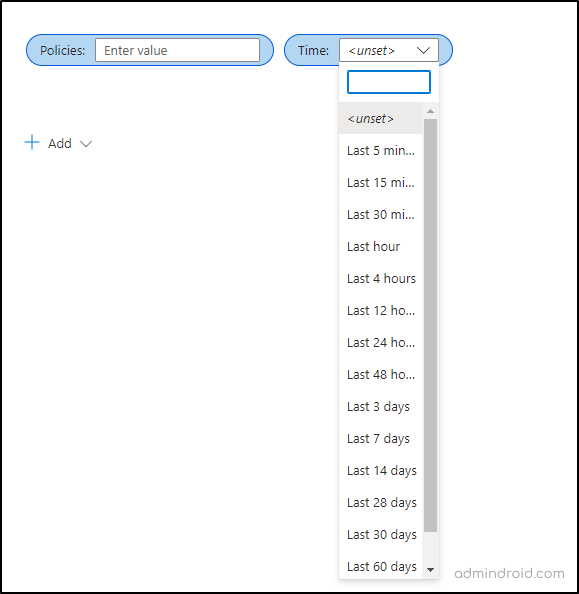
- Time Range Parameter:
- Specify the parameter name and description accordingly.
- Set the Parameter type as Time Range Picker and then choose from the available time ranges or enable custom range selection.
- Save the parameter.
- Policies Parameter:
- Specify the parameter name and description.
- Set the Parameter type as Text.
- Save the parameter.
This setup allows users to specify the specific policy and time range to gain insights within the workbook.
4. Add Links in Microsoft Entra Workbooks
Admins can utilize links to seamlessly navigate between different parts of the workbook, other sites, other workbooks, or specific items. These links can be styled as hyperlinks, buttons, or tabs, ensuring clarity and ease of use.
You can perform different link actions with this “Link” component. Among all, two main actions are,
- Set a parameter value: This action allows you to assign a value to a parameter when selecting a link, button, or tab.
- Scroll to a step: With this action, selecting a link will automatically scroll to reveal another step. It’s useful for creating a table of contents or a “go back to the top” experience.
Let’s consider an example:
You have to set up a table of contents containing all the sections configured in the workbook. To streamline navigation, you’ll want to add links to each section within the table. Here’s how:
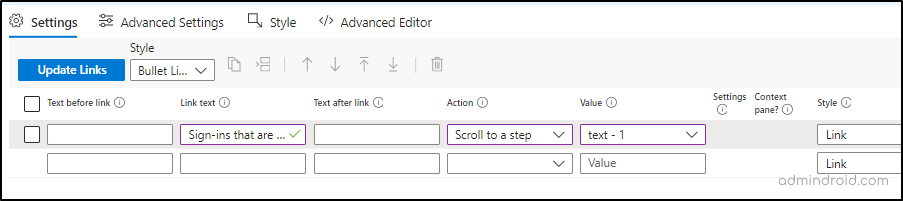
- Go to the “Add links/tabs” option among the available options on the new Workbook page.
- Enter the table of contents text as the “Link text.”
- Choose the “Scroll to a step” action and specify the respective section in the “Value” option.
- Finally, click the “Update links” button and proceed to finish editing.
That’s it. When you click on a link in the table of contents, you’ll be taken directly to the corresponding section. It’s a convenient way to navigate through the content effortlessly.
5. Configure Groups to Create New Workbooks in Entra ID
Groups within workbooks serve as an organizational component, allowing you to categorize and group sets of steps for better organization.
Imagine you’re creating a comprehensive workbook to track Microsoft 365 user activities and sign-ins. As the workbook grows, displaying all sections at once can become overwhelming.
Instead, you can group related insights in your new Workbook. For instance, if your workbook covers various aspects like Microsoft 365 audit logs, sign-in details, security policies, and more, grouping similar insights helps manage the complexity.
Let’s consider an example:
To create a comprehensive workbook showcasing insights about Legacy authentication, compromised sign-ins, Conditional Access enforcement, and more, the “Group” component proves invaluable. This feature allows you to organize similar insights effectively, enhancing visibility and usability.
Here’s how to utilize groups:
- Navigate to “Add group” among the available options on the new Workbook page.
- For the first group, such as “CA policies,” configure text, parameters, and links as needed for all insights related to Conditional Access enforcement.
- In the Advanced setting options, provide a suitable name for the group and then click “Show expand/collapse in the title of the group.”
- Repeat these steps to create additional groups for other insights like Legacy authentication and compromised sign-ins.
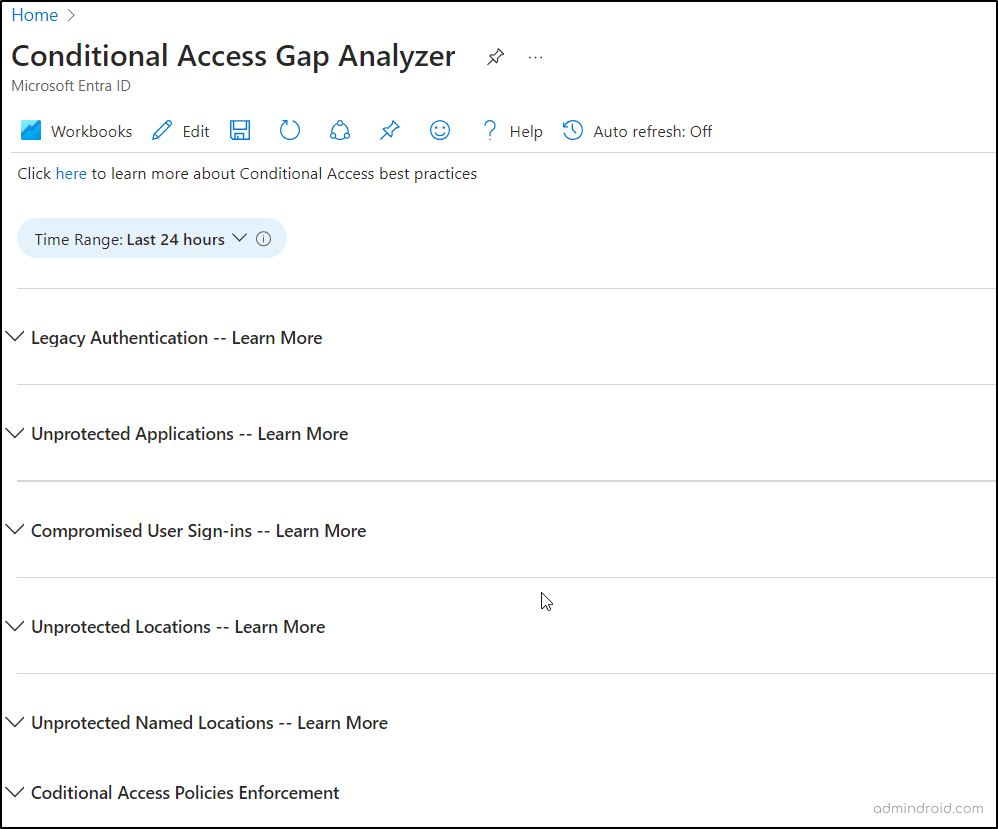
This is how it looks when you finish configuring all the groups.
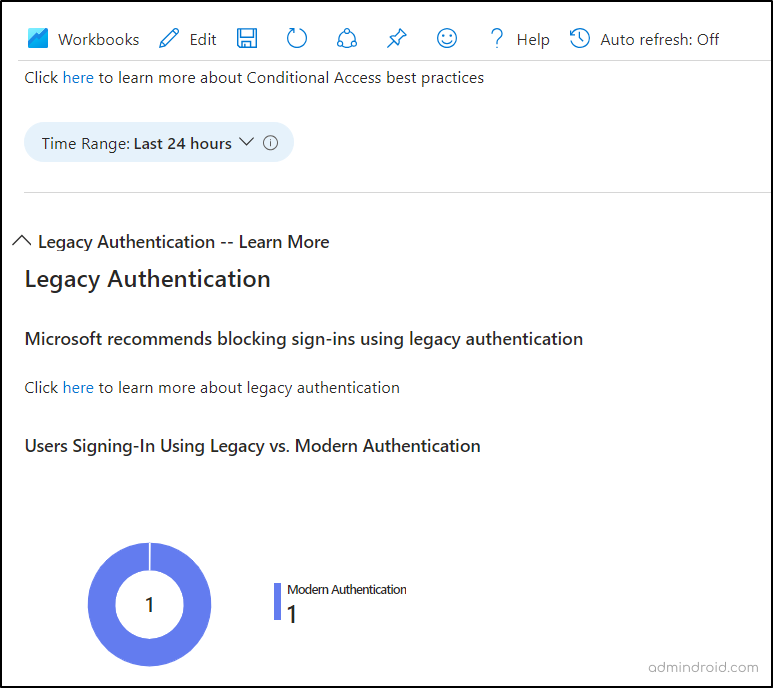
Once you expand the group, you will be shown the relevant details.
6. Add Metric Charts in Microsoft Entra Books
The metrics component in Entra Workbooks is designed to analyze the health and performance of your Azure resources, not specific user activities like sign-ins or Conditional Access policy effectiveness.
For instance, you can use it to analyze metrics like query count for Azure resources. However, it’s not the ideal tool for gaining insights into Entra ID logs. Therefore, it’s advisable to refrain from using it when investigating Entra activity logs with Workbooks.
Must-Create New Workbooks in Entra ID
To enhance monitoring of Entra ID audit and sign-in logs, alerts, and data visualization within our organization, it’s imperative to develop several critical Microsoft Entra Workbooks. Here are the few you need to create in your organization.
Conditional Access Analysis Workbook
You should craft this workbook to,
- Get Conditional Access policies in report-only mode.
- Get Sign-ins successfully blocked sign-ins by CA policy.
- Find applications not protected by CA policies.
- Get risk-based Conditional Access policies.
- Get Conditional Access policies require MFA for admins portals.
Microsoft 365 Audit Logs Workbook
You should create this workbook to,
- Audit Office 365 user activity report.
- Export Office 365 users’ activity history for the past 90 days
- Identify Azure AD protection risky users
Azure AD Sign-in Logs Workbook
You should design this workbook to,
- Monitor sign-in logs of Microsoft 365 admins.
- View all Microsoft 365 users’ last logon time.
- Check the last login date for admins.
- Get service principal sign-in to count overtime.
- Top sign-in errors by user and IP
- Monitor risky sign-ins in Microsoft 365
- Check Login activity/history in Microsoft 365
- Get the last successful sign-in date report for Microsoft 365 users
- User sign-ins not protected by MFA requirements
- Users sign in by location that isn’t protected by MFA.
Multi-factor Authentication Workbook
You should make this workbook to,
- Get MFA-enabled users report.
- List Office 365 users without MFA.
- Analyze excessive MFA prompts on specific users.
- Average authentication prompts based on applications
- Total count of interactive and non-interactive sign-ins
- Authentication prompts by CA policy, security defaults, per-user MFA, and more.
Create a Personalized Entra Workbook Now!
And that’s it for our workbook creation journey! Now that you’ve got the hang of making your workbooks, you’re in control. You can make them just the way you want. While public templates offer a great starting point, there’s nothing quite like the satisfaction of building a personalized Entra workbook from scratch.
I hope this blog has provided you with clear steps on how to create an Entra workbook from scratch for better analysis of Entra logs. If you need more assistance, don’t hesitate to contact the comment section below. We’re here to help!


