Managing repetitive tasks in Teams can be a real productivity killer ❌. Constantly sending reminders, sharing updates, or handling approvals manually takes time away from your important work. That’s where workflows step in, turning tedious manual processes into automated actions that run smoothly in the background. This gives you more time to focus on what really matters 🔐.
In this blog, we’ll cover creating workflows in Microsoft Teams using pre-built templates, custom flows with Power Automate, and explore the new AI-driven Workflow Builder.
What are Workflows in Microsoft Teams?
Workflows in Microsoft Teams are automated processes that help streamline tasks, notifications, or actions across Teams and other Microsoft 365 services. Think of them as “set-it-and-forget-it” routines that make work easier by reducing repetitive manual tasks. Workflows are even considered as one of the most important best practices for Teams governance that help you enforce consistency and maintain structure on your environment.
Imagine a scenario where you manually notify your team every time a file is uploaded to a shared folder. With workflows, this process becomes automatic. Teams can automatically notify everyone as soon as a file is uploaded. Similarly, workflows handle tasks like content approvals, reminders, email attachments, and updates seamlessly.
Workflows connect Teams with services like SharePoint, Outlook, or even third-party apps like Trello, automating tasks and ensuring smoother operations.
How to Create Workflows in Microsoft Teams?
Creating workflows in Microsoft Teams is straightforward with the Workflow app powered by Power Automate, the flow designer and editor. The Workflow app is installed by default, allowing you to create flows in different areas of Teams, such as chats, messages, and channels—these serve as entry points to workflows.
Here are multiple ways to create workflows within Microsoft Teams:
1. Create a Workflow Using Pre-Built Templates in Teams
To create workflows from workflow templates, follow these steps:
- Open the Teams desktop client or web app.
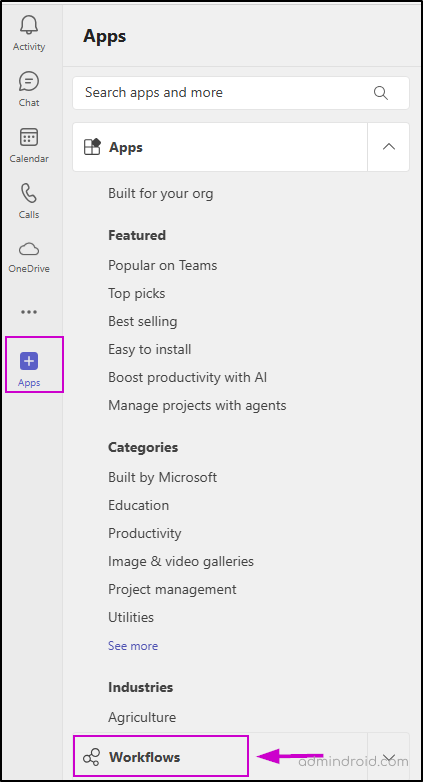
- Navigate to the Apps icon in the left navigation pane.
- Scroll down and click to expand the Workflows section.
On this page, you’ll find a dropdown menu with various categories and a list of pre-built workflows designed for Teams on the right-hand side.
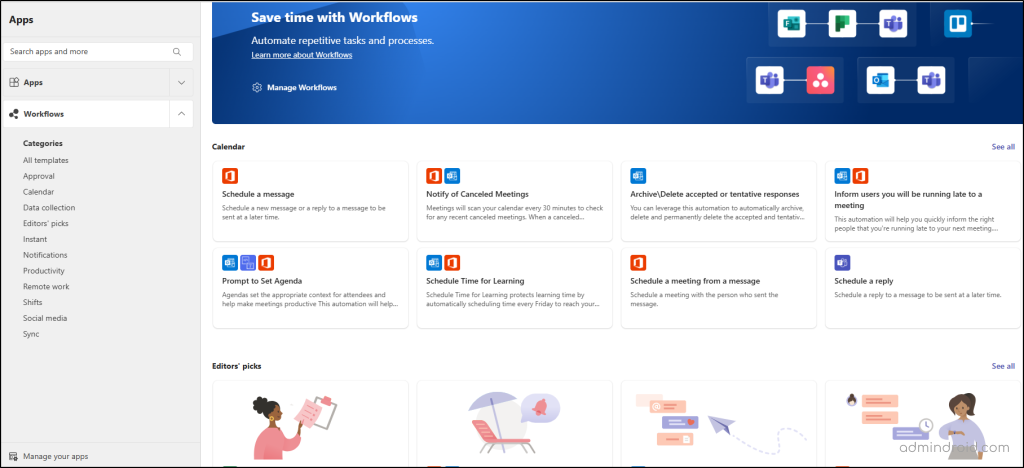
Use Case for Creating a Flow Using Templates
Let’s look at the use case for sending a meeting invite directly from a message. The “Schedule a Meeting from a Message” template simplifies scheduling a meeting by automatically creating a calendar event with the person who sent the message. This flow is useful when you need to quickly set up a meeting without leaving your current conversation.
To create the flow from the template,
- Go to the Calendar category and select the “Schedule a Meeting from a Message” template.
- Once selected, give your flow a name. Under Sign In, you’ll see the available connections.
- Click Next to proceed.
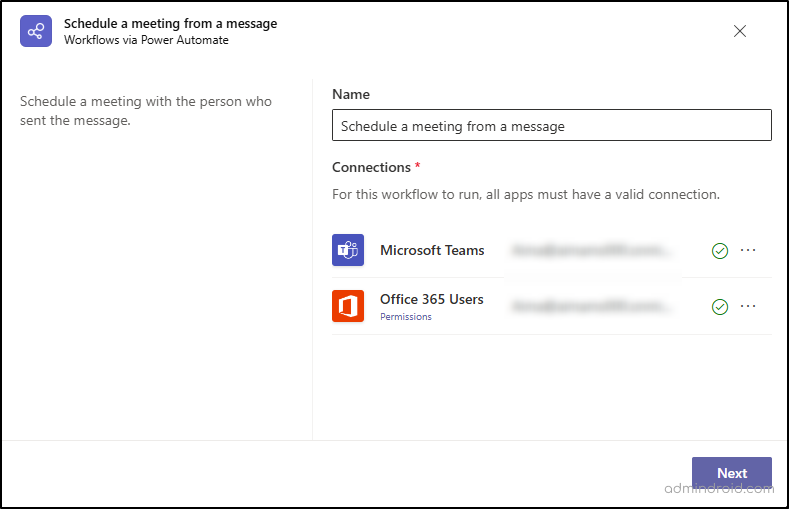
- In the next step, choose the calendar where you want to save the event and select the time zone for the meeting -> Create flow.
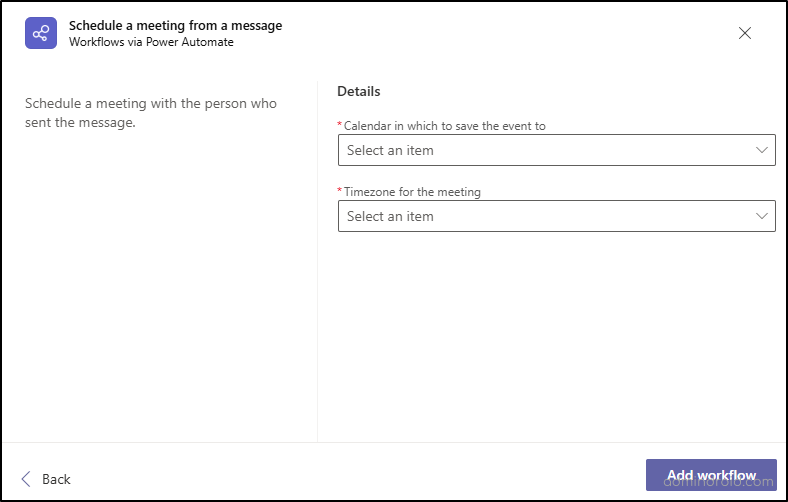
- When you click Add workflow, the following page will appear, click Done to finish the process.

After setting up the workflow, you’ll receive a message from Power Automate in your chat, notifying you that the workflow has been activated.
How to Use the Created Workflow in Teams for Scheduling?
To use the created flow or to create a flow from the message,
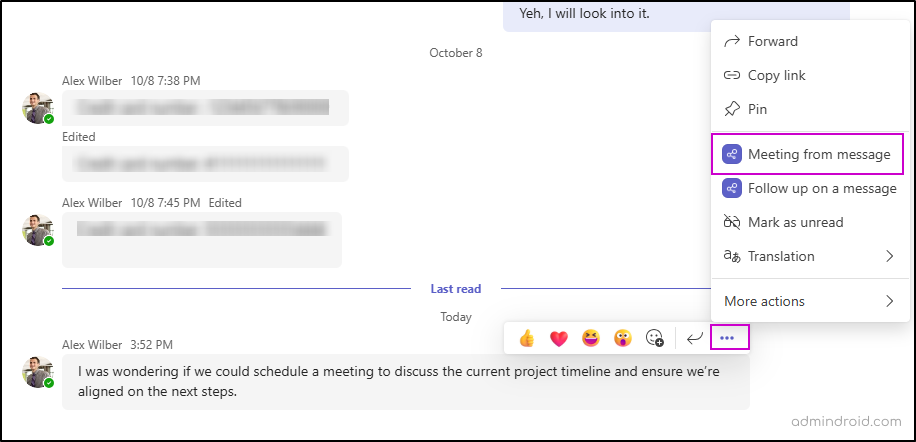
- Go to any chat and click on the ellipsis (three dots) after your message.
- Select the More Actions tab, where you’ll find all the workflows you’ve enabled.
- Select the template you just created from the list.
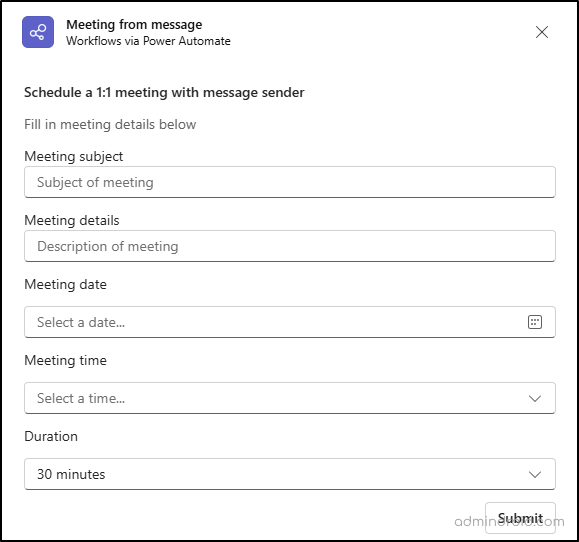
- Fill in the required details and click Submit. The meeting will then be scheduled in both the scheduler’s and the user’s calendars.
You can also create a flow directly from a message. To do this, open any message, click on the ellipsis → More Actions → Create New Action.
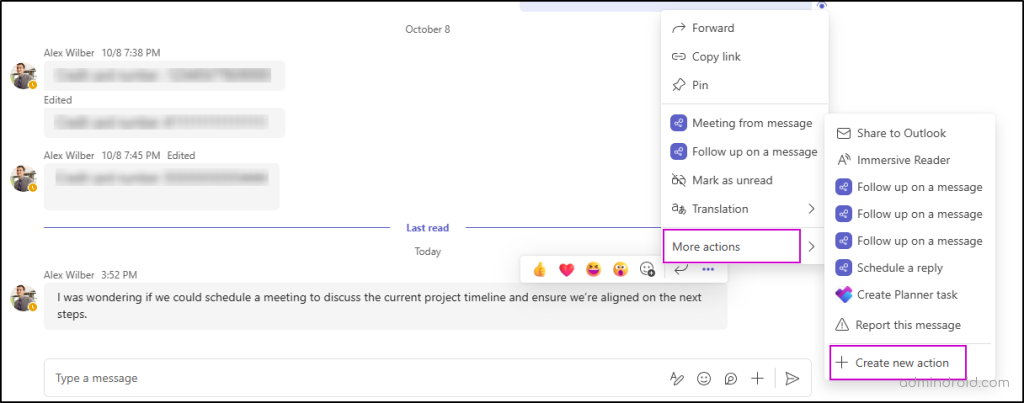
This will take you to the list of workflows associated with messages. You can select a workflow, configure it, and then click Submit to activate it.
2. Create a Cloud Flow from a Template in Teams
Here’s how you can create a custom cloud flow using a Microsoft Teams template.
- Sign in to Microsoft Teams web app or client.
- Click Apps on the left panel.
- Search for Workflows in the search bar.
- In the search results, click Open next to Workflows.
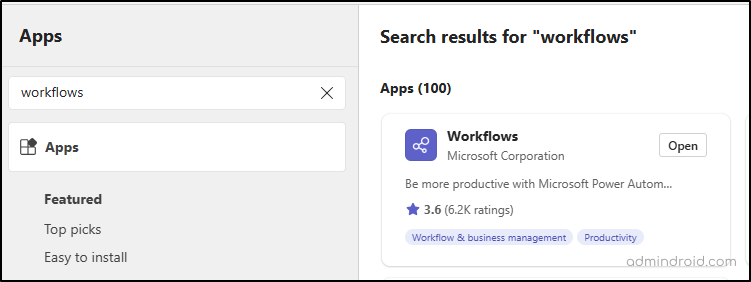
- Go to the Create tab and choose a template to start your flow.
- Set up/customize the connections/triggers as needed.
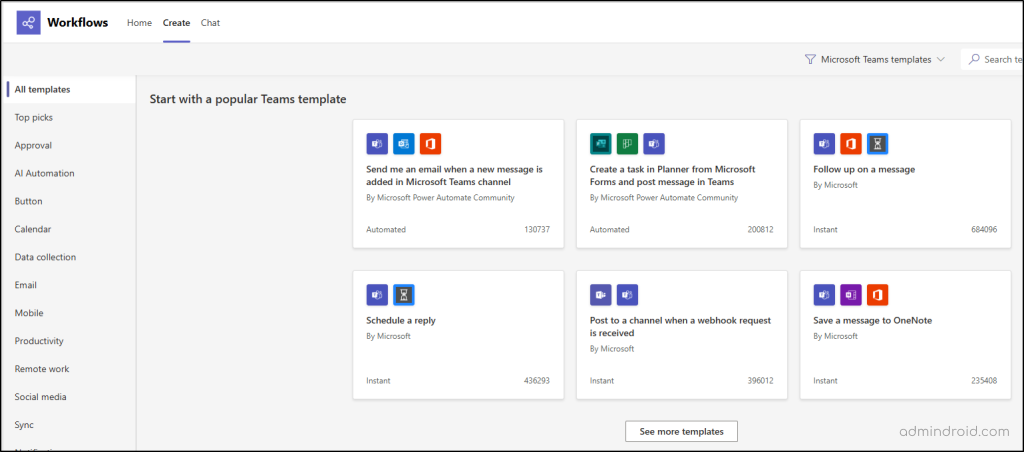
- Authenticate the required apps for the flow.
- Then, click Create Flow and set up the necessary connections.
A confirmation message will appear, letting you know your flow has been successfully created.
Important: Flows created within the Workflows app in Microsoft Teams are always saved in your organization’s default environment. You can also access and manage these flows in Power Automate.
💡 Tip: Beyond Teams workflows, Power Automate simplifies key tasks like Microsoft 365 user onboarding, offboarding, and managing password expiry notifications, helping automate critical business processes seamlessly.
3. Create a Flow from Scratch in Microsoft Teams
To have full control over the flow, instead of using a template, select the “Create from Blank” option in the top right corner. This allows you to start building the flow from scratch using Power Automate.
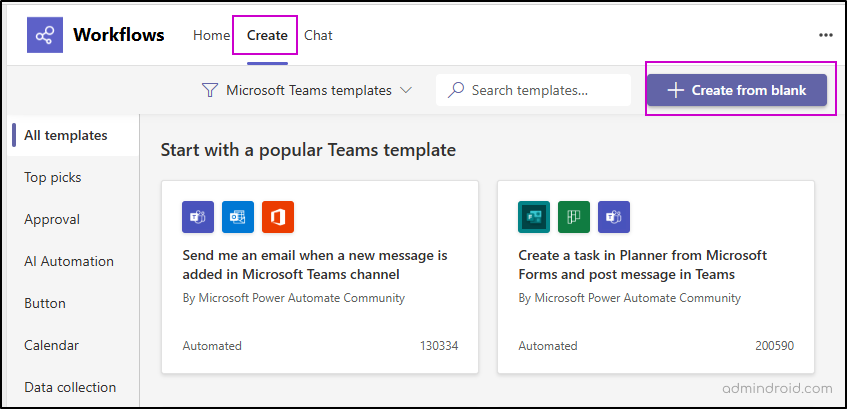
Manage Workflows in Microsoft Teams
After creating your workflow, you can manage it from the Workflows app in Teams or from Power Automate in the Home tab. You can:
- Turn the workflow on or off.
- Further customize the flow by clicking on the flow name and selecting Edit. This takes you to the Power Automate page, where you can modify actions, triggers, or add conditions.

New Workflow Builder in Teams – Describe it to Design it!
The Workflow Builder in Microsoft Teams is an AI-powered tool designed to simplify automation by allowing users to create workflows using natural language. Instead of manually configuring workflows, you can simply describe the automation you need, and Teams will generate the workflow for you. This is especially helpful if you can’t find a suitable template in Teams. Whether it’s sending notifications, tracking changes, or managing approvals, the Workflow Builder helps boost productivity and saves time.
In addition to the custom workflows, Teams offers pre-built templates for common tasks, such as SharePoint notifications, email triggers, and team member updates. Currently, the feature supports English descriptions for cloud flows and will be available in the Workflows app. It can be used across all chats, channels, and messages.
Rollout: The feature will roll out starting in late September 2024 and is expected to be completed by late December 2024.
Use Case for Workflow Builder in Microsoft Teams
Let’s ask AI to create a workflow that welcomes new members to a channel with guidelines. To do this, follow these steps:
- Select the chat/channel where you want to set up the workflow.
- Click on the ellipsis (three dots) next to the channel name and choose Workflows.
- In the Workflows window, click the Workflow Builder button to begin creating your automation.
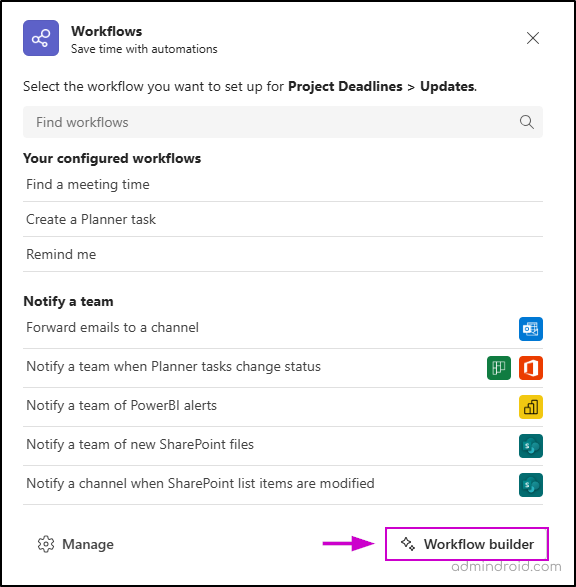
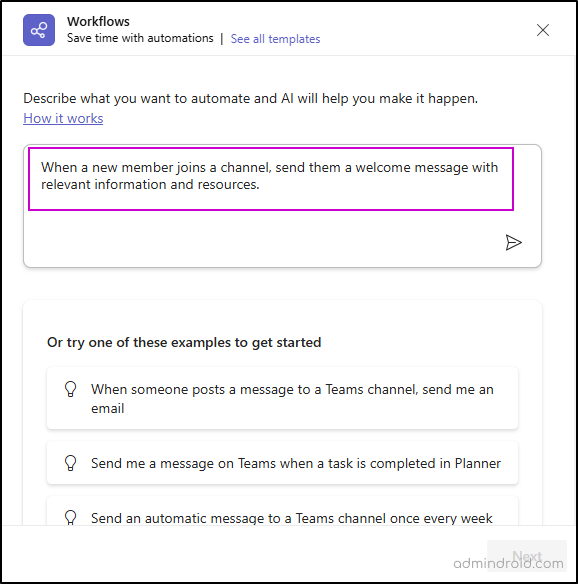
This opens a pane where you can describe your desired automation. For this workflow, we can enter the description as:
“When a new member joins a channel, send them a welcome message with relevant information and resources.”
4. Then, click the Send button.
Alternatively, you can choose to start with one of the pre-built examples to quickly create your workflow.
5. A suggested flow will appear. Review it to ensure the flow meets your requirements. If it does, click Next.
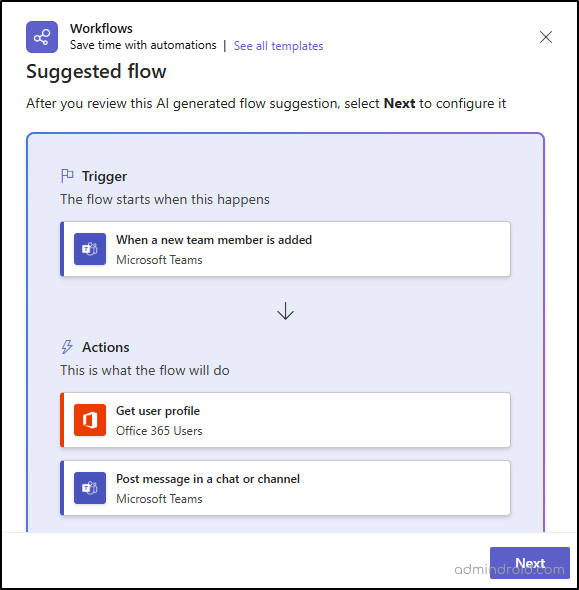
6. Then, configure the necessary connectors and fill in the required details, such as the team name. Once you’ve completed this, click Next.
You will then be redirected to the flow page, where you can further customize the actions and make any additional adjustments to the workflow.
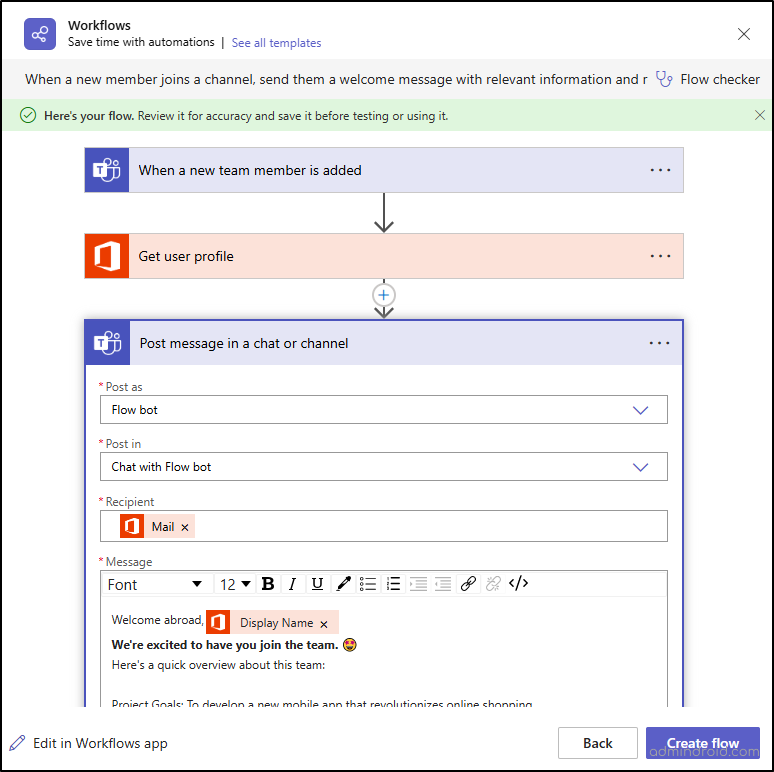
7. After customizing the welcome message, click Create flow to finalize the setup.
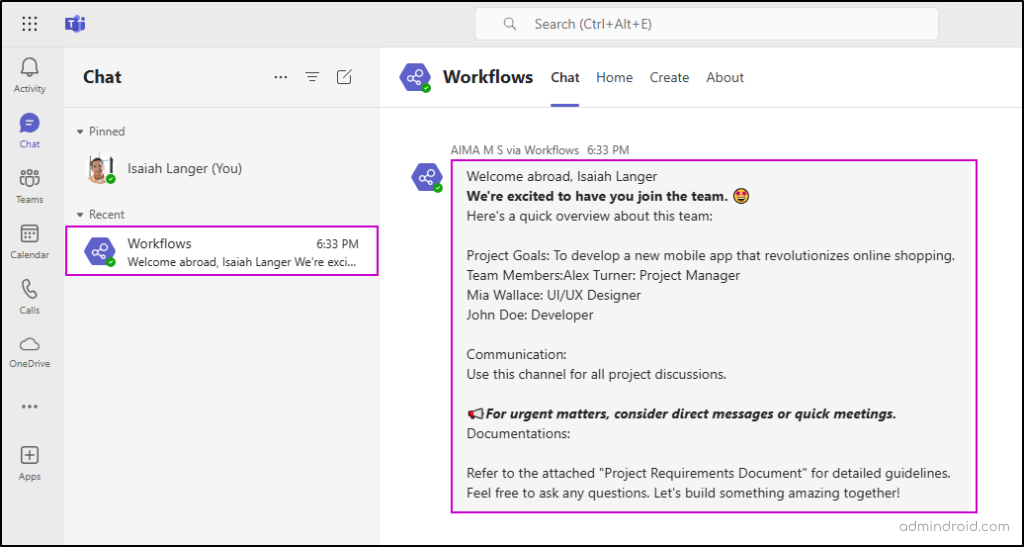
Now, whenever a new member is added to the team, the customized welcome message will automatically be sent to their inbox via the workflow.
And that’s a wrap-up! We hope this blog has helped you create workflows in Microsoft Teams and explained how AI enhances Teams workflows. Thanks for reading! If you have any further questions, feel free to drop a comment below.
