Microsoft Teams powers day-to-day collaboration across modern workplaces. However, as usage expands across departments and projects, teams are often created quickly to meet immediate needs. Over time, this rapid and unmanaged growth leads to Teams sprawl.
So, what does Teams sprawl actually mean?🤔
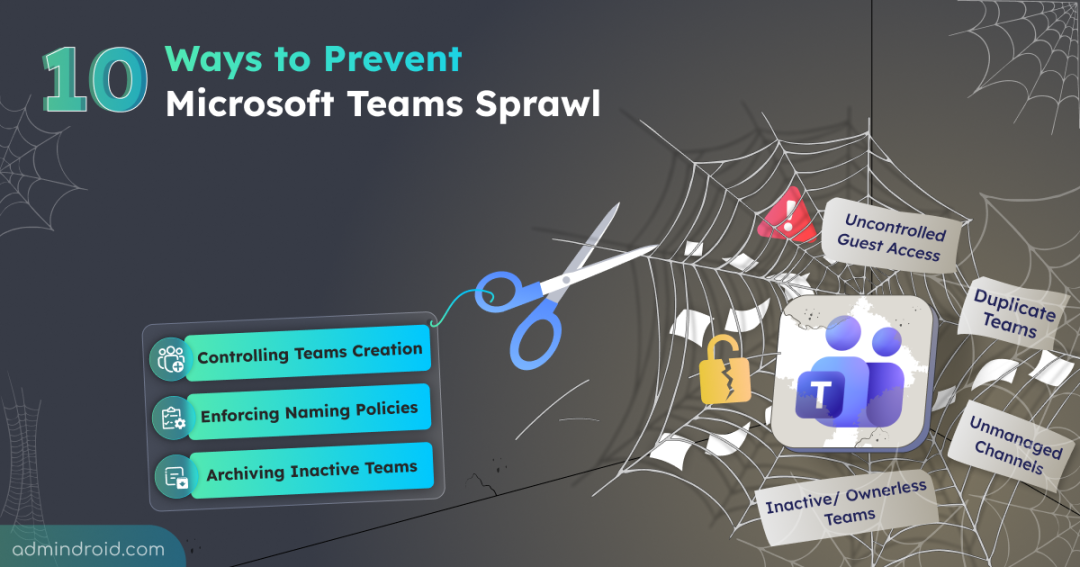
Teams sprawl refers to uncontrolled growth of teams, channels, and related resources across an organization. This occurs when too many collaboration workspaces are created without a clear purpose, defined ownership, or proper governance. Over time, this leads to cluttered environments that reduces productivity. Without the right controls in place, what begins as collaboration can quickly turn into chaos.
In this blog, we’ll explore the key risks caused by Teams sprawl and learn 10 practical ways to prevent it. Let’s get started!
What are the Risks of Teams Sprawl?
Teams sprawl goes beyond simple clutter and can create serious challenges for security, governance, and collaboration. Below are the key risks that commonly result from Microsoft Teams sprawl:
- Duplicate teams and content confusion: Multiple teams created for the same purpose fragment conversations and files, making it hard for users to find the right workspace and slowing collaboration.
- Data security exposure: Inactive owners and unreviewed memberships allow former employees or external users to retain access to sensitive data longer than intended.
- Uncontrolled guest access: Overly permissive guest settings can expose internal conversations and files to external users beyond their required scope.
- Higher storage and compliance costs: Every team consumes SharePoint storage. Unchecked growth increases storage usage and drives additional governance and compliance expenses.
- Increased IT administrative effort: Managing excessive teams leads to more access requests, permission issues, and cleanup tasks, limiting IT’s ability to focus on strategic work.
Understanding these risks highlights why proactive governance is essential. Next, let’s explore the key strategies to prevent Microsoft Teams sprawl and regain control of your collaboration environment.
Key Strategies to Prevent Teams Sprawl
Preventing Microsoft Teams sprawl requires a thoughtful mix of governance, automation, and user awareness. The goal isn’t to limit collaboration, but to ensure teams are created, used, and retired with clear purpose and ownership. The following strategies help organizations control growth while keeping Microsoft Teams flexible and productive.
- Control team creation
- Implement approval workflow for teams creations
- Enforce teams naming policies
- Restrict channel creation
- Apply group expiration policies
- Assign and maintain owners
- Archive inactive teams
- Audit teams and memberships
- Monitor new teams and channels creation
- Educate users
1. Limit Microsoft Teams Creation to Specific Users
By default, all users can create teams, so limiting this capability to specific users helps for preventing unnecessary team creation. However, to do this, create a dedicated security group in the Entra admin center and add only the users who should be allowed to create teams. Once you created the group, run the given PowerShell script to grant the teams creation permission to specific members of that group. You can follow the proceeding steps to so.
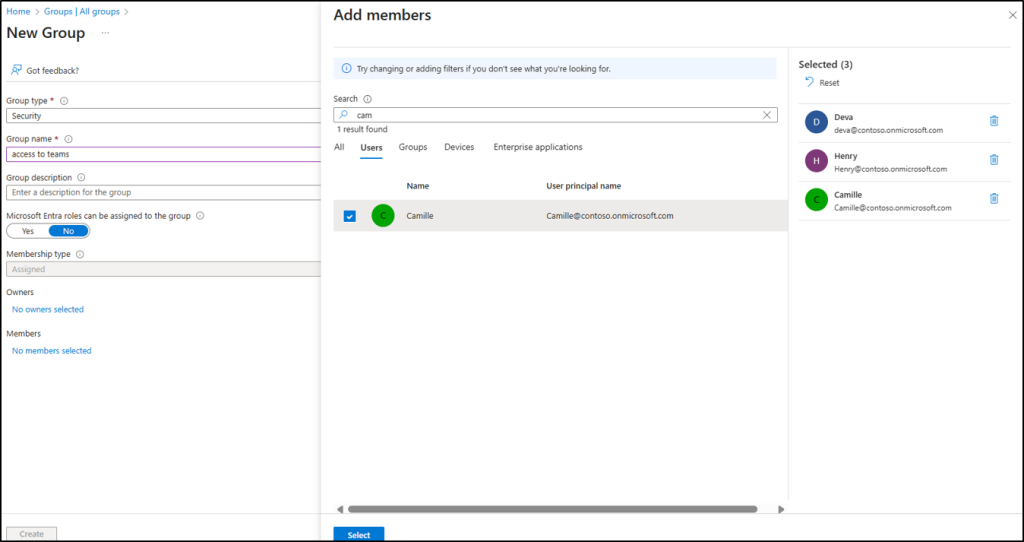
- Login to Entra admin center, navigate to the Groups → All groups and click “New group”.
- Choose the respective group type as Security. Then, enter the group name and description.
- Select No members selected, choose the required users to restrict who can create teams and Microsoft 365 groups, then click Select and Create to finish creating the security group.
- After creating a security group, you can execute the below PowerShell script with the ‘<GroupName>’.
The execution of above script disables the teams creation for everyone in the organisation except for all M365 administrators and users who are explicitly added to that security group.
|
1 2 3 4 5 6 7 8 9 10 11 12 13 14 15 16 17 18 19 20 21 |
Import-Module Microsoft.Graph.Beta.Groups Import-Module Microsoft.Graph.Beta.Identity.DirectoryManagement $GroupName = "<NameofYourGroup>" Connect-MgGraph -Scopes "Directory.ReadWrite.All" $GroupId = (Get-MgBetaGroup | Where-object {$_.displayname -eq $GroupName}).Id $DirectorySettingsID = (Get-MgBetaDirectorySetting | where { $_.DisplayName -eq "Group.Unified"}).id if(!$DirectorySettingsID){ $params = @{ templateId = "62375ab9-6b52-47ed-826b-58e47e0e304b" values = @(@{name = "EnableMSStandardBlockedWords"; value = "true"}) } New-MgBetaDirectorySetting -BodyParameter $params $DirectorySettingsID = (Get-MgBetaDirectorySetting | where { $_.DisplayName -eq "Group.Unified"}).Id } $params = @{ templateId = "62375ab9-6b52-47ed-826b-58e47e0e304b" values = @( @{name = "EnableGroupCreation"; value = "false"} @{name = "GroupCreationAllowedGroupId"; value = $GroupId}) } Update-MgBetaDirectorySetting -DirectorySettingId $DirectorySettingsID -BodyParameter $params (Get-MgBetaDirectorySetting -DirectorySettingId $DirectorySettingsID).Values |
2. Set Up Approval Workflows for Teams Creation
As organizations grow, managing Microsoft Teams creation becomes difficult without a structured approval process. Approval-based workflows allow users to request new teams while ensuring each request is reviewed before provisioning. A well-defined approval allows organised collaboration. Below are reliable ways to implement approval-based Microsoft Teams creation.
Create Approval Workflows Using Power Automate
Power Automate integrates with apps like Microsoft Forms, SharePoint, and Teams to collect team creation requests. Users can submit requests via integrated entry points, which then trigger an approval workflow. Once approved, the flow can automatically create the Team, apply naming conventions, and assign owners.
Use the Approvals App in Teams with Power Automate Integration
You can integrate the Approvals app with Power Automate for approval-based team creation. Requests submitted through the Approvals app can trigger automated flows for review and decision-making. Once approved, it can handle actions such as provisioning the team, defining ownership, and enforcing naming standards.
Use AdminDroid for Approval-Based Team Creation
If you don’t want to build and maintain approval flows from scratch, tools like AdminDroid offer built-in approval-based Teams creation. Users submit team creation requests via AdminDroid, and teams are automatically created once approved. This keeps team creation controlled and helps reduce Teams sprawl with less efforts.
3. Apply Consistent Naming Policies to Improve Teams Identification
To keep Microsoft 365 organized and prevent teams sprawl, enforcing a standardized naming policy for teams is essential. Naming policies ensure teams follow consistent conventions, making them easier to identify, manage, and govern.
For example, including details like department, purpose, or region in team names helps identify ownership and reduces the creation of duplicate teams. It can be achieved by configuring group naming policies. To setup naming policy, follow the given steps below.
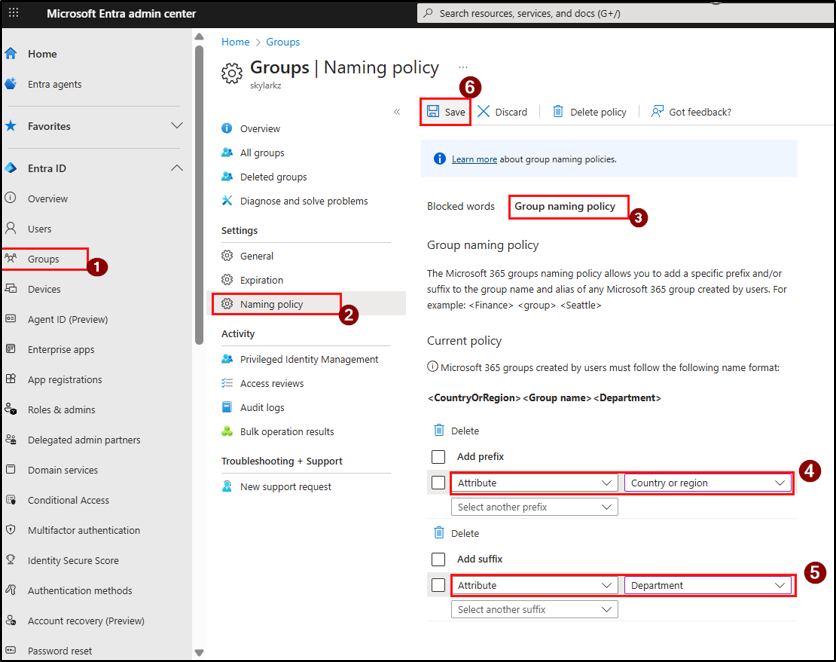
- Sign in to the Microsoft Entra admin center.
- Go to Entra ID → Groups → Settings → Naming Policy.
- Under Group naming policy, set a prefix and/or suffix using attributes or static text.
- Example: Location-[GroupName]-Department → NY-Campaign-Sales.
- Optionally, in the Blocked words list, upload terms you want to prevent such as “payroll,” “legal”, or restricted brand names.
- Click Save.
This enforces the rules across Microsoft Teams and Microsoft 365 groups. After this, users will automatically see the naming format applied whenever they create a new team.
4. Restrict Teams Members from Creating Channels
Allowing all team members to create channels can lead to uncontrolled channel growth, increasing the risk of data exposure. As more channels are created, duplicate or abandoned ones often retain sensitive files, and without clear ownership, archiving, or cleanup, these channels become hidden vulnerabilities that unintended users may access over time. By limiting channel creation to team owners, organizations can maintain better control, ensuring channels are created only when truly needed.
Follow the below steps to restrict channel creation to team owners:
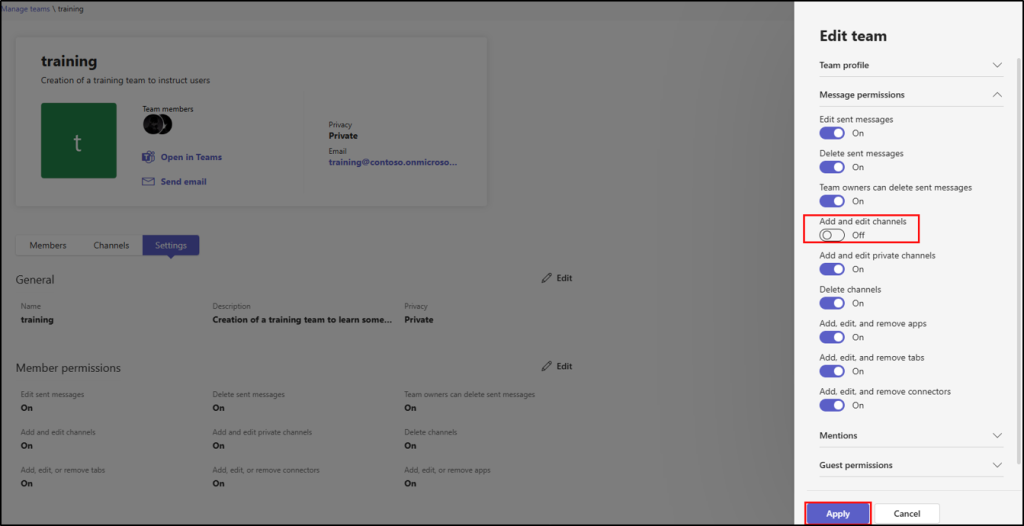
- Navigate to Microsoft Teams admin center → Teams → Manage teams.
- Select the specific team you want to restrict channel creations.
- Switch to Settings tab and click the Edit button placed nearer to the member permissions.
- Toggle off the option, Add and edit channels and click Apply to save configuration.
5. Implement Group Expiration Policies
Teams are often created for projects or short-term collaboration, and many become inactive once the work is completed. When inactive teams remain unmanaged, they can retain outdated permissions and guest access, increasing security and governance risks.
The Microsoft 365 group expiration policy helps address this by automatically identifying and cleaning up inactive teams after a defined period. When this policy is applied, owners/users configured for ownerless teams receive renewal notifications 30 days, 15 days, and 1 day before expiration. Active teams renew automatically based on usage while inactive teams are removed with a short 30-day recovery window. This ensures only relevant, active teams remain available while reducing sprawl and data exposure.
To apply the group expiration policy, follow the steps below.
- Go to Microsoft Entra admin center.Then, navigate to Entra ID → Groups → Expiration.
- Select the Expiration tab and choose the Group lifetime (180 or 365 days) or set a Custom lifetime (minimum 30 days).
- Enter an email for ownerless group notifications.
- Choose whether to apply the policy to All groups or Selected groups.
- Click Save to apply the expiration policy.
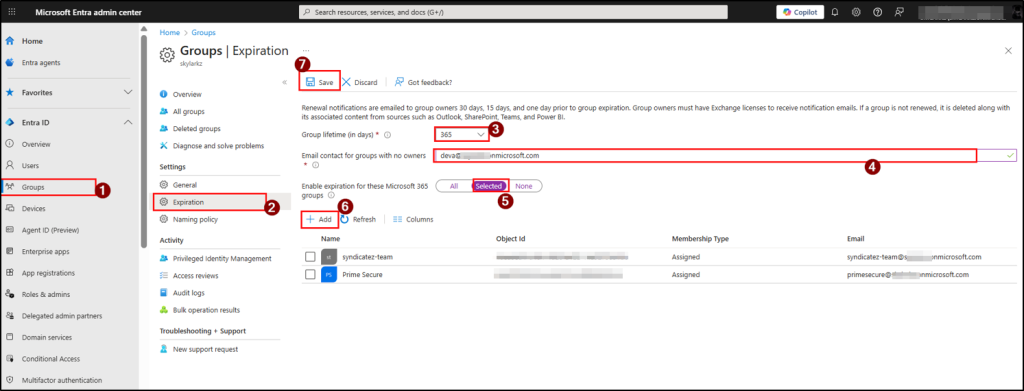
Once configuration is saved, the expiration policy applied to all teams via integrated groups.
6. Identify Ownerless Teams and Assign Ownership
Identifying ownerless teams helps IT and workspace administrators quickly detect unmanaged collaboration spaces that can cause confusion and stalled workflows. Assigning owners ensures responsibility for access control so teams stay organized and aligned with business operations.
- In Teams admin center, navigate to Teams → Manage teams.
- From the list of teams, ownerless teams are marked with a 0 and an exclamation mark under the owner column.
- Select the specific team and click +Add owners. Look for the users who you need to add as the owner then select them and click Apply.
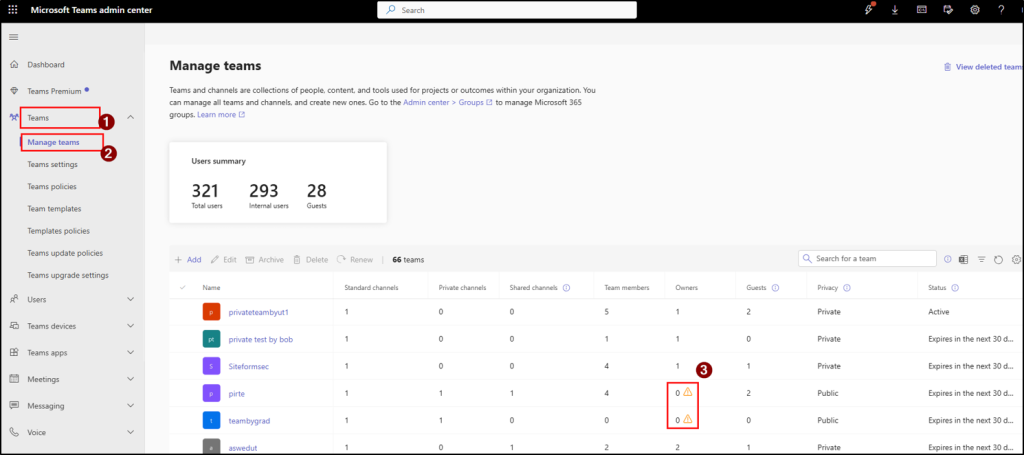
Assign at least two owners to maintain continuity and avoid orphaned teams if one owner resigns, takes extended leave or changes roles.
How to Identify Ownerless Teams in Large Environment?
Since the Teams admin center does not provide a direct way to filter only ownerless teams, you can use PowerShell for identifying the ownerless groups in a larger scale. It allows admins to take corrective actions such as manually assigning new owners or promoting existing members to prevent unmanaged ones.
7. Archive Inactive Teams
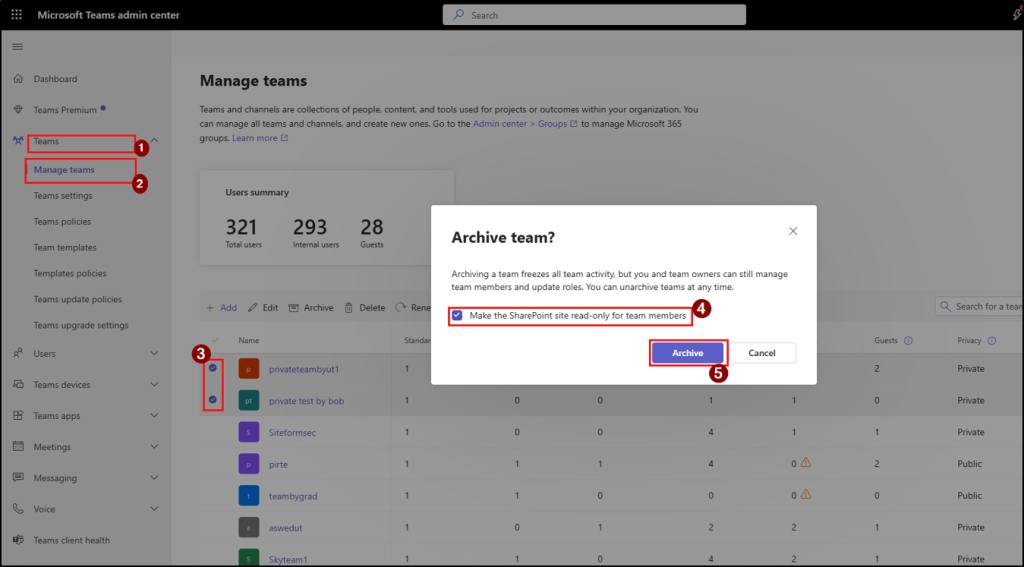
Archiving provides a controlled way to retain inactive teams without allowing ongoing collaboration. Unlike group expiration, which deletes inactive teams after a defined period, archiving preserves the team and its data in a read-only state. This prevents new posts, replies, or file uploads while keeping existing content accessible. Follow the steps below to archive inactive teams.
- Log in to the Microsoft Teams admin center and go to Teams → Manage teams.
- Select the inactive team you want to archive and click Archive on the toolbar.
- Check “Make the SharePoint site read-only for team members” to prevent them from editing content in the associated SharePoint site, then click Archive.
Manually identifying inactive teams and archiving them can be challenging, especially in large organizations with hundreds or thousands of teams.
How to Auto-archive Inactive Teams?
To simplify this process, you can use a pre-built PowerShell script that automatically identifies teams that have been inactive for a specified number of days and archives them.
- Download the script from GitHub: ArchiveInactiveTeams.ps1
- Run the script as,
|
1 |
.\ArchiveInactiveTeams.ps1 -InactiveDays 90 -ArchiveInactiveTeams |
This command automatically archives teams that have been inactive for 90 days.
If you want to review the list of inactive teams before archiving them, run the script without the -ArchiveInactiveTeams parameter. In that case, the script will only list teams that have been inactive for 90 days, allowing you to validate them before taking action.
8. Perform Regular Audits of Teams, Channels, and Memberships
Regularly auditing teams and channels helps identify and control Teams sprawl. By reviewing how many teams and channels exist and how members are associated, administrators can quickly spot duplicates or inactive teams. This enables timely cleanup actions such as removing redundant teams, fixing ownership issues.
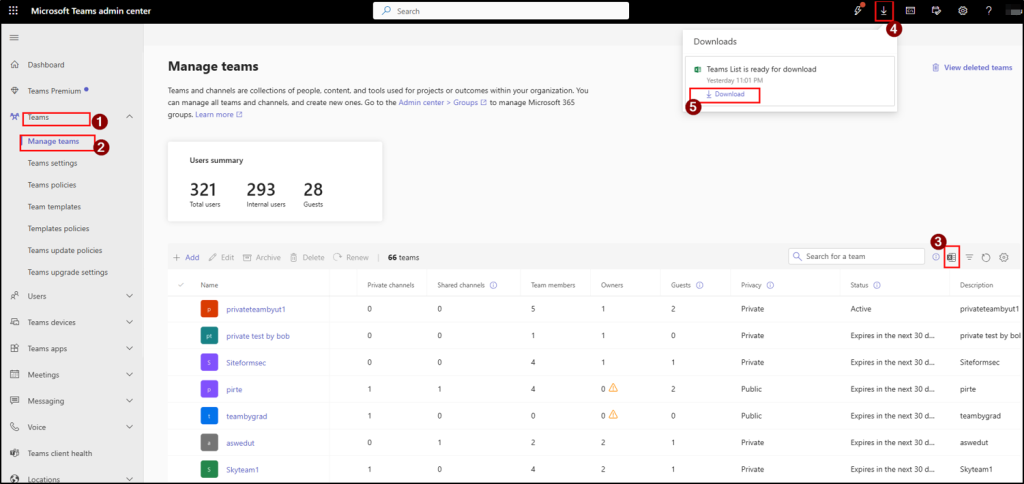
- Go to Teams admin center. Then, navigate to Teams → Manage teams.
- There, click the export icon to export a list of all teams.
The report includes key details such as the total number of shared and private channels, the number of members, owners, guests per team, expiration date, group ID, description, and team status.
Inspecting every team individually to export its channels members and owners is a time-consuming process even in small environments. As the number of teams grows this approach becomes harder to manage and reduces overall administrative efficiency.
To overcome this, you can use the prebuilt PowerShell script which provides various and flexible reporting options using steps below.
- At first, download the Teams reporting script to export teams, channels, and memberships.
- Then, open the Windows PowerShell as Administrator and execute the script as:
|
1 |
./TeamsReports.ps1 |
- After execution, you can choose from the available options listed below.
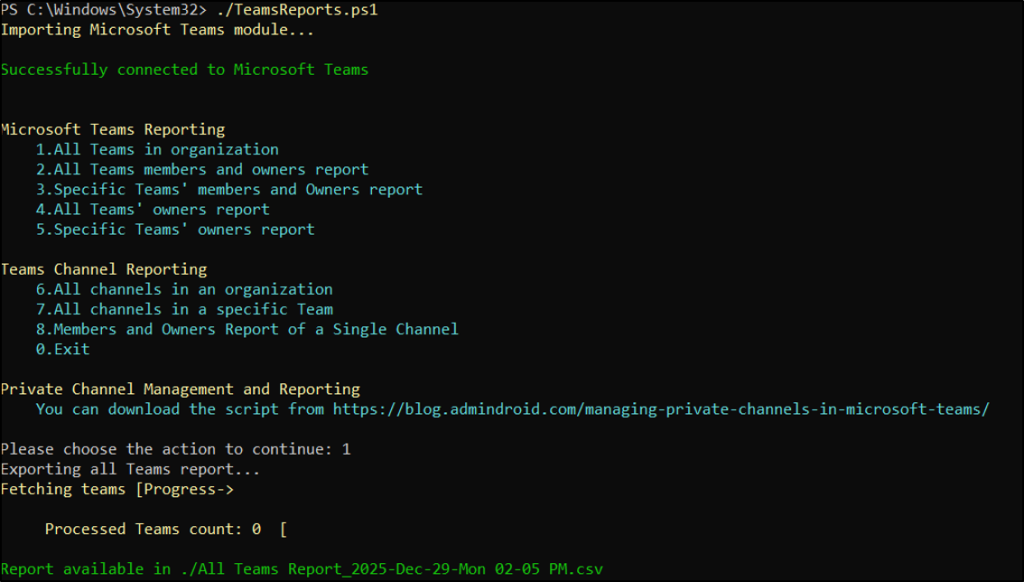
For example, when you enter 1, the script exports a report of all teams in the organization, including team name, team type, description, archive status, channel count, member count, and owner count.
Likewise, the script allows you to generate several reports at once which reduces manual effort and improves visibility across the tenant compared to using the Microsoft 365 admin portals.
Teams Access Reviews to Control Membership Sprawl
Along with auditing, it’s also important to keep team membership up to date. Create Teams access reviews to prevent sprawl by prompting owners to confirm who still belongs, allowing inactive members to be removed. For example, when users move to a new project, they may still retain access to old project resources. In such cases, access reviews help remove unnecessary access and sensitive data exposure.
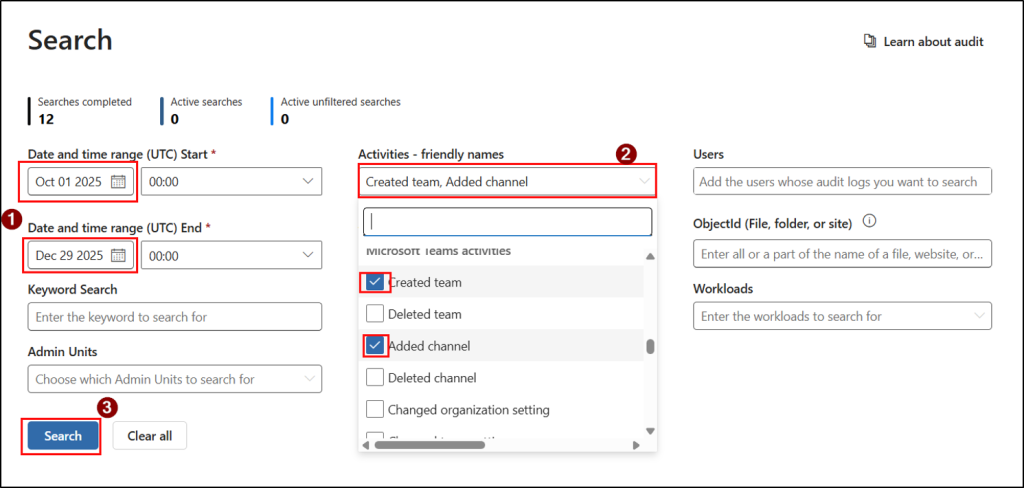
9. Monitor Recently Created Teams and Channels Using Audit Logs
Tracking recently created teams and channels through audit logs helps prevent sprawl by spotting redundant teams early. It ensures that team creation aligns with organizational policies and naming standards, keeping things organized.
- Go to Microsoft purview. Then, navigate to Solutions → Audit.
- Set the date range, select the ‘Added channel’ and ‘Created team’ activity from the Activities – friendly names dropdown and click on Search.
- Once the search is complete, you will be able to see all MS Teams and channel creations that occurred within the selected timeframe.
10. Educate Users on Responsible Teams Usage
User awareness plays a major role in preventing Microsoft Teams sprawl. When users understand when to create a team, how to reuse existing ones, and how to manage content properly, unnecessary growth can be avoided. Below are practical ways to improve user awareness and reduce sprawl:
Instruct users on Microsoft Teams best practices: Train users on Microsoft Teams best practices and provide clear guidelines to users on organizing content, using channels effectively, and choosing the right collaboration space. This reduces unnecessary teams and improves collaboration efficiency.
Explain the impact of Teams Sprawl on productivity: Show how Teams sprawl risks can hinder productivity, cause confusion, and create security issues. This awareness helps users to take better decisions before spinning up new teams.
I hope this blog helped you understand how to control Microsoft Teams growth by applying the right governance settings and best practices. Feel free to share your thoughts or doubts in the comments section below!


