Imagine logging into your account one morning only to find yourself blocked from access. 😱 Your password does not work, and you soon realize an attacker has taken over. They might have slipped in through a leaked password, a password spray attempt, or by tricking you into an MFA bypass. Once inside, the attacker performs MFA registration attacks by enrolling their own MFA method and shuts you out. 😢
This may sound alarming, but it is a real tactic used in modern attacks. Threat actors exploit weak MFA registrations in Entra to maintain long-term control of compromised accounts. That is why securing the MFA enrollment process is just as important as setting up MFA itself. In this blog, we will walk through practical steps to block unauthorized MFA registrations in Microsoft Entra ID and keep your accounts safe. 🛡️
How to Protect Your User Accounts from MFA Registration Attacks in Microsoft 365?
Once attackers find a way to access your account, they can move around just like you would. If MFA enrollment is left wide open, they can quickly add their own phone number, authenticator app, or FIDO2 key. From that moment on, they’ve created a hidden backdoor, and you could be kicked out of your own account. 😟
The fix is simple: secure the MFA registration process in Microsoft Entra ID and apply layered protection for new MFA enrollments. This way, attackers can’t reach the MFA registration page, and your Microsoft 365 accounts stay protected from unauthorized access. ✅
Here are some of the most effective ways to prevent attackers from adding their own MFA methods to user accounts:
- Require MFA verification to register security information
- Block MFA registration attempts from unknown/untrusted locations
- Limit MFA enrollments to compliant devices and trusted network locations
- Restrict MFA registration using the user-risk policy in Microsoft Entra ID
- Track MFA Registration Activity Reports in Entra
- Get alerts on all MFA registration events in Microsoft 365
Now, let’s dive into how you can implement these measures in Microsoft Entra ID and safeguard your user accounts from MFA registration attacks.
1. Require MFA Verification to Register Security Information
Without additional controls, attackers who compromise an account can add their own MFA method, creating a backdoor and locking out the real user.
To prevent such risks, you can enforce a Conditional Access policy that requires trusted MFA verification. This requires users to authenticate with an existing MFA method, such as a phone number, authenticator app, or phishing-resistant MFA methods such as FIDO2 and passkeys. If only this verification is successful, users can proceed to register a new MFA method, which keeps the account fully under their control. ✅
To configure MFA verification for registering security information, follow these steps:
- Sign in to the Microsoft Entra admin center at least as a Conditional Access administrator.
- Under the Entra ID section, go to Conditional Access and click + Create New Policy.
- In the New tab displayed, give your policy a clear name, such as ‘Require MFA to register security information’.
- Under Assignments, make the following selections:
- In the Users → Include, select ‘All users’ to apply the policy across your organization.
- In Exclude, add such as break-glass accounts that should not be impacted by the policy.
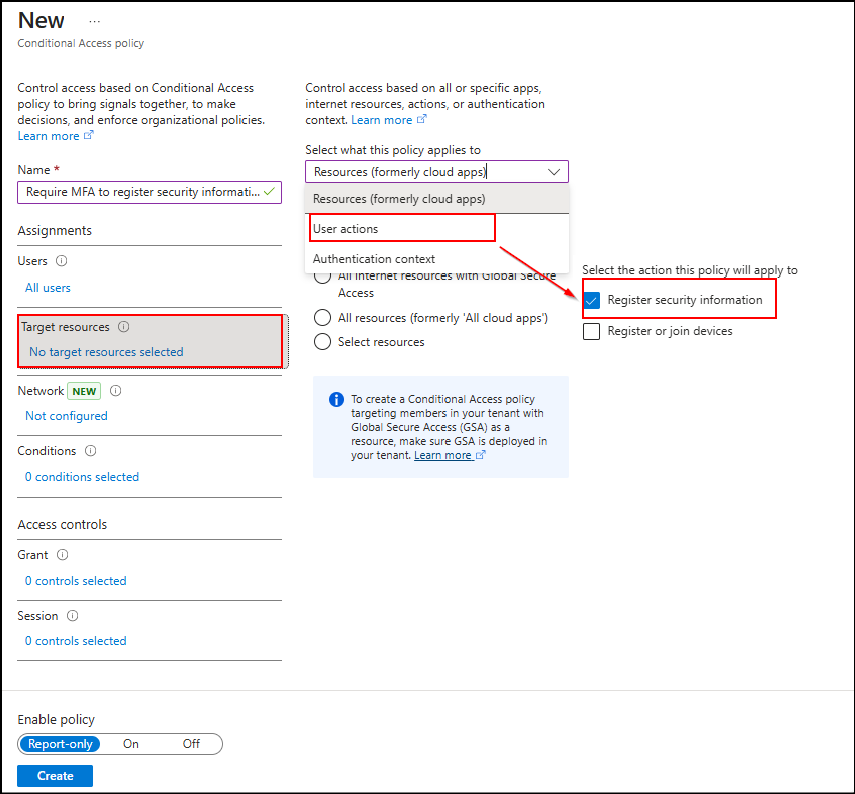
- Then, in the Target resources section, from the Select what this policy applies to dropdown, choose User actions and select Register security information.
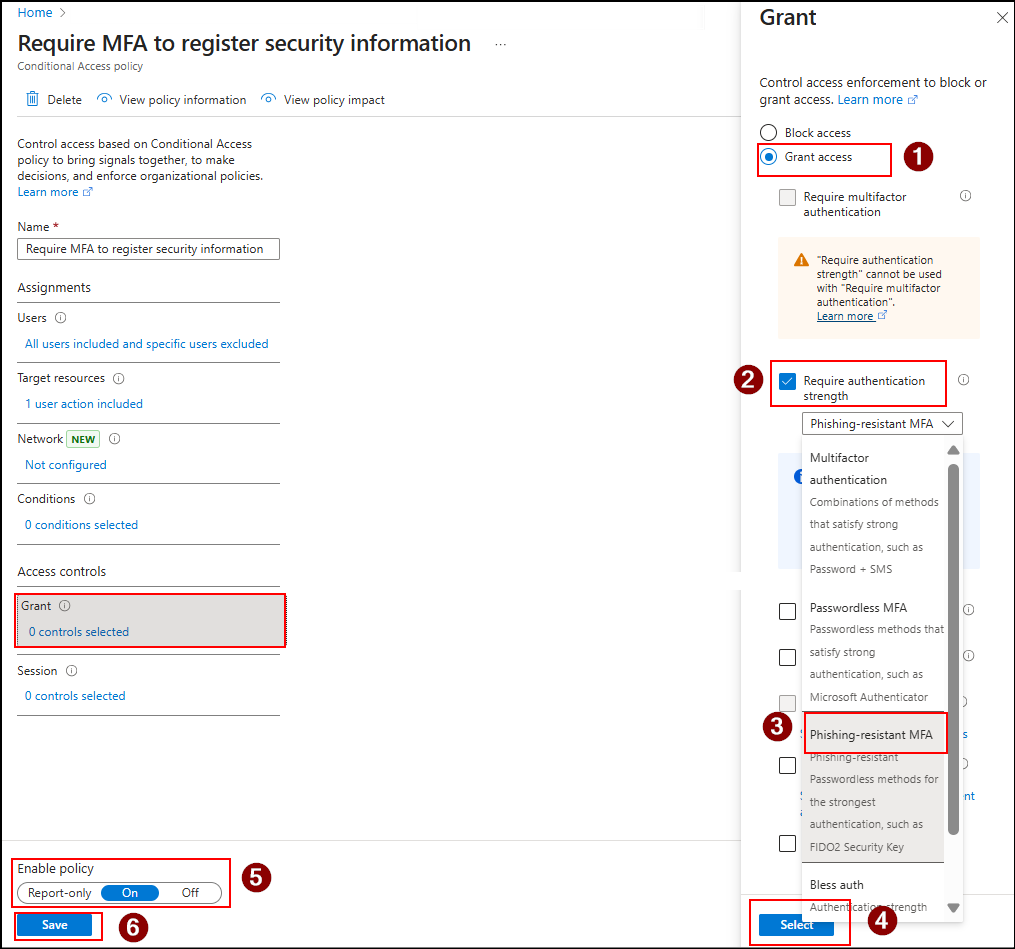
- Next, under Access controls → Grant:
- Select Grant access.
- Enable the Require multifactor authentication checkbox. This ensures users must complete an MFA challenge with one of their existing registered methods.
- Or if you want to enforce a stronger MFA method of your choice, then you can enable Require authentication strength and select either Phishing-resistant MFA (like FIDO2 security keys or passkeys) or your own custom authentication strength.
- Now, set Enable policy to On, and click Create.
How This Policy Works?
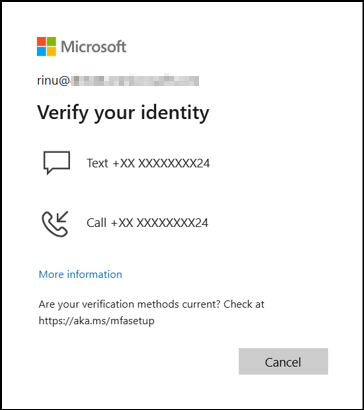
Once this policy is active, if MFA is enabled, any attempt to add a new MFA method will first require MFA verification of your choice. This means only the MFA methods already registered, like text messages, calls, or authenticator apps, can be used to confirm the user’s identity.
A sample prompt is shown below.
On the other hand, if FIDO2 or passkey authentication is enabled, the prompt will instead require the user to sign in with their passkey or security key before proceeding. Here’s the sample image of the prompt.
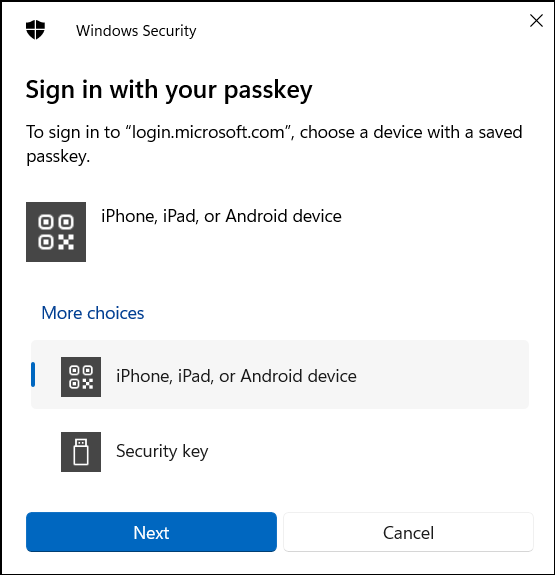
So, new MFA methods cannot be added until the existing ones are successfully verified. This simple step stops attackers from sneaking in their own MFA and keeps your account fully under your control.
2. Block MFA Registration Attempt from Unknown/Untrusted Locations
Even with existing MFA in place, attackers can sometimes trick users into bypassing it. That’s why adding another layer of protection is critical. For example, an attacker might try to register a new MFA method from their own Wi-Fi or a foreign location. If successful, they could take control of the account by adding their own authentication method. Hard to imagine, right?
To prevent this, organizations must restrict MFA registration to trusted locations. This ensures that MFA registration happens only in controlled and secure environments.
Implement Conditional Access policies in Microsoft Entra ID to restrict MFA enrollment to trusted locations and prevent unauthorized registrations by following these steps.
- Sign in to the Conditional Access page and click +New Policy.
- In the New tab, provide a name for the policy. Here, I’ve given as ‘Block MFA registrations from untrusted locations.’
- Then, under Assignments, make the following changes.
- In the Users section, include all users and exclude the emergency access accounts as mentioned in the earlier method.
- Now, in the Target Resources block, in the Select what this policy applies to dropdown, select User actions.
- Then, enable the Register security information checkbox.
- After this, in the Network tile, toggle the Configure to Yes. Then, include Any network or location and exclude All trusted networks and locations.
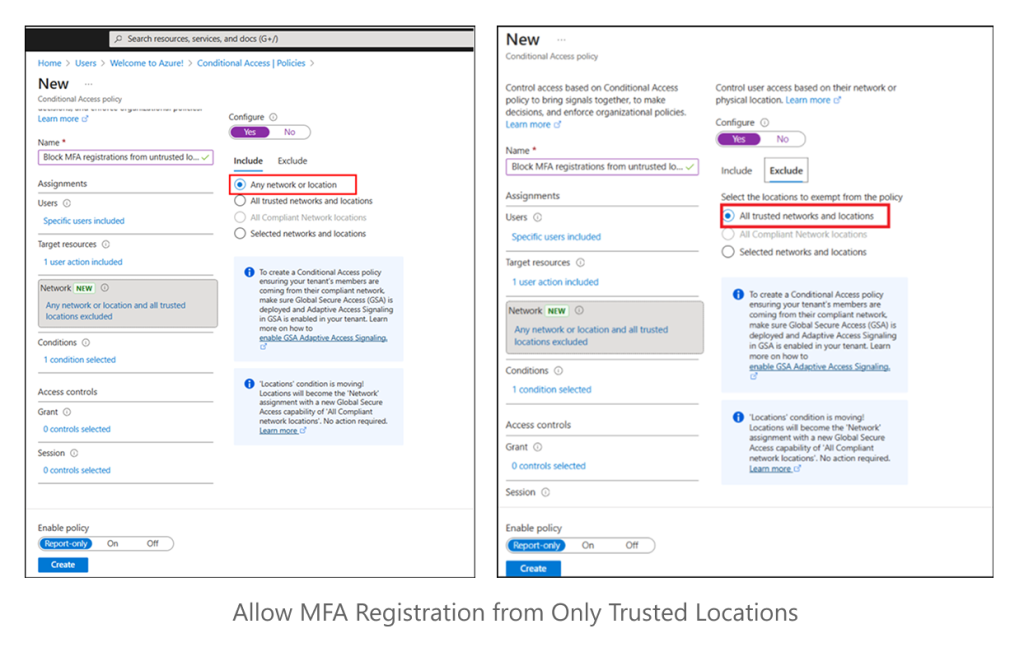
- Then, under Access controls >> Grant, select Block access and click Select.
- Once configured, toggle the Enable policy to On and click Create to run the policy.
Know How the Policy Works!
Once this policy is active:
- A user signing in from a trusted location (e.g., your U.S. office) can register MFA without any issues. ✅
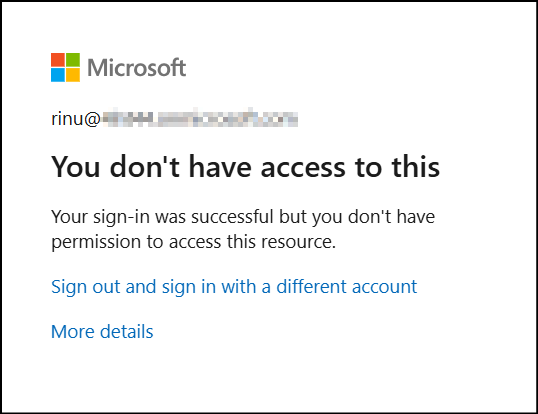
- An attacker trying to perform MFA registration attacks from an unknown location (e.g., Dubai or public Wi-Fi) will be blocked. They will see a message similar to:
“Your sign-in was successful but you don’t have permission to access this resource.”
This ensures that MFA registration is limited to secure, trusted networks.
3. Limit MFA Enrollments to Compliant Devices and Trusted Network Locations
You’ve already applied restrictions to block MFA registration from untrusted locations. But what if an attacker somehow manages to perform an attack from inside that trusted location? 🤔 Many admins mark their office IPs as trusted locations to skip MFA prompts — it feels convenient, but this approach can weaken your Zero Trust stance and leave your environment vulnerable if those networks are ever compromised. In such cases, relying on location alone isn’t enough!
To further strengthen security, apply multiple layers of control. It’s recommended to enforce MFA registration only from compliant devices within trusted networks. This can be done in a 2-step process, which includes:
3.1. Create Device Compliance Policies in Microsoft Intune
Here, we’ll define the rules that determine when a device is considered compliant. To achieve this, you can configure an Intune device compliance policy by following these steps:
- Sign in to the Microsoft Intune admin center → Devices → Manage devices → Compliance → Create policy.
- Select the appropriate machine platform and profile type. Next, click Create.
- In the Basics tab, enter a suitable name and description for the policy and click Next.
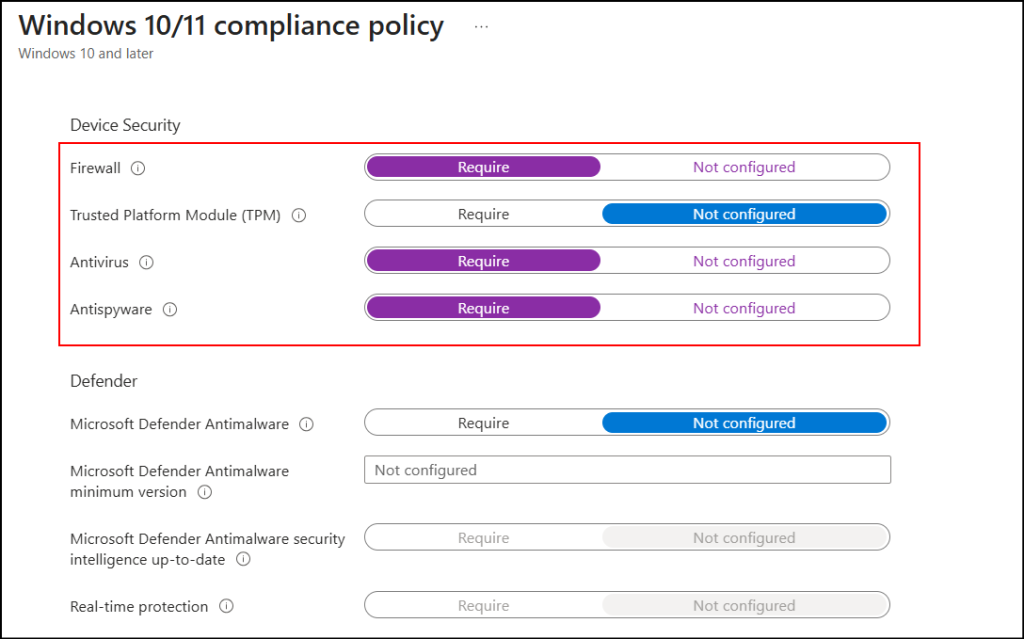
- In the Compliance settings tab, under System Security, navigate to the Device Security section.
- Set Firewall, Antivirus, and Antispyware to “Require” (Note: Some configurations may be hidden based on the platform).
- Configure any additional settings as needed, then click Create to configure the device compliance policy.
3.2. Enforce MFA Registration from Trusted Locations and Compliant Devices
Now it’s time to set up the Conditional Access policy to protect MFA configuration on trusted devices and networks. Follow these steps to implement it:
- Go to the Policies tab in the Conditional Access page and click +New to create a policy.
- Provide a descriptive name for the policy, for example, ‘Restrict MFA enrollment from trusted devices and locations.’
- Under Assignments, configure the following:
- Users: Select All users and exclude break-glass accounts to prevent accidental lockouts.
- Target Resources: From Select what this policy applies to, choose ‘User actions’ and enable ‘Register security information.’
- Network: Include All trusted networks and locations.
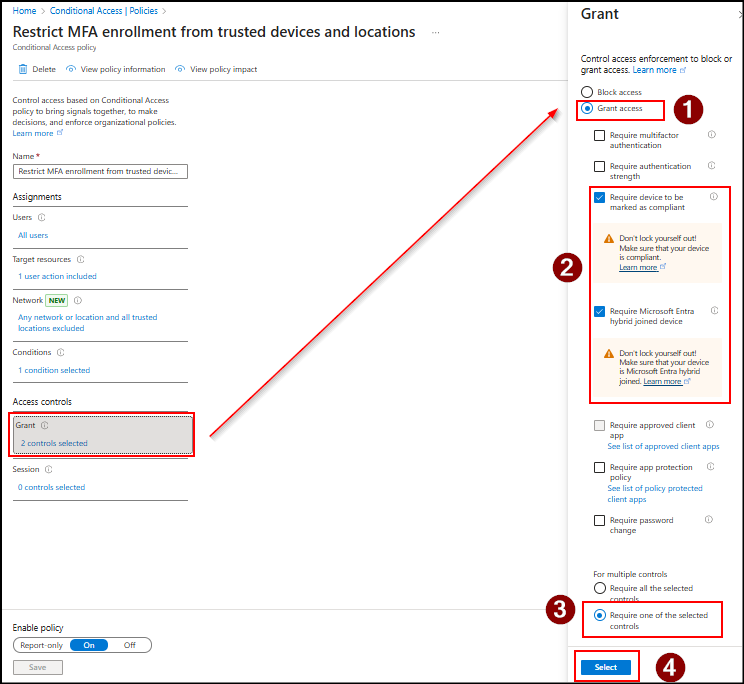
- The critical step is in Access controls → Grant and enable Grant access. Now, check:
- Require device to be marked compliant
- Require Microsoft Entra hybrid-joined device
- Enable Require one of the selected controls from the multiple options, then Click Select.
- With this, you can finish setting up this policy by toggling the Enable policy to On and then click Create.
What Happens When the Policy Is Applied?
Once the policy is in place:
- A legitimate user registering MFA from a trusted location on a compliant device will complete the process without issues. For example, a device accessing from the U.S. office that meets compliance checks (firewall, antivirus, and antispyware) will pass smoothly. ✅
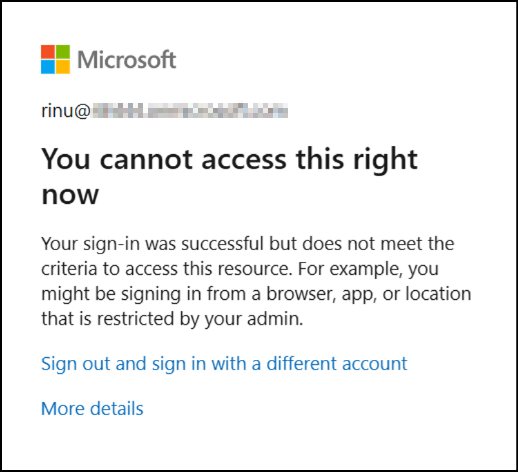
- If an attacker attempts to register MFA from a trusted location but uses a non-compliant device, the request will be blocked. Instead of completing the registration, they will encounter an error such as:
“Your sign-in was successful but not meet the criteria to access this resource”.
This way, the attacker’s device never gets a chance to add MFA, while your trusted users continue their registration smoothly.
4. Restrict MFA registration Using User-Risk Policy in Microsoft Entra ID
So far, we’ve seen how to restrict MFA registration by location and device compliance. 🔐 But what happens if the account itself is already compromised? That’s when the real danger begins. Attackers who gain control of a risky account often try to add their own MFA method right away. If they succeed, they can lock out the legitimate user and keep long-term access.
This is where user-risk policies make a difference. These policies can help identify risky users, such as those with leaked credentials or abnormal account activity, and stop MFA registration until the risk is resolved. By enforcing this safeguard, you ensure that only trusted, verified users can manage MFA settings, preventing attackers from creating persistent access. Here’s how to configure the user-risk policy to block MFA registrations from suspicious accounts.
- Start by creating a new Conditional Access policy and give a suitable name for your policy. Here, it is ‘User-risk policy to block MFA registration’.
- Under Assignments → Users, choose the target users you want the policy to cover.
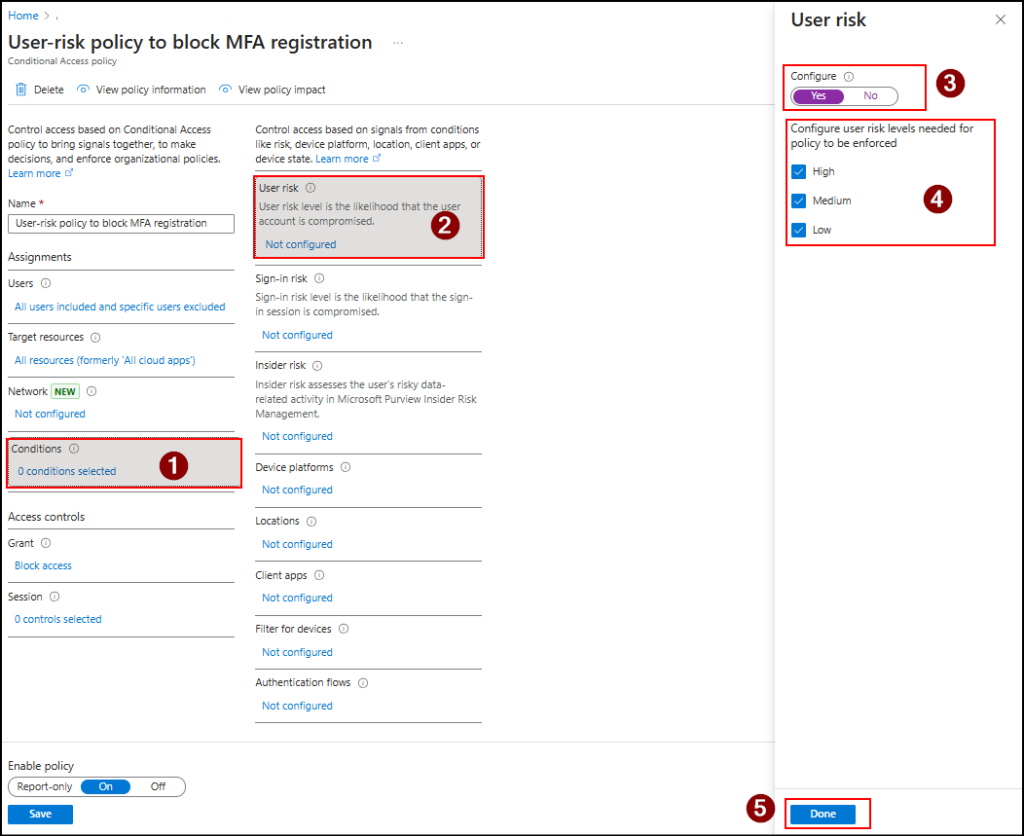
- Then, in the Target resources section, select the User action to Register security information, just as you did in the earlier methods.
- The key part comes under Conditions → User risk. Turn Configure to Yes, then set the user risk level to High, Medium, and Low. Next, click Done.
- Then, under Access controls → Grant, select Block access. Then, click Select.
- Once everything is configured, enable the policy to On and click Create to save it.
How It Protect Your Account?
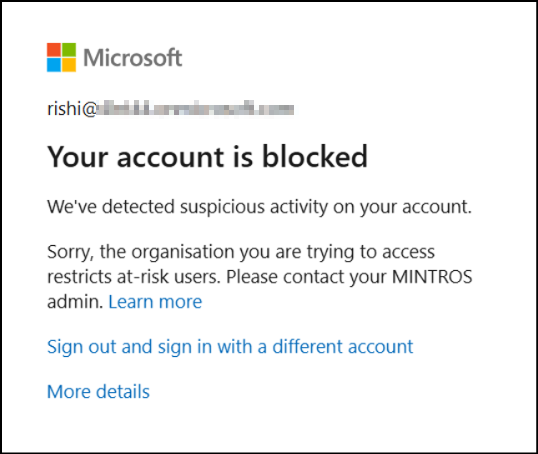
Once the policy is applied, it ensures that only users with no risk are allowed to register for MFA. If an account is tagged as risky due to suspicious activity, the policy takes effect. The user-risk policy interrupts the attempt and blocks MFA registration, displaying an error message like the one below:
“Your account is blocked. We’ve detected suspicious activity on your account.”
5. Track MFA Registration Activity Reports in Entra
You have now applied multiple layers of protection, like location-based rules, device compliance, enforced user-risk policies, and passkeys. ✅
But the job is not done yet. Security is not only about applying policies, but also about continuous visibility into MFA registration trends across your organization. You need to monitor all Entra MFA user registrations happening across your organization to detect unusual MFA enrollment activity early. For example, a sudden spike in MFA registrations after office hours or from unfamiliar locations could indicate a compromised account.
To stay ahead of threats, regularly reviewing Azure AD MFA registration activity logs helps confirm that MFA registrations are coming from legitimate users, while also highlighting irregular or risky sign-up attempts. Here’s how the Microsoft Entra MFA registration reports benefit you.
- Sign in to the authentication methods in the Microsoft Entra admin center.
- Under the Monitoring section, you can explore three key reporting dashboards, which include:
- Activity Reports – This shows overall MFA registration and usage trends. A sudden spike here can highlight suspicious activity.
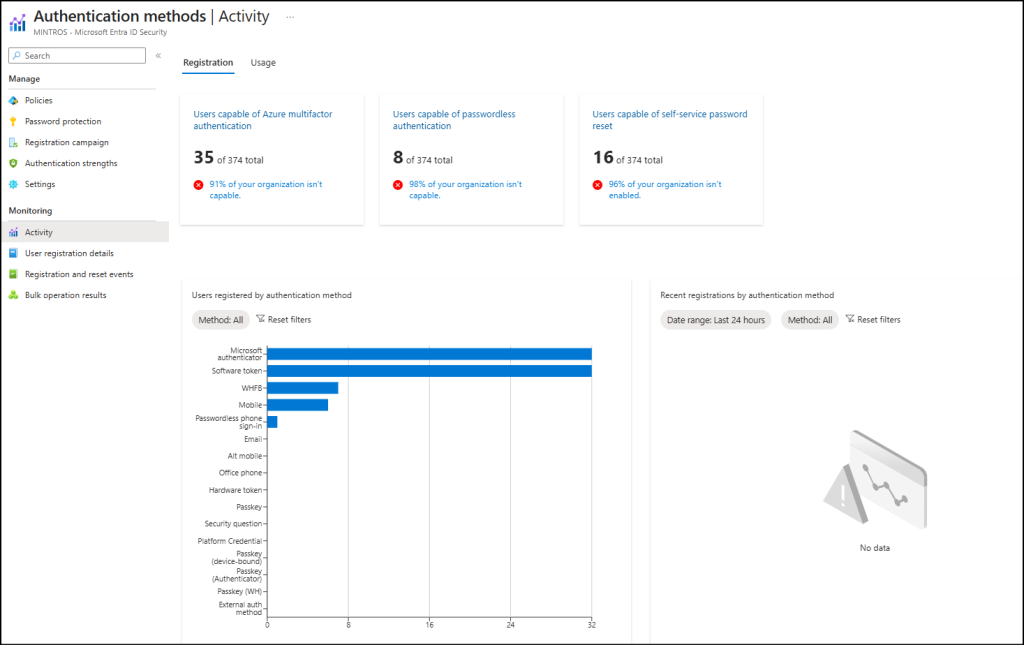
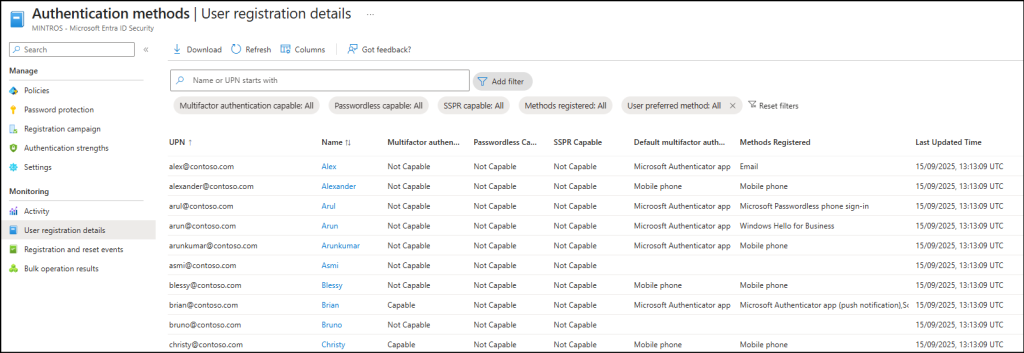
- User Registration Reports – This lets you see which users have registered MFA and who still need MFA enforcement.
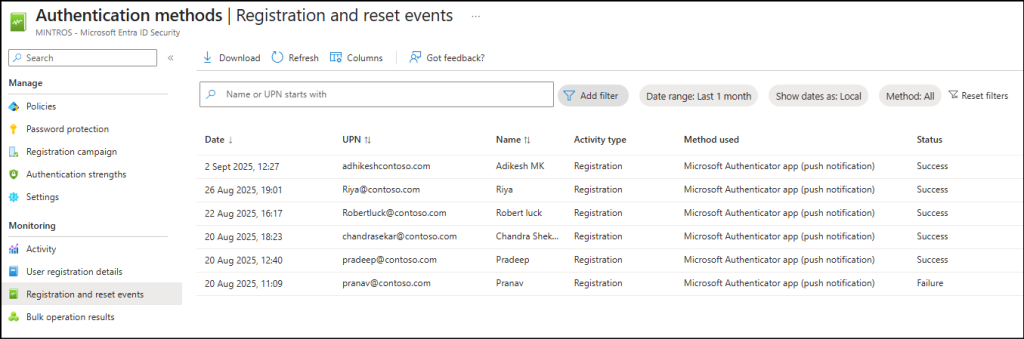
- Registration and Reset Events give detailed logs of every action. You can check the date, UPN, activity type, method used, and status for each registration attempt.
These insights give you real-time visibility. You can quickly detect risky patterns, stop attackers in action, and prove your security policies are protecting your Microsoft 365 environment. 🔒
6. Get Alerts on All MFA Registration Events in Microsoft 365
Even with all these preventive measures in place, you should never rely solely on blocking or restricting MFA registrations. 👀 Without real-time monitoring, suspicious MFA enrollments could still go unnoticed. By setting up alerts, you’ll instantly be notified for every MFA registration. This way, any suspicious attempt can be caught in real time before it turns into a full-blown compromise.
By default, the Microsoft Entra admin center does not provide alert policies for MFA registrations. While Microsoft Sentinel can handle this, it requires additional licensing costs.
So, as an alternative, you can use AdminDroid Alerts to quickly create alerts for 3500+ reports. Based on your use case, you can set up alerts for any new MFA registration activity. Here’s how:
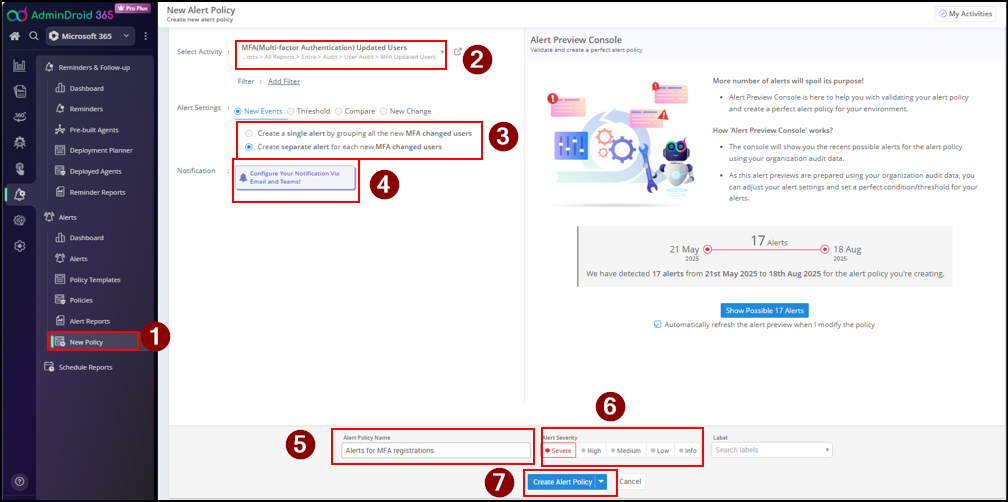
✅ That’s it! From now on, you’ll receive instant alerts for every MFA update in your organization.
At the end of the day, securing MFA registration is about strengthening identity and data protection. Each step you apply, like blocking unknown locations, enforcing device compliance, using FIDO2 or passkeys, and more locks against attackers. With monitoring in place, you can spot issues quickly and act before damage is done. You can choose any one of the suggested methods or combine multiple approaches, depending on your organization’s needs. By following these methods, you not only enable MFA but also secure it.
We hope this blog gave you useful insights into securing MFA registrations. Share your thoughts in the comments. We’d love to hear from you!


