On Day 14 of Cybersecurity Awareness Month, explore effective strategies to defend against phishing threats with Microsoft Secure Score recommendations. Stay tuned for more security tips and expert insights in the Microsoft 365 Cybersecurity blog series!
Phishing is one of the most dangerous forms of social engineering, where attackers deceive users into giving up sensitive information. Tempting deals and fake offers can easily lure your Microsoft 365 users down the wrong path. But as an admin, it’s nearly impossible to track every email threat manually. That’s where Microsoft Secure Score comes in.
“The greatest weapon against cyber threats is vigilance.” – James Scott
Microsoft Secure Score is a powerful analytics tool that evaluates your organization’s security posture and offers actionable recommendations to strengthen it. In this blog, we’ll explore Microsoft Secure Score recommendations for phishing to help protect your email environment from phishing attacks.
6 Key Microsoft Secure Score Recommendations Against Phishing
In Microsoft environments with high email traffic or inadequate security settings, phishing messages can easily slip through the cracks. Discover these six essential Microsoft Secure Score recommendations to outsmart phishers and boost your email security!
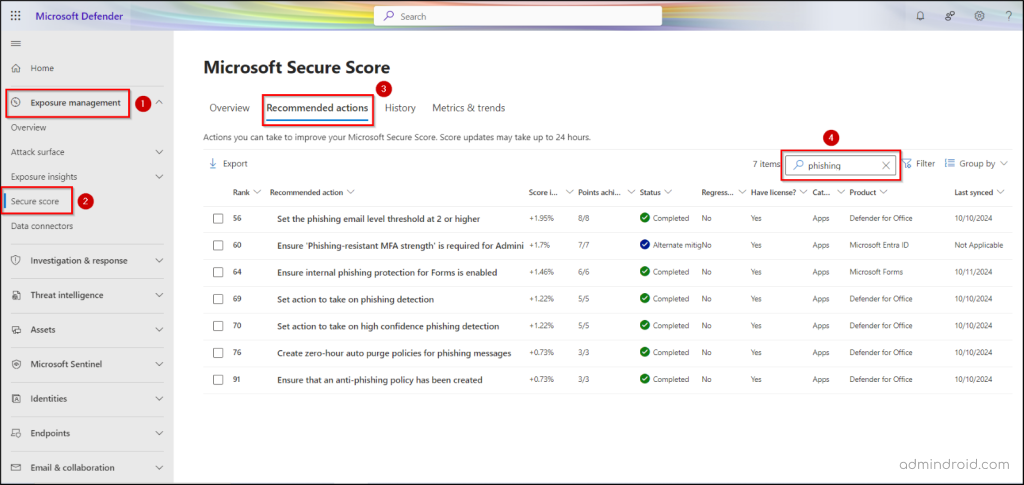
- Set the phishing email level threshold at 2 or higher
- Ensure that an anti-phishing policy has been created
- Set action to take on phishing detection
- Set action to take on high confidence phishing detection
- Create zero-hour auto purge policies for phishing messages
- Ensure internal phishing protection for forms is enabled
How to Access the Microsoft Secure Score Recommendations for Phishing Protection?
You can access phishing-related Secure Score recommendations in the Microsoft 365 Defender portal under Exposure management → Secure score → Recommended actions. Then, simply search for “phishing” on the Recommended actions page.
Let’s dive right into the Microsoft Secure Score insights, exploring why each one is essential and how to configure them with ease!
1. Set the Phishing Email Level Threshold at 2 or Higher
✅ License Required: Microsoft Defender for Office 365 P2
✅ Microsoft Secure Score Points Gained: 8
Phishing threshold is a rating that reflects how confident Microsoft Defender is that a message is a phishing attempt. The rating can range from low to very high, and messages are handled differently depending on the confidence level.
Setting the threshold to value 2 (Aggressive) provides enhanced protection by detecting a wider range of phishing attempts without overly blocking legitimate emails. Microsoft recommends this setting because it strikes a balance between security and email flow. This ensures better protection against phishing attacks while minimizing false positives.
How to Set Phishing Email Threshold Level in Microsoft 365?
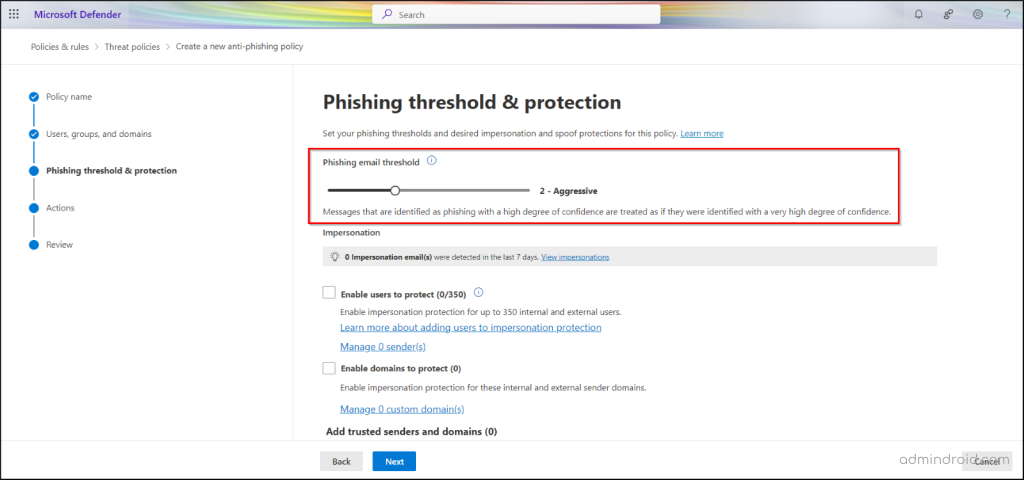
To configure the phishing threshold in an anti-phishing policy, use the path below and complete the steps provided.
Microsoft Defender → Email & collaboration → Policies & rules → Threat policies → Policies → Anti-phishing → Create policy
- Provide a name and description for your custom anti-phishing policy on the Policy name page, then click Next.
- On the Users, groups, and domains page, specify the users, groups, or domains to include or exclude as needed, and click Next.
- On the Phishing & threshold page, set the phishing email threshold level to 2 using the slider. Setting it to level 2 is recommended for balanced protection, but you can also set it higher for tighter protection. Click Next.
Note: The phishing threshold value is set to 1 by default as the standard setting. - Configure the protection settings according to your preferences, then click Next.
- On the Actions page, set the appropriate actions for detected phishing emails, and proceed to the Review page to review your configurations.
- Once reviewed, click Submit to finalize and create the policy.
Note: Custom policies are designed for application to specific user groups. For organization-wide configurations, consider adjusting the threshold values in the default anti-phishing policy to meet your broader needs.
2. Ensure that an Anti-phishing Policy has been Created
✅ License Required: Microsoft Defender for Office 365 P2
✅ Microsoft Secure Score Points Gained: 3
Creating an anti-phishing policy in Microsoft 365 is crucial for detecting and blocking malicious emails while ensuring compliance with regulatory standards. It also reduces financial risks and allows admins to tailor protection to specific needs, boosting the organization’s defense against cyber threats. For these reasons, Microsoft strongly recommends configuring anti-phishing policies in Microsoft Defender.
Create an Anti-phishing Policy in Microsoft 365
- Sign in to the Microsoft 365 Defender portal.
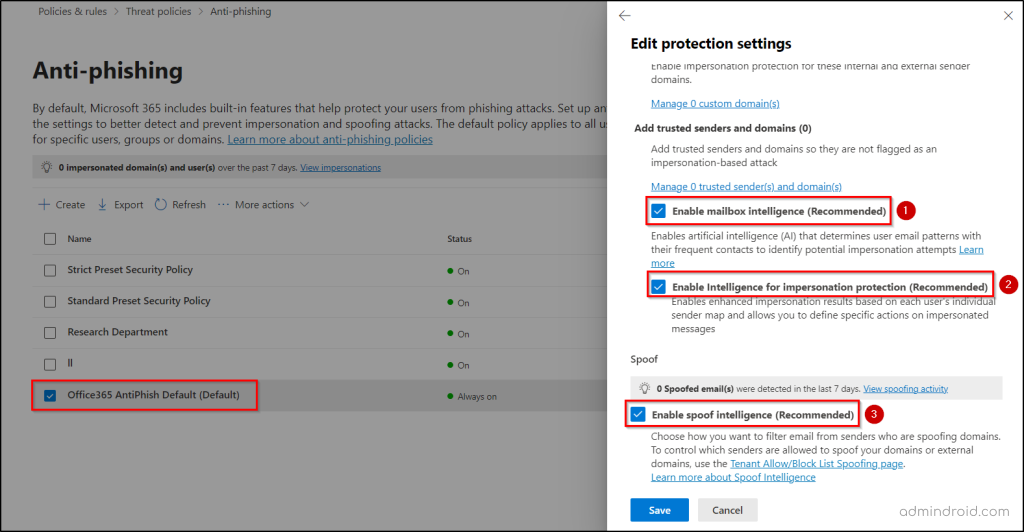
- Navigate to Email & collaboration > Policies & rules > Threat policies > Anti-phishing policies.
- Select the Office 365 Anti-phish Default policy and click Edit protection settings under Phishing threshold and protection.
- Set the Phishing email threshold to at least 2 – Aggressive.
- Under the Impersonation section, check the following boxes:
- Enable mailbox intelligence (Recommended)
- Enable Intelligence for impersonation protection (Recommended)
- In the Spoof section, check Enable spoof intelligence (Recommended).
- Click Save to tune your anti-phishing protection.
3. Set Message Action to Take on Phishing Detection
✅ License Required: Microsoft Defender for Office 365 P2
✅ Microsoft Secure Score Points Gained: 5
An employee receives an email that appears to be from a trusted source, requesting them to update their login credentials via a link. Without the employee’s knowledge, email is a phishing attempt designed to steal their credentials. If the phishing message is not quarantined, the employee might accidentally click the link, leading to a compromised account and potential data breaches.
That’s why Microsoft recommends configuring phishing messages to be quarantined. This proactive measure allows admins to review suspicious content before it reaches users, safeguarding sensitive information and maintaining organizational security.
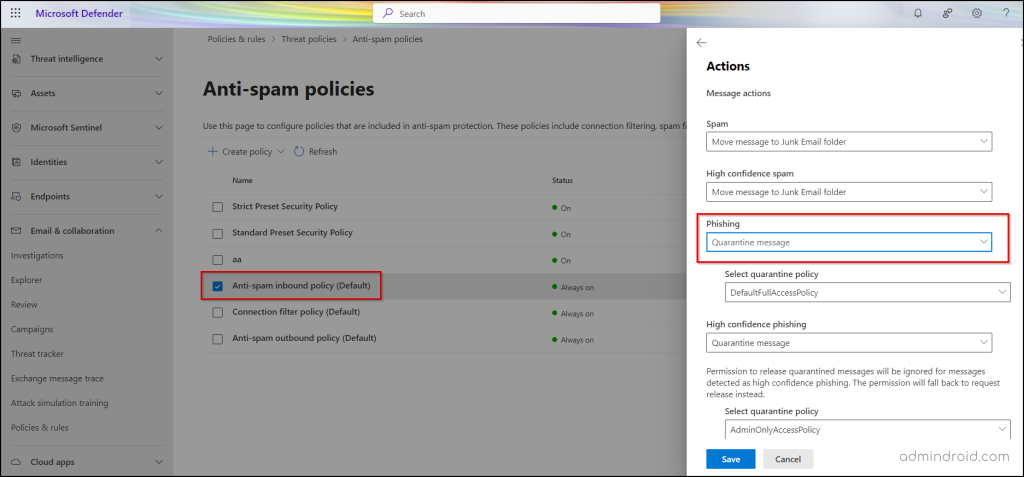
How to Set Phishing Message Action to Quarantine in Microsoft 365?
- Sign in to the Microsoft 365 Defender portal and navigate to Email & collaboration > Policies & rules > Threat policies > Anti-spam.
- Select Anti-spam inbound policy (Default) and click Edit actions under the Actions section.
- In the Message actions section, change the Phishing drop-down from the default ‘Move message to Junk Email Folder’ to ‘Quarantine message‘.
Note: If this policy is too strict for some users, you can create a custom anti-spam policy for specific groups. However, Microsoft recommends ensuring that all users have a policy where Phishing message action is set to ‘Quarantine message’ by either updating or creating new policies.
4. Set Action to Take on High Confidence Phishing Detection
✅ License Required: Microsoft Defender for Office 365 P2
✅ Microsoft Secure Score Points Gained: 5
Phishing detection refers to emails flagged as suspicious based on certain indicators, while high confidence phishing strongly indicates that the email is a phishing attempt. This classification allows for more aggressive protective measures to be implemented against potential threats.
Microsoft recommends quarantining high confidence phishing emails because they have a greater likelihood of being genuine threats. By placing these emails in quarantine, organizations can protect users from potential credential theft and data breaches.
Set High Confidence Phishing Message to Quarantine in Microsoft 365 Defender
To set the action for high confidence phishing messages to quarantine, follow these steps:
- Navigate to Microsoft 365 Defender.
- Go to Email & collaboration > Policies & rules > Threat policies > Anti-spam.
- Select the Anti-spam inbound policy (Default) and click Edit actions under the Actions section.
- In the Message actions section, set the High confidence phishing drop-down menu to Quarantine message.
5. Create Zero-hour Auto Purge Policies for Phishing Messages
✅ License Required: Microsoft Defender for Office 365 P2
✅ Microsoft Secure Score Points Gained: 3
Have phishing emails slipped through your email filters despite multiple layers of protection? Attackers constantly adapt, using techniques like weaponized URLs, malicious attachments, and drive-by downloads to target users. Even with advanced security, these threats can bypass defenses, leading to data breaches or compromised accounts.
To combat such evolving threats, enable Zero-hour Auto Purge (ZAP) in Exchange Online. ZAP in Microsoft 365 automatically detects and removes malicious emails after delivery. As a result, it reduces the risk of phishing attacks and protects your organization before users can interact with harmful content.
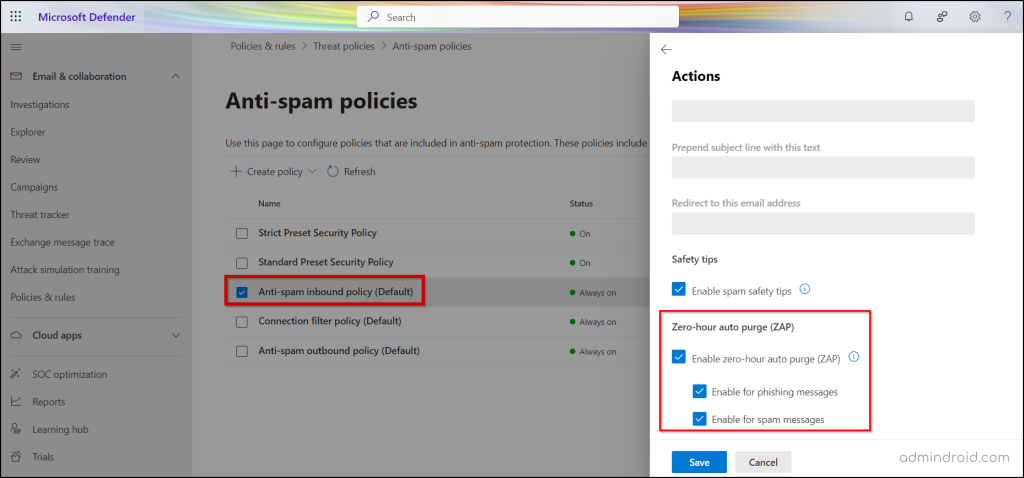
Create Zero-hour Auto Purge Policies in Microsoft Defender
Follow these steps to configure Zero-hour Auto Purge (ZAP) policies for phishing messages in Microsoft Defender:
- Navigate to the anti-spam policy page:
Microsoft Defender → Email & Collaboration → Policies & Rules → Threat Policies → Anti-Spam - Select Anti-spam inbound policy (Default) and click Edit actions under the Actions section.
- In the ‘Zero-hour auto purge (ZAP)‘ section, ensure the following options are enabled:
✅Enable zero-hour auto purge (ZAP)
✅ Enable for phishing messages
✅ Enable for spam messages - Click Save to apply the changes.
6. Ensure Internal Phishing Protection for Forms is Enabled
✅ License Required: Microsoft Defender for Cloud Apps
✅ Microsoft Secure Score Points Gained: 6
Microsoft Forms, part of Microsoft 365, allows users to create surveys, quizzes, polls, and feedback forms. However, cybercriminals may exploit it for phishing by creating forms that mimic trusted organizations to steal sensitive information like usernames and passwords.
To prevent this, enable internal phishing protection in Microsoft Forms. This feature proactively scans forms for phishing indicators, such as requests for sensitive data. Any flagged forms will be blocked from sharing, and admins will receive notifications via the message center.
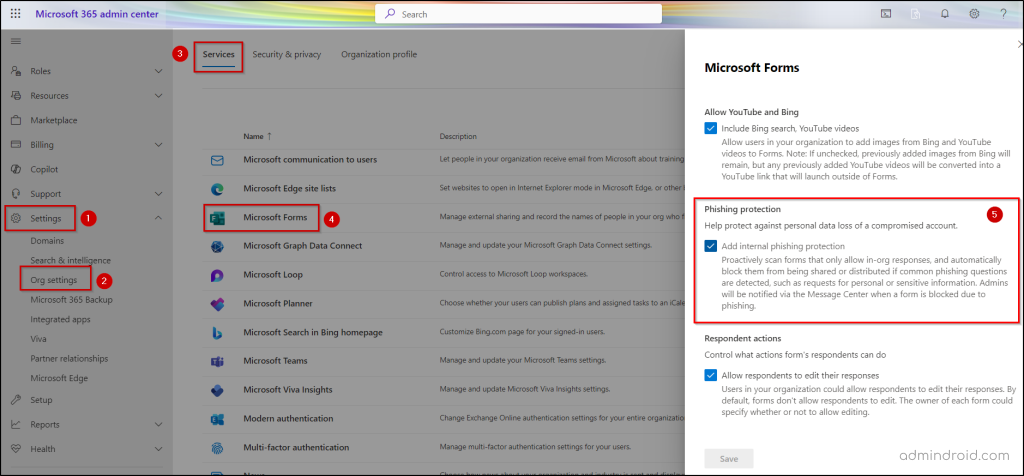
How to Configure Phishing Protection in Microsoft Forms?
- Navigate to the phishing protection settings for Microsoft Forms by following the path outlined below.
Microsoft 365 admin center → Settings → Org settings → Microsoft Forms → Phishing protection
- Check in the Add internal phishing protection check box to enable phishing protection.
- Click Save to apply the changes.
Hope this blog has assisted you in strengthening your security configurations and framework against phishing in Microsoft 365. Don’t wait—configure these settings now to increase threat protection for Microsoft 365. However, don’t just stop at configuring these recommendations; make sure to effectively monitor the Secure Score changes. If you have any questions or need further assistance, feel free to leave a comment! Let’s enhance our security together!


