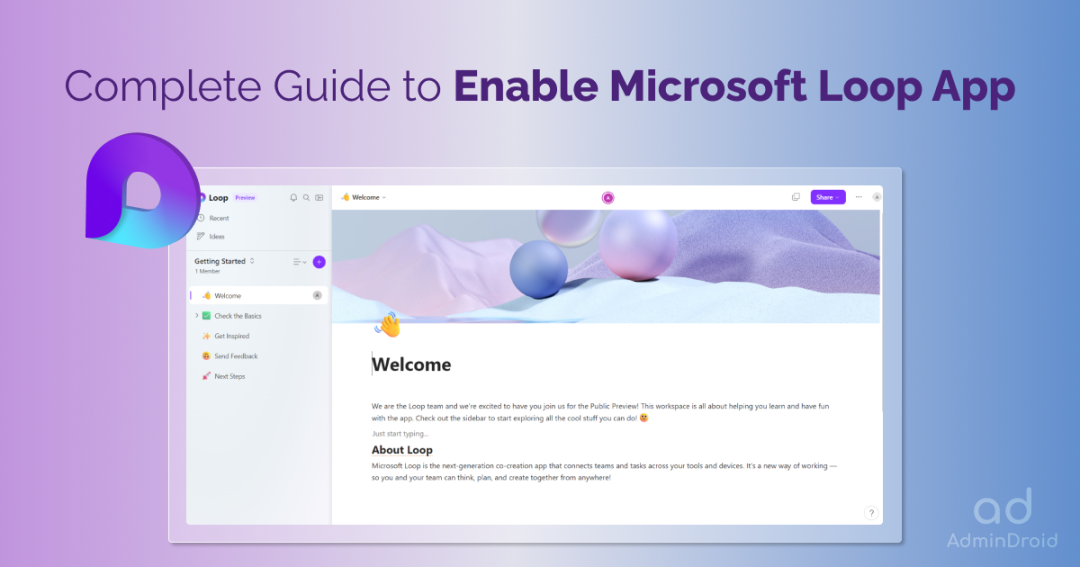
Microsoft Loop App – An app built exclusively to bring team collaboration to the next level!
The world of team collaboration has just been revolutionized with the introduction of Microsoft Loop. This powerful feature and app, built on the cutting-edge Fluid Framework, is designed to help teams in organizations compete in today’s fast-paced work environment. Microsoft Loop’s new way of working is generally available now for customers with Microsoft 365-Business Standard, Business Premium, E3, and E5 on the web and mobile. Are you curious and wondering how to enable the loop app in your organization?
Let’s dive in and explore what this app is all about and how you can start using it!
What is Microsoft Loop App?
At its core, Microsoft Loop is all about flexibility!
Microsoft Loop app is much more than just a collaboration tool. It’s a platform that enables organizations to streamline and automate their workflows. As a result of its powerful integrations with other Microsoft 365 apps and services, the loop app makes it easy to bring together all the tools and teams needed to get their work done. Currently, Microsoft loop components include bulleted lists, checklists, numbered lists, paragraphs, tables, voting tables, and task lists.
Now let’s know what are all the steps admins need to follow for enabling Microsoft Loop app.
Licensing Requirements of Microsoft Loop
Access to the full suite of features in the Loop app is granted to users with Microsoft Entra accounts who are subscribed to specific Microsoft 365 plans. These plans include:
- Microsoft 365 Business Standard
- Microsoft 365 Business Premium
- Microsoft 365 E3
- Microsoft 365 E5
Users with any of these four Microsoft 365 plans gain three additional capabilities within the Loop app:
- Creating new Loop workspaces
- Adding members to Loop workspaces
- Removing members from Loop workspaces
It’s important to clarify that users with an Office 365 E3 or E5 plan do not automatically qualify for these supplementary capabilities. To access these features, users must specifically have a Microsoft 365 E3 or E5 plan.
In cases where users with a Microsoft 365 E3 or E5 plan still do not have access to these capabilities in the Loop app, the activation of the Extra Features license is necessary. This license, offered at no extra charge, is a requirement for early adopters of Microsoft 365 E3 and E5. Instructions on enabling the Extra Features license can be found here.
Note – For an easy transition post-Public Preview, organizations (Microsoft Entra tenants) with users using the Loop app during 2023 get a grace period until early 2024. During this time, all users retain full access to Loop app features, like creating new workspaces and managing members. After the grace period, access to certain capabilities may depend on the user’s Microsoft 365 plan.
How to Enable Microsoft Loop App in the Organization?
To enable the Microsoft Loop app, it is essential to establish a comprehensive Cloud Policy that ensures the safety and security of company data. Before getting to know about Cloud Policy, however, it is equally important to create a security group that includes only the users authorized to use the Microsoft Loop app.
To make the points clear, take a look at the overview! Here are the necessary steps that administrators need to follow to enable the Loop app:
- Create a security group that includes all the users in your organization who should have access to the Loop app during the public preview.
- Create a Cloud Policy that is specifically scoped to the security group you have created to enable the Loop app.
- Ensure that your firewall rules permit all the necessary services to use the app.
- Allow an hour or so for the setting to propagate, and then log in to the Loop app.
1. Creation of a Security Group in Microsoft 365
A security group can be created in two different ways. They are,
Dynamic Security Group
- Azure Active Directory Dynamic groups aim to ease admin’s work by getting group membership updated dynamically based on defined rules.
- With query-based membership, users are automatically added to appropriate dynamic groups based on the attributes of the user or device that are relevant to them.
- Microsoft Dynamic security group requires an ‘Azure AD Premium P1 or P2 license’ subscription.
Creation of a Dynamic Security Group that Includes ‘All Members’
- Sign into Azure Active Directory using an account with the Global administrator or User administrator role.
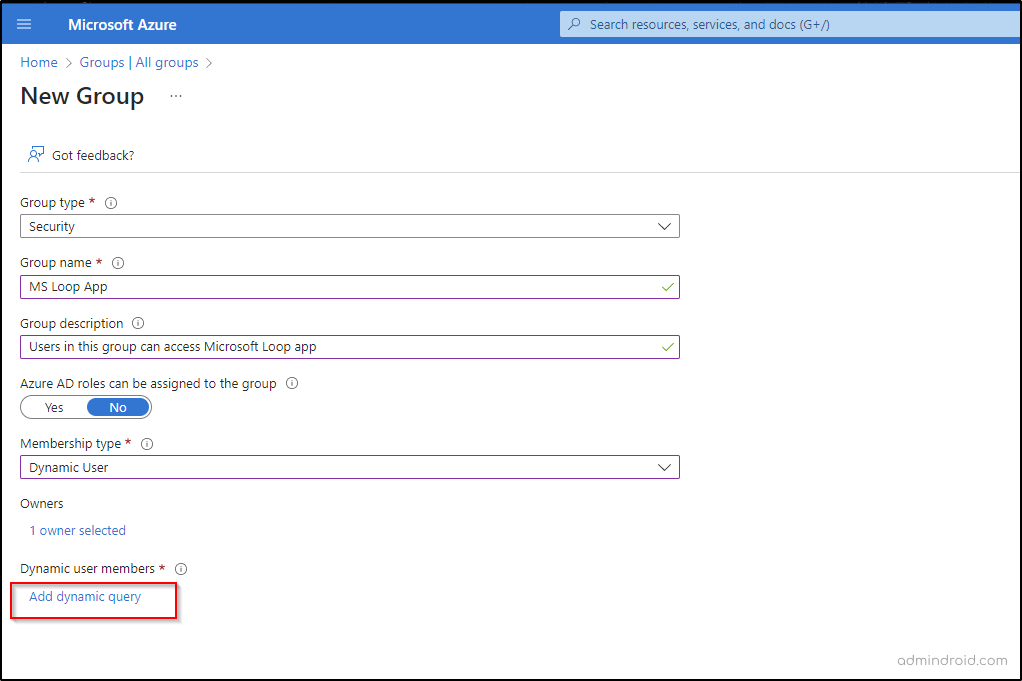
- Navigate to Groups –> New group under Azure AD.
- Choose the group type as ‘Security’.
- Provide a name and apt description for it.
- You can also choose Azure AD roles to be assigned to the group based on your requirements. Once the setting opted for ‘Yes’, the group’s eligibility for role assignment is permanent.
- Change the membership type to Dynamic User.
- Add owners for this dynamic security group.
- Then go to Add dynamic query under Dynamic user members.
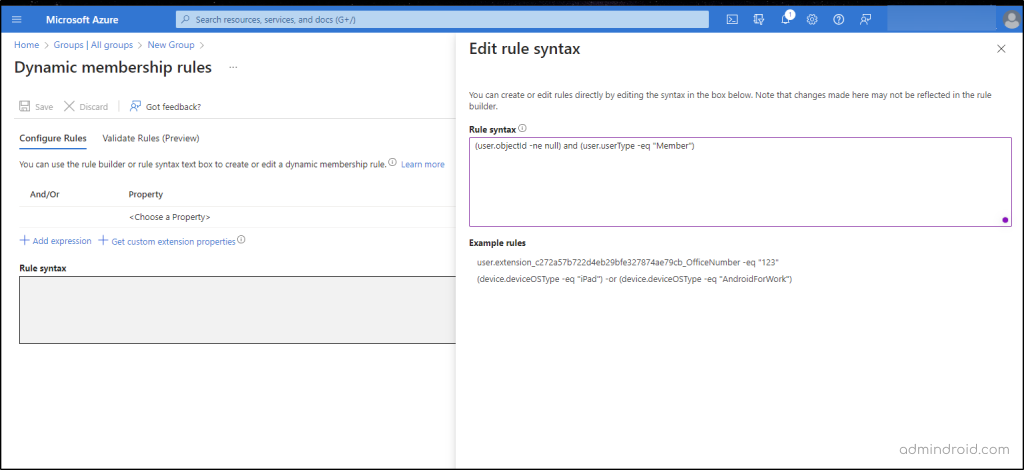
- Click on Edit which is placed at the right corner of the rule syntax box.
- Inside the Rule Syntax box, type the following.
|
1 |
user.objectId -ne null |
11. Select Ok and Click Save.
The above-mentioned rule syntax ‘user.objectId -ne null’ means that this new dynamic group can include B2B guest users as well as the members of the organization.
Creating a Dynamic Security Group with only ‘Tenant Members’
For this case, you have to enter the following rule syntax.
|
1 |
(user.objectId -ne null) and (user.userType -eq "Member") |
This rule syntax will exclude guest users and will include only members of your tenant.
Static Security Group
- A static security group is a group whose membership is manually managed by the administrator in Microsoft 365 admin center.
- This type of group contains a fixed list of members and does not change unless the administrator manually adds or removes members.
- Static security groups are commonly used to assign permissions to shared resources, distribute messages to a group of users, or simplify administration tasks.
How to Create Security Groups in Microsoft 365 Environment?
- Sign into the Microsoft 365 admin center.
- Navigate to Teams & groups –> Active teams & groups –> Add a group.
- Choose Security on the group type page.
- Give the security group a proper name and description.
- You can allow Azure AD roles to be assigned to this group based on organizational needs.
- Finally, Review and finish adding the group.
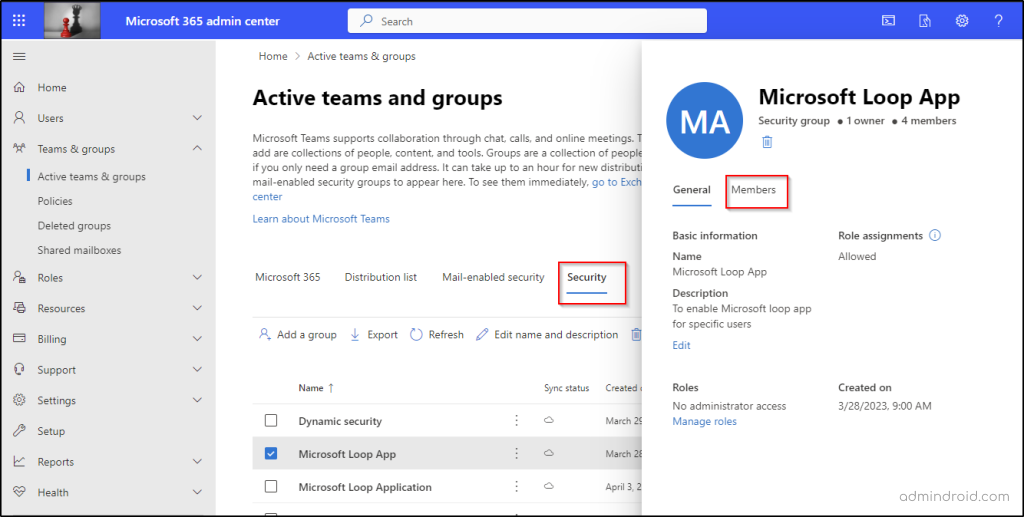
To add members to the security group,
- Go to Security on the ‘Active teams & groups’ page.
- Select the security group you want to add members.
- Click on the Members tab where you can view and manage owners and members.
- After adding respective owners and members, select Save.
In order to enable the Microsoft Loop app within your organization, it is essential to set up a Cloud Policy after creating a security group.
2. Creation of Cloud Policy in Microsoft 365
Are you wondering why we are going for Cloud Policy creation? Here is the answer!
With the rise of hybrid work, companies are dealing with new security challenges in recent times. One such challenge is the prospect of employees utilizing their personal devices to access corporate data. Traditional security measures like Active Directory Policy Group Policy Management don’t work for these unmanaged devices. However, Office Cloud Policy service can help administrators by applying policies to users that work across all devices, no matter how they are managed.
How to Create Microsoft Cloud Policy to Enable Microsoft Loop app?
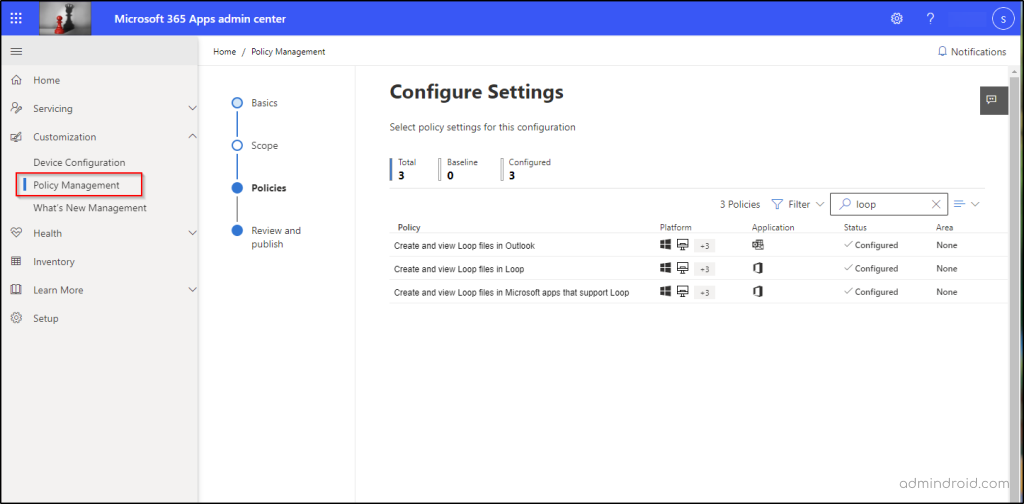
- Sign into Microsoft 365 Apps admin center.
- Navigate to Customization –> Policy Management.
- Select Create a new policy and name it with a proper description.
- Under the scope, select an appropriate security group to apply the Cloud Policy.
- Under policies, search for the loop and you will find these settings.
✅ Create and view Loop files in Microsoft apps that support Loop
✅ Create and view Loop files in Outlook
✅ Create and view Loop files in Loop
6. Click on each setting and change the configuration to Enabled status.
7. Finally, Review and publish the policy.
Note – Each policy configuration can only be assigned to a single security group, and each group can only be assigned one policy configuration. In addition, admins have the ability to reassign priority to Cloud Policy configurations in cases where they apply to the same group of users. In such situations, the policy configuration with the highest priority will be enforced.
3. Ensure Firewall Rules don’t Affect the Loop App
To ensure seamless connectivity to loop services, it’s essential to allow traffic to pass through your firewall. If you’re using firewall rules, make sure to enable connections to loop services and ensure you’ve enabled the services documented here: Office 365 URLs and IP address ranges.
This will help optimize your system’s performance and ensure uninterrupted access to critical services.
4. Wait for Some Time Before Getting Looped In
It will take time for the policies to get reflected. So, you should wait for around 24 hours! In the case of existing policy configuration, it will take up to 90 minutes to reflect.
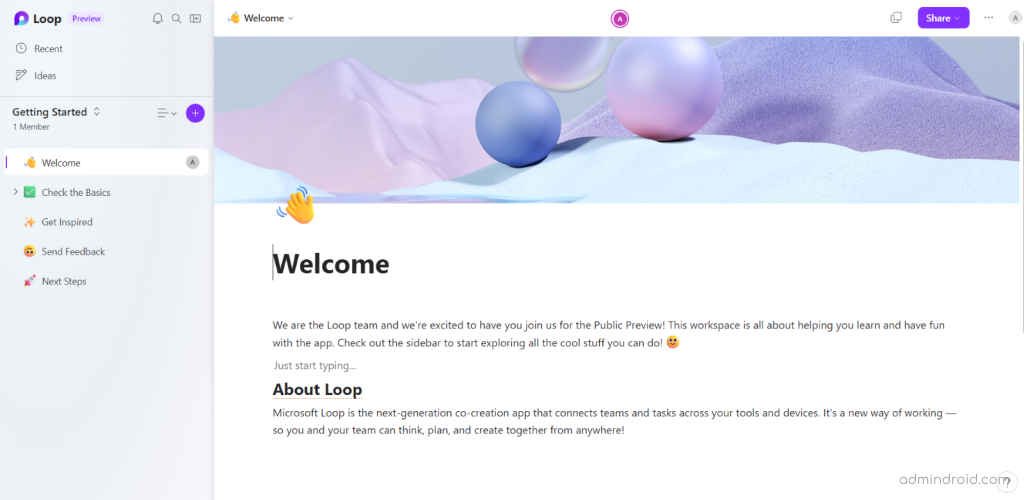
Once you are enabled with Microsoft Loop app, you will see this.
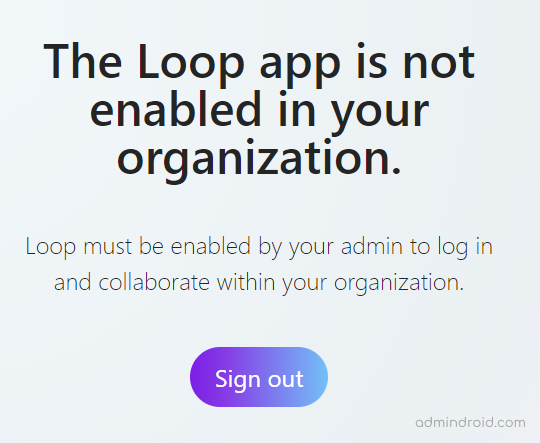
If you do not have access to the Microsoft Loop app, you will see the following message.
Once you get into the Loop, you can discover a dynamic collaborative workspace where you can unleash your productivity.
Inbuilt Features of Microsoft Loop App
The features available in the Microsoft Loop app include:
Better Meetings: Introduces Collaborative notes and Copilot in Collaborative notes to enhance meeting productivity by co-creating agendas, taking notes, and tracking tasks efficiently.
Copilot in Loop: Utilizes Copilot to co-create and organize work, stay focused, analyze and edit workspace content. Copilot capabilities include adaptive canvas, table generation, file attachment, intelligent summarization, asking open-ended questions, content rewriting, and code collaboration.
Integration with Other Tools: Microsoft Loop supports integration with various Microsoft tools and apps, including Teams, OneNote, Whiteboard, Planner, GitHub, ADO (Azure DevOps), Figma, ToDo, and more.
Task Syncing: Tasks in a progress tracker component sync across ToDo and Planner for easier project management. According to new improvements, users can now bring Planner plans to Loop workspaces without leaving the Loop context, by simply choosing via the Loop discoverability menu.
Data Integration: Integrates with Jira and Trello boards for project tracking, with additional data integration options such as GitHub and ADO.
Sharing Capabilities: Allows sharing of Loop components, pages, and workspaces with external partners, customers, vendors, etc.
IT Management: Supports Syntex repository services for data storage, Cloud Policy for management, and eDiscovery for compliance.
User-Requested Features: Implements user-requested features such as Code blocks, markdown support, Loop page templates, video embedding, and duplication of Loop pages.
Mobile App: The Loop mobile app is generally available, supporting iPad with features like Magic Keyboard and Apple Pencil support, push notifications, comments, reactions, Ideas components, and app protection policies for IT professionals using Intune.
With its powerful tools and features, you can seamlessly organize, co-author, and share a wide range of content including documents, spreadsheets, notes, tasks, and much more.
Guest Sharing Settings in Microsoft Loop
Loop workspaces, pages, and components will be soon generally available for B2B guest-sharing integration, subject to administrator policy. This advancement will enable users to share Loop creations with external partners, clients, and collaborators.
For tenants who haven’t set up sensitivity labels: Rollout is scheduled to commence in late April 2024 and is anticipated to conclude by early June 2024.
For tenants with sensitivity labels configured: Rollout will commence once sensitivity labels for Loop workspaces, pages, and components are universally available, which is expected to happen in the first half of 2024.
Note: However, if your existing OneDrive and SharePoint external sharing settings prohibit guest sharing, the same will be applied to Loop workspaces, pages, and components as well.
I hope this blog gave you a better understanding of what is Microsoft Loop app is and how to enable Microsoft Loop in the organization. Feel free to reach out for further assistance.


