
External sharing in Microsoft 365 makes collaboration with vendors, clients, and partners seamless. But at the same time, it is also one of the biggest gateways for data leaks and misuse. This ongoing debate of security vs. productivity often leaves admins wondering how much external sharing is too much.
While disabling external sharing may seem secure, it forces organizations to convert external users into internal ones for collaboration, which creates security concerns. At the same time, it can also block productivity and slow down teamwork. The key lies in finding the right balance!
That’s why we have put together an external sharing security checklist. To make it easier to follow, we’ve grouped the settings into three distinct categories. Each category addresses a different aspect of external sharing security, whether it’s managing access, protecting sensitive information, or controlling how collaboration happens. Let’s explore them in detail.
External Sharing Checklist in Microsoft 365
Here’s a structured checklist covering the essential areas of external sharing security in Microsoft 365.
- Microsoft 365 data and content protection settings
- Restrict external collaboration and integration in Microsoft 365
Manage Sharing and Access Controls in Microsoft 365
1. External Sharing Settings in the SharePoint Admin Center:
Microsoft 365 already comes with a set of built-in settings to help you manage how files and sites are shared externally. These controls, available in the SharePoint admin center, help you fine-tune the balance between security and collaboration.
To configure them:
- Sign in to the SharePoint admin center.
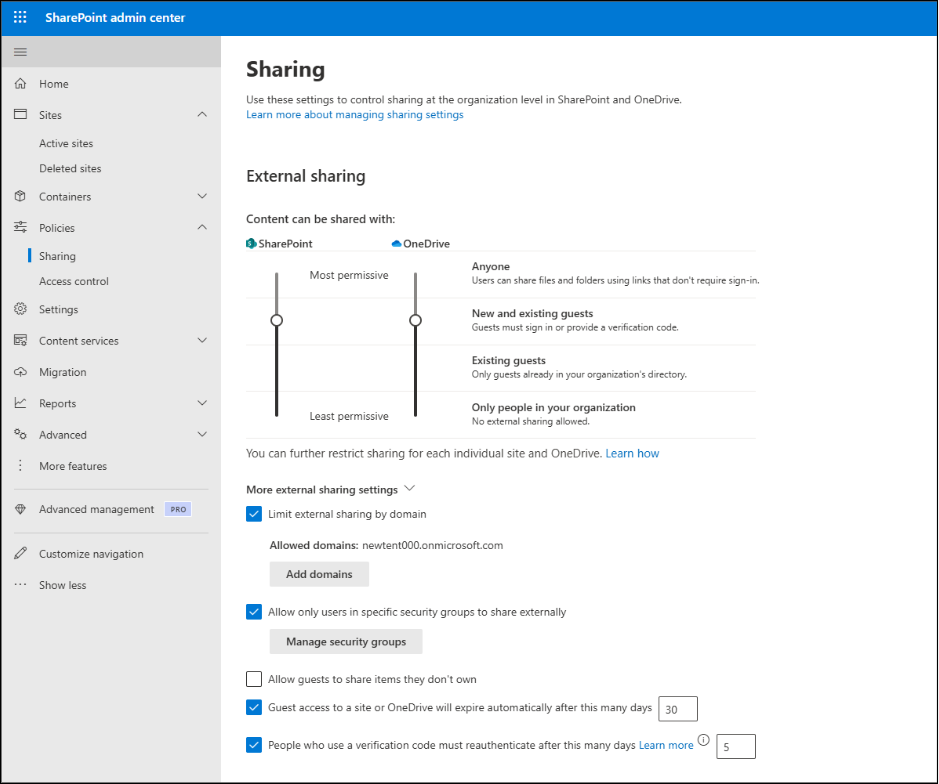
- In the left navigation pane, go to Policies -> Sharing.
- From here, adjust the following settings to control external sharing:
1.1) Disable Anonymous Sharing Links:
Anonymous links let anyone with the link access shared content without authentication. Disabling them requires all users to sign in with their official Microsoft account before accessing shared content. This prevents uncontrolled external sharing and helps maintain accountability. However, keep in mind that users will no longer be able to use the File Request feature, which allows external users to upload files to publicly accessible folders.
1.2) Restrict External Sharing by Domain:
Limiting external sharing to specific domains ensures that only users from allowed organizations can access shared content, preventing accidental exposure to untrusted or unknown domains.
1.3) Allow Only Users in Specific Security Groups to Share Externally:
Rather than allowing all users to share content externally, SharePoint Online provides a way to restrict external sharing capability to a specific group of trusted individuals. You can configure external sharing permissions by assigning them to a designated security group. This ensures that only trusted users can share content outside your organization, significantly reducing the risk of accidental or unauthorized data exposure.
1.4) Allow Guests to Share Items They Don’t Own:
Preventing guest users from re-sharing files or folders ensures that shared content doesn’t get shared beyond the people it was meant for. Guests can still share only the items for which they have full control.
1.5) Set Guest Access Expiration:
Set guest access expiration to ensure shared content is only available to external users for a defined period, reducing risks from inactive accounts.
1.6) Require Reauthentication for Users Using a Verification Code:
When external users access shared files or folders via a verification code, they may stay signed in on that browser session. By enabling reauthentication, you ensure they must re-enter the verification code each time they access the shared content. This adds an extra layer of security to external sharing, preventing unverified access if the link or browser session is compromised. This works only for ad-hoc external recipients.
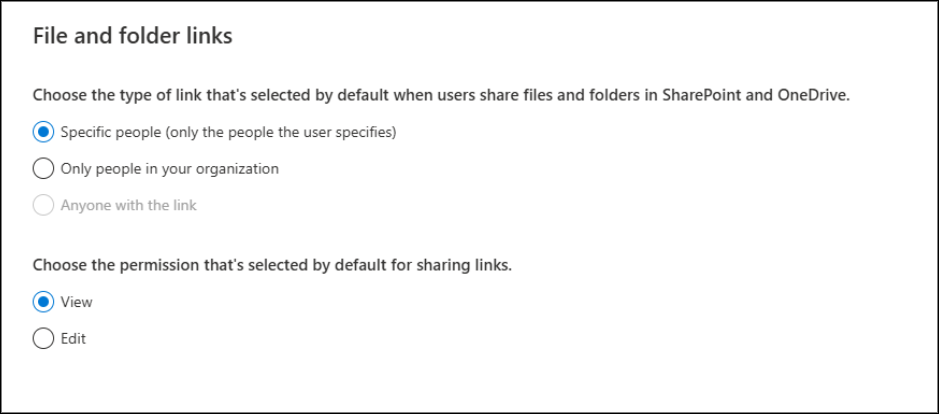
On the same Sharing page, under the File and folder links section, you can further refine how external users access shared content:
a) Restrict Default Sharing Links: Control the type of link external users receive by default when you share files or folders with them. Setting it to Specific people ensures that only intended external recipients can access the content, reducing the risk of accidental exposure.
b) Set Default Permission for Sharing Links: Decide whether external links grant view-only or edit access by default. This helps prevent giving external users more permissions than necessary, maintaining tighter control over your shared content.
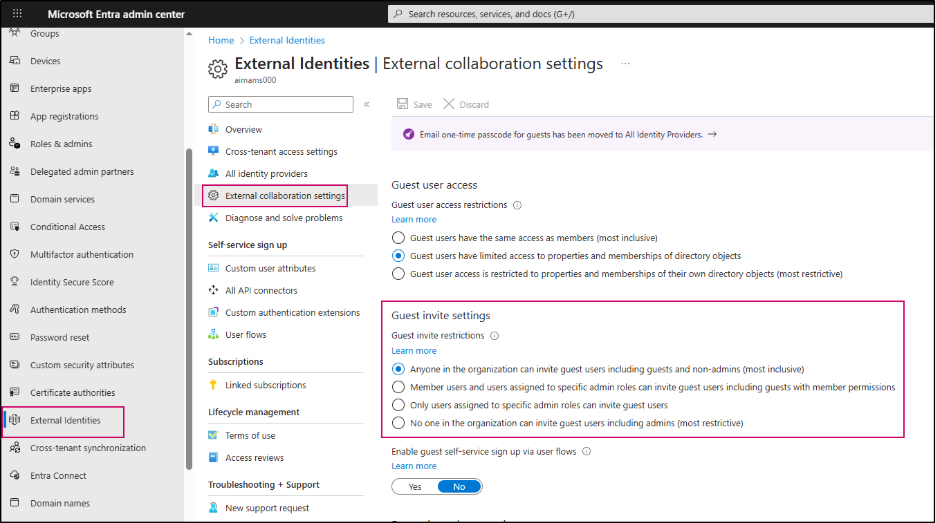
2. Restrict Guest User Invitations in Microsoft Entra:
Allowing anyone to invite guest users can quickly lead to uncontrolled access and accidental oversharing of sensitive data. By restricting guest invitations to authorized users or admins, organizations can maintain better control over who enters their environment. This setting is available in the Microsoft Entra admin center under External collaboration settings. Limiting guest invitations strengthens security while ensuring that external collaborators are added intentionally and responsibly.
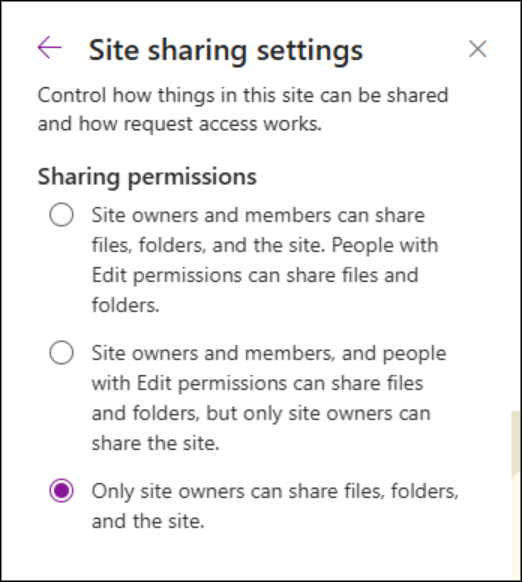
3. Prevent External Users from Re-Sharing Content:
In SharePoint, users with Edit permission can re-share files, folders, or sites with others, which may extend access beyond the intended audience. This differs from the “Allow guests to share items they don’t own” setting, which only stops guests from sharing items they don’t fully control. So, to prevent external users from sharing content entirely, you can update the permissions in the Site sharing settings.
To configure this, navigate to Site Settings -> Site permissions -> Change how members can share and specify who is allowed to share content. Only site owners or admins can manage this configuration.
Microsoft 365 Data and Content Protection Settings
1. Watermark Sensitive Documents with Sensitivity Labels:
Applying Microsoft 365 sensitivity labels automatically adds a watermark or header/footer, which plays a key role in safeguarding files shared with external users. This visual marker clearly identifies the document’s ownership or copyright, making it obvious to anyone accessing the file outside your organization that the content is sensitive. Watermarks not only discourage misuse or accidental distribution but also help maintain control over your organization’s data.
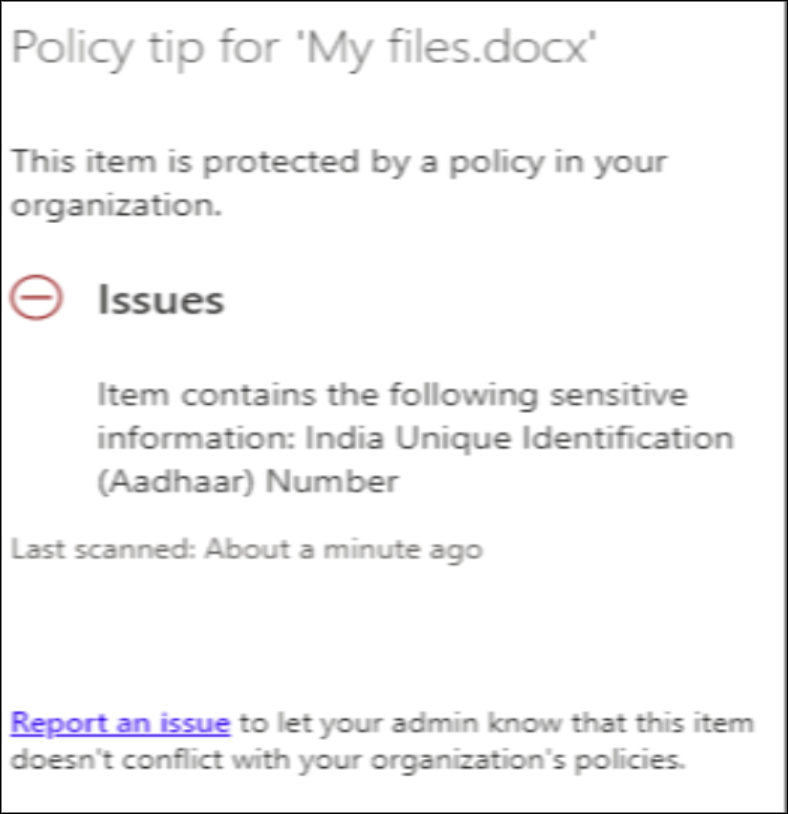
2. Implement Data Loss Prevention (DLP) Policies:
When a DLP (Data Loss Prevention) policy is applied, it monitors content for sensitive information (like credit card numbers or personal data) before sharing externally. If the content matches the DLP910A0A rules, external sharing can be blocked, restricted, or accompanied by a warning, ensuring that sensitive data doesn’t leave your organization unintentionally.
3. Enable Information Rights Management (IRM):
Information Rights Management (IRM) helps protect files such as PDFs and Office documents from being printed, copied, or forwarded, even after they are shared externally.
To enable IRM in SharePoint:
- Ensure Azure Rights Management is activated for your organization.
- Sign in to the SharePoint admin center.
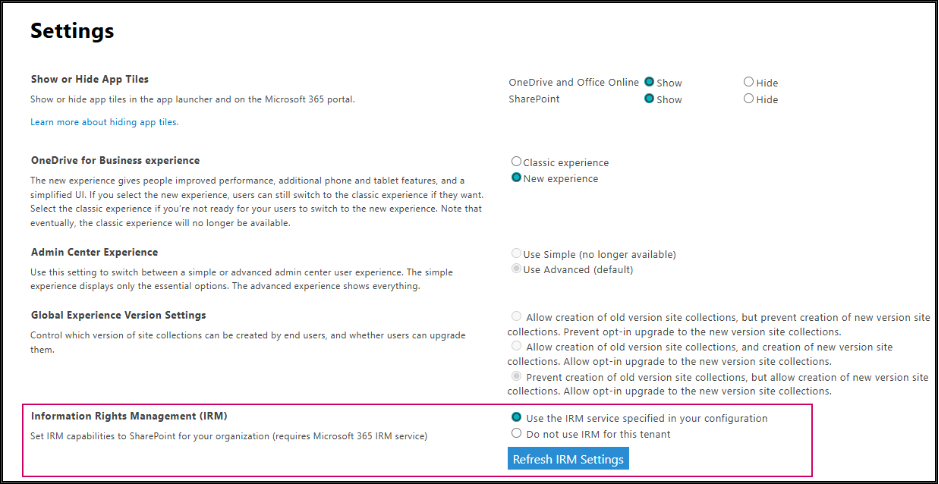
- In the left pane, select Settings, then click Classic settings page.
- Under the Information Rights Management (IRM) section, select Use the IRM service specified in your configuration, and then click Refresh IRM Settings.
Once IRM is enabled and refreshed, users in your organization can start applying IRM to SharePoint lists & libraries. Note that the options may take up to an hour to appear under library settings. Once available, you can configure IRM directly from the library or list settings to control permissions such as restricting printing, blocking forwarding, or limiting access to specific users.
4. Implement MFA for Guest Access Using Conditional Access
Requiring MFA for guest users adds an extra layer of security. Even if an external user’s credentials are compromised, unauthorized individuals cannot access shared content without the second verification factor, helping protect your organization’s sensitive data.
To configure MFA for guest access:
- Sign in to the Microsoft Entra admin center.
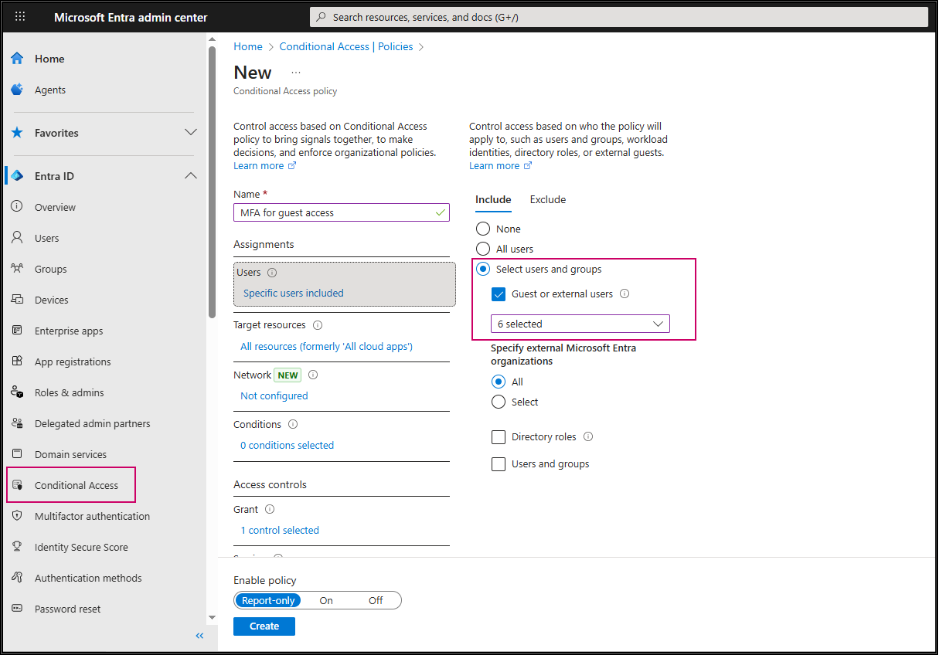
- Go to Entra ID > Conditional Access > Policies and select Create new policy.
- Under Assignments > Users > Include, select Users and groups, then choose Guest or external users and check all guest types.
- Under Exclude, select your organization’s emergency access or break-glass accounts.
- Under Target resources > Resources > Include, select All resources. Exclude any apps that don’t require MFA.
- Under Access controls > Grant, select Grant access and Require multifactor authentication, then click Select.
- Set Enable policy to Report-only to review the impact.
- After confirming the settings, toggle Enable policy from Report-only to On and click Create.
This ensures that all guest users must verify their identity before accessing shared resources, strengthening your external sharing security.
5. Conduct Regular Guest Access Reviews:
When you share files, folders, or Teams with external users in Microsoft 365, guest accounts are added to your organization. If these accounts are not reviewed regularly, guests may continue to have access long after they actually need it, which can increase the risk of data being accidentally or intentionally misused.
Conducting periodic guest access reviews helps check whether external users still need access and removes permissions that are no longer necessary. This keeps your shared content secure, ensures that only the right people have access.
By making guest access reviews a routine practice, organizations can strike the right balance between collaboration and security.
Restrict External Collaboration and Integration in Microsoft 365
1. Limit External Channel Creation:
Restricting external users from creating channels in Teams helps prevent accidental or intentional data leaks. For example, in a project with multiple external partners, allowing guests to create channels could lead to sensitive information being shared with the wrong people or exposed outside the intended audience. By limiting channel creation to internal owners or designated users, organizations reduce the risk of confidential data being accessed or misused.
To prevent guests from creating or managing channels in Teams, follow these steps:
- Navigate to the team you want to configure, click the three dots (…), and select Manage team.
- Go to Settings > Guest permissions.
- Under Channel creation, make sure the following options are left unchecked:
- Allow guests to create and update channels
- Allow guests to delete channels
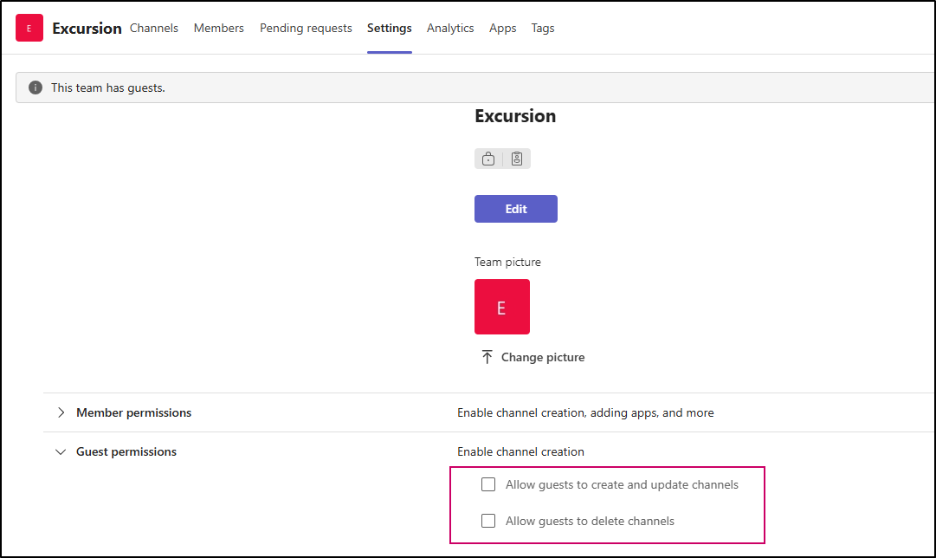
This ensures that external users cannot create, modify, or remove channels.
2. Block External Users from Downloading Microsoft 365 Files
Blocking downloads for external users adds an important layer of security to your external sharing strategy. Even if a guest has access to your files in SharePoint, OneDrive, or other Office 365 apps, preventing downloads ensures that sensitive data cannot be stored locally or shared outside your organization. This helps maintain control over your content and reduces the risk of data leaks.
To configure this using Conditional Access in Microsoft Entra ID, follow the steps below:
- Sign in to the Microsoft Entra ID admin center and navigate to Protection > Conditional Access.
- Click New policy and give it a name.
- Under Users, select Users and groups, then choose Guest or external users and check all guest types.
- Under Target resources -> Include, choose Select resources and select Office 365 (this includes Teams, SharePoint, OneDrive, etc.).
- In the Session controls section, choose Use Conditional Access App Control and from the dropdown, select Block downloads (preview).
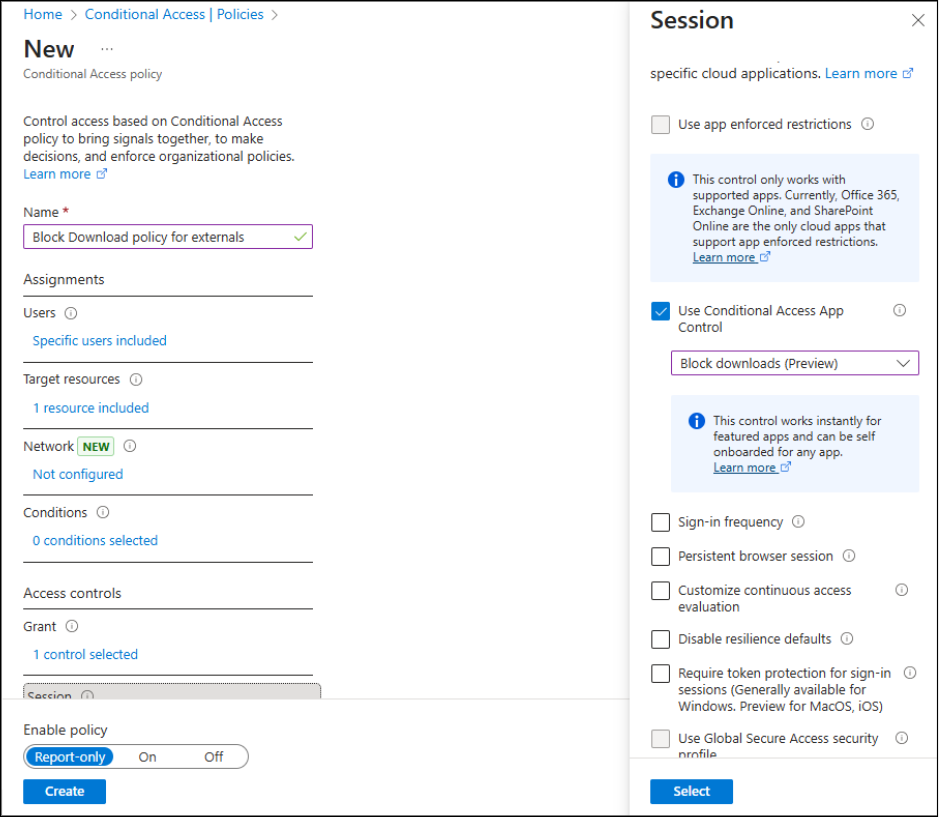
This ensures that external users can view shared files online but cannot download them. To enable the block download policy for a specific site, use the following cmdlet:
|
1 |
Set-SPOSite -Identity <siteURL> -BlockDownloadPolicy $true |
3. Enable SharePoint and OneDrive Integration with Azure AD B2B
Integrating SharePoint and OneDrive with Azure AD B2B makes sharing files with external users safer and easier. With this setup:
- External users can access shared files, but their access is controlled automatically using security rules like Multi-Factor Authentication (MFA).
- This adds an extra layer of protection for important files while still allowing collaboration.
- Admins can control who can access files based on factors like user identity, device, or location, reducing chances of unauthorized access.
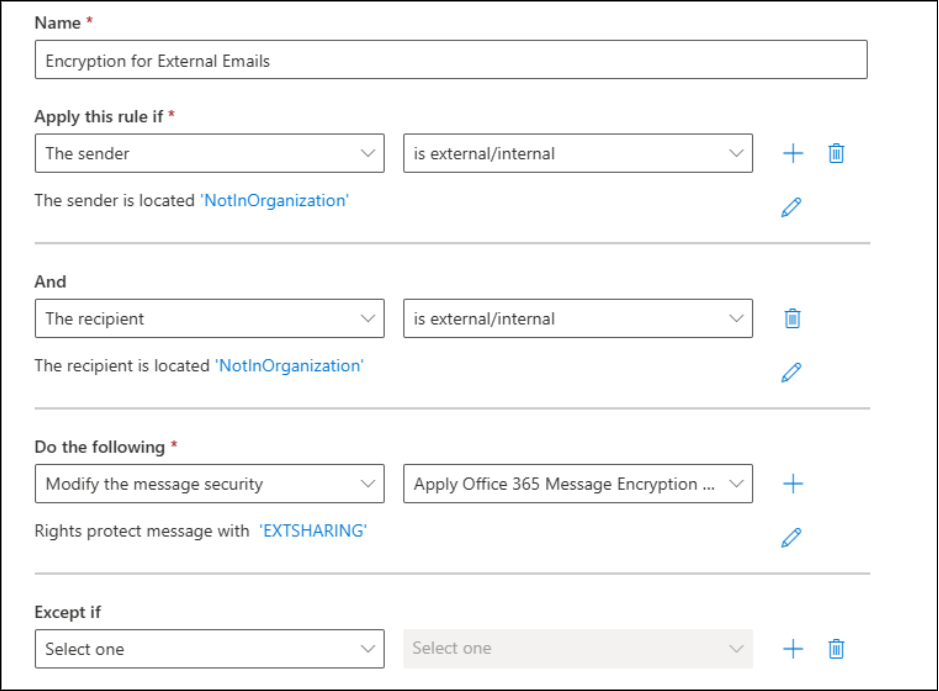
4. Enforce Message Encryption for External Emails
Sharing sensitive information over email can be risky, especially when sending messages outside your organization. Enforcing message encryption ensures that only intended recipients can read the content, protecting your data from accidental leaks.
To implement this control:
- Sign in to the Exchange admin center and go to Mail flow.
- Click Rules and create a new rule with a descriptive name.
- Under Apply this rule if, configure the conditions:
- Sender -> Is external/internal -> select Outside the organization.
- Click + Add to include the Recipient condition.
- Recipient -> Is external/internal -> select Outside the organization.
- Under Do the following, choose:
- Modify the message security -> Apply Office 365 Message Encryption and rights protection.
- Select the desired RMS template.
- Save the rule.
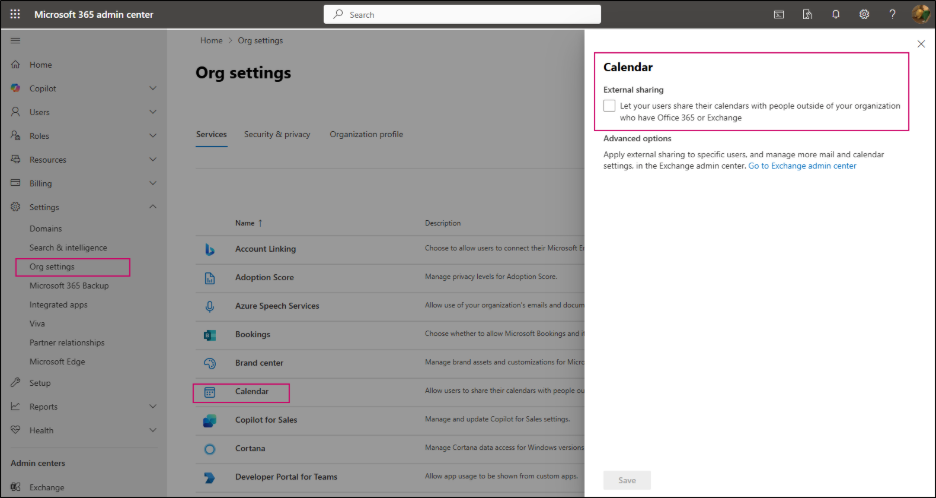
5. Prevent External Users from Viewing Calendar Details
To stop external users from accessing your users’ calendar details, follow these steps in the Microsoft 365 Admin Center:
- Sign in to the Microsoft 365 admin center and expand Settings.
- Select Org settings.
- Go to Calendar.
- Make sure that the “Let your users share their calendars with people outside your organization who have Office 365 or Exchange.” option is unchecked.
Different Ways to Monitor External Sharing
Monitoring external sharing is as crucial as configuring the right security settings. Even if your environment is properly set up, a lack of oversight can result in unnoticed data leaks or compliance violations. Microsoft 365 provides several tools that help admins track, analyze, and respond to external sharing activity.
1. Enable Alerts for Unusual External Sharing Activity
As classic SharePoint alerts are being retired, setting up modern alert policies is essential for admins to monitor external user activity and respond to potential security incidents.
How to configure alerts:
- Go to the Microsoft Defender portal.
- Navigate to Email & collaboration > Policies & rules > Alert policy.
- Here, you can view existing alerts, such as unusual volumes of external file sharing and check if the alert policy is enabled.
- Update or configure the alert policies as needed to ensure timely notifications of suspicious external sharing activity.

This proactive monitoring helps organizations stay ahead of potential risks and maintain control over externally shared content.
2. Audit External Sharing Activity
Regular auditing provides visibility into what content is shared externally and who has access. By reviewing external sharing activity, admins can ensure that sensitive data is not being exposed unintentionally and can take corrective action if needed. For more advanced auditing, you can also use PowerShell scripts to generate detailed reports of external sharing.
We have a script that can produce reports for the last 180 days or for a custom period, tracking external sharing activity separately in SharePoint Online and OneDrive. It exports the results to a CSV file for easy analysis, making it simple for admins to review and act on the data.
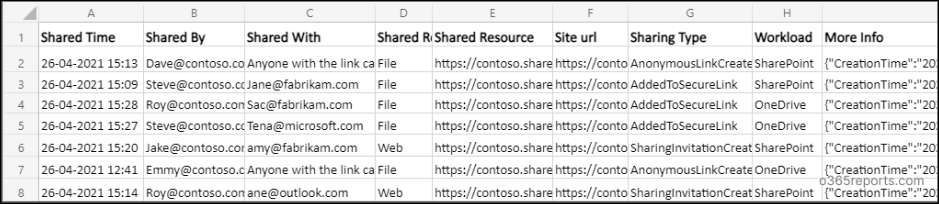
The script is available on GitHub for download.
3. Generate Microsoft 365 External Sharing Reports
Microsoft 365 offers built-in external sharing reports that provide detailed insights into sharing activity. These reports help admins monitor which files, folders, or sites are shared externally, identify unusual sharing patterns, and make informed decisions to improve security and manage access effectively.
We hope this blog has helped you understand key best practices for managing external sharing in Microsoft 365. By following these guidelines, you can reduce the risk of accidental or unauthorized data exposure. Beyond external sharing, maintaining a Microsoft 365 security checklist for your overall environment is also a good practice to ensure ongoing security and compliance. Thanks for reading, and feel free to share your questions or experiences in the comments section!


