At the crossroads of access and security in Microsoft 365, one common challenge is balancing user access to resources. Granting excessive permissions can compromise security and expose sensitive data. On the other hand, overly restricting access can limit users’ ability to complete critical tasks and hinder productivity. That’s where Microsoft 365 roles step in! It enables you to implement least privilege access by assigning roles to users and granting access only to the necessary resources.
What is a Role in Microsoft 365?
Microsoft 365 roles are predefined sets of permissions that determine what actions users can perform within the organization. These roles range from basic user access to specialized administrative capabilities across different services like Exchange Online, SharePoint Online, etc. These predefined roles help delegate responsibilities to reduce administrative overhead in Microsoft 365.
By properly assigning roles, you can enhance their security posture while empowering their teams to work efficiently. Let’s dive into why roles are important in Microsoft 365.
Why Assigning Roles is Important in Microsoft 365?
Role-based access control in Microsoft 365 helps you authorize access to the resources and shape the foundation of users’ collaboration. Assigning the right role clarifies users’ responsibilities, prevents overlap, and reduces inefficiencies in administration.
From a security perspective, if a user only needs read-only access to all administrative features, assign the “Global Reader” role instead of the “Global Administrator” role. This helps to limit unnecessary permissions and secure admin accounts. Therefore, you need a clear understanding of the most powerful admin roles to make wise assignments that help optimize security and control.
What are the Most Powerful Admin Roles in Microsoft 365?
Assigning suitable Microsoft 365 admin roles might seem challenging. However, missteps in this process can lead to significant risks, as these roles come with important responsibilities and access.
Let’s explore some of the most impactful admin roles and their capabilities you should be aware of.
- Global Administrator: This role allows you to manage your Microsoft 365 environment and grants full control over your tenant. By default, the person who signs up for Microsoft 365 services is automatically assigned to this role. A global admin can perform almost any task, from managing users to overseeing critical settings that affect the entire organization. However, they cannot manage their own password, which is a security measure to prevent misuse of privilege.
- Billing Administrator: These admins are responsible for managing the financial aspects of the Microsoft 365 environment. While billing admin handles financial tasks in the organization, they do not have full access to anyone’s credit card details in the tenant. However, they can manage Microsoft 365 subscriptions, make purchases, monitor service health, etc.
- Exchange Administrator: With full access to Exchange Online, this admin oversees creating and managing groups, handling service requests, and performing other critical tasks related to email services. Users with this role can access all mailboxes, manage EXO settings, configure mail flow rules, and more. Therefore, assign this role cautiously to reduce security risks, such as unauthorized access to sensitive mailboxes, inadvertent exposure of confidential email content, and unapproved modifications to mailbox permissions.
- SharePoint Administrator: Manages services like SharePoint Online and OneDrive for Business within Microsoft 365. Users assigned to this role can manage SPO sites, groups, storage limits, sharing settings, etc. SharePoint Online admins can view the Microsoft 365 users’ details, but they cannot modify it.
How to Assign Admin Roles to Users in Microsoft 365?
Properly assigning admin roles in Microsoft 365 is crucial for efficient management of your organization’s resources.
You can assign roles to Microsoft 365 users using the following methods:
Assign Roles in the Microsoft 365 Admin Center
The Microsoft 365 admin center made assigning roles simple with the Role assignment section. Here you can assign multiple users to the single role by following the steps below:
- Sign in to the Microsoft 365 admin center.
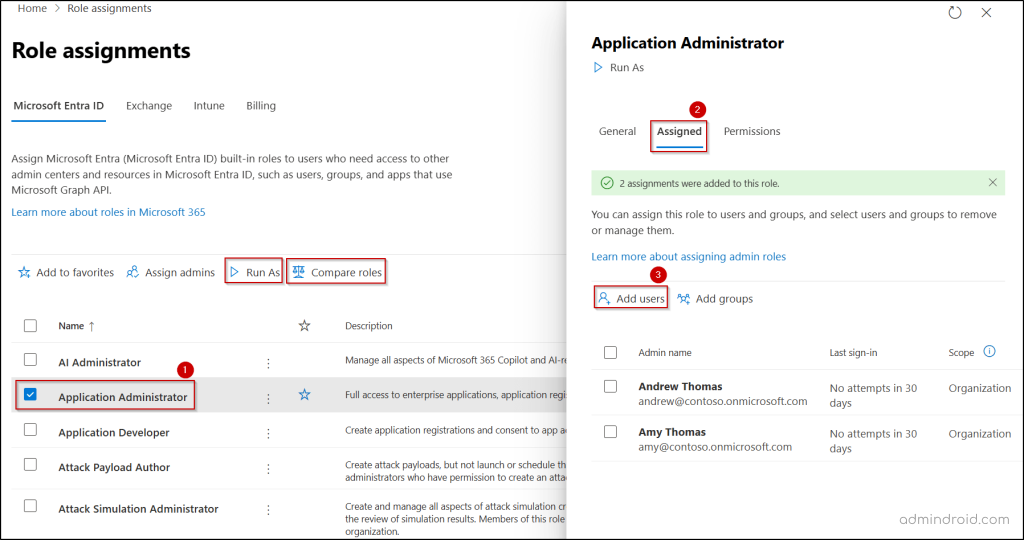
- Navigate to Roles > Role assignments.
- Choose the Microsoft Entra ID, Exchange, Intune, or Billing tab to view available roles. Keep in mind that these tabs may vary based on your Microsoft 365 subscription.
- Select the role you want to assign to the users.
- In the flyout pane, click Add users from the Assigned tab. Then, select the users and click Add.
Before assigning a role, use the Compare roles feature to evaluate up to three roles and determine which best fits the needs of the user.
Additionally, you can use the Run As option to simulate a role before applying it. This helps you understand the permissions, resources, and services accessed by that role. It assists you in determining whether the role is suitable for the respective Microsoft 365 user.
Tip: If you’re assigning the same role to multiple new users, use a template to create M365 users to simplify the role assignment process.
When you need to assign multiple roles for a specific user, you can use the Active users page in the Microsoft 365 admin center by following the steps below.
- Click the name of the user to whom you want to assign roles. Then, select Manage roles under Roles in the flyout pane.
- Then, choose Admin center access and hit Show all by category to view all available admin roles.
- Now, select the desired admin roles and click Save changes.
Assign Roles to the Users using Microsoft Graph PowerShell
Microsoft Graph PowerShell eliminates the need to navigate through multiple sections in the Microsoft 365 admin center to assign and change roles. It provides a direct way to assign roles, saving time and reducing manual effort.
First, ensure to install the Microsoft Graph PowerShell module before executing the following cmdlets.
|
1 2 3 4 5 6 |
$UPN="<UserPrincipalName>" $RoleName="<AdminRoleName>" Connect-MgGraph -Scopes "RoleManagement.ReadWrite.Directory" $RoleId = (Get-MgRoleManagementDirectoryRoleDefinition -Filter "DisplayName eq '$RoleName'").Id $UserId = (Get-MgUser -Filter "UserPrincipalName eq '$UPN'").Id New-MgRoleManagementDirectoryRoleAssignment -DirectoryScopeId '/' -RoleDefinitionId $RoleId -PrincipalId $UserId |
Replace <UserPrincipalName> and <AdminRoleName> with the UPN of the Microsoft 365 user and role name.
This PowerShell snippet first connects to the Graph API with essential permission. It then uses the ‘New-MgRoleManagementDirectoryRoleAssignment’ cmdlet to assign the given role to the user. You can also assign custom roles using this PowerShell snippet.
Assign Role using PIM in Microsoft Entra Admin Center
With Microsoft Entra Privileged Identity Management (PIM), you can assign roles to users and grant them just-in-time access to their privileges. It also provides the option to review the access of the role-assigned users to ensure only the right users retain access. By providing time-limited permissions for privileged tasks, it minimizes the risk of unauthorized actions.
To assign roles to a Microsoft 365 user using PIM, follow these steps below:
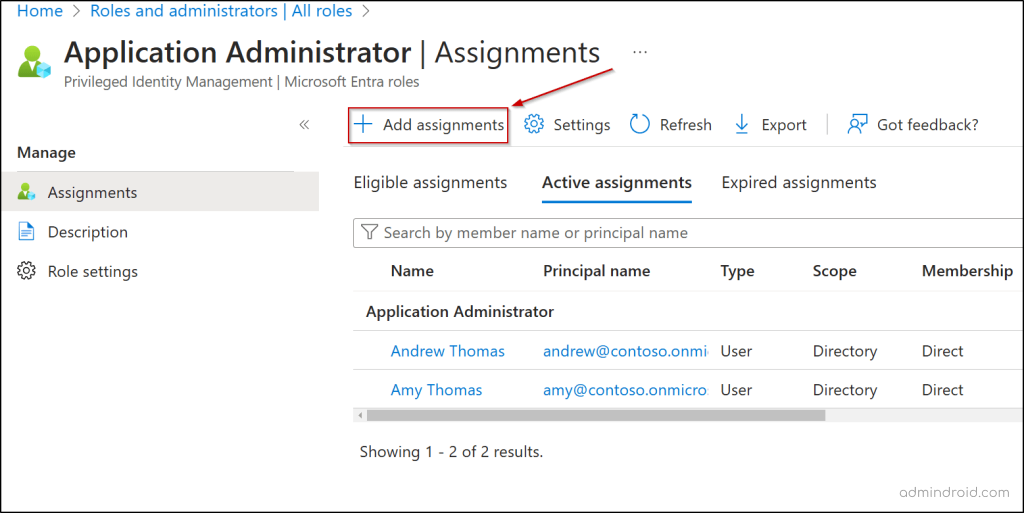
- Navigate to the Roles & admins page in the Microsoft Entra admin center.
- Then, click the role name you want to assign users and select the Add assignments.
- Under the Membership tab, press the link from the Select member(s).
- Choose the desired users suitable for the role, hit Select and then click Next.
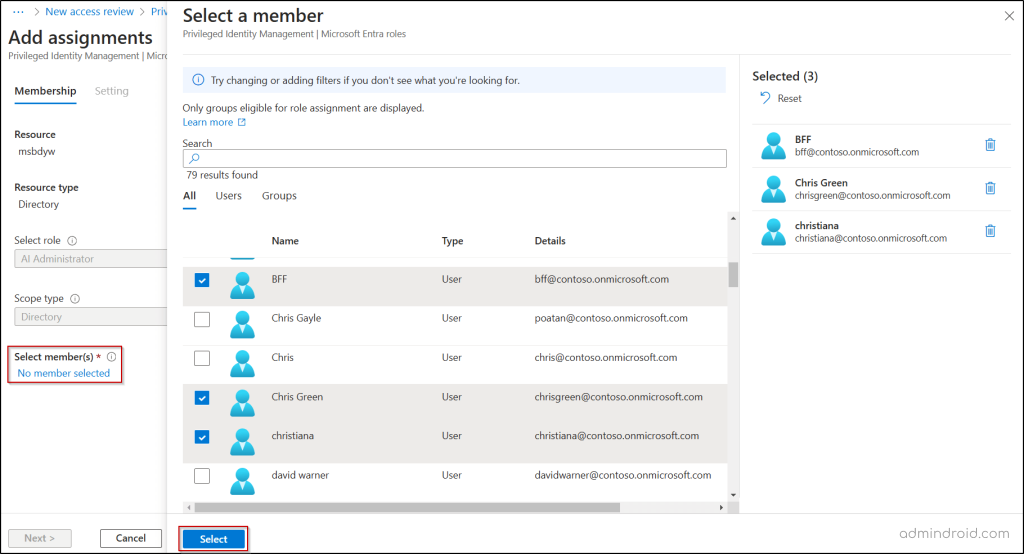
- Under the Settings tab, select the desired option from the Assignment type section and set eligible duration.
- In Entra PIM, eligible assignment means a user doesn’t have immediate access to a role’s permissions but can activate it when needed. This often requires additional steps like providing a reason, MFA authentication, or admin approval.
- On the other hand, active assignment gives the user continuous access to the role’s permissions without needing activation.
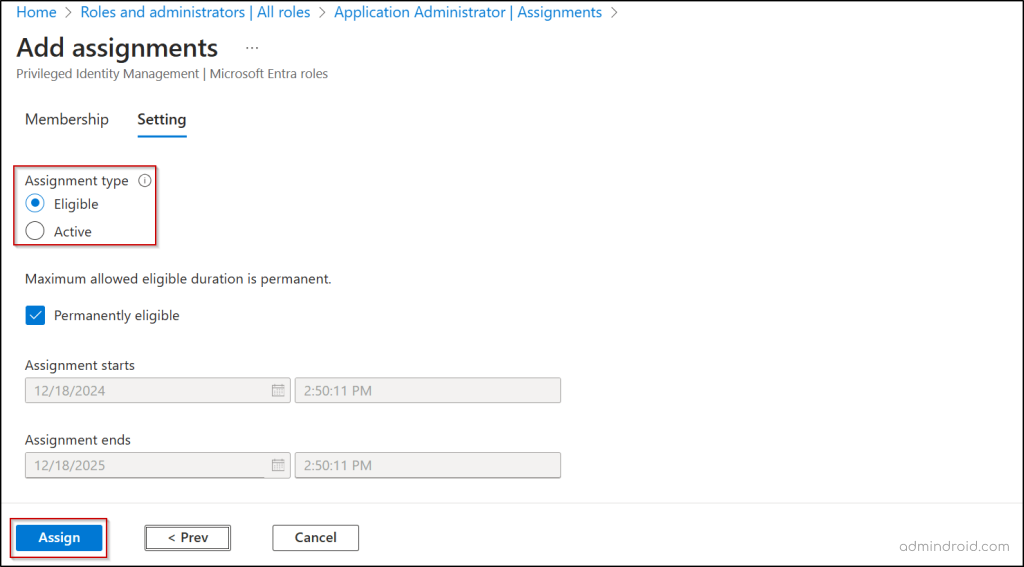
- With eligible duration, you can assign roles to users for a specific time range. Once the time expires, the role is automatically removed from the users.
- To set continuous eligibility, select the Permanently eligible checkbox in the Setting tab.
- Finally, click Assign to set up Microsoft Entra role to the users.
Organize Role Assignments with Administrative Units in Entra ID
Administrative units (AUs) in Microsoft Entra ID allow you to scope role assignments to specific groups, users, or resources. For example, you can create an administrative unit for a department or location and assign roles that apply only to that unit.
Follow the steps below to create AU in Microsoft Entra admin center.
- Log in to Microsoft Entra ID.
- Navigate to the Identity > Roles & admins > Admin units and click Add.
- Enter a name for the administrative unit (AU).
- To allow specific admins to manage AU, switch ‘Restricted management administrative unit‘ to Yes and click Next.
- Then, select a role and choose the users you want to include. Afterward, click Add to confirm and then hit Next.
- Review the configuration and click Create to finalize the AU.
- After creating the AU, select it and click Add member to include users.
- You can also add groups and devices under respective sections in the Manage pane.
By organizing users and resources into administrative units, it helps ensure that each user accesses only the resources required for their roles. It provides more granular control over who can manage resources within specific AUs, rather than assigning broad permissions.
Best Practices for Assigning Microsoft 365 Roles to the Users
Consider the following best practices for assigning admin roles to keep your Microsoft 365 environment secure and clutter-free.
- Limit the assignment of the global administrator role to prevent excessive permissions that could lead to misuse of privileges. Therefore, assign a maximum of two global admins to reduce the security risks.
- Utilize security defaults in Microsoft 365 to enforce baseline security settings that block admin role-assigned users from signing in using legacy authentication protocols. This helps reduce the risk of account-compromising attempts.
- Automate validation of user access to critical roles by creating access reviews in Entra ID to check whether users still require their roles. This improves security and limits access to authorized users only.
- Make sure you configure multi-factor authentication with additional verification methods for all admin roles to block malicious users.
- Assign users to role groups with admin center-specific roles to manage certain aspects of the services without granting elevated privileges. For example, assign users who need access to audit tasks to the Audit Manager role group with permissions in the Purview portal.
- After assigning admin roles to users, monitor admin users’ activity to ensure roles are used responsibly and only for authorized tasks. This enhances accountability and detects misuse before it causes any compliance issues.
In conclusion, assigning roles in Microsoft 365 is like equipping the right tools for the job—effective only when used by those who truly need them. Just as proper resource access can enhance productivity, improper access can expose your organization to risks. With role-based access control, you can ensure that users access only the resources they require. When combined with proactive measures and regular access reviews, you can strengthen the security and efficiency of your Microsoft 365.
If you have any queries or need assistance, feel free to reach out in the comment section. We’re here to help!


