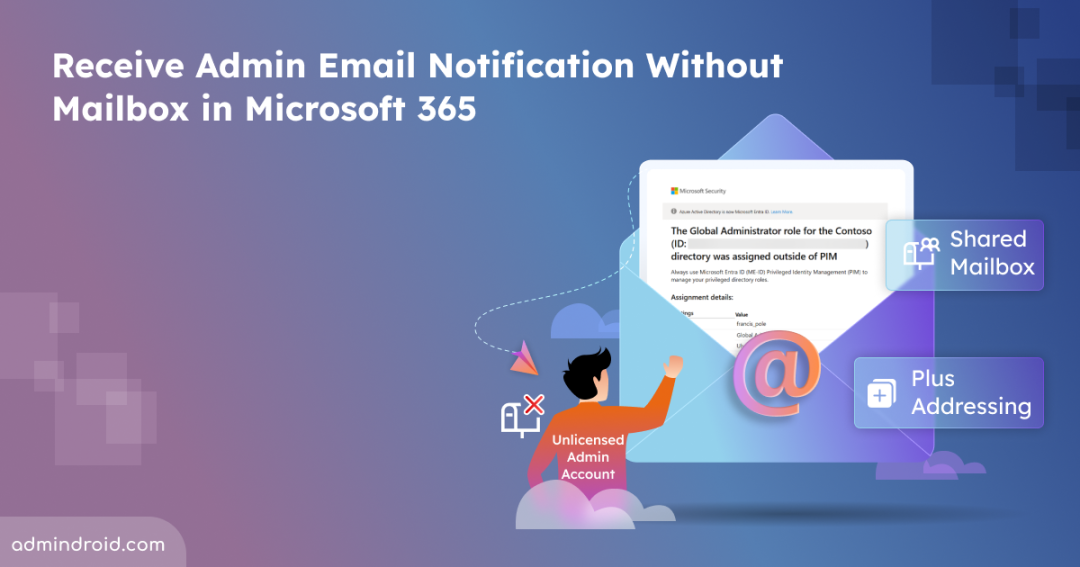
Many organizations keep administrator accounts unlicensed in Microsoft 365 to limit their exposure to attacks targeting high-privilege access. However, this security practice creates a challenge: email sent to an admin may go unnoticed. Missing such critical alerts can delay responses to security incidents and disrupt important administrative tasks. Fortunately, assigning a license isn’t the only way to solve this issue. In this blog, we’ll explore alternative methods for receiving email sent to unlicensed admin accounts, that helps you stay responsive and avoid missing critical alerts.
Why Microsoft 365 Admin Accounts Don’t Need Licenses?
An admin account plays a critical role in managing and securing the environment, but they don’t necessarily need a mailbox of their own. These accounts are used mainly for administrative tasks, as it provides permissions to manage the system, not to access end-user services like OneDrive. This administrative access mode allows organizations to save licenses and reserve them for accounts that require user features. As a result, many organizations choose to keep Microsoft 365 admin accounts unlicensed for the following reasons:
- Enhanced security: Without a mailbox, admin accounts are less exposed to phishing, spam, and other malicious attacks, reducing the attack surface for high-privilege accounts.
- Efficiency & Cost saving: Leaving admin accounts unlicensed avoids unnecessary Exchange Online license usage and mailbox clutter, keeping administration simple and cost-effective.
- Risk reduction: Safeguarding admin accounts by restricting them to privileged access helps reduce risk and strengthens overall security.
How to Receive Email Notifications for Unlicensed Admin Accounts
In the next section, we’ll explore different ways to ensure critical emails reliably reach admin accounts, even without a mailbox. Each method offers its own benefits, and you can choose the option that works best for your organization’s needs and setup.
1. Configure plus addressing in Exchange Online (Recommended)
2. Redirect admin mails to shared mailbox using mail flow rules
1. Configure Plus Addressing in Exchange Online Admin Center
Plus addressing (or subaddressing) lets you add a ‘+tags’ to a mailbox address, creating unique variations of the same email. This makes it easier to organize and track incoming messages without creating new mailboxes. It allows you to append a tag to an email address like +alerts, which enables the routing of system-generated notifications to a designated mailbox without requiring an Exchange Online license.
i) Enable Plus Addressing in EAC
Plus addressing is enabled by default in most tenants, but it’s good to confirm before proceeding with configuration. You can follow the steps below to ensure it is turned on.
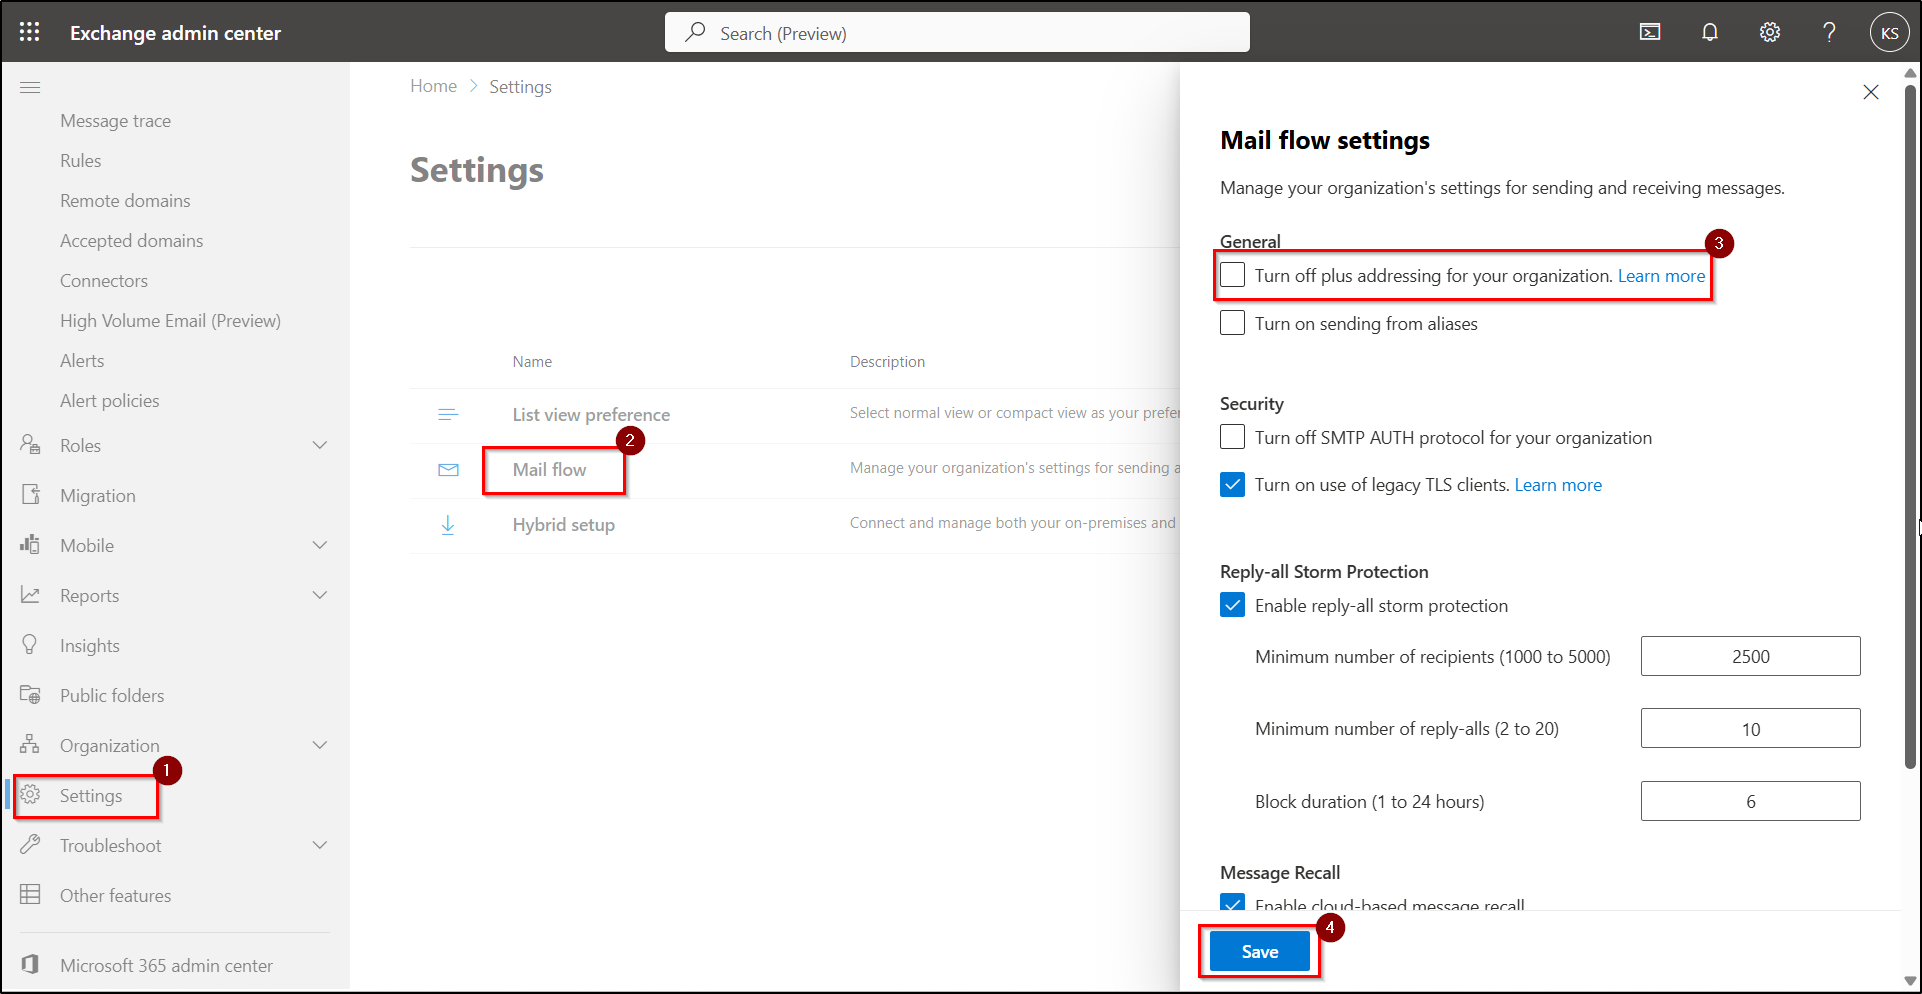
- Sign in to the Exchange Admin Center and navigate to Settings → Mail flow.
- Under General, make sure the option “Turn off plus addressing for your organization” is unselected.
- If it’s checked, unselect it and click Save to apply changes.
ii) Assign a Plus Address to the Admin Account
To assign a plus address to your unlicensed admin account, follow the steps below:
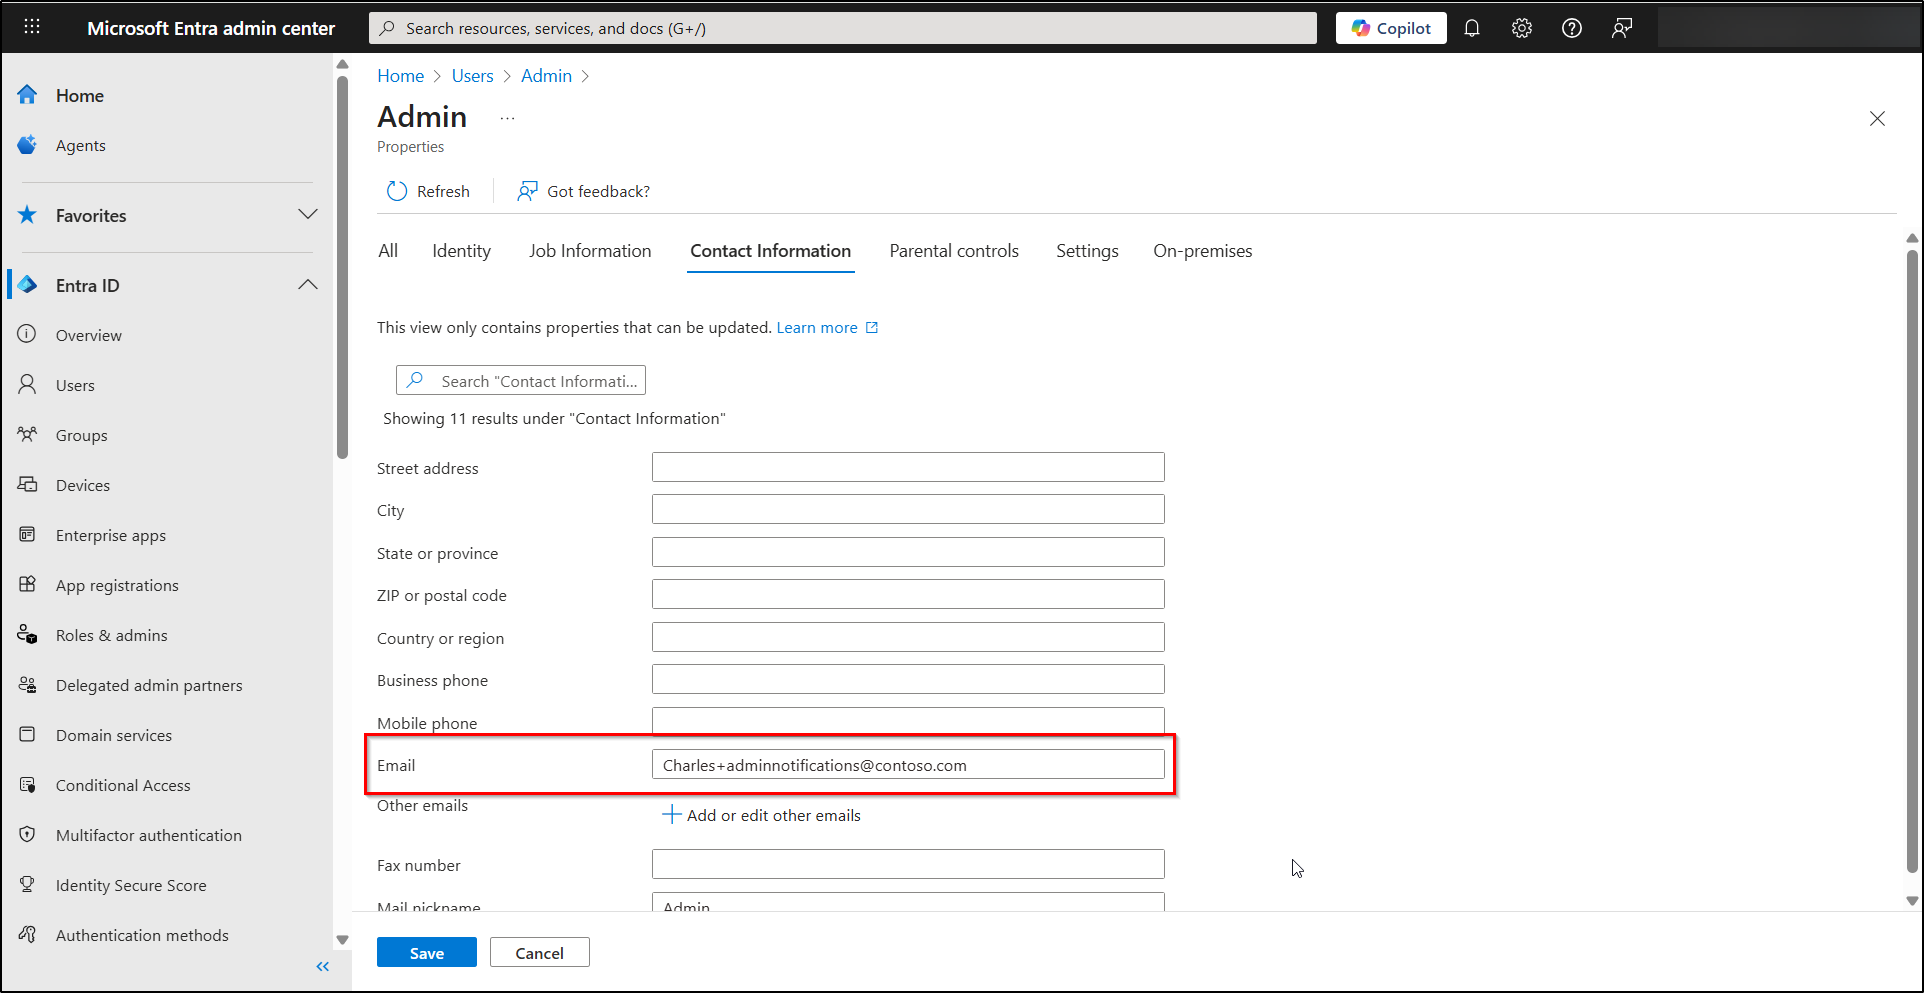
- Log in to Microsoft Entra admin center and navigate to Entra ID → Users → All users.
- Click on the admin user you want to configure, then choose Properties → Edit Contact Information.
- In the Email field, enter a regular user account email that belongs to the same user who owns the admin account, along with the desired +addressing tag like John+alerts@domain.com.
- Click Save to assign the new plus address to the unlicensed admin account.
The system now deliver emails directly into the designated mailbox, even though the admin account has no license.
Note: Ensure the email address used in plus addressing belongs to a licensed mailbox. Exchange Online doesn’t allow removing addresses assigned to unlicensed admin — they can only be modified, not deleted.
Set Up Plus Addressing Using PowerShell
You can also configure plus addressing using Exchange Online PowerShell by following the steps below.
Connect to Exchange Online PowerShell using the cmdlet below.
|
1 |
Connect-ExchangeOnline |
Verify whether Plus Addressing is enabled in the tenant using the cmdlet below.
|
1 |
Get-OrganizationConfig | Select-Object AllowPlusAddressInRecipients |
If it is disabled, run the following cmdlet to enable subaddressing in your Microsoft 365 environment.
|
1 |
Set-OrganizationConfig -AllowPlusAddressInRecipients $true |
Then, run the below cmdlet to assign a plus address to an admin account.
|
1 |
Set-Mailbox -Identity "admin@domain.com" -EmailAddresses @{add="user+adminalerts@domain.com"} |
Replace admin@domain.com with the UPN of the unlicensed admin account, and user+adminalerts@domain.com with the plus address you want to assign.
Boundaries of Plus Addressing Feature
- Plus addressing works for on-premises mailboxes only when Exchange Online recognizes their addresses. If they aren’t, messages sent to plus addresses may fail to deliver.
- External filtering services that don’t support plus addressing may block or drop emails.
- Plus addresses aren’t actual mailbox aliases, so they don’t resolve to a user’s name in Outlook. As a result, they aren’t easily identifiable in the To or CC fields.
2. Redirect Admin Mails to Shared Mailbox Using Mail Flow Rules
To receive critical security emails on unlicensed admin accounts in M365, you can use mail flow rules in Exchange Online. It helps redirecting emails sent to an admin’s mail contact to admin’s regular account or a shared mailbox.
This method involves creating a mail contact for the unlicensed admin account so Exchange Online recognizes it as a valid recipient. Next, set up a shared mailbox as the target destination, and configure a mail flow rule to automatically redirect messages to that destination.
This approach ensures that important alerts and notifications are reliably delivered while keeping high-privilege accounts unlicensed.
i) Configure mail contact for unlicensed admin
ii) Create a shared mailbox to receive admin emails
Iii) Set up mail flow rule to redirect emails
i) Create Mail Contact for Unlicensed Admin Account
First, create a mail contact for the unlicensed admin account so that Exchange Online can recognize it as a valid recipient. This step ensures that emails sent to the admin account can be redirected properly.
- In the EAC and navigate to Recipients → Contacts and click Add a mail contact.
- Fill in the fields by providing the unlicensed admin’s display name, a unique alias/username, and set the external email address to the admin account’s UPN.
- Enter other necessary information required and click Create.
Important:
- If an admin email address is already in use, you need to carefully clean up leftover mailbox attributes or conflicting addresses and then create mail contact for admin.
- Pay special attention to group-based licensing, which can prevent license removal from admin account.
ii) Create a Shared Mailbox to Receive Admin Emails
- Sign in to the Exchange admin center and go to Recipients → Mailboxes.
- Click + Add a shared mailbox and enter a Display name and Email address for the mailbox.
- Click Save to create the shared mailbox.
- Select the created mailbox from the list and click Delegation, click edit option under Full Access permission.
- Add the admins’ regular email addresses as members so they can securely receive all critical security-related emails.
- Click Confirm to save the changes.
Potential Conflicts in Shared Mailbox Delivery
- Newly created shared mailbox may take some time before they can receive external emails, so there might be a short delay in delivery.
- Outlook displays shared mailboxes as separate mailboxes unless you disable automapping and email is forwarded.
iii) Set Up Mail Flow Rule to Redirect Admin Emails
After creating shared mailbox, configure the mail flow rule to automatically forward all emails from the unlicensed admin account to the destination mailbox.
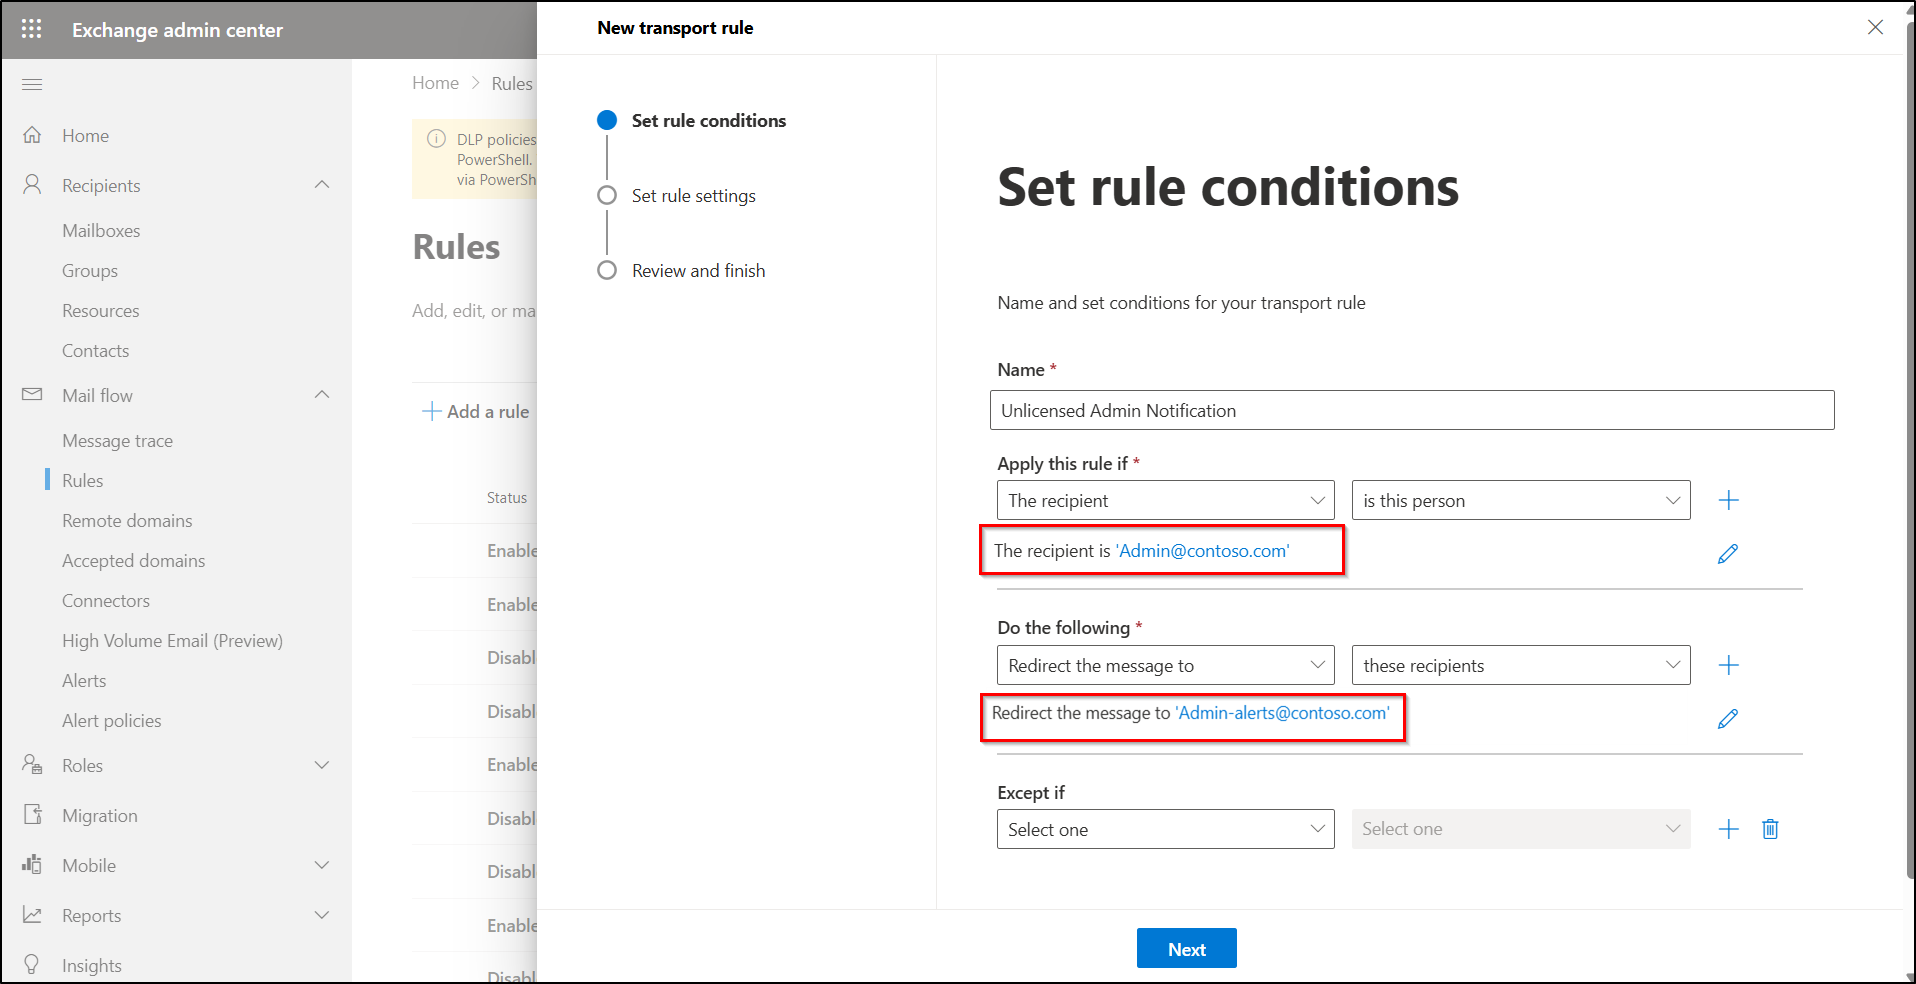
- Select Create a New Rule under Mail Flow → Rules → + Add a Rule in the Exchange admin center.
- Name the rule and select ‘Apply this rule if’, select The recipient, and choose the mail-enabled admin account you just created.
- Under ‘Do the following’, choose Redirect the message to and select a shared mailbox or a non-privileged licensed mailbox of the admin.
- Select Next, and in the Rule Mode option, choose Test with Policy Tips first to validate the rule.
- Check Stop processing more rules if you want this rule to take priority and prevent other rules from acting on the same message.
- Finally, Save the rule.
Newly created mail flow rules start disabled by default, so enable them by navigating to the configured rule and toggling it on. After testing with tips, you can switch to enforce when ready to make it active.
Best Practices for Managing Unlicensed Admin Email Notifications
- Make sure all eligible admins are active, because only active members of a role receive notifications when an event triggers.
- To automatically identify and manage messages sent to plus addresses, configure and manage inbox rules in Exchange Online, that perform actions such as moving messages to a dedicated folder for easier monitoring.
- Do not assign an alias to a regular user if that alias already exists as a UserPrincipalName (UPN) on another account to avoid alias conflicts.
- Configure SPF, DKIM, and DMARC to block phishing and prevent attackers from impersonating your domain, helping to secure you email environment.
- Utilize the mailflow status reports to regularly verify emails to unlicensed admin accounts are successfully redirected and that critical alerts are successfully delivered.
That’s it, we’ve explored different ways to receive email notifications on unlicensed admin accounts in Microsoft 365. We hope this blog helps you streamline admin email management without compromising on the security and assigning unnecessary licenses. Feel free to share your thoughts or questions in the comments below.


