On Day 19 of Cybersecurity Awareness month, let’s find an answer for the ever-happening debate – security defaults vs Conditional Access. Stay tuned for upcoming blogs in Microsoft 365 Cybersecurity blog series.
The world is moving away from passwords and enforcing Multi-Factor Authentication (MFA) for all users. At the same time, Microsoft Secure Score is also driving us to enable MFA for all users! But the real question everyone’s asking is: how should you enable MFA? Whether via
- The Traditionalist: Configure per-user MFA
- The One-size-fits-All: Turn on MFA using security defaults
- The Trend Setter: Enable MFA via Conditional Access policies.
And trust me, but the question Azure security defaults vs Conditional Access policies – debate isn’t going away anytime soon!
While security defaults offer a quick, no-fuss setup, Conditional Access policies allow for more tailored control. So, which one should you choose? Let’s dive into what each method brings to the table and when to use it in your MFA journey.
What is Security Defaults in Microsoft Entra ID?
It is a simple, easy-to-use feature that provides a solid first layer of protection for your Entra ID tenant. Security defaults are automatically enabled for all new Microsoft 365 tenants created after October 22, 2019.
In short, security defaults enable these basic security settings:
- Require Multi-Factor Authentication (MFA): Requires both users & admins to register for MFA and prompt second-factor authentication when necessary.
- Block Legacy Authentication: All authentication requests using older protocols are blocked. Plus, security defaults specifically block basic authentication for services like Exchange ActiveSync.
The best thing? Security defaults are available with the Entra ID free license. So, even without Premium licenses, every organization can have a strong first line of defense – at no extra cost! It’s a hassle-free, effective way to secure your environment right from the get-go.
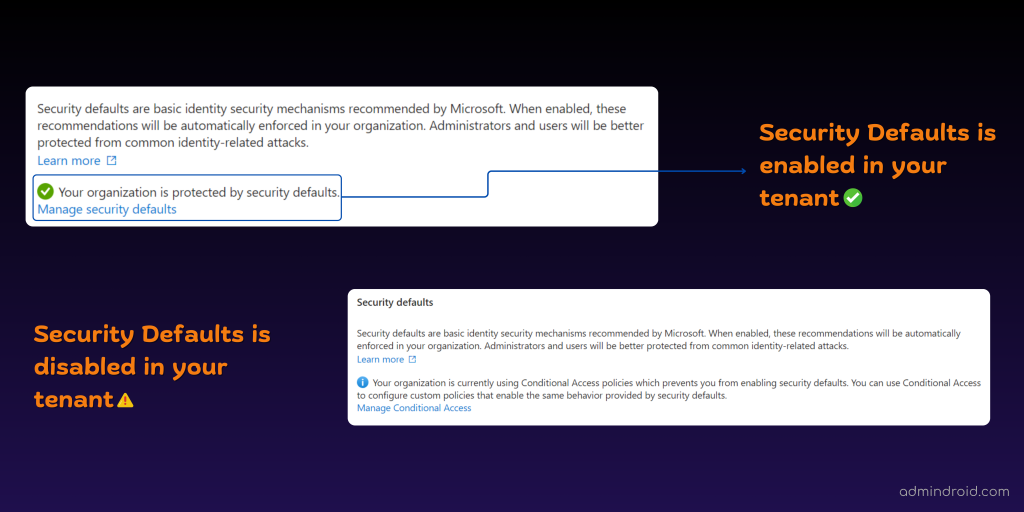
If you want to check whether security defaults is enabled or disabled in your tenant, you need to have Security admin or Global admin privileges. Once you’ve got that covered, here’s how you can check:
- Open Microsoft Entra admin center.
- Click on the ‘Overview’ tab, then switch to the ‘Properties’ section.
- Scroll down to the ‘Security defaults’ section to view the current status.
What Does Security Defaults Do in Microsoft 365?
Security defaults enforce MFA registration for both users and admins. Previously, new users had 14 days to delay MFA setup in Microsoft 365. However, for newly created tenants starting on December 2nd, 2024, an MFA setup is required immediately to avoid hacker intrusions. And for existing tenants, this change will take effect from January 2025.
One key point to note is the phrase when necessary. Security defaults do not prompt users for MFA for all sign-ins; it only prompts them if they sign in from a risky location!
For organizations running Free Entra licenses, security defaults can be considered a “starter pack” of security. Also, it’s a simplified version of Microsoft-managed Conditional Access policies that you can turn on with just one click.
Here are the controls that security defaults enforce behind the scenes:
- Require all users to register for multifactor authentication
- Require multifactor authentication for admins
- Require users to do multifactor authentication when necessary
- Block legacy authentication protocols
- Protect privileged activities like access to the Azure portal
So, overall, security defaults is primarily for organizations on the free Entra ID tier, looking to improve their security stance. However, for organizations needing more flexibility, advanced options like Conditional Access are available.
What is Conditional Access in Entra ID?
Conditional Access is an advanced security measure for Entra ID Premium users. Basically, Conditional Access policies operate on a simple if-then logic. If a user wants to access a resource, then they must meet certain conditions.
As an example, a user trying to access Microsoft 365, might be prompted to perform additional security actions set by the administrator, like MFA satisfaction, to gain access.
The key difference is cost! While security defaults are free, Conditional Access requires a Entra ID Premium licensing (Entra ID P1 or P2).
Key Benefits of Conditional Access Policies
- Conditional Access offers more granular control over who can access what and when! 💯 How? Conditional Access uses identity-driven signals – such as a user’s location, device, and risk level to make smart, real-time access decisions.
- Plus, Entra ID offers over 15 Conditional Access policy templates that you can easily deploy in a snap.⚡There are several security needs covered in these templates, including Zero Trust, secured remote work, protected admin accounts, and more!
- Also, MS is rolling out 3 essential pre-configured CA policies for all organizations to ensure baseline security and simplify configuration.
- Security defaults enable MFA for all users at once, including service accounts. In contrast, you can require MFA for all users with Conditional Access while easily excluding break glass accounts from the policies.
- CA policies provide enhanced monitoring and reporting capabilities compared to security defaults. They allow you to track user activity, and policy impacts and even monitor CA policy changes through two workbooks:
What Does Entra ID Conditional Access Do?
While security defaults simply prompt for MFA, Conditional Access offers a much richer, more customizable experience! 🚀
Consider you have per-user MFA enabled. While it secures accounts, it prompts MFA every time, which can be tedious and disrupt productivity! However, completely disabling MFA is risky, leaving user accounts vulnerable to attackers. Security defaults also miss the mark, as they lack customization and only trigger MFA for risky sign-ins!
So, to strike the right balance, you came up with this configuration –
- Require MFA specifically for users accessing resources from outside your office location (within your country).
- Block access to anyone outside your country completely.
Now you’re curious about how to achieve this flexibility, right? But that’s exactly what Conditional Access policies are designed to do! This flexibility is not only possible but straightforward with Conditional Access.
Here’s how you can set it up with two distinct policies:
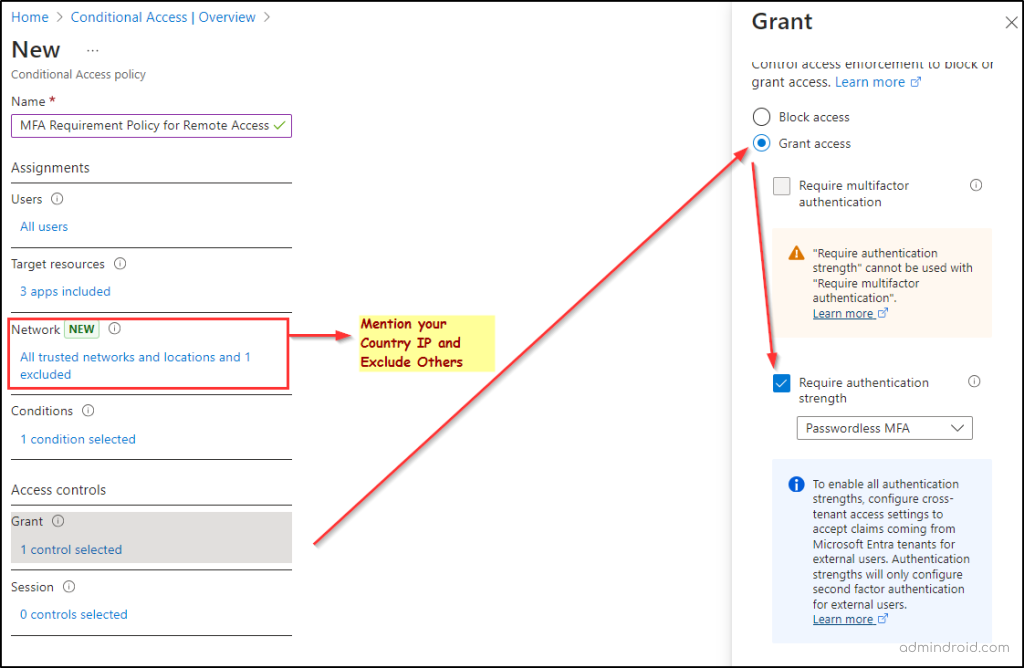
1. MFA Requirement Policy for Remote Access:
This policy requires MFA for users outside the office (within your country) but allows in-office access without MFA.
- Users & Target Resources: You can include specific users and workloads based on your organization’s needs.
- Network:
- Include: Specify the IP ranges of your country.
- Exclude: Include your company’s IP from the trusted location list so that users inside the office aren’t prompted for MFA.
- Access Control – Grant: Select the ‘require the authentication strength’ of your choice.
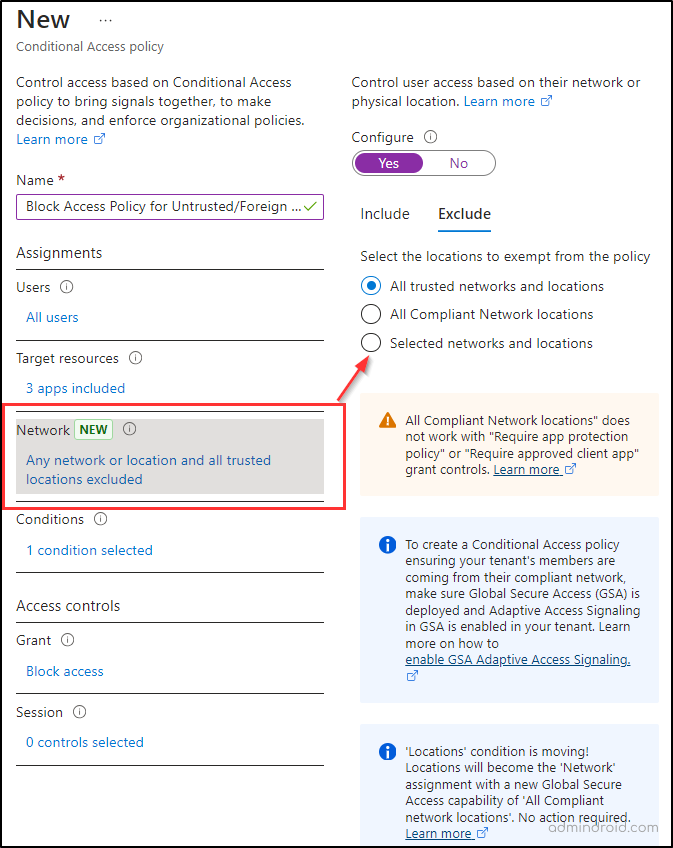
2. Block Access Policy for Untrusted/Foreign Locations:
This policy is designed to block access entirely for users attempting to connect from locations outside your country.
- Users & Target Resources: Include the same users and resources as the first policy.
- Network:
- Include: Give as ‘Any network or location’
- Exclude: Specify all your trusted locations here. This will ensure that access is revoked for all others.
- Access Control – Set the control to ‘Block Access’.
With these two policies, you can effectively manage access based on location and enforce MFA only when necessary!
Pro-tip: To prevent unexpected issues, always test your Conditional Access policies with a small group of users before full deployment. Use the “What-if” tool to simulate different scenarios and ensure policies don’t unintentionally lock users out.
When to Use What – Security Defaults vs Conditional Access Policies?
Let’s now get into the real talk of when to use what.
| Category | When to Use Security Defaults | When to Use Conditional Access |
| Cost | Go for security defaults if you want a no-cost solution! | Choose Conditional Access if you have Entra ID P1/P2 licensing. |
| Customization | If you want a quick approach, use security defaults for a straightforward setup. | Opt for Conditional Access if you need tailored settings that fit your unique organization needs. |
| Security Level | If you’re looking for basic access control, security defaults can help protect against brute-force and phishing attacks. | Choose Conditional Access policies for context-based assessments that adapt to user behavior and locations. |
| Implementation Time | For a quick and easy implementation, security defaults are the way to go. | If you’re ready to invest time for better security, Conditional Access offers flexibility and adaptability. |
| Policy Scope | Security defaults apply a one-size-fits-all approach. | Conditional Access lets you create targeted policies for different users or situations. |
| Adaptability | Security defaults are static and don’t adjust to new risks. | If you want something that works dynamically, CA policies work in real-time, responding to dynamic security signals. |
| Target Resources | Go for security defaults if you want to enforce MFA for users alone. | You can expand your approach by targeting both internal and external users. You can also create device-based Conditional Access policies to target specific devices. |
| User Experience | If your organization is small and users don’t mind occasional MFA prompts, security defaults will do. | Opt for Conditional Access to create a smoother experience, minimizing prompts while still ensuring security. |
| Best Fit | If you’re a small business or startup with basic security needs, stick with security defaults. | For larger organizations with specific security requirements, Conditional Access is the smarter choice. |
So, which one should you choose? 🤔
- If you’re just starting out and need basic protection without a Premium license, security defaults is a solid choice.
- If you have complex security needs and want granular access control, go with Conditional Access Policies.
However, don’t expect to use both together! 😉To implement Conditional Access policies, you must first disable security defaults. So, our suggestion for you is:
- 👉Take a good look at your organization’s requirements and weigh the pros and cons of each option.
- 👉 By understanding this essential Microsoft 365 features difference, you can better match your choice to your organization’s unique needs —whether you opt for the simplicity of security defaults or the customization of Conditional Access.
Remember, the goal is to keep your resources secure while ensuring your users can work seamlessly. Ultimately, it depends on your organization’s unique needs – so the choice is yours!
Happy securing! 🚀


