When Microsoft introduced Cross-Tenant Synchronization, it simplified multi-tenant collaboration by enabling automatic user syncing. This removed the need for manual B2B invites, repeated consent prompts, and redemption steps.
However, one critical piece was still missing—groups. Since access and permissions are primarily group-driven, admins had to manually recreate group structures or rely on complex workarounds. As a result, a common question remained: is there a reliable way to sync groups across tenants?
For a long time, the answer was no. That limitation is now starting to change. With cross-tenant group synchronization (currently in preview), organizations can extend synchronization beyond users to include groups. In this blog, we’ll explore what cross-tenant group sync is and how to configure it in your Microsoft 365 environment.
What is Cross-Tenant Synchronization in Microsoft Entra ID
To understand the value of cross-tenant synchronization, let’s take a look at the old way of doing things.
Imagine two tenants, Contoso and Fabrikam, entering a business partnership. As collaboration begins, users in Fabrikam (Source tenant) need access to resources in Contoso (Target tenant), such as Microsoft Teams, SharePoint, and even non-Microsoft applications.
Before 2023, this was a tedious process. Admins either had to rely on any of the following manual approaches:
- Create new user accounts in Contoso for Fabrikam users and manage them entirely within the target tenant.
- Send individual guest invites and wait for users to find the email, click the link, and accept the redemption process.
Cross-tenant synchronization changed the game by turning manual work into an automated identity lifecycle. You set the conditions once, and users from Fabrikam are automatically provisioned as external users in Contoso. User profile details remain synchronized between tenants, ensuring attributes like job title, employee ID, department, and more stay consistent. If a user is deleted in Fabrikam, they are automatically removed from Contoso in the next sync cycle, ensuring security is never compromised.
In simple terms, cross-tenant synchronization in Microsoft Entra ID automates the creation, update, and removal of B2B collaboration users across Multiple Entra tenants.
Cross-Tenant Group Synchronization: The New Microsoft Entra Update
While user synchronization was a massive win, admins were still left manually managing user access in the target tenant. In most organizations, access is rarely granted to individual users—it’s managed through groups. Without the ability to sync those groups, admins had to recreate the same security structures across multiple tenants.
Now, Microsoft has finally closed that gap. With cross-tenant group synchronization, admins can sync groups from a source tenant to a target tenant, bringing consistency to access management across Entra tenants.
Currently, this capability supports both security groups and Microsoft 365 groups from the source tenant, whether their membership type is static or dynamic. However, regardless of the source type, all synchronized groups are created as static security groups in the target tenant. Let’s take a closer look at how it works.
The source tenant represents the environment where the groups originate, and the target tenant is where those groups are synchronized and used.
What Happens When a Group is Synchronized
When you sync a group using cross-tenant synchronization, the group is created in the target tenant with key attributes such as display name, description, membership, mail nickname, security-enabled status, mail-enabled status, and visibility. You can also extend this by including additional attributes like app role assignments, creation options, etc.
How Group Changes are Reflected Across Tenants
- If a group is updated in the source tenant, those changes are automatically reflected in the target tenant during the next sync cycle (approx. 40 mins).
- If a group is removed from the synchronization scope or deleted in the source tenant, it will be soft-deleted in the target tenant.
- Group members are automatically provisioned as users with the “Member” user type in the target tenant.
- Group ownership is not synchronized and must be managed separately in the target tenant.
Note: This feature is currently in Public Preview, and its behavior may change before it reaches general availability (expected around late April 2026).
Pre-requisites to Configure Cross-Tenant Group Synchronization
Before jumping into the setup steps, make sure the following requirements are in place in both the source and target tenants.
Source Tenant
- You must have Microsoft Entra ID Governance or the Microsoft Entra Suite license.
- The admin configuring group sync must have the following least privilege roles or be a Global Administrator:
- Security Administrator – to access and configure cross-tenant access settings
- Hybrid Identity Administrator – to configure cross-tenant synchronization
- Cloud Application Administrator or Application Administrator – to assign users to a configuration or to delete a configuration.
Target Tenant
- The admin must have the Security Administrator role to configure cross-tenant access settings.
How to Configure Cross-Tenant Group Synchronization in Microsoft Entra
Follow the steps below to set up group synchronization between tenants using the Microsoft Entra admin center:
- Enable group synchronization in the target tenant
- Configure trust settings in the source tenant
- Create a cross-tenant synchronization configuration in the source tenant
- Test the connection between the source and target tenants
- Configure provisioning settings in the source tenant
- Select the groups to be provisioned in the source tenant
- Define attribute mappings for groups in the source tenant
- Start group synchronization in the source tenant
- Use provision on demand for instant synchronization
- Monitor the cross-tenant group provisioning process
1. Enable Cross-Tenant Group Synchronization in the Target Tenant
To begin synchronization between the source and target tenants, you must first establish a cross-tenant access relationship.
Follow the steps below to enable cross-tenant group sync in the target tenant.
- Sign in to the Microsoft Entra admin center of the target tenant.
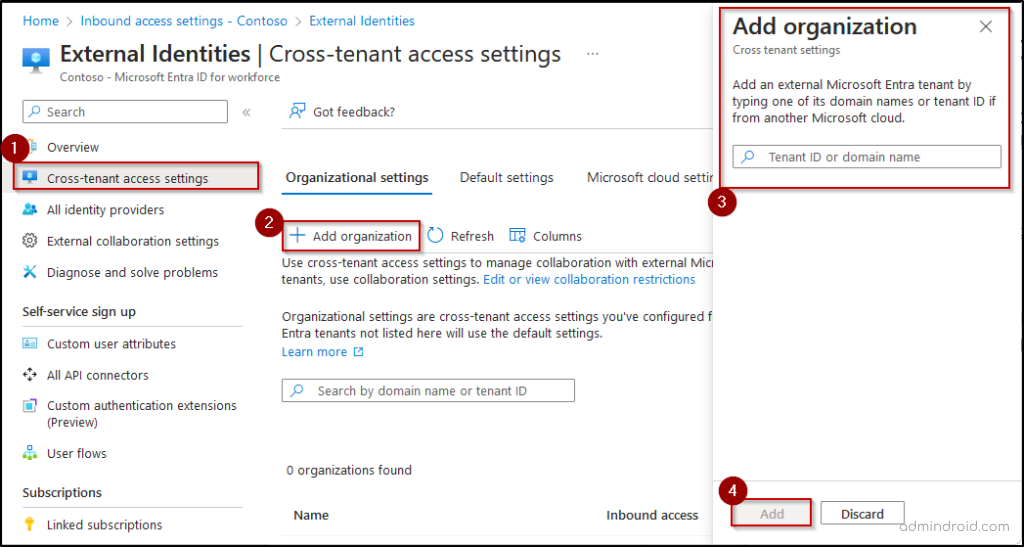
- Navigate to Entra ID → External Identities → Cross-tenant access settings and click Add organization.
- Enter the source domain name or tenant ID and click Add.
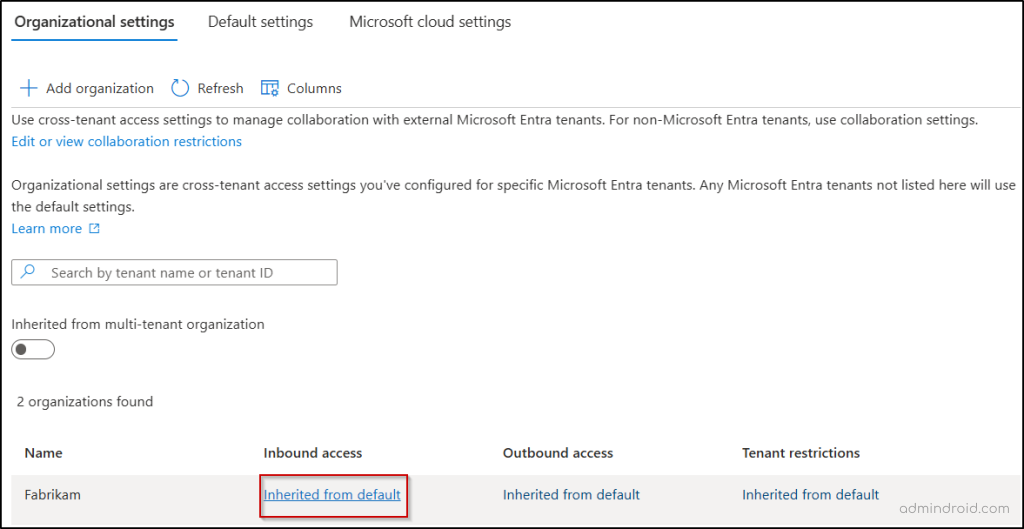
- Under Inbound access of the added organization, select Inherit from default.
- Switch to the Cross-tenant sync, select the ‘Allow user synchronization into this tenant’ and ‘Allow group synchronization into this tenant’ checkboxes and click Save.
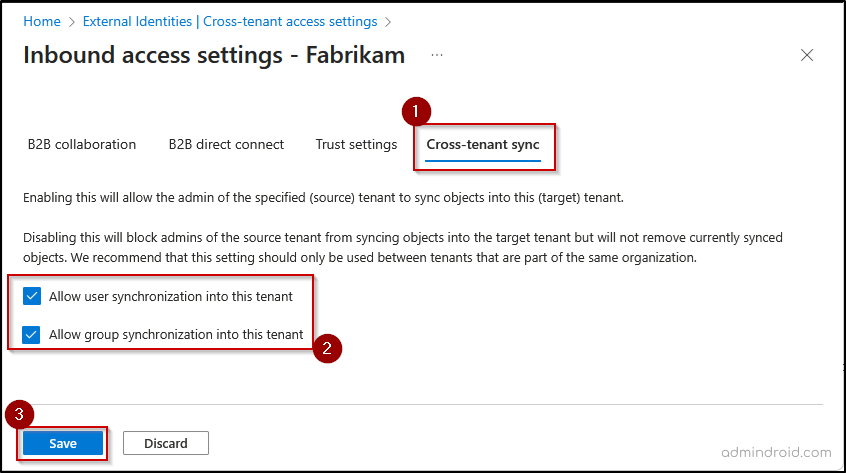
Note: You should select user sync to enable the group sync between the tenants. - When prompted to enable cross-tenant sync and automatic redemption, click Yes if you want to automatically redeem all invitations in the target tenant.
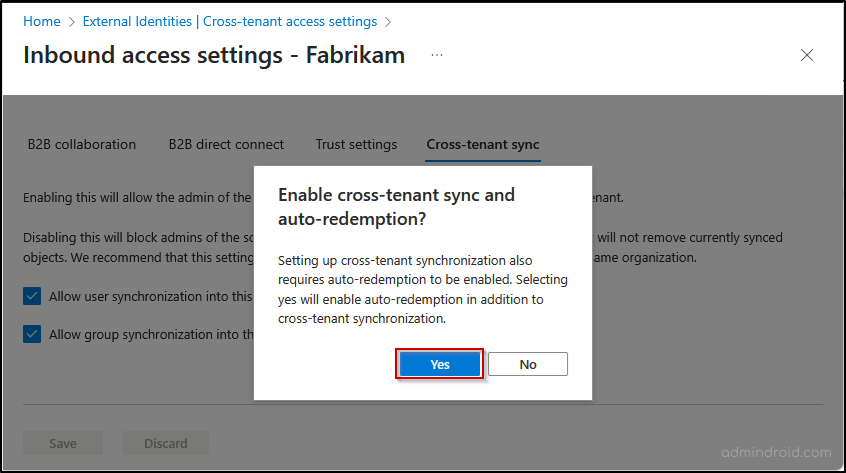
If you have chosen No, you can enable automatic redemption later. To do this, go to the Trust settings tab and select the option Automatically redeem invitations with the tenant.
2. Configure Cross-Tenant Sync Trust Settings in the Source Tenant
Now that you’ve enabled inbound trust settings in the target tenant, the next step is to configure outbound trust settings in the source tenant. This ensures that both tenants have a mutual trust relationship.
Follow the steps below to automatically redeem invitations in the source tenant:
- Sign in to the Microsoft Entra admin center and go to Entra ID → External Identities → Cross-tenant access settings.
- On the Organization settings tab, click Add organization, enter the target domain name or tenant ID, and click Add.
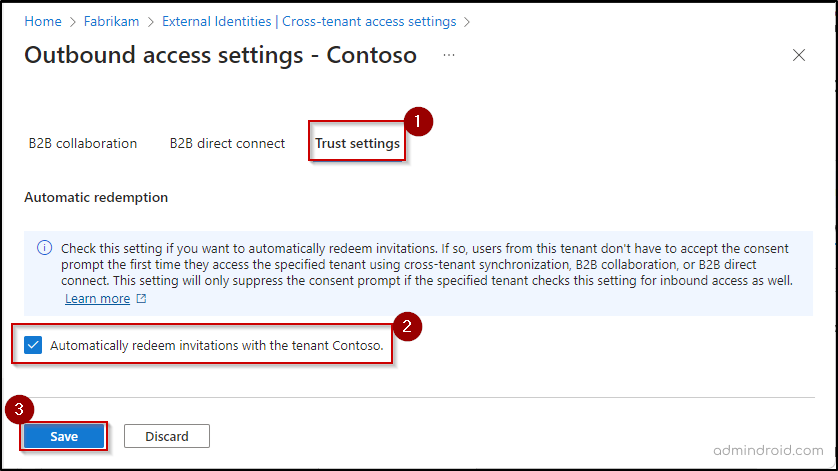
- Select Inherited from default under “Outbound access” of the added organization and go to the Trust settings tab.
- Check the “Automatically redeem invitations with the tenant ” and select Save.
3. Create Cross-Tenant Synchronization Configuration in the Source Tenant
To begin syncing groups, you first need to create a cross-tenant sync configuration. This helps you define how objects are provisioned from the source tenant to the target tenant.
Follow the steps below to create the sync configuration in the source tenant:
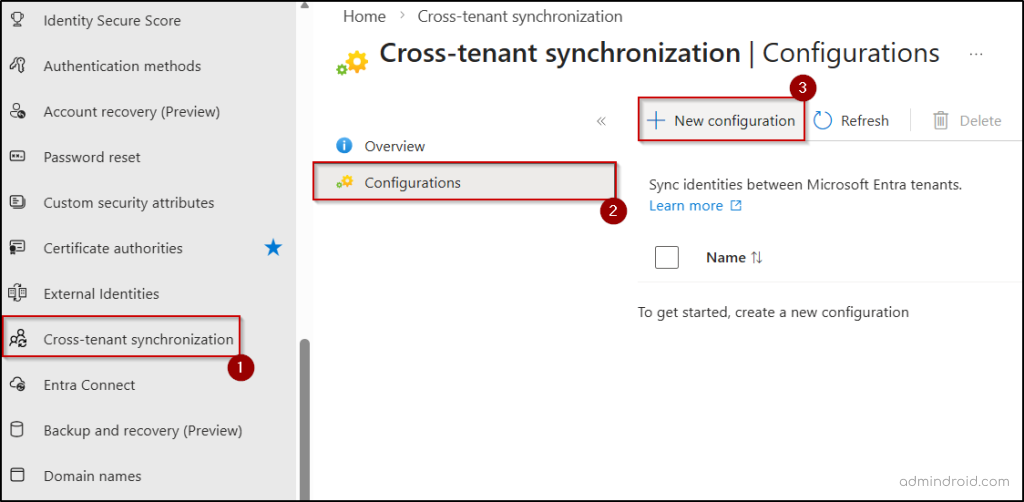
- Go to the Microsoft Entra admin center and click Cross-tenant synchronization in the left pane.
- Select Configurations and click + New configuration at the top of the page.
- Enter a name for the synchronization configuration and click Create.
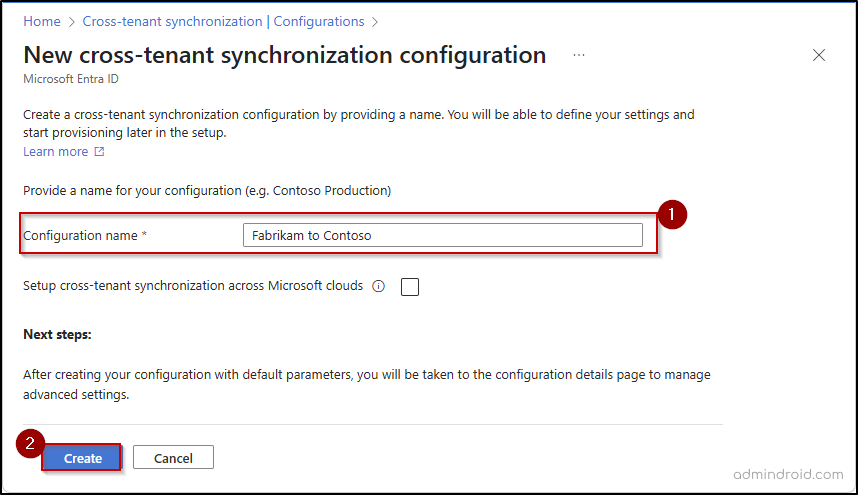
Note: If this synchronization configuration is removed or disabled later, previously synced users and groups are not automatically removed from the target tenant. Those objects should be managed or removed manually.
4. Test Cross-Tenant Sync Connection in Microsoft Entra
Once the configuration is created, you can use the following steps to verify that the connection between the source and target tenants is working correctly.
- Select the newly created configuration from the Configurations list.
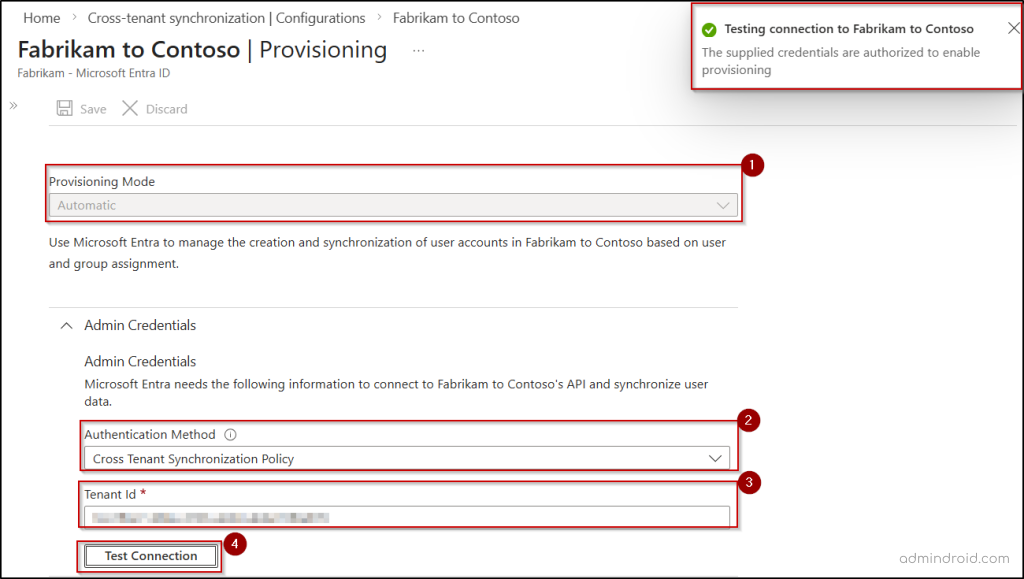
- Click Get started and set the ‘Provisioning mode’ to Automatic to enable continuous synchronization of groups between tenants.
- Under the Admin credentials section, set the ‘Authentication method’ to Cross-tenant synchronization policy.
- Enter the target tenant ID in the Tenant ID field and click Test connection.
- If the test is successful, you’ll see a confirmation message indicating that the credentials are authorized and provisioning is enabled. The connection testing may also fail due to several reasons, such as incorrect tenant ID, missing inbound or outbound access configurations, etc.
- Then, click Save and close the provisioning page.
With the connection validated, you’re now ready to define what gets synchronized between the tenants.
5. Configure Provisioning Settings in the Source Tenant
To enable group synchronization across Microsoft Entra tenants, you must configure the provisioning scope to “Sync only assigned users and groups”. This setting defines the synchronization boundary, ensuring that only explicitly assigned users and groups are processed. If this setting is not configured properly, you may encounter errors such as Group skipped due to EntityTypeNotSupported during synchronization.
Follow the steps below to set the required scope for group synchronization in Entra.
- In the source tenant Entra admin center, go to Cross-tenant synchronization → Configurations and select your newly created configuration.
- Select Provisioning under Manage and expand the Settings section.
- Set the Scope to “Sync only assigned users and groups”.
- Here, you can also define the Accidental deletion threshold and specify an email address to receive alerts if a sync cycle fails.
- Click Save at the top of the page to save any changes.

6. Select the Groups to be Provisioned in the Source Tenant
Microsoft Entra allows you to define which groups are synchronized using Direct Assignment, with the option to further refine the selection using Scoping Filters.
Direct Assignment is used to explicitly select a defined set of groups for synchronization, making it suitable for controlled deployments. Scoping Filters can then be applied on top of this selection to further narrow down the groups based on specific attributes.
Direct Assignment
- Go to the Users and groups page under the ‘Manage’ section of your configuration.
- Click + Add user/group at the top of the page.
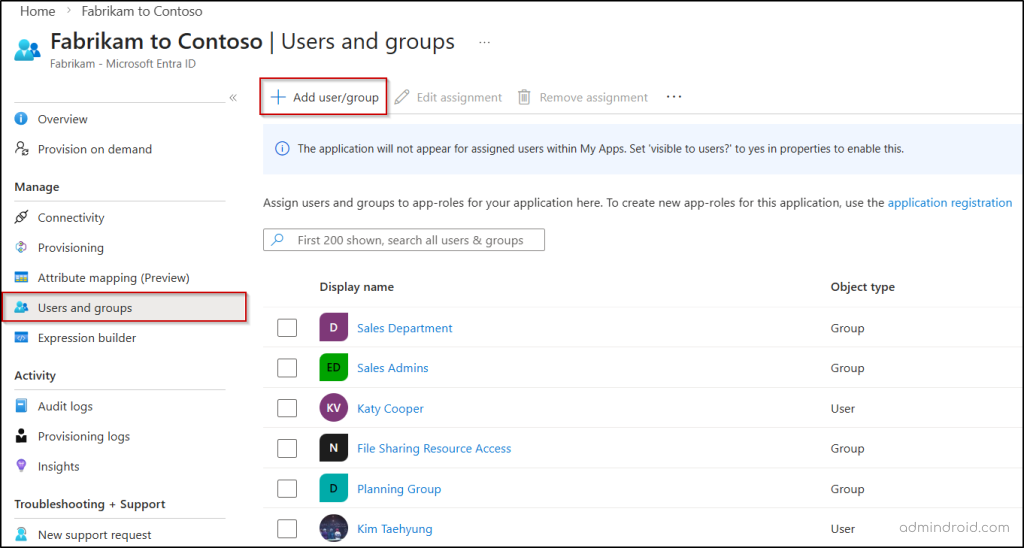
- Under Users and groups, click None Selected.
- Choose the specific security or Microsoft 365 groups you want to sync and click Select.
- Click Assign to save the group scope.
Attribute-Based Scoping Filters
To narrow down the groups to sync automatically based on specific criteria (like group types or members attributes), you can create a group scoping filter using the following steps.
- Go to the specific sync configuration and select Attribute mapping.
- Click Provision Microsoft Entra ID Groups and move the Enabled toggle to Yes.

- Under Source Object Scope, click All records to open the filter editor.
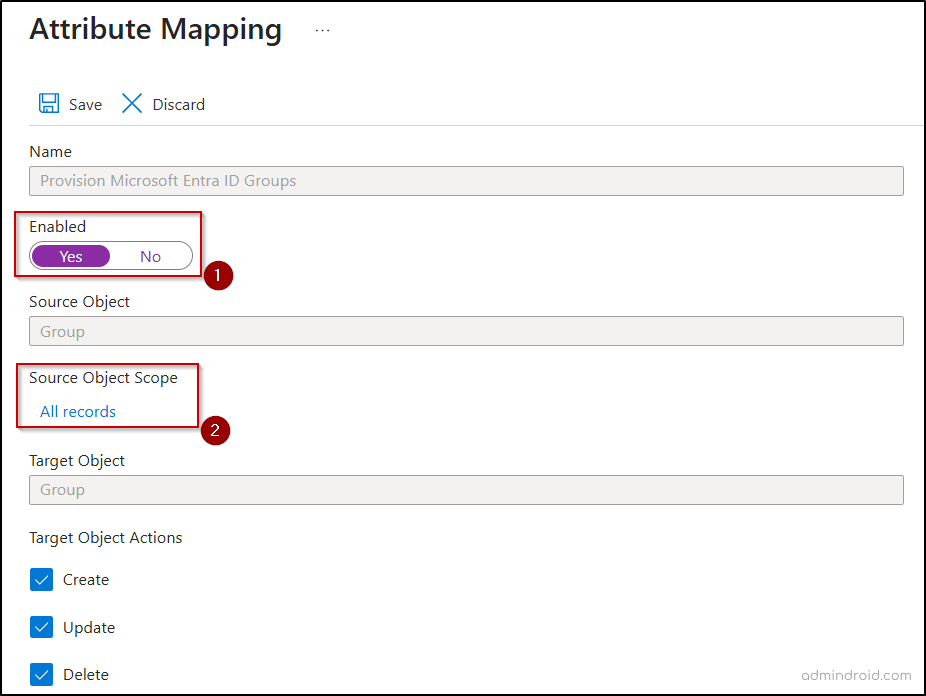
- Click + Add new filter group and define which groups are in scope for provisioning. You can filter by description, group type, mail-enabled status, visibility, and more.
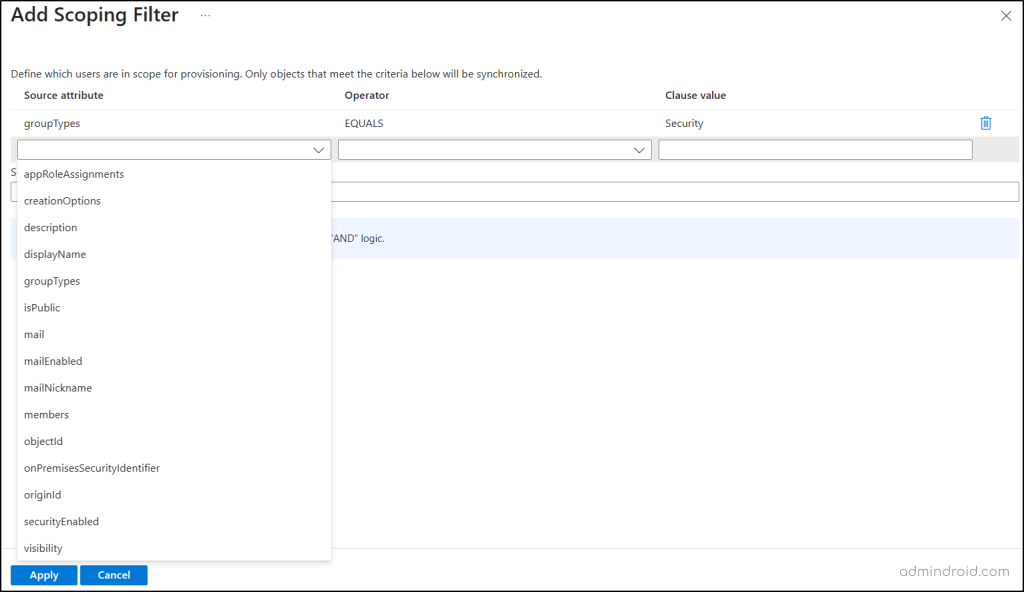
Note: When multiple conditions are defined within a single filter, they are evaluated using AND logic (all conditions must match). When multiple filters are defined, they are evaluated using OR logic (any filter match is enough).
- Once you have defined all the required scoping filters, click Apply to save your scope.
7. Define Attribute Mappings for Groups in the Source Tenant
Attribute mappings determine exactly which data flows between tenants during a synchronization cycle. While standard attributes like display name and members are included by default, you can include additional attributes or customize these mappings to fit your specific environment.
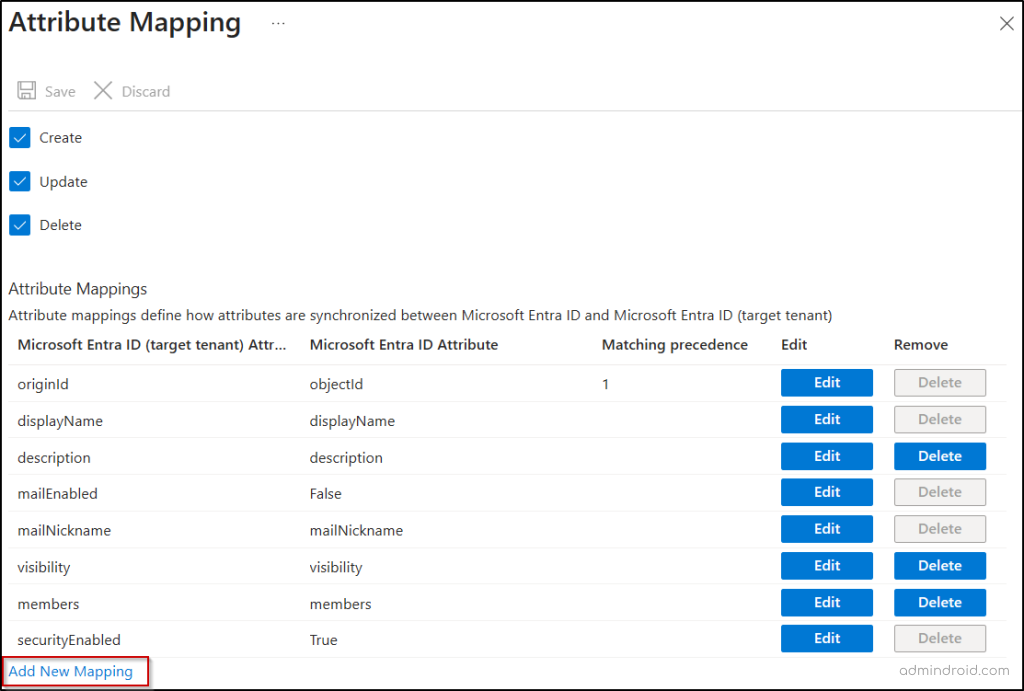
- On the Attribute Mappings page, scroll down to view the list of default attributes that are defined to be synchronized to the target tenant.
- You can edit or remove certain attributes based on your needs. Specific core attributes, like display name, mail-enabled, and security-enabled, are mandatory and cannot be deleted.
- To add new group attributes, click Add New Mapping and provide the required details.
- Here, you can configure default values for attributes or set up cross-attribute mappings as needed.
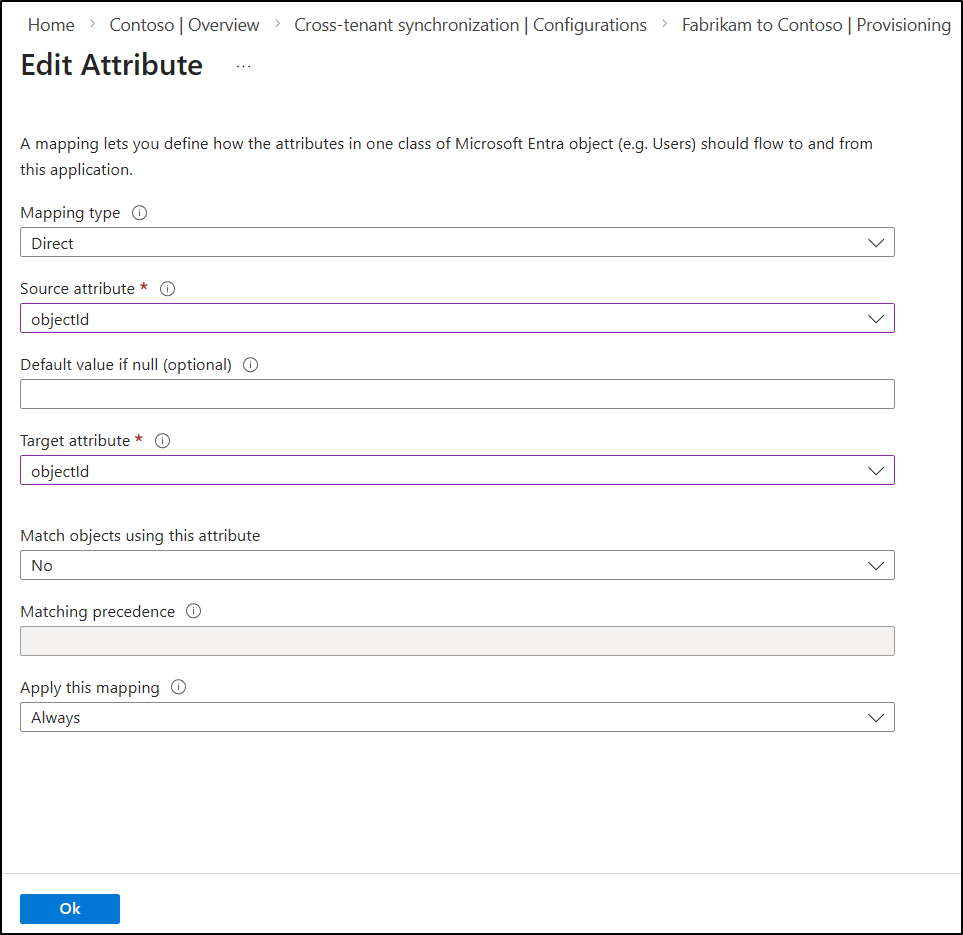
- Ensure the source and target attributes are compatible, as entering an invalid attribute mapping can trigger a SchemaInvalid error.
- Once all required mappings are configured, click OK and then select Save. Then, close the Attribute Mapping page.
8. Start Group Synchronization in the Source Tenant
Now that all the required configurations are set, it’s time to initialize the sync engine.
- Access the Provisioning page of your specific configuration in the source tenant.
- Then, switch the Provisioning Status toggle to On to automatically start the synchronization process.
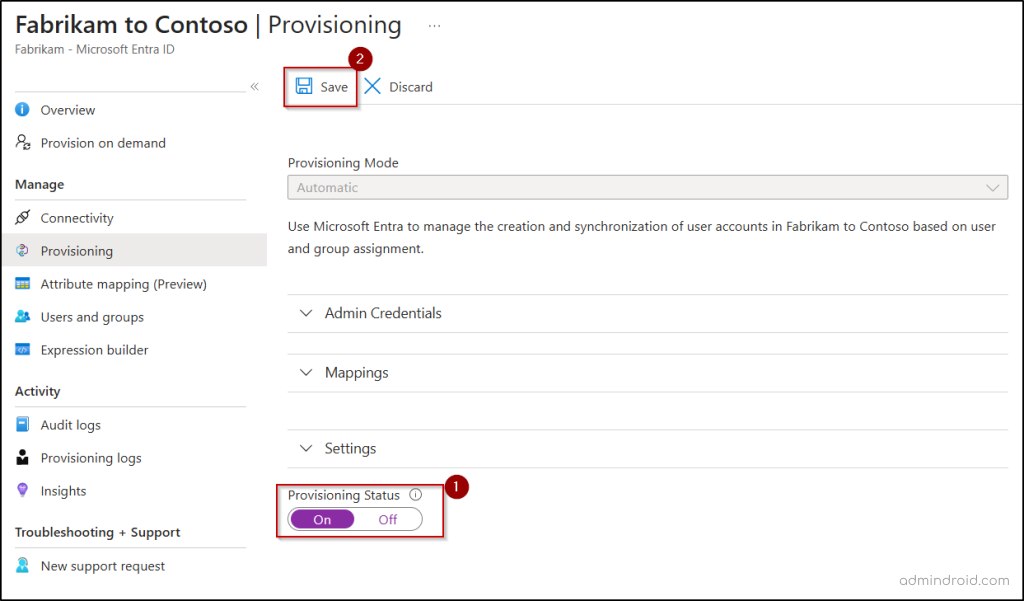
- Alternatively, you can also click Start provisioning from the Overview page to enable provisioning and initiate synchronization.
That’s it! Your groups are now being successfully synchronized across the two Microsoft Entra tenants.
9. Use Provision on Demand for Instant Synchronization
By default, the synchronization cycle runs approximately every 40 minutes. However, in scenarios where you need to sync specific groups immediately, you can use the Provision on Demand feature.
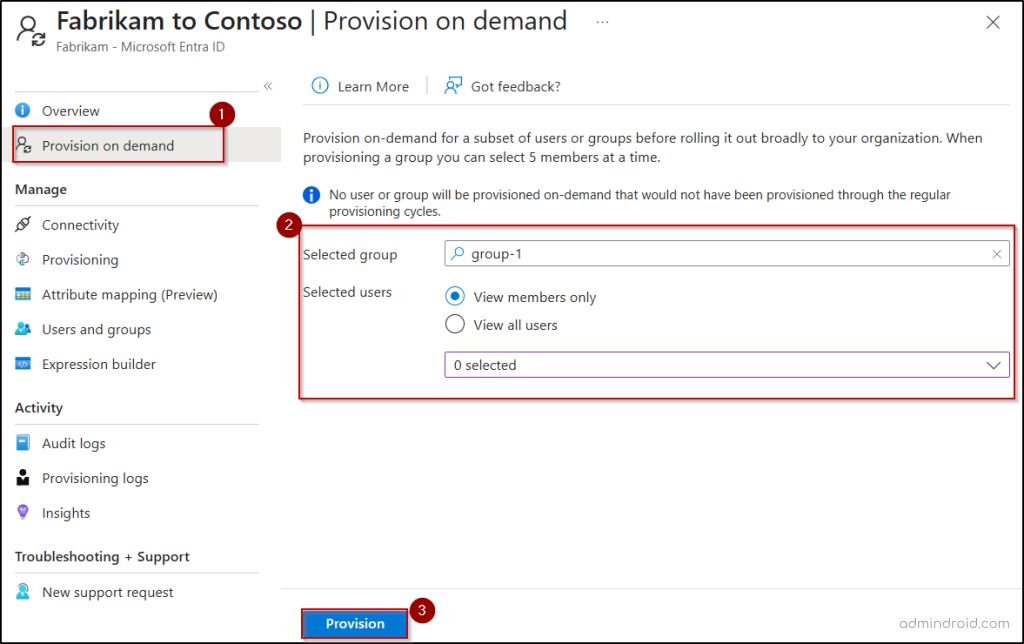
- Go to the specific cross-tenant configuration and select Provision on demand.
- In the Select a user or group field, search for and select the required group, and click Provision.
- Once validation checks are completed, the group provisioning starts instantly.
Only users or groups within the defined provisioning scope can be synced on demand. Attempting to sync others will result in an error such as “NotEffectivelyEntitled“.

10. Monitor the Cross-Tenant Group Provisioning Process
Once cross-tenant group synchronization is live, consistent monitoring ensures the process remains healthy and reliable. By tracking which groups synced, skipped, or failed, you can quickly pinpoint misconfigurations or attribute mapping issues and take immediate corrective action.
Let’s explore how each of these monitoring options helps you track and troubleshoot group synchronization effectively.
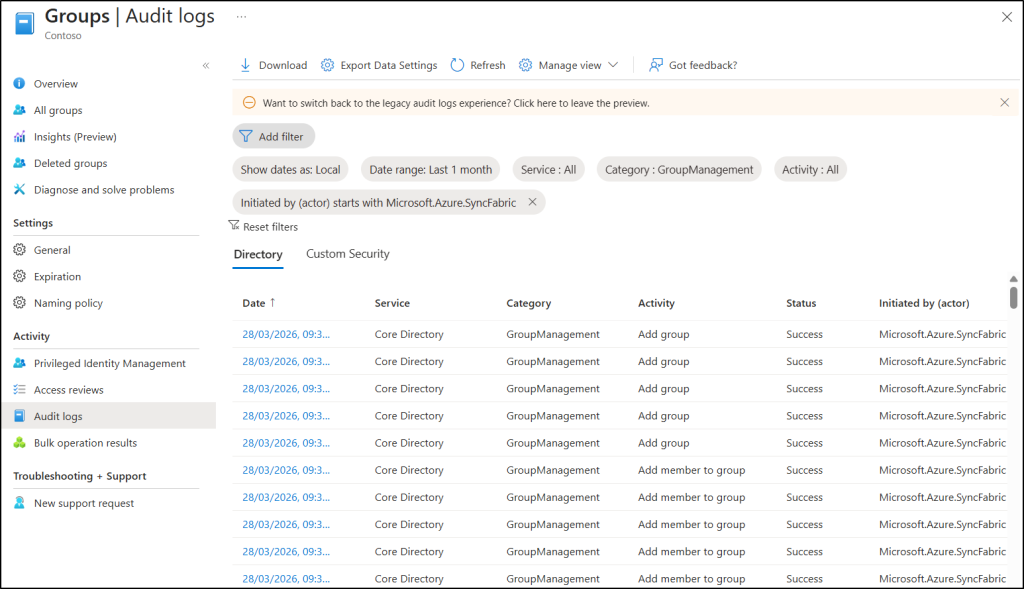
Audit Logs in the Target Tenant – In the target tenant, navigate to the following path to validate how synced objects are being processed.
Microsoft Entra admin center → Groups → Audit logs
Here, set the Initiated by (Actor) filter to Microsoft.Azure.SyncFabric. You can track group creation, updates to group memberships, and other changes triggered by cross-tenant synchronization.
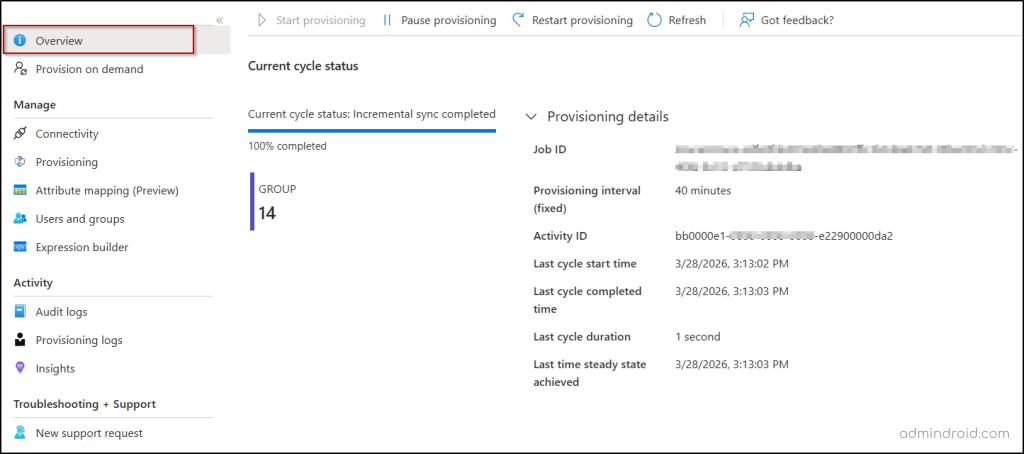
Overview in the Source Tenant – In the source tenant’s Microsoft Entra admin center, navigate to the following path:
Cross-tenant synchronization → Configurations → [Your Configuration] → Overview
This provides a high-level summary of the health and progress of your synchronization job. Here, you can view the completion percentage of the current provisioning cycle and the number of users or groups added to the scope of provisioning. Expand the Provisioning details to find the job ID, last sync started time, last cycle finished time, cycle duration, etc.
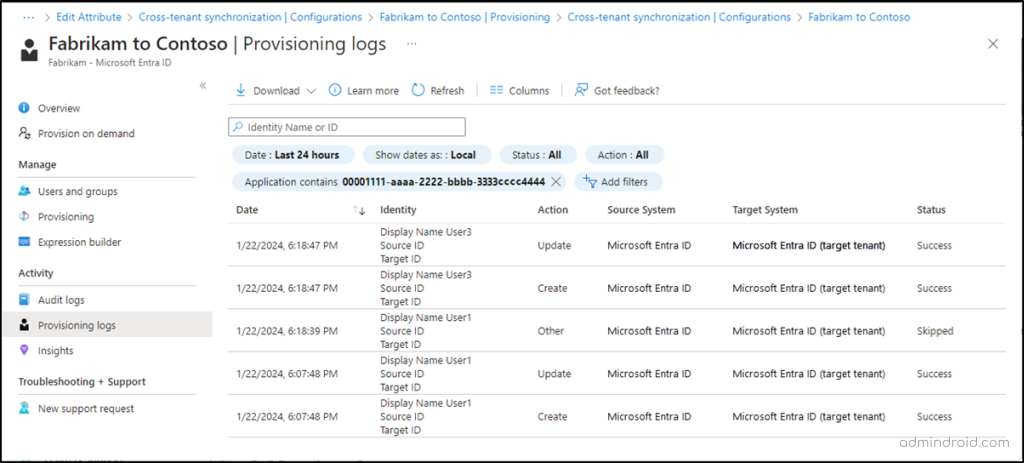
Provisioning Logs in the Source Tenant – In the source tenant, go the following path to access detailed, object-level view of synchronization activity.
Microsoft Entra admin center → Configurations → [Your Configuration] → Provisioning logs
With these logs, you can track whether groups are successfully provisioned, skipped, or failed, understand why a group was skipped, identify errors, and view detailed execution steps, modified attributes, and system actions.
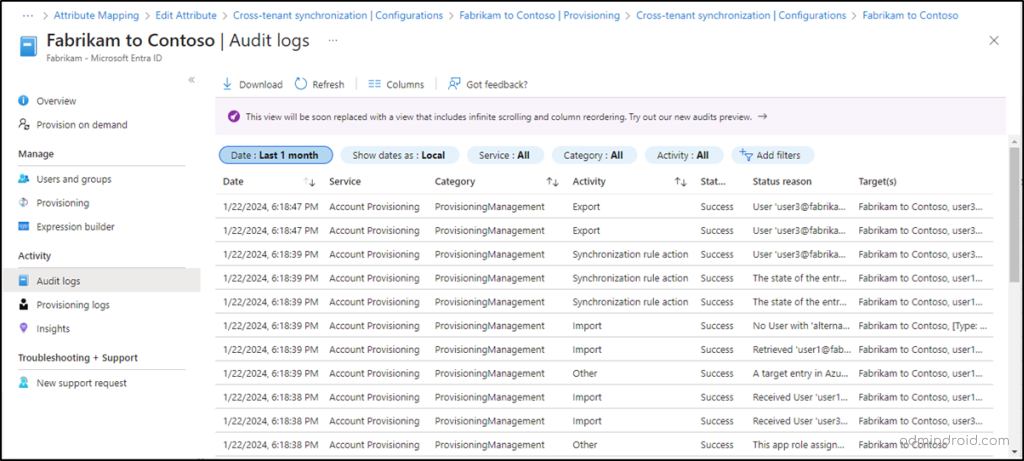
Audit Logs in the Source Tenant – Audit logs provide a broader view of administrative and provisioning-related activities. These logs capture events such as creation or deletion of provisioning configurations, updates to synchronization settings, import, export, and other provisioning operations. You can use the Category filter to quickly narrow down relevant details like ProvisioningManagement, UserMangaement, GroupManagement, etc.
Limitations of Cross-Tenant Group Synchronization in Microsoft Entra ID
Although group synchronization simplifies access management, it comes with certain restrictions you should be aware of.
- Unsupported groups: Group types such as distribution groups, mail-enabled security groups, dynamic distribution groups, and shared mailboxes are not supported for cross-tenant synchronization.
- No nested group support: Only direct user members of a group are considered during synchronization.
- User-Initiated Exit & Membership Impact: If a user removes themselves from the target tenant, their membership in synchronized groups is automatically revoked. To prevent this, you can configure external collaboration settings to restrict external users from leaving the organization on their own
- Soft deletion behavior: If a synchronized group is soft deleted in the target tenant, it is not automatically restored in the next synchronization cycle.
- No cross-cloud support: Synchronization across different cloud environments (such as Azure Commercial, Azure Government, or Azure China operated by 21Vianet) is not supported.
- Target-side changes are not auto-corrected: If a synced group is modified in the target tenant, those changes will persist. They are only overwritten if a corresponding change occurs in the source tenant.
- No management of existing groups: Groups that were created outside of cross-tenant synchronization are not managed or updated by the sync process, even if they have similar names or purposes.
As we wrap up, it’s time to move past the limitations of legacy B2B setups. By transitioning to cross-tenant synchronization, you aren’t just updating a setting; you’re reclaiming the hours spent on manual user management. This feature brings structure, consistency, and automation into your multi-tenant environment.
I hope this blog helped you understand how cross-tenant group synchronization works and how you can start using it effectively. Feel free to share your experience or questions in the comments!


