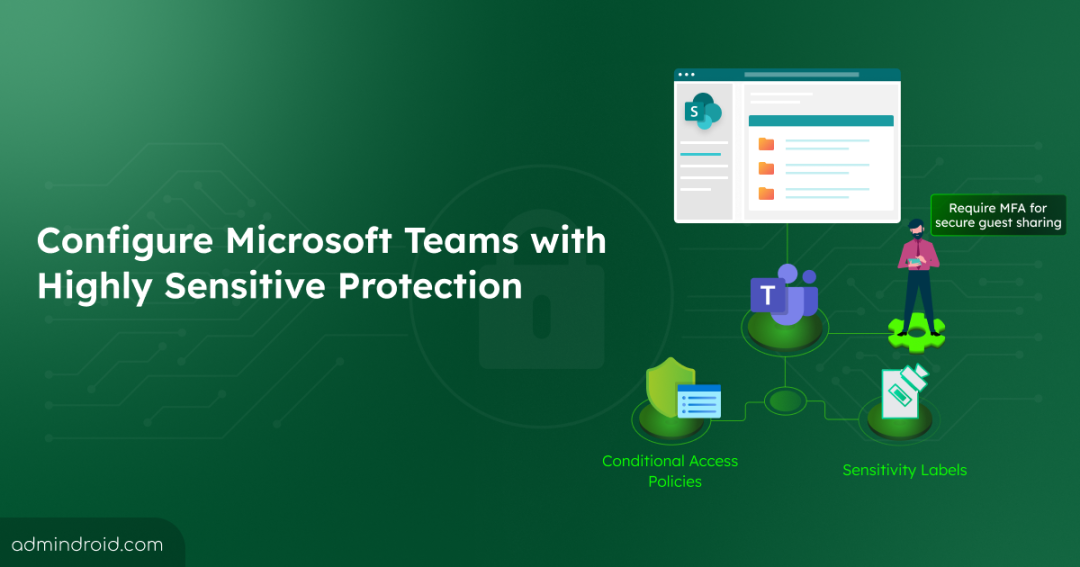
On Day 31 of Cybersecurity Awareness Month, learn how to configure teams with highly sensitive protection, allowing you to grow your external collaborations without worrying about security. Dive into our captivating M365 Cybersecurity blog series, packed with valuable tips to keep your organization secure!
In today’s world of remote work, many of us rely on Microsoft Teams for seamless communication, both within our internal teams and with external partners and clients. Yet, there’s an important issue we must confront – is Microsoft Teams really secure for sensitive data?
The answer to this question is a resounding ‘NO.’ The digital landscape is filled with increased cyber threats when it comes to sharing sensitive files through Microsoft Teams. Consider the scenario where users often use their personal devices, which may not have the best security measures in place, and sometimes they unintentionally share sensitive data with unintended recipients.
To make matters more challenging, Microsoft Teams stores files in SharePoint Online, which, by default, often has lenient settings and permissions that allow broad access to the content. These situations necessitate a closer look at enhancing data security.
If your organization uses Teams to share sensitive data, Microsoft suggests to configure teams with highly sensitive protection. This blog explores configuring highly sensitive protection in MS Teams to strike the right balance between security and collaboration convenience.
MS Teams with Three Tiers of Protection
Before configuring MS Teams for highly sensitive data protection, it’s essential to grasp Microsoft’s three-tiered security model for MS Teams and its significant impact on your sensitive files.
Microsoft Teams is indeed a trusted service, but its security is greatly influenced by user behavior and the devices on which it’s installed. To protect sensitive files in teams, Microsoft suggests three tiers of protection, each providing varying levels of protection. These configurations range from public teams with open sharing policies to increasingly secure settings that restrict teams access with sensitivity labels. They are,
- Baseline protection (Public & Private) –The baseline tier offers basic safeguards against potential oversharing through identity & device access policies and malware protection.
- Sensitive protection – The sensitive tier uses Teams sensitivity labels to control guest access to SharePoint, enforces web-only access for unmanaged devices, restricts default link sharing, and allows private channels for team members only.
- Highly sensitive protection – The highly sensitive protection tier in Microsoft 365 aims to prevent unauthorized access and enhance data security. It incorporates sensitivity labels and Conditional Access policies to ensure that only specific guests can access sensitive content on Microsoft Teams, building upon lower-tier security measures.
Why Configure Teams with Highly Sensitive Protection Tier?
The highly sensitive protection tier offers the following security measures, making it the top choice for enhancing data security in teams.
- A special label is used for the most sensitive teams and files, accessible only to approved organization members and designated guests.
- The label controls guest sharing and sets strict access rules for SharePoint. It’s also the default label for files.
- Only team owners can create private channels, and SharePoint site access is highly restricted to team members.
Configure Teams with Highly Sensitive Protection in Microsoft 365
Without delay, let’s proceed to configure Microsoft Teams with highly sensitive protection, safeguarding your files and collaboration using the following steps:
- Configure guest sharing
- Create Conditional Access authentication context
- Create Microsoft 365 sensitivity labels
- Create a team with protection for highly sensitive data
- SharePoint settings
1. Configure Guest Sharing
If you’re considering enabling guest sharing for highly sensitive data teams, Microsoft provides various security and compliance tools to ensure safe sharing of sensitive content. It’s a more secure option than sending sensitive information directly via email to external parties. To enhance security, you can limit external sharing in SharePoint Online, minimizing the risk of accidental file exposure to external individuals. Additionally, you can create a secure environment for guest sharing.
2. Create Conditional Access Authentication context
To grant designated guests access to content with enhanced security, you should create a Conditional Access policy with the authentication context. With MS Teams authentication context, you can ensure that unauthorized guest users can’t access sensitive data from teams.
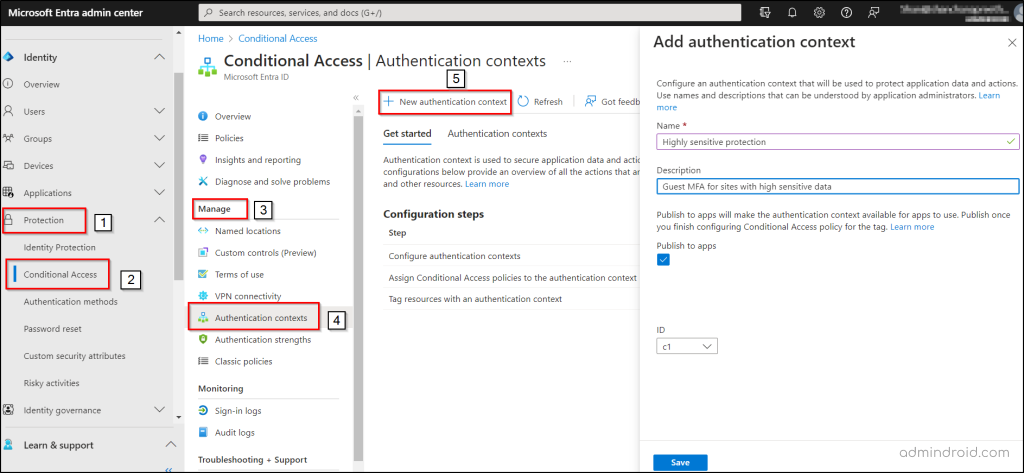
Add an Authentication Context
Microsoft Entra authentication context is a crucial part of keeping data and actions safe in various applications. The authentication context enables labeling and access control based on specific conditions. In this case of configuring Teams, it ensures Team members adhere to strict conditions for SharePoint access.
- Navigate through the following path to add an authentication context in Microsoft Entra ID.
Microsoft Entra admin center 🡢 Identity 🡢 Protection 🡢 Conditional Access 🡢 Manage 🡢 Authentication context 🡢 New authentication context
- Write a suitable name and description to your Microsoft Entra authentication context.
- Then, tick the “Publish to apps” checkbox and click “Save”.
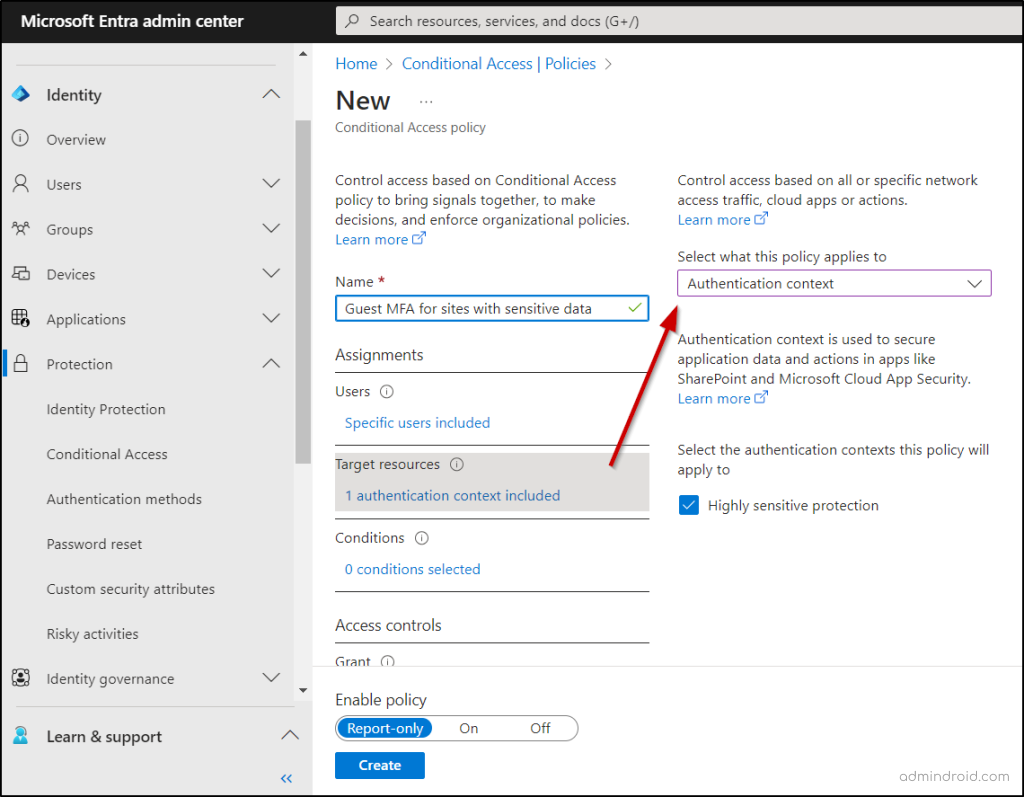
Configure Conditional Access Authentication Context
Next, we need to establish a Conditional Access policy that leverages the authentication context as decision making signal and mandates guest users to use multi-factor authentication (MFA) when accessing the SharePoint site.
- Follow the path below to create a Conditional Access policy and use authentication context.
Microsoft Entra admin center 🡢 Identity 🡢 Protection 🡢 Conditional Access 🡢 New policy
- Give a standard name for your Conditional Access policy.
- Go to the Assignments section and find the “Users” option.
- Under the “Include” setting, choose “Select users and groups.”
- In this selection, select “Guest or external users” and choose “B2B collaboration guest users” from the dropdown menu.
- Afterward, in the Target resources section, choose “Authentication context” from the dropdown menu under the “Select what this policy applies to” option.
- Then, choose the authentication context you’ve created by marking the associated checkbox.
- Next, go to the Access controls section and click on “Grant access.” From there, choose “Require multifactor authentication,” and complete the process by clicking “Select.”
- Decide the way you want to activate the policy under Enable policy, and then proceed by selecting “Create.”
3. Create Microsoft 365 Sensitivity Labels
In this section, we’ll explore how to apply Microsoft 365 sensitivity labels to provide a high level of protection. These labels serve the dual purpose of classifying teams and encrypting individual files within those teams. Moreover, you can enable sensitivity label support for files in other locations like SharePoint or OneDrive.
Before proceeding, ensure that sensitivity labels for Microsoft Teams are enabled. If you already have sensitivity labels, customize their settings or names to align with your organizational needs and enhance your overall labeling strategy.
- If not, let’s walk through the process of creating a new label by navigating through the path below.
Microsoft Purview compliance portal 🡢 Solutions 🡢 Information Protection 🡢 Labels 🡢 Create a label
Name and tooltip page:
- Give your label a name, for example, “Highly sensitive” as suggested by Microsoft or a name of your choice.
- Add a display name and short description. Click “Next.”
Define the scope for this label page:
- Under this page, select “Files,” “Emails” under “Items,” and choose the “Groups & sites” option. Click “Next.”
Choose protection settings for labeled items page:
- Select the option “Apply or remove encryption.” Click “Next.”
Encryption page:
- Under this encryption page, choose “Configure encryption settings.”
- Under “Assign permissions to specific users and groups,” click “Assign permissions.”
- Select “Add all users and groups in your organization.”
- If your organization has guests with decryption permissions, click “Add users or groups,” and add them. Click “Save” and then click “Next.”
Auto-labeling for files and emails page:
- Turn on the “Auto-labeling for files and emails” toggle.
Define protection settings for groups and sites:
- Select “Privacy and external user access settings” as well as “External sharing and Conditional Access settings.” Proceed by clicking “Next.”
A new section is on its way to “Groups and Sites” called “Private team discoverability and shared channel settings.” This change aims to enhance controls for private team discoverability and introduce extra controls for shared channels in Teams, aligning with the MC709659 message center news. The standard release is set to start late February 2024 and is expected to end by early March 2024.
Private Teams Discoverability Control: Applying a designated label in the Compliance portal enables private teams to become searchable within the Teams app. These labels, easily created or edited in the portal, serve to enhance the discoverability of private teams. Team owners can seamlessly apply these labels, making their teams searchable while retaining full control over membership.
Shared Channel Controls (Three Options):
- Restrict to: Internal Only: Limit sharing to internal teams.
- Restrict to: Same Label Only (For Internal Teams): Control sharing to teams with the same label.
- Restrict to: Private Teams Only: Manage sharing exclusively with other private teams, internal, and external.
Define privacy and external user access settings page:
- Choose “Private” under the “Privacy” section.
- If you wish to allow guest user access, select “Let Microsoft 365 Group owners add people outside your organization to the group as guests” under “External user access.” Then, press “Next.”
Define external sharing and device access settings page:
- Choose “Control external sharing from labeled SharePoint sites.”
- For “Content can be shared with,” select one of the following options:
- “New and existing guests” to permit guest user access.
- “Only people in your organization” to restrict guest user access.
- Click “Use Microsoft Entra (Azure AD) Conditional Access to protect labeled SharePoint sites.”
- Then, select the “Choose an existing authentication context” option and pick your authentication context from the dropdown list. Proceed by clicking “Next.”
Auto-labeling for database columns page:
- Activate the “Auto-labeling for database columns.” Click “Next.”
- Finally, click “Create Label” and then “Done.”
After creating the label, publish it for organization-wide access by going to the Microsoft Purview compliance portal 🡢 Solutions 🡢 Information protection 🡢 Label policies. You can either add the label to an existing policy that applies to all users or create a new sensitivity label policy in Microsoft 365. This way, all users in your organization can utilize the label.
4. Create a Team with Protection for Highly Sensitive Data
After establishing authentication context and labels for sensitive documents in Teams, create a team with enhanced protection for highly sensitive data.
- To create a team, follow the path below:
Microsoft Teams admin center 🡢 Teams 🡢 Manage Teams 🡢Add
- Provide an appropriate name and description for your Team.
- Add one or more team owners, and make sure to include yourself as an owner to set a default sensitivity label for files.
- Choose the sensitivity label you specifically created from the “Sensitivity” dropdown menu.
- Click “Apply.”
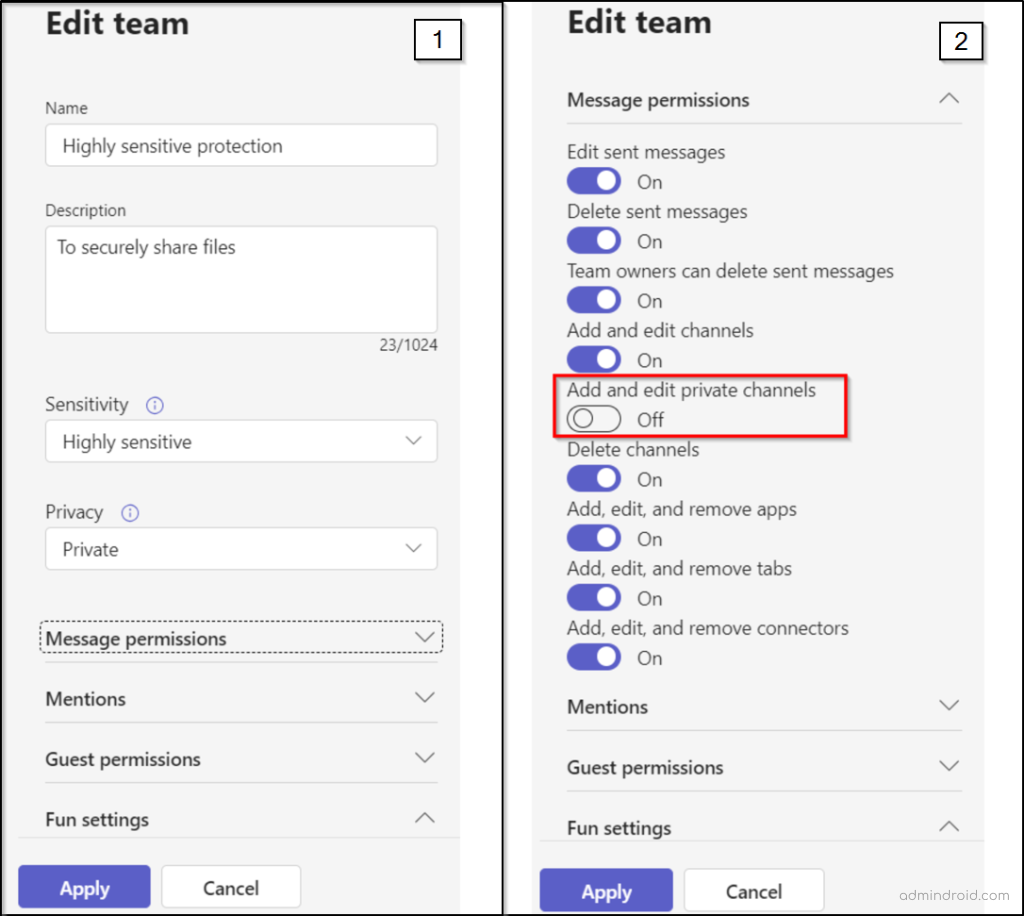
As part of the highly sensitive protection tier, private channel creation should be restricted to team owners only upon the creation of a team to enhance data protection.
Restrict Private Channel Creation
Let’s now restrict the creation of private channels to team owners only to prevent unnecessary channel proliferation by team members, ensuring better control over access. Here’s how to configure it:
- Select your team in the Teams admin center and click “Edit.”
- Under “Message permissions,” switch “Add and edit private channels” to “Off.”
- Click “Apply” to save the changes.
NOTE: Shared channels in MS Teams do not have team-specific settings like private channels. The shared channel configurations you set in the Microsoft Teams admin center and Microsoft Entra ID are universal, applying to all teams, regardless of their sensitivity level.
5. SharePoint Online Settings
When creating a new team with the highly sensitive label, there are two significant SharePoint settings that need to be managed each time. Moreover, enabling these features requires a Microsoft Syntex – SharePoint Advanced Management license.
NOTE: Please note that the default sensitivity label must be established within the SharePoint site directly and cannot be configured via PowerShell or from the SharePoint admin center.
Restrict Site Access to Team Members Only
Enabling restricted site access on the associated SharePoint site immediately after creating a team with a highly sensitive label is a crucial security practice. This prevents external individuals from accessing the site or its content, reducing the risk of data leaks and breaches in your organization.
- To activate restricted SharePoint site access for your organization, connect to SharePoint Online PowerShell and run the following command:
|
1 |
Set-SPOTenant -EnableRestrictedAccessControl $true |
NOTE: Keep in mind, if you’re using Microsoft 365 Multi-Geo, you must run this command for each geo-location where you want to implement restricted access control.
- Around an hour after activating restricted access control for your organization, you can proceed to enable it for the specific site connected to your team. To restrict site access for this site, execute the following command.
|
1 |
Set-SPOSite -Identity <siteurl> -RestrictedAccessControl $true |
Choose a Default Sensitivity Label for Files
Apply the created sensitivity label as the default for the SharePoint site’s document library connected to Teams. This will automatically assign the highly sensitive label to new label-compatible files uploaded to the library, ensuring encryption. Please note that this action necessitates team owner permission to execute these steps.
- Go to the “General” channel of the desired team.
- Click “Files” in the team’s toolbar, select “More options” (three dots), and then choose “Open in SharePoint”
- In the SharePoint Online site, access Settings (gear icon) and select “Library settings.”
- Within the Library settings flyout pane, choose “Default sensitivity labels” and pick the “highly sensitive” label from the dropdown menu.
In conclusion, configuring teams with highly sensitive protection is key to preventing unauthorized access, data leaks, and breaches. It’s also essential to follow the best Microsoft Teams security practices to maintain the overall security of your Microsoft 365 environment. We hope this blog has given you valuable tips on achieving safe collaboration with external parties and strengthening your Microsoft 365 security. If you have any questions or need assistance, please don’t hesitate to ask in the comments.
Understand what data you hold, how you are using it, and make sure that you are practicing good data hygiene.
– David Mount


