On Day 30 of the Cybersecurity Awareness Month, learn how user tags improve the security of Microsoft 365. Stay tuned for additional informative blog posts in our M365 Cybersecurity blog series.
In this digital age, cyberattacks are a constant threat💯! Like a predator stalking its prey, attackers are waiting to get into Microsoft 365. Their primary targets are the vital users responsible for sensitive information, such as the CEO, the finance group, and the IT team.
While admins vigilantly monitor these accounts, there are instances where these critical accounts may slip through cracks. So, are you thinking of a way to ensure that these accounts are never overlooked? This is where user tags in Microsoft 365 Defender can help you! User tags act as an extra set of eyes👀, catching these accounts at the very first go to enhance the security of Microsoft 365.
Curious? Then, dive into this blog to know the silent role user tags play in Microsoft 365 security.
What are User Tags in Microsoft Defender for Office 365?
User tags are identifiers/labels that can be applied to Microsoft 365 users and groups. When you assign tags to users, it’s like giving them a unique identity that makes them stand out! These tags make it easy to track what they’re doing and take swift action if anything unusual happens.
But this doesn’t stop there! User tags go beyond mere labels; they are robust security enhancers. When security alerts surface or during investigations, these tags swiftly pinpoint the users in focus, acting as a spotlight on your organization’s key security elements.
Moreover, these user tags are your extra pair of eyes in Microsoft 365! You can use user tags to filter alerts, reports & investigations and quickly find the users involved in security incidents.
Types of User Tags in Microsoft 365 Defender
There are two types of user tags available, and they are:
System Tags: The system tag is specially intended for high-profile executives or users who have access to sensitive information. Currently, the only available system tag is the “Priority Account tag”. With priority account tagging, you can tighten the security of M365 priority accounts.
- For instance, when a user is assigned the “Priority Account tag,” the user automatically benefits from priority account protection! This entails enhanced visibility and additional heuristics for priority account security, which regular user accounts lack. However, there’s a limit! You can assign only 250 users with priority account tag in your organization. This limit is in place to ensure the effective use of the tag and to reserve priority account protection for your most crucial users.
Custom Tags: So far, we’ve set up a “priority tagging” system to help us manage executive accounts, leaders, and managers more effectively. But it’s equally important to have a way to categorize all our users! That’s why “custom tags” are available in Microsoft 365 Defender. 🚀
- With custom tags, admins can have the flexibility to create tags according to their specific needs. Here, admins can create user-defined tags and differentiate users based on various criteria, such as job roles, departments, security risk profiles, and other relevant factors.
Divided by classification, both system and custom tags are essential components for rapidly pinpointing the impacted users or groups affected by cyberattacks. These tags are the linchpin for lightning-fast responses against potential threats in Microsoft 365.
Seems like a must-configure feature, right? Don’t wait! Let’s dive into the following section on how to set up user tags in Microsoft 365 Defender.
Create User Tags in Microsoft 365 Defender
Now that you have a clear overview of system and custom tags, let’s delve further into managing them in the Microsoft 365 Defender portal.
System Tags in Microsoft 365:
The “Priority Account” user tag is available by default in your Microsoft 365 Defender portal. So, you can simply apply system tag to priority Microsoft 365 accounts. However, there are few limitations when coming to managing priority accounts.
- You can’t remove the priority account tag within your organization.
- You can’t rename the priority account tag in Microsoft 365 Defender portal.
Create Custom User Tags in Microsoft 365 Defender:
Before initiating the process of creating a new custom tag in Microsoft 365, it’s crucial to take note of the following factors.
- User tags can be applied to mailbox users only.
- Custom User Tag Limits: Admins can make 500 custom tags and assign up to 10,000 users to each tag.
- License Requirement to Create Custom User Tags: Defender for Office 365 Plan 2.
- Required Roles to Create Custom User Tags: Before diving into the steps, ensure you have the necessary roles to effectively manage user tags within Microsoft Defender for Office 365.
| Actions | Required Role Group Membership |
| Create, modify and delete custom tags Apply and remove existing custom user tags from users | Organization Management or Security Administrator |
After checking that you have the respective role, follow the steps below to configure the Microsoft 365 custom user tag.
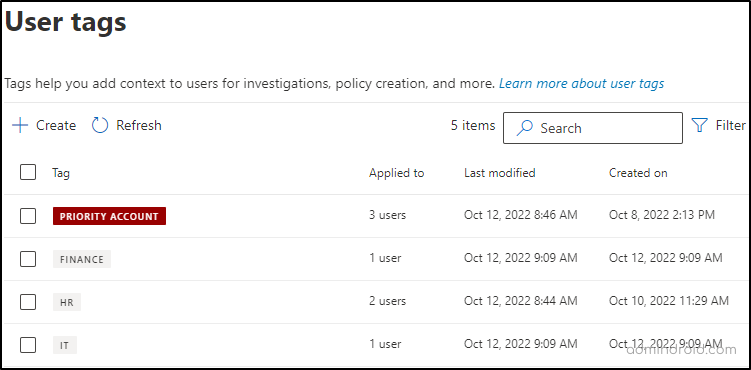
- Sign into the Microsoft 365 Defender portal.
- Navigate to Settings → Email and Collaboration → User tags → +Create.
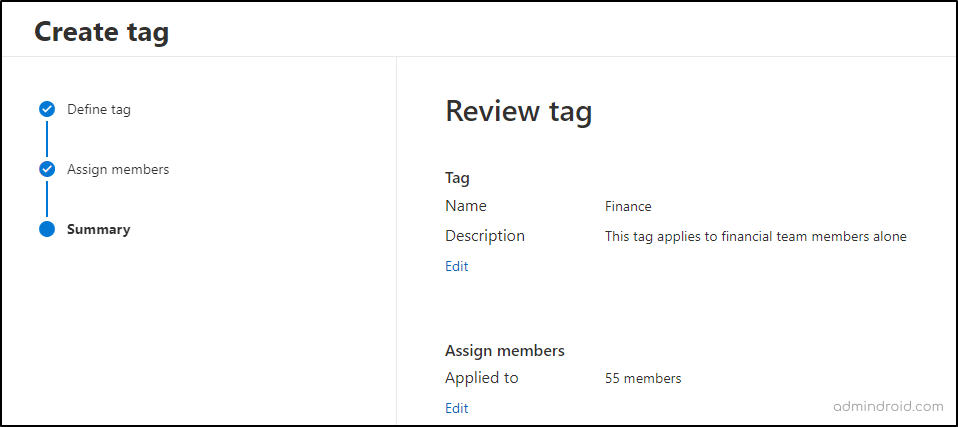
- Give a suitable name and description for the user tag and proceed further by clicking “Next”.
- Assign Members → + Add members → Select respective M365 users → Add → Next.
- Finally, review the configuration and click Submit to create the custom tag.
That’s it! A custom user tag for the specific set of users will be created! With the custom tag in place, admins can enhance data protection, mitigate potential risks, and streamline user monitoring within Microsoft 365 environment.
In the topic ahead, we’ll break down the importance of user tags in Microsoft 365 security, making it easy to grasp. Let’s dive into it!
How Do User Tags Enhance Microsoft 365 Security?
As of now, we have learned about how to configure user tags in Microsoft 365 Defender. Let’s move to the main fact of how it plays its role in increasing the defense against threats in your organization.
- Investigate risky users swiftly with user tags in Microsoft 365 Defender
- Configure Microsoft 365 security policies using user tags
- Plan remedial actions for risky users in Microsoft 365
1. Identify and Investigate Risky Users with Microsoft 365 User Tags
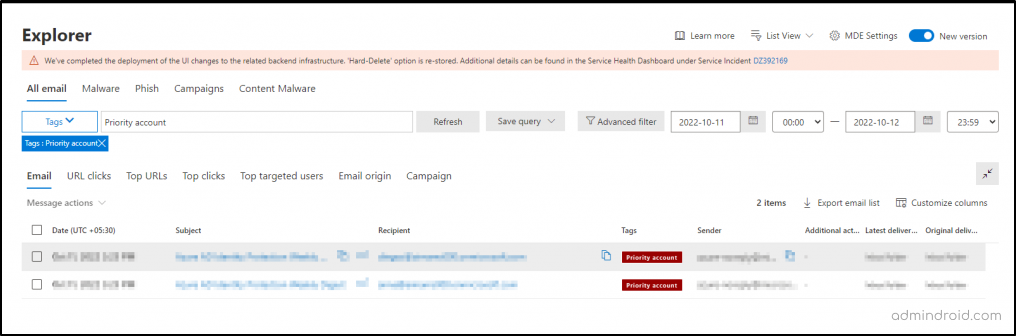
Microsoft 365 Defender offers a range of security reports, such as Alerts, Incidents, Threat Explorer, Threat Protection Status Report, and more. These reports are essential for identifying malicious threats associated with each M365 account. However, when faced with simultaneous malicious actions involving multiple user accounts, it becomes challenging to discern which accounts require immediate attention among the regular users!
To efficiently address this issue, consider leveraging user tags. By strategically tagging crucial accounts with access to sensitive data, you can rapidly identify and prioritize them in the event of a security breach.
- By using user tags as filters in the Microsoft 365 Defender reports, you can determine the priority order for investigating the activities on specific accounts. This will ensure that your most crucial data remains protected.
Going beyond investigation prioritization, user tags provide us with the ability to pinpoint the origins of attacker strategies. For example, in the case of an attacker targeting financial data in M365, their initial focus is often on the financial team. When users from these groups are not tagged in reports, there’s a risk of overlooking them amidst their various tasks and responsibilities.
- However, by applying tags to groups such as “Financial” and “IT,” we can swiftly identify these targeted groups. This capability equips us to take proactive measures and implement customized security policies to safeguard these specific user groups from potential threats.
2. Configure User Tags in Microsoft 365 Alert Policy
User tags are valuable for customizing M365 security policies. Let’s say you have a team responsible for handling sensitive financial documents in your organization. However, there’s a data leakage risk stemming from your financial team members! Therefore, to mitigate this risk, you can establish a distinct user tag, appropriately named “Finance,” and assign it to this specialized group.
Once the user tag is in place, you can strategically configure a Microsoft 365 alert policy to monitor the activities of the finance team. Specifically, a Microsoft 365 alert policy can be created that automatically sends a notification to a security administrator if any finance team member shares a file with external users. This ensures immediate awareness and proactive action in the event of such actions, reinforcing data protection and security.
- By effectively leveraging user tags with alert policies, organizations can stay on top of their data security game and watch out for possible risks.
Here are the steps to create an alert policy that will monitor external sharing activity with the specific user tag.
- Sign into Microsoft 365 Defender portal.
- Policies &rules → Alert policies → +Create new alert policy → Give appropriate name, description, severity, and category.
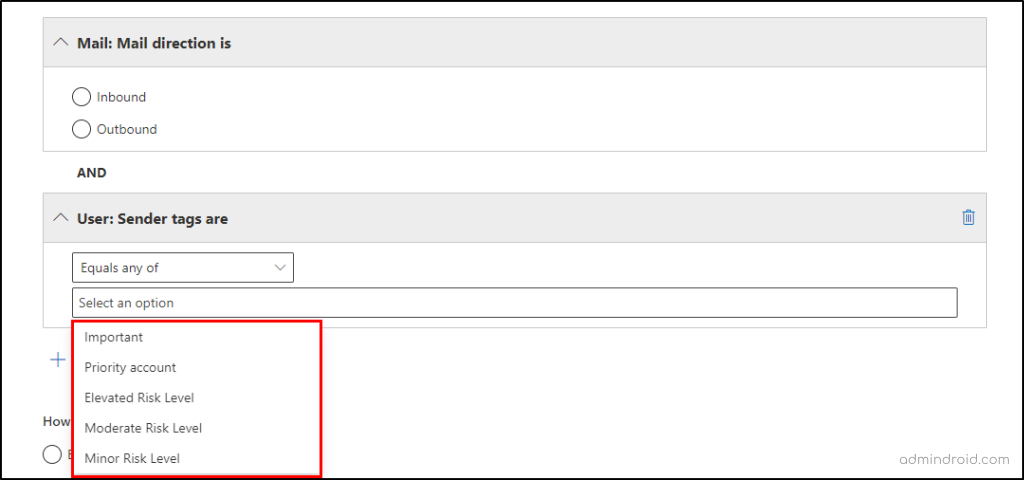
- Choose the “Shared file externally” activity and click + Add condition → User: user tags are > Select the respective tag.
- Select recipients for email notifications → Review your settings → Done.
3. Plan Remedial Actions for Risky Users in Microsoft 365
With swift identification of risky users through user tags, you can make informed decisions promptly. There’s no need to spend time analyzing each user account’s role and access.
For example, you’ve configured user tags like “High Risk,” “IT,” and “Finance.” When you come across these tags in your reports, you can take quick actions specific to those users, all without affecting others! 💯. Here’s a swift course of action admins can do after identifying users with crucial tags:
- Conditional Access Policies: Admins can create Conditional Access Policies tailored to the specific user type. For example, these policies can require certain conditions like named locations, device-based CA conditions or multi-factor authentication (MFA) to access Microsoft 365 resources, ensuring a higher level of security for these vital users.
- Attack Simulation Training: Admins can design attack simulation training for the affected users. This training equips users with the knowledge and skills to enhance their awareness and reduce their vulnerability to cyberattacks. By educating your users on identifying and mitigating cyber threats, you can significantly decrease the risk of successful attacks in Microsoft 365.
True cybersecurity is preparing for what’s next, not what was lost.
– Neil Rerup
Closing Lines:
Much like the proverb “Even a small stream can power a light mill,” the simplest configuration of user tags in Microsoft 365 Defender can serve as the supreme support system of Microsoft 365 security. So, identify fast, act quickly, and let attacks out with user tags now.
Hope you have gained curious information about how user tag enhances Microsoft 365 security. If you have any queries, feel free to reach us through the comments section.


