Microsoft 365 licenses serve as passports, granting access to the rich suite of Microsoft 365 services and apps. 💯 Assigning a Microsoft 365 license manually for limited users is quite an easy task. But when it comes to larger organizations, it turns out to be a hassle! Because, with a constant stream of new users joining those organizations, individually assigning licenses to each one isn’t practical. 👎But don’t worry!
As Microsoft integrates automation into everything nowadays, they left the hassles behind by introducing automated solutions for bulk user license assignments. Let’s explore them all and choose the best one out of them.
How to Assign Licenses to Bulk Microsoft 365 Users?
As of now, Microsoft has got 5 different ways to assign licenses to bulk users, and each of them has its benefits and few drawbacks. Let’s see what those are and how they differ from each other.
- Self-service purchasing for Microsoft 365 products
- Auto-claim policies in Microsoft 365
- Group-based licensing in Microsoft Entra ID
- Assign licenses to multiple users using Microsoft 365 admin center
- Assign license to bulk users with Microsoft Graph PowerShell
✅ Self-service Purchasing for Microsoft 365 Products
Microsoft introduced the “Self-service purchasing” capability in Microsoft 365 to enable users to claim licenses automatically. With this feature, users can purchase subscriptions like Business Standard, SPO licenses, ClipChamp, Project Plan 1, Power Automate, and anything directly without needing to involve their IT department.
Drawbacks:
👎 Tenant – wide feature: Once enabled, it applies to all users without the ability to specify individual users.
👎 Lack of tracking: There’s no mechanism to track which user purchased what licenses. This can lead to shadow IT, compliance, and protection issues within your Microsoft 365 organization. So, it is advisable to block self-service purchase for Microsoft 365 products.
✅ Auto-claim Policies in Microsoft 365
Auto-claim policies in Microsoft 365 might seem like self-service purchasing at first glance, but they come with more restraint. While self-service purchasing allows users to select the licenses they need, auto-claim policies only permit users to claim the specified license configured in the policy.
Drawbacks:
👎 Tenant – wide scope: Similar to self-service purchasing, auto-claim policies apply to all users by default, without the option to specify individual users.
👎 Limited specificity: It doesn’t allow for license assignment based on users’ roles, departments, or teams.
✅ Group-based Licensing in Microsoft Entra ID
Azure AD group-based licensing enables you automate Microsoft 365 license provisioning to existing users based on groups.
Drawback:
👎 Configuration repetition: During this Microsoft 365 group-based license management, you must repeat the process multiple times to assign different licenses to different groups. This can become quite repetitive and time-consuming, especially when dealing with numerous groups or different types of licenses.
✅ Assign Licenses to Multiple Users Using Microsoft 365 Admin Center
You can assign licenses to your bulk users directly from the Microsoft 365 admin center itself by following the navigation below.
Microsoft 365 admin center → Billing → Licenses → Select a product → ‘+Assign licenses’ →Choose the respective users → Turn apps and services to “On/Off” → Assign.
Drawback:
👎 Not fit for larger organizations: It is suitable for smaller organizations alone, as it only allows license assignment to 20 users at a time. If you are a larger organization, you need to repeat the above steps to assign a license for all users.
- Alternatively, you can assign bulk licenses from the ‘Active users’ page of the Microsoft 365 admin center. However, there are limitations regarding the ability to specify different licenses for individual users.
- For further user management, you can also bulk update users from the Microsoft Entra admin center by modifying user properties, managers, sponsors, and more.
✅ Assign Licenses to Bulk Users with Microsoft Graph PowerShell
You can easily assign licenses to multiple users using Microsoft Graph PowerShell. This can be especially useful for admins to save time, as it automatically assigns licenses to the specified users.
Drawbacks:
👎 Deep understanding needed: Creating a lengthy PowerShell script is required for granular license assignments. While this approach may be suitable for experts, newbies may struggle with scripting and require a deep understanding to execute license allocation effectively.
✅ Effortlessly Assign Licenses to Bulk Users Using Microsoft365DSC
Seems like everything comes with drawbacks, doesn’t it? But don’t worry! Your ultimate alternative is here – the Microsoft365DSC tool – for automatically assigning licenses in bulk to your Office 365 users. With this one tool, you can easily overcome all the drawbacks of the above solutions.
What is the Microsoft365DSC Tool?
Microsoft365DSC is a powerful open-source tool designed to configure and manage Microsoft 365 using a configuration-as-code approach. By adopting its PowerShell Desired State framework, you can precisely define and implement the desired setup for your tenant!
With Microsoft365DSC, you can:
- Automate your crucial M365 settings and policies
- Export your Microsoft 365 tenant configurations into CSV/JSON
- Monitor changes in security settings and policies
- Compare a tenant configuration with a blueprint
- Sync your M365 settings from one tenant to another
How to Assign Licenses to Bulk Users Using Microsoft365DSC?
Microsoft365DSC streamlines the license assigning process with its auto-deploy capability. You can follow these steps to efficiently allocate licenses to multiple users using Microsoft365DSC.
- Create a DSC Code File: Begin by writing a DSC code to automate license assignment using Microsoft365DSC and save the file in .ps1 format.
- Compile the DSC File: Compile the DSC code into a MOF (Managed Object Format) file, which serves as the configuration file.
- Deploy Configuration to M365 Tenant: Apply the compiled MOF file to the target Microsoft 365 tenant and initiate the license assignment process.
Before that, make sure you run the following cmdlets.
|
1 2 |
Install-Module Microsoft365DSC –Force Update-M365DSCDependencies |
Note: Before proceeding, you need to execute the “Export-M365DSCConfiguration” cmdlet from the Microsoft365DSC tool. [Simply running the above cmdlet will export the default settings, which can be time-consuming and unnecessary. Instead, you can run the above cmdlet with any parameter, as we are doing this to get the configuration data file alone.]
- This action will generate two essential files: one in .ps1 format and another in .psd1 format named “ConfigurationData.ps1”.
- Following this, it is needed to relocate the “ConfigurationData.psd1” file to your chosen directory, where your DSC code will be stored. This step is fundamental for the smooth integration of the configurations you’ve developed.
1. Create a DSC Code to Assign Licenses to Bulk Users Using Microsoft365DSC
To allocate licenses automatically with M365DSC, you need to create a DSC code with the “LicenseAssignment” property. Here, we have covered two primary use cases:
- Bulk assign Office 365 licenses from CSV file using Microsoft365DSC
- Assign license to bulk users based on department
Assign Different Licenses to Bulk Microsoft 365 Users Using CSV File
To assign different licenses for multiple Microsoft 365 users, you need to create a DSC code that will read the users’ and license information from the CSV file.
So, we have illustrated a sample CSV file containing columns for “UserPrincipalName” and “LicenseAssignment” for each user.
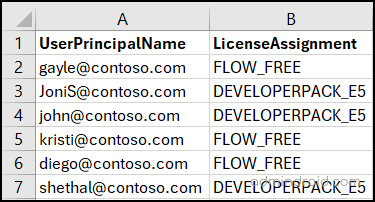
After customizing the CSV file with your desired values, you can move to save the CSV file and make sure to note down its path. Then, simply copy the code provided below in Windows PowerShell ISE, and save the code in .ps1 format for future use. The code will assign the respective licenses to the users as specified in the CSV file.
Code:
|
1 2 3 4 5 6 7 8 9 10 11 12 13 14 15 16 17 18 19 20 21 22 23 24 25 26 27 28 29 30 31 32 33 34 35 36 37 |
param ( [parameter()] [System.Management.Automation.PSCredential] $Credential ) Configuration M365TenantConfig { param ( [parameter()] [System.Management.Automation.PSCredential] $Credential ) if ($null -eq $Credential) { <# Credentials #> $Credscredential = Get-Credential -Message "Credentials" } else { $CredsCredential = $Credential } $OrganizationName = $CredsCredential.UserName.Split('@')[1] Import-DscResource -ModuleName 'Microsoft365DSC' -ModuleVersion '1.24.117.1' Node localhost { Import-Csv -Path "<CSV_FilePath>" | ForEach-Object { $UserPrincipalName = $_.UserPrincipalName AADUser $UserPrincipalName { UserPrincipalName = $UserPrincipalName LicenseAssignment = @($_.LicenseAssignment) Credential = $CredsCredential } } } } M365TenantConfig -ConfigurationData .\ConfigurationData.psd1 -Credential $Credential |
Note: Tweak the above code to add and license Microsoft 365 users
The code provided is suitable for adding licenses to existing users only. To add and assign licenses to new users in bulk, make sure to include the “UsageLocation” property in the code. Because usage location is necessary for adding a license to a new user. Additionally, you can tweak this code to assign multiple Microsoft 365 licenses to multiple users.
Assign Licenses to Bulk Users by Department
Effective license optimization hinges on granular license assignment, which means there should also be possibilities to assign licenses by different categories like department. location, job title, etc.
To address this requirement, we have refined the previous code accordingly to allocate licenses based on users’ departments. To utilize this code, you’ll need to generate a CSV file containing user principal names and their respective departments, as demonstrated below.
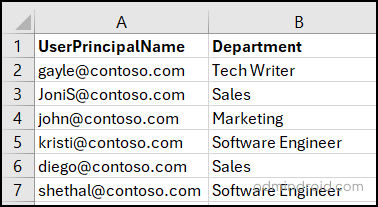
Once you’ve completed the CSV file setup, you can simply copy and paste the code provided below into PowerShell ISE. Make sure to save the script in .ps1 format for future use.
Code:
|
1 2 3 4 5 6 7 8 9 10 11 12 13 14 15 16 17 18 19 20 21 22 |
#Use the code provided above just by replacing the Node Local host part given below Node localhost { Import-Csv -Path "<CSV_FilePath>" | ForEach-Object { $UserPrincipalName = $_.UserPrincipalName $LicenseAssignment = @() if ($_.Department -eq "Sales") { $LicenseAssignment = @("DEVELOPERPACK_E5") # You can specify the respective license } elseif ($_.Department -eq "Software Engineer") { $LicenseAssignment = @("FLOW_FREE") # You can specify the respective license } AADUser $UserPrincipalName { UserPrincipalName = $UserPrincipalName Department = $_.Department Credential = $CredsCredential LicenseAssignment = $LicenseAssignment } } } } |
The code provided checks the department specified in the CSV. If it matches any of the specified departments, the respective license is assigned. Otherwise, no license is assigned to Microsoft 365 users. Let’s get to the next step.
2. Convert DSC Configuration File into MOF File
The next crucial step is to convert the DSC file into a MOF file. This phase is pivotal as it prepares the configuration file for implementation in the target tenant. To accomplish this, you’ll need to execute the following cmdlet. Upon execution, you’ll be prompted to provide your global admin credentials.
|
1 |
.\<Configuration_File_Path> -Credential (Get-credential) |

Upon successful compilation, a reassuring message will confirm the creation of the MOF file! The generated MOF file is stored in the same location as your configuration file.
3. Automatically Assign Licenses to Bulk Users Using Microsoft365DSC
Once this step is completed, the final phase involves automatically assigning licenses to users. You can implement the license assignment process by running the following code.
|
1 2 |
Start-DscConfiguration –Path <MOF_Folder_Name> -Wait -Verbose –Force |
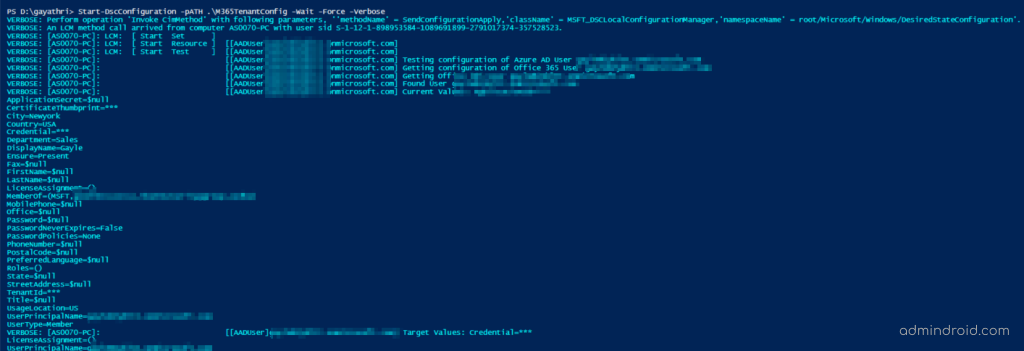
Once done, log into your tenant and check licenses assigned to Microsoft 365 users to ensure the enforcement.
Properly Assign Licenses to Bulk Users Using Microsoft365DSC!
Instead of relying on features with drawbacks, you can opt for the open-source Microsoft365DSC tool for bulk assign licenses in Microsoft 365. With Microsoft365DSC, you can meet all your requirements, such as flexible license allocation and user-friendliness. Not only that, but you can also save time with just three simple cmdlets.
So, the one tool to rule them all is now in your hands. Seize the opportunity and improve effective Office 365 license management!
We hope this blog has provided you with the necessary information on how to assign licenses to bulk users using Microsoft365DSC. Furthermore, feel free to contact us in the comment section for further assistance.
