Organizational data continues to grow across Exchange Online, SharePoint, OneDrive, Teams, and other Microsoft 365 services. Over time, organizations reach a point where they need to decide what content should be kept, what can be deleted, and how long information should remain available. Failing to manage this properly can leave organizations struggling with both data sprawl and compliance obligations.
Retention helps manage this content lifecycle. Microsoft 365 offers two ways to retain content: retention policies and retention labels. Retention policies are effective for applying retention settings broadly across Microsoft 365 workloads. But what if individual items need different retention settings? To address this need, Microsoft introduced retention labels.
In this blog, we’ll focus on retention labels and see how they enable admins to apply retention settings:
- What are retention labels in Microsoft 365
- Retention labels vs retention policies
- How to create a retention label in Microsoft 365
- Publishing retention labels to users and locations
- Ways to apply retention labels
- Advanced retention label capabilities
- Monitoring retention labels in Microsoft 365
- Common FAQs on Microsoft 365 retention labels
What are Retention Labels in Microsoft 365?
Retention labels provide item-level retention management in Microsoft 365 by allowing retention settings to be applied directly to documents, emails, files, and folders.
For example, a SharePoint site may have a retention policy that keeps all files for 5 years. However, some important documents, such as signed contracts, need to be kept for 7 years. A retention label can be applied to those specific files to enforce a 7-year retention period, while all other files in the site are retained for 5 years.
Retention Labels vs Retention Policies in Microsoft 365
Both retention policies and retention labels help manage data throughout its lifecycle. However, retention labels offer more flexibility, granular control, and records management capabilities.
The table below compares their key differences and use cases:
| Aspect | Retention Labels | Retention Policies |
| Scope | Item-level retention (files, emails, documents, folders) | Container-level retention (sites, mailboxes, Teams, OneDrive accounts, etc.) |
| Locations supported | • Exchange Online mailboxes • SharePoint Online (documents, folders, lists, and list items) • OneDrive for Business • Microsoft 365 Groups | • Exchange Online mailboxes and public folders • SharePoint Online • OneDrive for Business • Microsoft 365 Groups • Microsoft Teams (chats and channel messages) • Viva Engage (Yammer) • Copilot experiences • Skype for Business |
| How retention is applied | Applied by users, admin-configured auto-labeling, or via default labels. | Applied automatically to configured locations. |
| Retention travels with the content | ✅ Yes, within the same tenant. | ❌ No |
| Trigger retention based on business events | ✅ Supported. | ❌ Not supported. |
| Content-based identification | ✅ Supports sensitive information types, keywords, and trainable classifiers. | ❌ Not supported. |
| Require approval before content deletion | ✅ Supported through disposition reviews. | ❌ Not supported. |
| Apply another label at the end of retention | ✅ Can automatically replace the current label with another retention label. | ❌ Not supported. |
| Run a Power Automate flow at the end of the retention period | ✅ Can initiate automated approval, notification, and records management processes through Power Automate. | ❌ Not supported. |
| Records management | ✅ Can mark content as a Record or Regulatory Record. | ❌ Not supported. |
| Audit retention actions | ✅ Auditing supported for actions like label application, changes, removal, and priority cleanup actions. | ❌ Not supported |
| Identify retained content | ✅ Easy to identify retained items | ❌ Cannot directly identify retained items |
| Best suited for | Records management, regulatory compliance, business-specific retention requirements, and content-level control. | Broad compliance requirements, organization-wide retention baselines, and large-scale automated retention. |
Now, let’s move on to how to create, publish, and apply retention labels in Microsoft 365.
Prerequisites for Creating and Managing Retention Labels in Microsoft Purview
Before creating retention labels, make sure you meet the following prerequisites:
License requirements
To create and apply retention labels, you need one of the following licenses:
- Microsoft 365 E1/E3/E5, A1/A3/A5, G1/G3/G5, F1/F3
- Office 365 E1/E3/E5, A1/A3/A5, G1/G3/G5, F3
- Microsoft 365 Business Premium
- Microsoft Purview Information Protection and Governance
📝 Note: Advanced features such as event-based retention, disposition reviews, record or regulatory record declaration, and automatic relabeling require Microsoft 365 E5, Office 365 E5, or Microsoft Purview Information Protection and Governance licensing.
Role requirements
To create and manage retention labels, you must be a Global Administrator, Compliance Administrator, or a member of the Microsoft Purview Records Management role group. This role group includes the necessary Retention Management and Records Management permissions.
How to Create a Retention Label in Microsoft 365?
To create a retention label in Microsoft Purview:
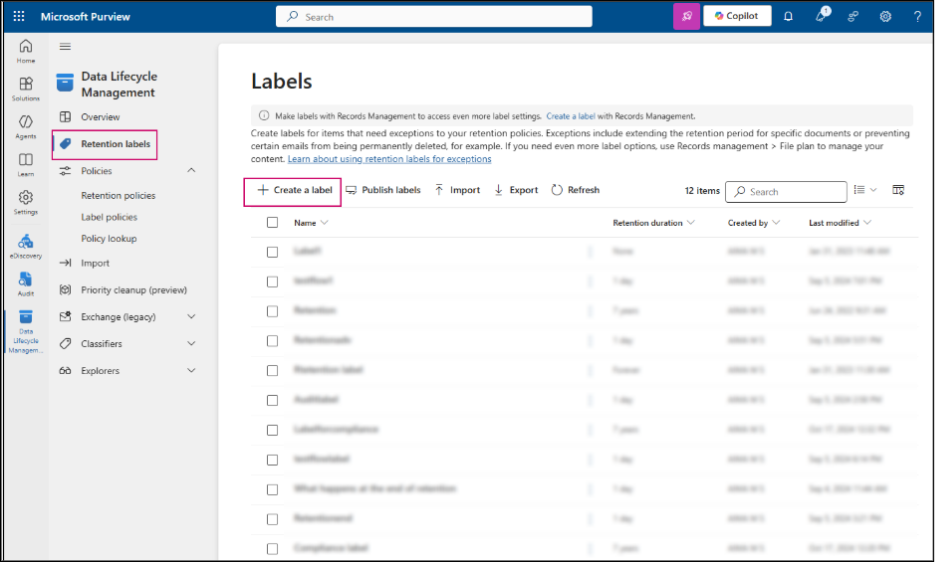
- Sign in to the Microsoft Purview portal.
- From Solutions, choose Data Lifecycle Management.
- On the Data Lifecycle Management page, select Retention labels → Create a label.
- Give the label a name and provide a description for both users and admins. Click Next.
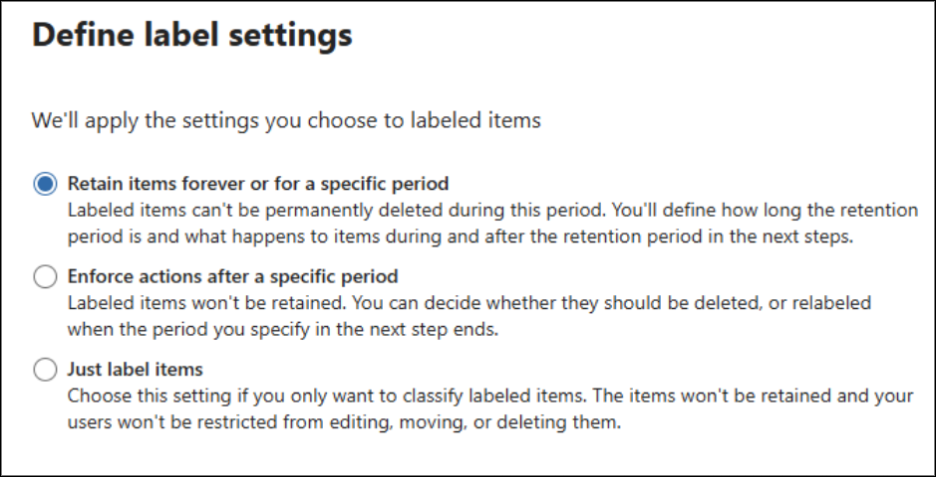
- Then, configure the label settings by choosing one of the following options and hit Next:
- Retain items forever or for a specific period – This option keeps content for a specified period or forever, so it remains available and cannot be removed before the retention period ends.
- Enforce actions after a specific period – Lets the content stay as usual for a set period, then automatically enforces the next configured action once the time ends.
- Just label items – Applies a label for classification purposes only, without retaining, deleting, or otherwise managing the data.
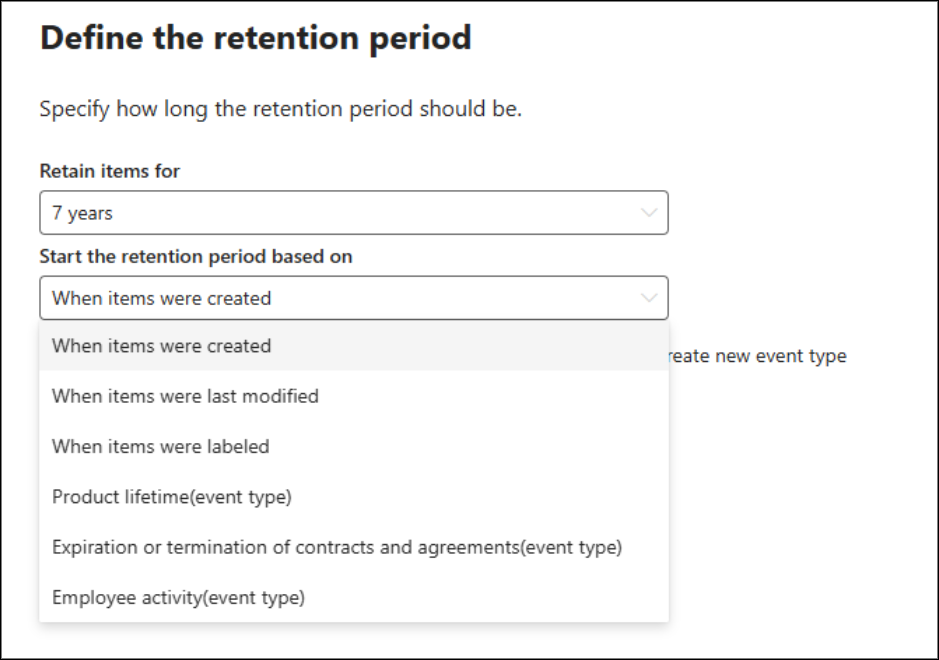
- In the next step, specify how long the content should be retained. Choose a predefined duration (such as 5, 7, or 10 years), set it to forever, or enter a custom retention period.
- Then, choose the event that determines when the retention period starts, such as when an item is created, last modified, labeled, or based on an event.
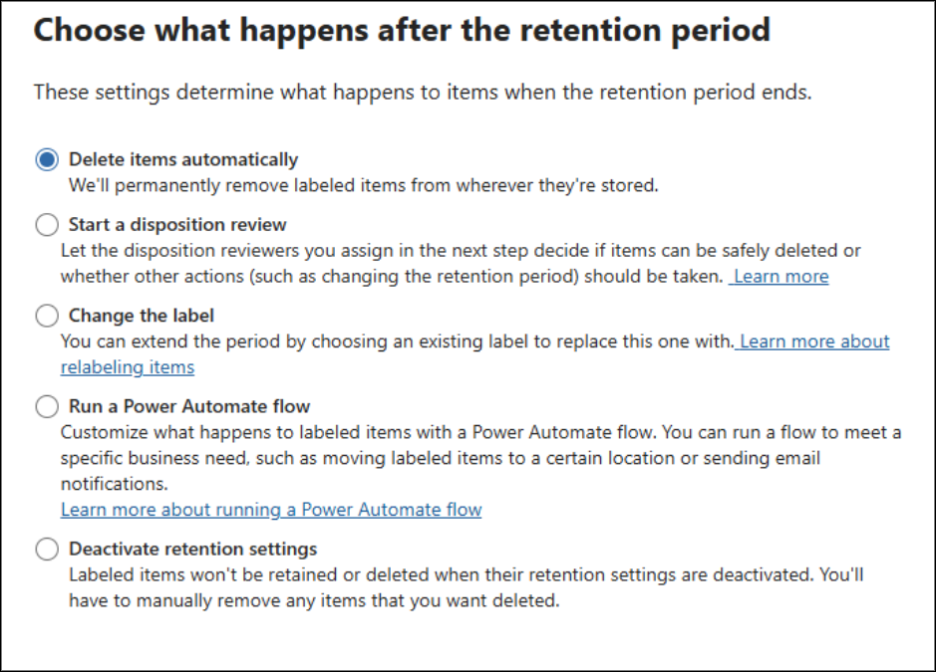
8. Next, choose what should happen when the retention period expires. Select the appropriate action based on your organization’s retention requirements:
| Retention Label Action After Retention Period | What It Does |
| Delete items automatically | Permanently deletes the content when the retention period ends. |
| Start a disposition review | Requires designated reviewers to approve deletion before content is removed. |
| Change the label | Applies another retention label to continue a new retention cycle. |
| Run a Power Automate flow | Triggers a custom workflow, such as notifications or content movement. |
| Deactivate retention settings | Stops retention enforcement without deleting the content. |
- Finally, review your settings and click Create label to complete the label creation process.
📝 Note: Some retention label settings are permanent after creation, including names, record options, and retention rules (except the retention period).
Creating a retention label only defines the retention settings; it does not apply the label to any content or make it available to users. To allow users to apply the label to documents and emails, you must publish the label.
Publishing Microsoft 365 Retention Labels to Users and Locations
To publish the retention label in Microsoft 365,
- Go back to the Data Lifecycle Management page.
- Under Policies, select Label policies → Publish labels.
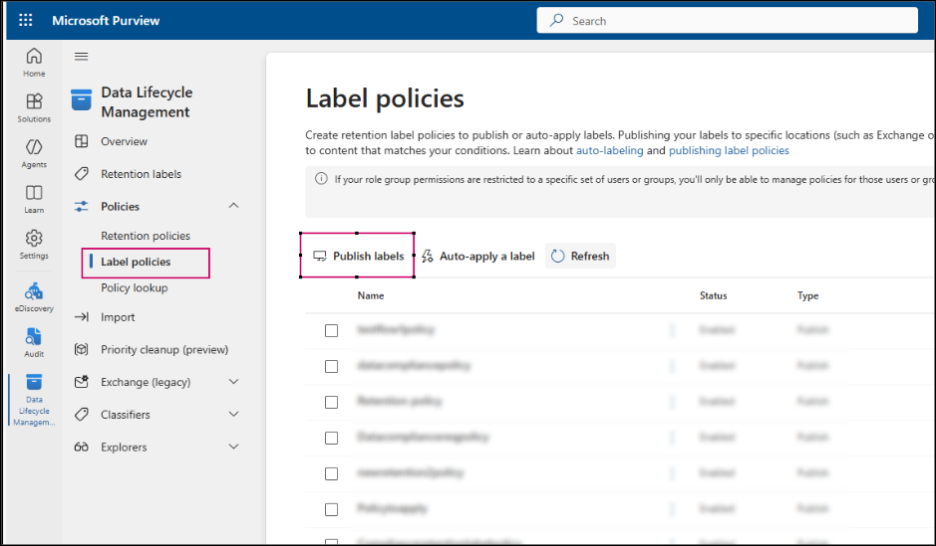
- After choosing the label to publish, select the scope and locations. Scopes determine where the label appears.
Optional: You can also select administrative units to publish the label to specific users and groups within that unit. - Provide a name for your label policy.
- Review your settings and finish creating the policy by clicking Submit.
📝Note: After publishing, retention labels typically appear in SharePoint Online and OneDrive within a day. For Exchange Online, it can take up to 7 days for the labels to become available.
Ways to Apply Retention Labels in Microsoft 365
After creating and publishing retention labels, you can apply them to content using any of the following methods:
Note that while labels can be assigned through different methods, only one retention label remains effective on a single item at any given time.
Automatically Apply Retention Labels Using Auto-Labeling Policies
Another powerful capability of retention labels is auto-labeling. Instead of relying on users to manually apply labels, auto-labeling policies can automatically assign retention labels to content that meets specific conditions, helping organizations consistently retain and protect important information.
To create an auto-labeling policy for a retention label:
- On the Label policies page, select Auto-apply a label.
- Enter a name and description for the policy. Click Next.
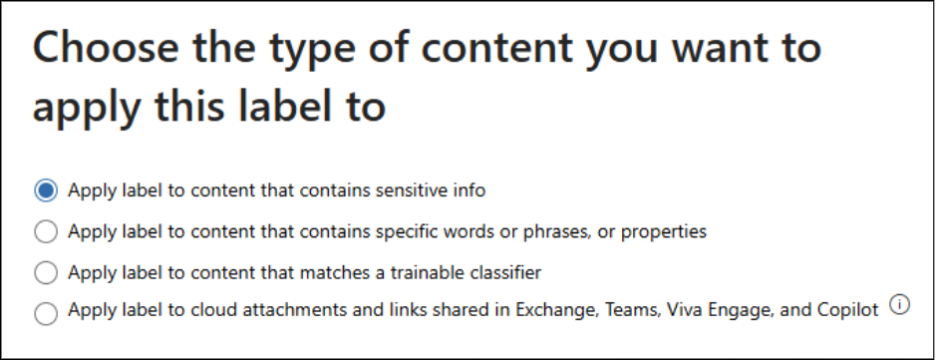
- Choose the type of content you want the label to be applied to:
- Apply label to content that contains sensitive info – Applies the label when content contains sensitive information types, such as credit card numbers, passport numbers, tax IDs, or other personal data.
- Apply label to content that contains specific words or phrases, or properties – Automatically applies the label when predefined keywords, phrases, or document metadata are detected.
- Apply label to content that matches a trainable classifier – Assigns the label to content belonging to a specific category, such as contracts, resumes, source code, or financial documents.
- Apply label to cloud attachments and links shared in Exchange, Teams, Viva Engage, and Copilot – Applies the label to files stored in SharePoint, OneDrive, or Microsoft 365 Groups when they are shared as cloud links in Outlook, Teams, Viva Engage, or referenced in Copilot interactions.
For example, here, I’ve selected Apply label to content that contains sensitive info.
- Select Custom and then choose Custom policy. Click Next.
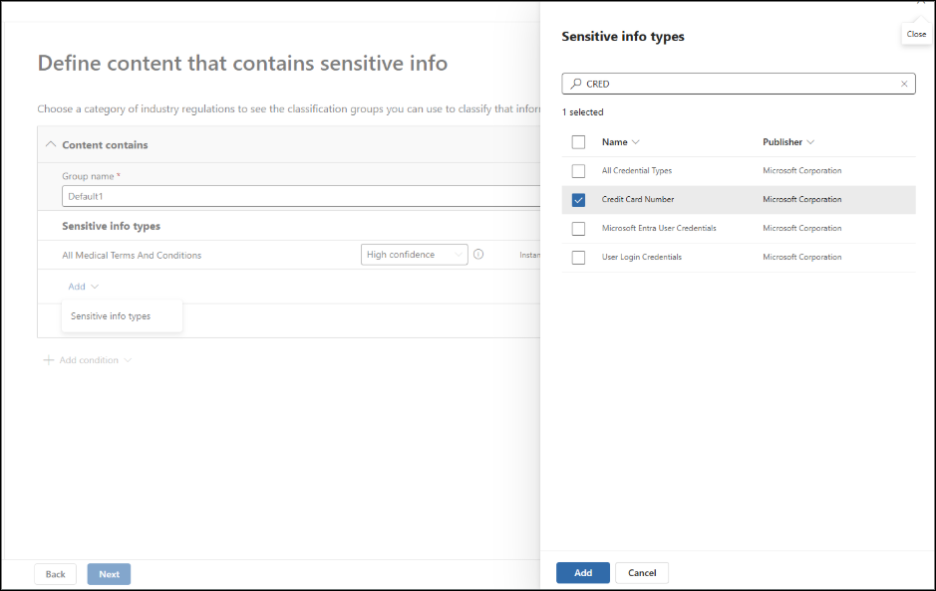
- Under Choose the type of content you want to identify, select Add and choose Sensitive info types from the dropdown list.
- In the list of available sensitive information types, select the required sensitive info type – for example, Credit Card Number and click Add.
- Optionally add administrative units. When policies are applied to administrative units, the policy scope is limited only to the users, groups, or resources inside that unit.
- In the next step, select whether to apply the policy using adaptive scopes or static locations.
- Next, choose the label for the auto-apply policy. The label will be enforced automatically on content in the locations you select.
- Choose whether to test the policy first or run it immediately, and then click Next.
- Review your settings and click Submit to complete the creation of the auto-labeling policy.
Once the policy is active, the selected retention label will be automatically applied to content that matches the configured conditions in the locations you specified. Users will typically see the label applied to matching content within a few days, though it can take up to a week for the policy to fully process and apply labels.
Apply Retention Labels Manually in Microsoft 365
Once the retention label is available in the published workloads, users can start applying it to the required content. Users can manually assign retention labels to content across supported Microsoft 365 workloads. The following SharePoint Online example illustrates how users can manually apply retention labels to content after the labels have been published by an admin.
To manually apply a retention label to a document or folder in SharePoint:
- Navigate to the SharePoint site that contains the document or folder.
- Open the document library and select the item you want to label.
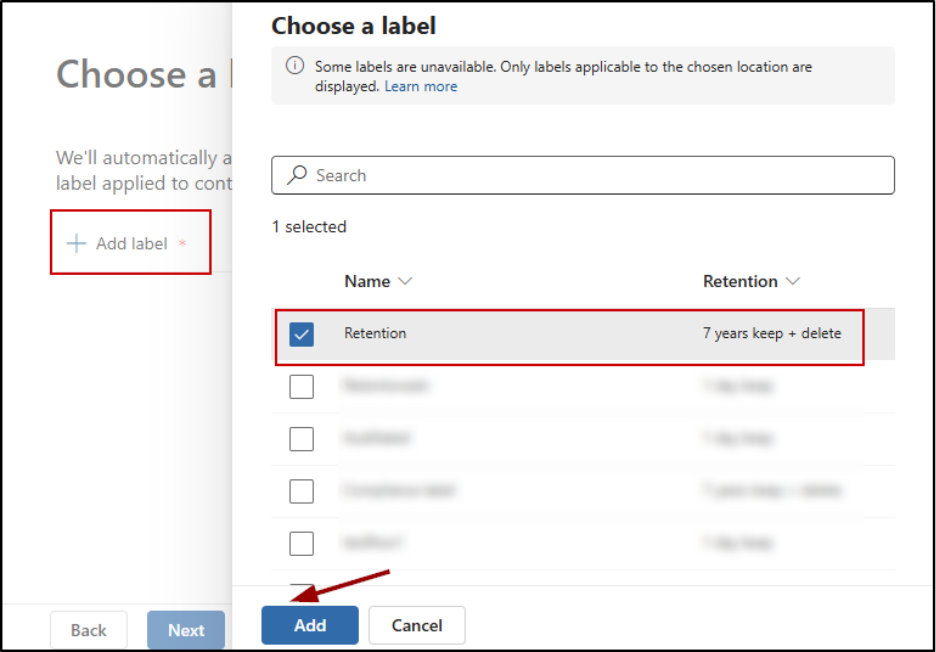
- Open the Details pane → Under Properties, select Apply label.
- A list of available retention labels will be displayed, along with their retention details.
- Select the required label.
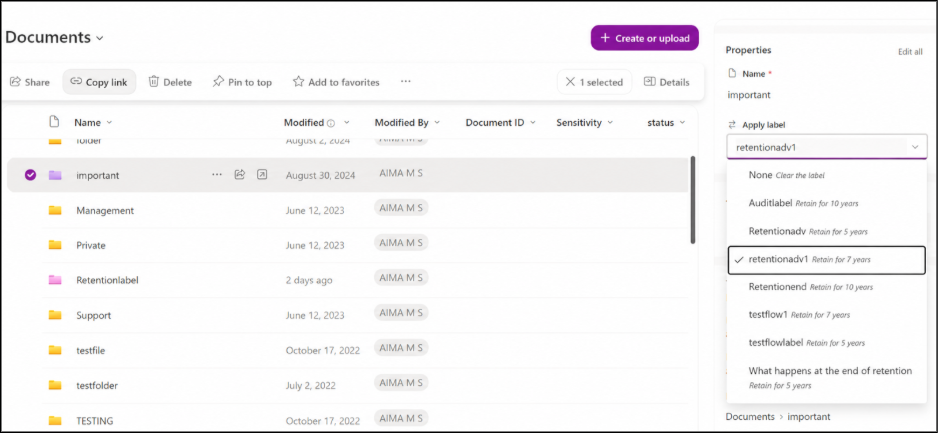
The selected retention label is now applied to the document or folder, and its retention settings will take effect based on the label configuration.
💡Quick Tip:
To make retention labels easier to track, add the Retention label column to your document library view. Go to View options > Edit current view, select the Retention label column, and click OK.
This displays the retention label assigned to each document or folder directly in the library view, making it easier to identify and manage labeled content without opening individual items.
Configure Default Retention Labels for SharePoint Document Libraries
One key capability of retention labels is the ability to apply a default retention label at the SharePoint document library level.
When a default retention label is configured for a document library, the label is automatically applied to all files and folders stored in that library. This helps ensure consistent retention settings without requiring users to manually label each item.
To configure a default retention label for a document library:
- Open the SharePoint site that contains the document library.
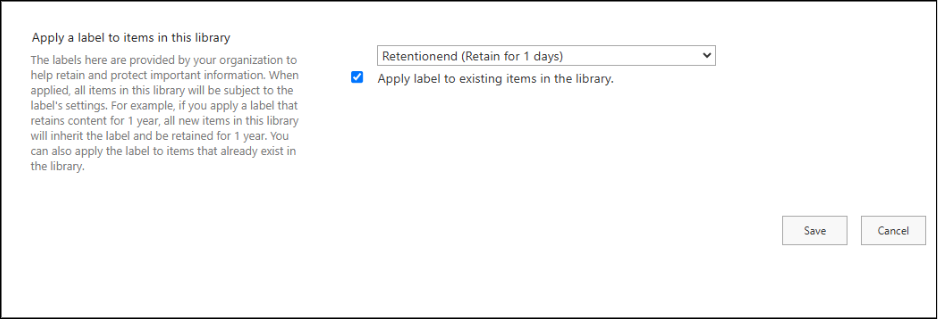
- Select Settings > Library settings > More library settings.
- Under Permissions and Management, select Apply label to items in this list or library.
- Choose the required retention label from the dropdown list.
- Optionally, select the setting to apply the label to already existing items in the library and click Save.
Default retention labels can also be configured in Outlook folders. When combined with Inbox Rules, emails routed into those folders automatically inherit the assigned retention label.
Advanced Retention Label Capabilities
Beyond manual labeling, default labeling, and auto-labeling, retention labels provide several advanced capabilities that help organizations meet complex compliance, records management, and regulatory requirements.
Retention labels can also be used for the following scenarios:
Apply Retention Labels Using Adaptive Protection
Adaptive Protection integrates insider risk signals with Microsoft Purview policies. It can dynamically apply stricter protections to content owned by users who are identified as having elevated risk levels.
For example, if a user is flagged as high risk by Microsoft Purview Insider Risk Management, a stricter retention label is automatically applied to the content they create or modify. If they delete content from SharePoint, OneDrive, or Exchange, it will be retained for 120 days.
This helps organizations preserve potentially important evidence while reducing the need for manual intervention.
Note: These labels are managed by Microsoft Purview and isn’t visible or directly manageable by administrators through the standard retention label interface.
Use Retention Labels with Priority Cleanup
Priority Cleanup in Microsoft Purview helps organizations identify and remove unnecessary content that no longer provides business value. When you create a Priority Cleanup policy, Microsoft Purview automatically configures and applies retention labels to items that match the query conditions you define.
These labels can override existing retention and eDiscovery holds, enabling faster cleanup of targeted content.
This capability is particularly useful when managing large SharePoint, OneDrive, and Exchange environments with significant amounts of aging content.
Use Retention Labels as Conditions in DLP Policies
Retention labels can also act as conditions in Microsoft Purview Data Loss Prevention policies to enforce stricter data protection controls.
For example, admins can configure a SharePoint DLP policy to prevent documents in SharePoint Online from being shared externally if a specific retention label is applied.
This helps organizations combine retention and data protection policies to strengthen compliance and reduce accidental data exposure.
Monitoring Retention Labels in Microsoft 365
After creating and applying retention labels, administrators can monitor their usage in the following ways:
1. Content Explorer in Microsoft Purview
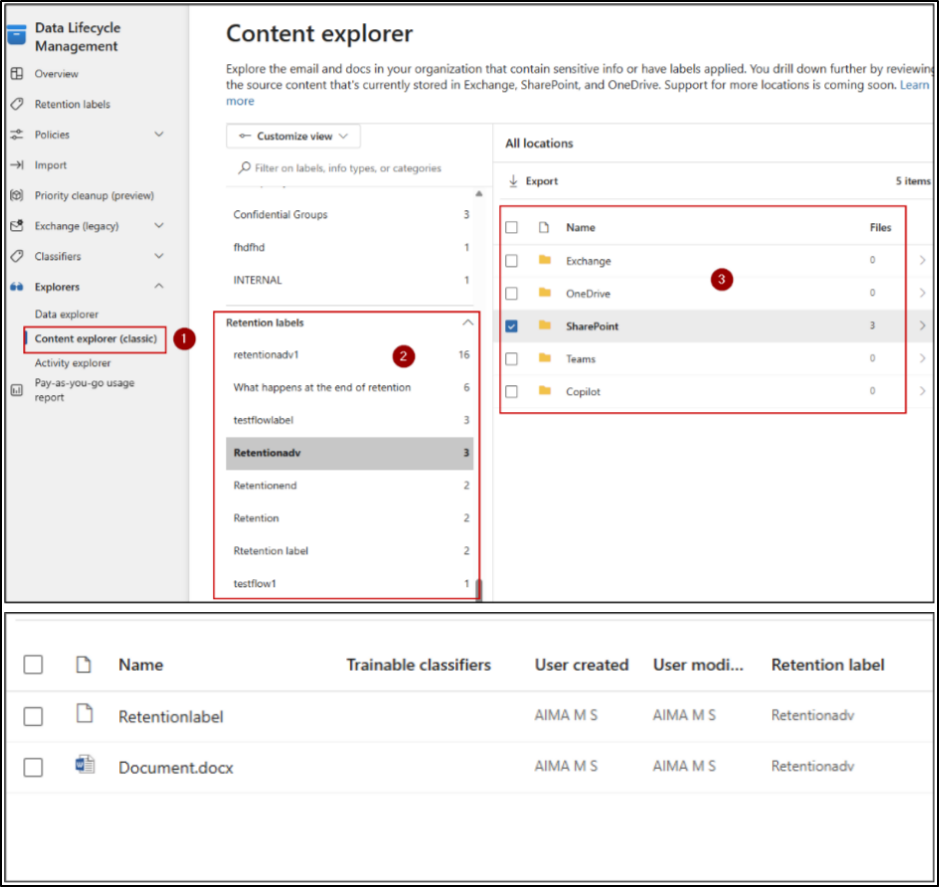
Content Explorer allows administrators to view emails, documents, and other content that have retention labels applied across Microsoft 365 workloads. It also shows details such as the item name, user who created, modified by user, and the retention label assigned.
Go to Data Lifecycle Management → Explorers → Content Explorer (Classic).
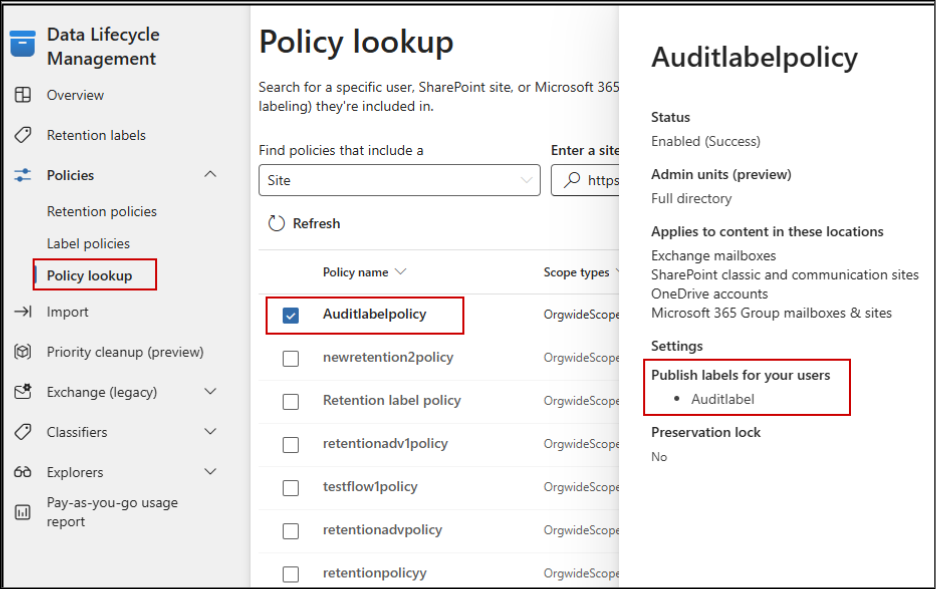
2. Policy Lookup Tool
The Policy Lookup Tool helps administrators determine which retention label publishing policies and auto-labeling policies apply to a specific user, SharePoint site, or Microsoft 365 group. It also provides information such as policy status, scope, and published labels.
Go to Data Lifecycle Management → Policies → Policy Lookup.
3. Find Content with Specific Retention Labels Using Content Search
Content Search allows admins to locate files and emails that have a specific retention label applied across Microsoft 365.
To search for labeled content:
- Go to Solutions → eDiscovery → Content Search.
- Create a New search.
- Select the data sources (locations) you want to search.
- Under Keywords, enter the query: ComplianceTag:”Label Name”. Select Run query.

The search results will display all files and emails that currently have the specified retention label applied. You can also export or download the results for further analysis and reporting.
Common FAQs on Microsoft 365 Retention Labels
Here are some of the most frequently asked questions about Microsoft 365 retention labels:
1. What is the difference between a retention policy and a retention label policy?
A retention policy and a retention label policy serve different purposes:
- Retention policy directly applies retention settings to locations such as SharePoint sites, OneDrive accounts, and Exchange mailboxes.
- Retention label policy publishes retention labels, making them available for users or services to apply to content.
2. What are the precedence rules for retention labels?
When content is subject to multiple retention settings, Microsoft 365 follows these rules to determine which setting takes effect:
- Retention wins over deletion: If one setting retains content and another deletes it, the content is retained.
- Longest retention period wins: If multiple retention settings apply, the content is kept for the longest retention period.
- Retention labels take precedence over retention policies: A retention label applied to an item overrides broader retention policies applied to the container (such as a site, mailbox, or Microsoft 365 group).
- Shortest deletion period wins: If multiple settings require deletion, the content is deleted according to the shortest deletion period.
- Only one retention label can be applied: An item can have only one retention label at a time. Applying a new label manually, through auto-labeling, or by policy can replace the existing label, unless the item is locked as a record.
3. What happens if a file already has a retention label, and a default label is later configured for the document library?
The existing file keeps its current retention label. Default retention labels configured at the folder or document library level apply only to unlabeled content and do not overwrite an existing retention label.
4. What happens when a retention label is applied to a SharePoint folder?
When a retention label is applied to a SharePoint folder, all unlabeled files and subfolders within that folder automatically inherit the label as their default retention label.
5. Can a retention label be included in multiple retention label policies?
Yes. A single retention label can be published through multiple retention label policies.
6. Can an auto-apply retention label policy contain multiple retention labels?
No. An auto-apply retention label policy can apply only one retention label.
7. Can multiple retention labels be applied to the same item?
No. A document, email, or folder can have only one retention label at a time. If multiple conditions match, the oldest label is applied based on retention principles and priority.
8. Can retention labels be managed using PowerShell?
Yes. Microsoft 365 provides PowerShell support for creating, managing, and reporting on retention labels and retention label policies. This can be done through Security & Compliance PowerShell using cmdlets such as New-ComplianceTag, Get-ComplianceTag, New-LabelPolicy, etc.
9. Can a document have both a retention label and a sensitivity label?
Yes. Retention labels and sensitivity labels in Microsoft 365 are independent of each other and can be applied to the same document or email simultaneously. A sensitivity label protects the content, while a retention label governs how long the content is retained and when it can be deleted.
10. Why don’t retention labels appear in Outlook or Outlook on the web for some users?
Retention labels are only displayed in Outlook and Outlook on the web when the user’s mailbox contains at least 10 MB of data. If the mailbox size is below this threshold, the retention labels might not be visible even if they have been published successfully.
11. Retention Policies vs. Retention Labels — which should you use?
It depends on your compliance requirements. Use retention policies when you need broad, location-level retention across mailboxes, sites, or user accounts. Use retention labels when you need granular, item-level control for specific documents, emails, or folders, especially for records management. You can also use both together.
That wraps up the overview of retention labels in Microsoft Purview. Thanks for reading. If you have any questions, suggestions, or need further clarification, feel free to reach out through the comments section.


