On Day 25 of Cybersecurity awareness month, learn to protect your Office 365 suite from credential phishing that uses fake Office 365 sign-in pages. Stay tuned for more blogs in the Office 365 Cybersecurity blog series.
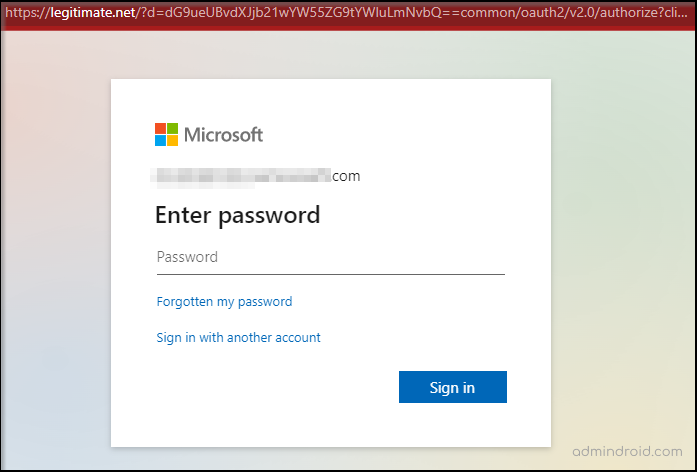
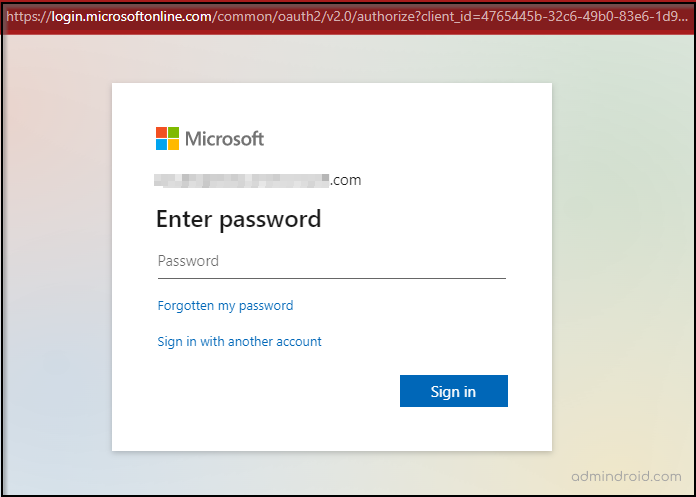
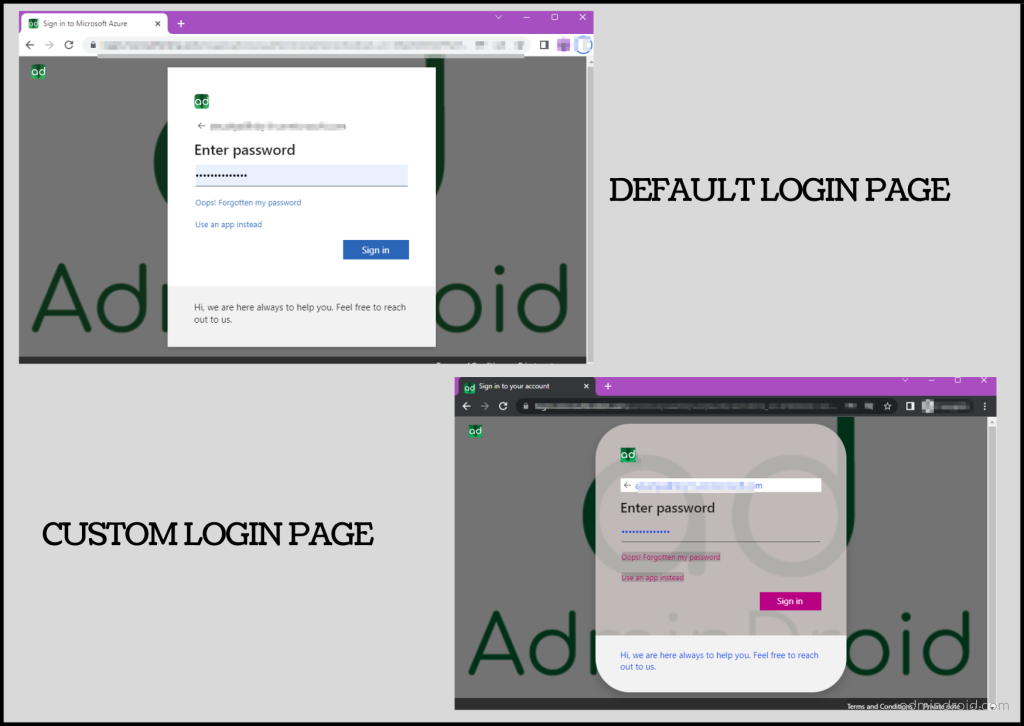
Are there any differences in the above default Microsoft login portals? No, both are legitimate Microsoft login portals with the same user interface, right? Ok then, what about the URL? Ugh! It looks different! 😮 How did you miss the URL? Do you know what will happen if you do not notice these kinds of fake login portals? This is where the hacker’s key play stands!
“Cyber-Security is much more than a matter of IT”
– Stephane Nappo
Exactly! As we all know, fake Office 365 login portals are now so trendy these days. Attackers cleverly use phishing pages with fake sign-ins to fool Office 365 users.
What are the possibilities for fake Microsoft login pages?
Attackers use different phishing strategies to steal Office 365 login credentials and may log into your enterprise. You may think it might be easy to find fake login portals as we are familiar with them. What would you do if you found yourself in the following situations?
- Call for action or threats – Attackers can create a false sense of urgency like ‘Your password is expiring soon’, ‘Click to download invoice’, ‘Action Required’ or other ‘Do it immediately’ actions that reduce our patience and force us to act abruptly.
- Spelling and bad grammar – You can find some misspellings when you are routed from illegitimate links to some websites or pages that require login credentials. However, you will move forward with the actual process without noticing those mistakes.
- Suspicious links – You often see ‘Click here to know more’ links. Sometimes, this may take you to where it requires your credentials for further proceedings. The attackers behind this scam may have set up a fake portal that looks like an office 365 sign-in portal. Your credentials will get compromised as soon as you type and will be redirected to the original portal without any clue.
Do you think the above scenarios make sense? Yes, it is true that these are just a few of the tricks that users fall for when dealing with phishing schemes.
“Think Before you click”
It’s not a cause for concern! There is a simple method to strengthen your security from these types of vulnerabilities encountered through fake Office 365 login portals.
How does Microsoft 365 Company Branding help to mitigate phishing attacks?
Microsoft is the most targeted by phishers and still stands top on the victim’s list amongst all the cloud companies. Most of the attackers try to create fake login pages like a default one. They won’t target specific domains by recreating login pages using their corporate logo and banner. Hence, configuring company branding helps users spot those phishing pages and adds little complexity for attackers to recreate them.
If you are Microsoft 365 Enterprise admin, you can now add your company branding to your Office 365 to protect yourself from those malicious credential phishing attacks. Company branding will appear after entering the username and will be visible only on the password and MFA page.
Configure Company Branding to customize your Office 365 sign-in portal
Follow the steps below to customize your Office 365 login page with your company banner and logo.
1. Sign into the Azure Portal as a Global administrator.
2. Select ‘Azure Active Directory’ and then select ‘Company branding’ under ‘Manage’.
3. Click Configure and provide the below General Settings.
| Language | The language for the first custom branding is your default locale and it can’t be changed. However, you can add a language-specific custom branding once the default sign-in experience has been created. |
| Sign-in page background image | Backgrounds can be set as PNG or JPEG files. It will appear in the center of the browser. Images should not be greater than 1920*1080px and larger than 300 KB. |
| Banner logo | PNG or JPEG can be accepted for banner logos. It will appear on sign-in pages after the user sign-in. The image shouldn’t be larger than 60*280px and larger than 10 KB. Transparent without a padded image is recommended. |
| Username hint | This hint would appear to the user if they forgot their username. This text must be Unicode, without any links or code and can’t exceed 64 characters. This hint will not be shown when guests log in to the portal. |
| Sign-in Page Text | This text will appear at the bottom of the sign-in page. It is additional information such as the phone number or email. This text should not exceed 1024 characters and must be Unicode. To begin a new paragraph, press the enter key twice. You can also change the text formatting by following the below syntax. Hyperlink: [text](link) Bold: **text** or __text__ Italics: *text* or _text_ Underline: ++text++ |
4. Set up Advanced Settings. However, it needs Azure Premium licenses or Office 365 subscription (for Office apps).
- Set the sign-in page background color in hexadecimal format (#000000).
- Then, select the image (should be in PNG or JPEG) for the square logo image. It is used for Windows authentication and is shown only for users who are using Windows Autopilot. Transparent without a padded image is recommended.
- Next, insert the square logo image – dark theme. It will be shown when users are logged in to Office 365 portal in dark mode. If your logo works with white, dark blue, or black, adding this is not needed.
5. Show option to remain signed in – You can uncheck this option if you want your users to log in each time the browser is closed and reopened.
Note: This has been moved to ‘User Settings’.
6. Once you have configured all the options, select Save in the upper-left corner of the portal.
This process will successfully create the first default custom Office 365 branding configuration for your tenant. You can’t remove this branding after once created.
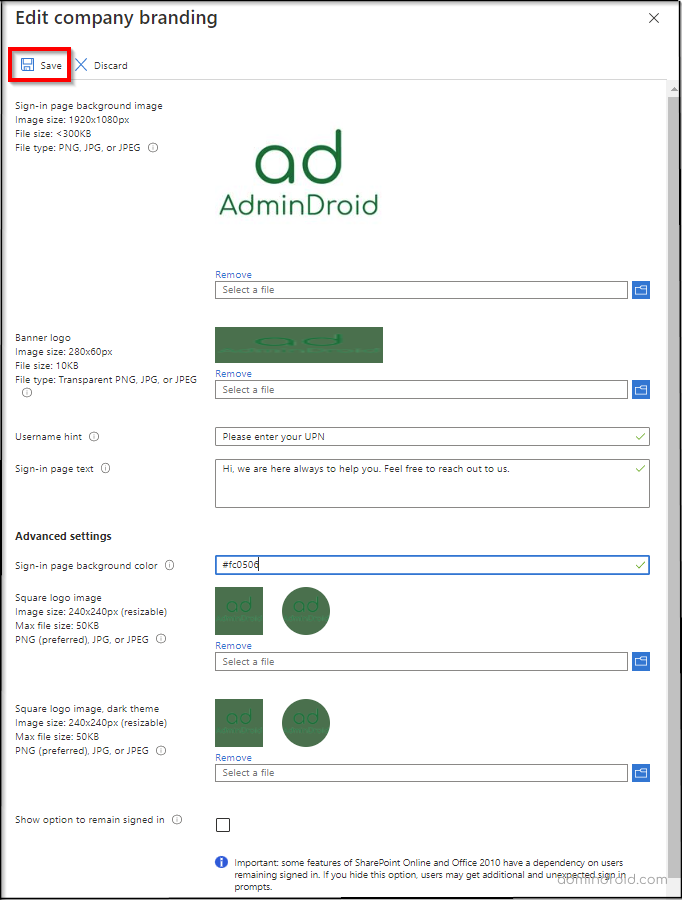
Note: You can also configure language-specific sign-in experience by selecting a ‘New Language’ in the portal. Follow the default sign-in experience steps above to create more brandings in different languages.
Revamp your Microsoft 365 sign-in page with the latest ‘Enhanced Company Branding Experience’ preview!
Incorporating company branding into Office 365 environment can help to enhance the trust and credibility to protect your business and data. Since the Legacy company branding experience had only offered basic customization options, Microsoft recently added a better version of company branding for sign-in experiences.
Yes! The enhanced company branding experience is available as a preview feature now! To opt and explore immediately, navigate to ‘Azure AD > Preview Features’ and enable the Enhanced Company Branding Experience.
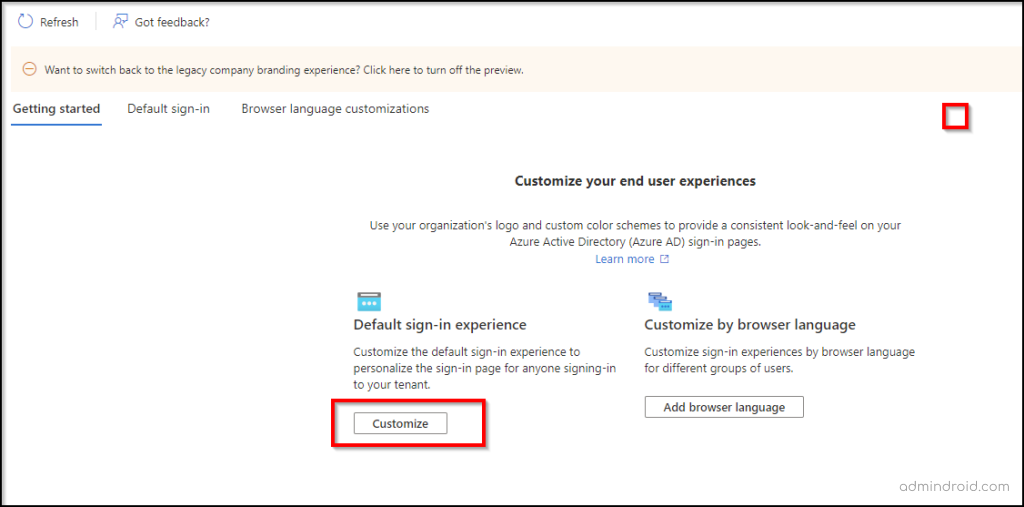
This new design of Microsoft’s company branding provides more flexible and user-centric customization of Microsoft 365 applications.
To make it easier for admins, Microsoft has grouped the sign-in experience into six sections and integrated older settings with new ones. They are categorized as Basics, Layout, Header, Footer, Sign-in form, and Review.
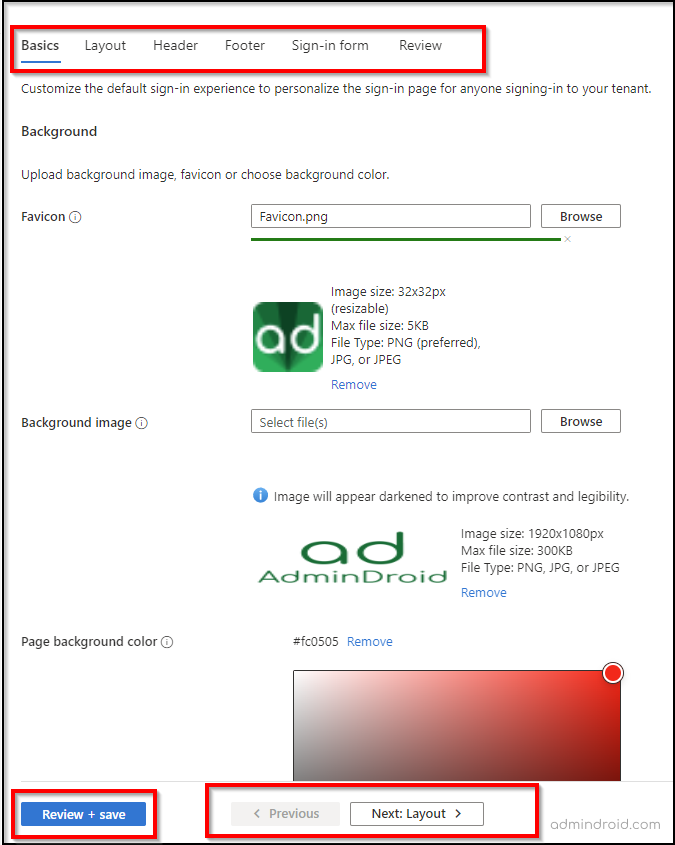
Here are the new enhanced preview settings that are now available to configure Office 365 company branding.
1. Favicon Customization:
A favicon is an icon that is displayed on tabs at the top of a web browser. Favicon must be either PNG or JPG file, not exceeding 5KB or more than 32×32 pixels.

2. Customize using Visual Templates:
Sign-in page can be customized using templates or custom CSS.
- Templates: You can choose any one of the templates, either full-screen or partial-screen background. A full-screen template hides the background image, while a partial-screen template displays the complete background picture.
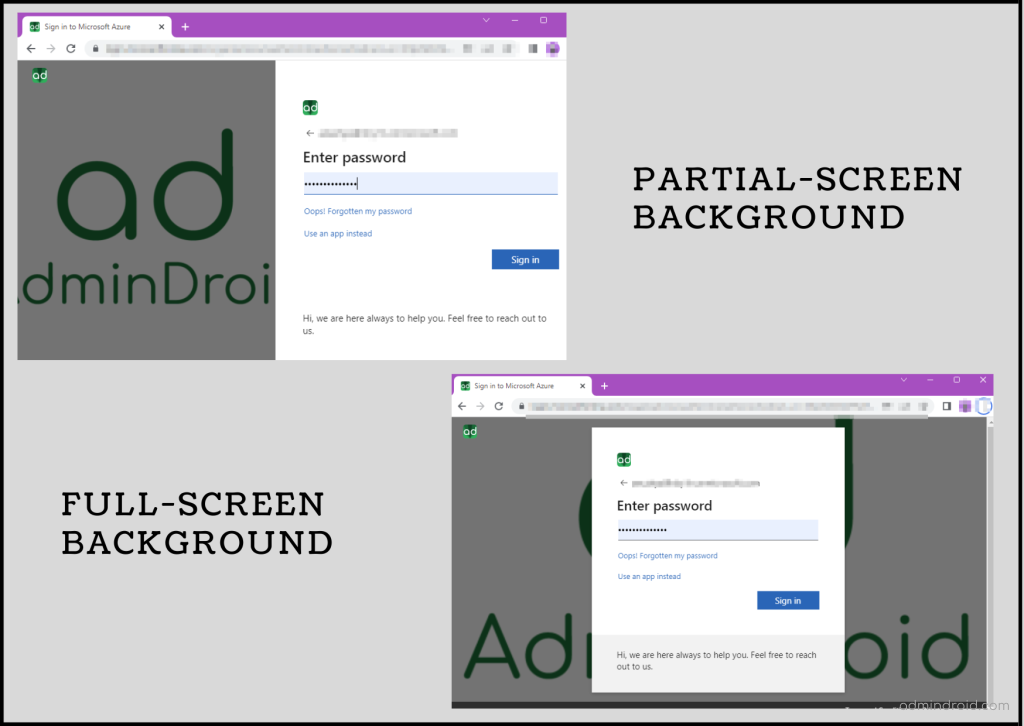
- Custom CSS: You can customize the login page layout based on your preference. Microsoft has provided a CSS template to replace the Microsoft default design. You are allowed to manage different colors, fonts, text size, positioning, screen size and different displays for different devices.
Here is an example of a sample Office 365 login page that you can design to replace the default one.
3. Header Customization:
- Select ‘Show header’ in the ‘Layout’ section to enable the login page header.
- Once enabled, you can upload your logo, image, text, or hyperlinks to display in the sign-in page’s header. The file size should be less than or equal to 10 KB.

4. Footer Customization:
Enable the footer by selecting the ‘Show footer’ in the ‘Layout’ section.
- Show ‘Privacy & Cookies’: It is enabled by default and displays the Microsoft ‘Privacy and Cookies’ link. You can also uncheck this option to hide it.
- Show ‘Terms of Use’: This is also enabled by default and displays the Microsoft ‘Terms of Use’ link.
In addition, you can optionally replace your Display text and URL with the default ones. The below image shows the footer configurations on the Office 365 login page.

5. Self-service password reset:
- Show self-service password reset (SSPR): Select or unselect the check box to configure SSPR on the sign-in page.
- Common URL: If you wish to show the SSPR in the login pages, enter the destination URL for where your users will reset their passwords. This URL appears on the username and password collection screens.
- Account/Username collection display text: Replace the ‘Can’t access your account‘ text with your own custom username collection display text.
- Password collection display text: Replace the ‘forgot password’ text with your own custom password collection text.
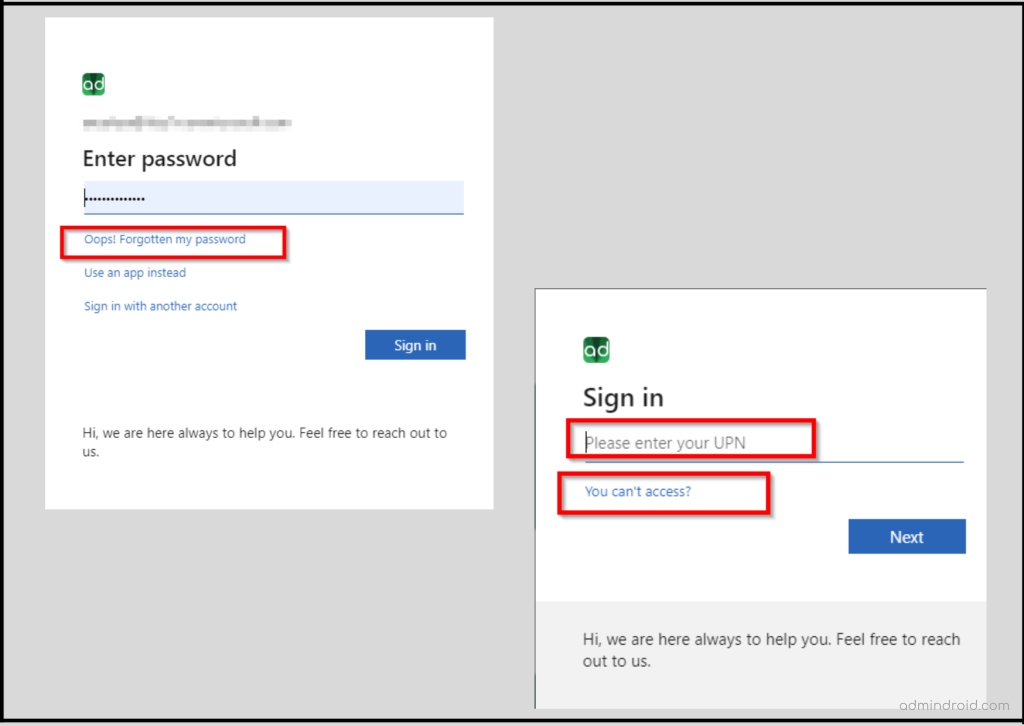
Aside from customizing your Office 365 environment with your company branding, it also minimizes daily phishing attacks that are popping up on the corporate network.
📢Latest Crucial Update: Enforce Least Privilege Access to Authentication UX via Entra ID Company Branding
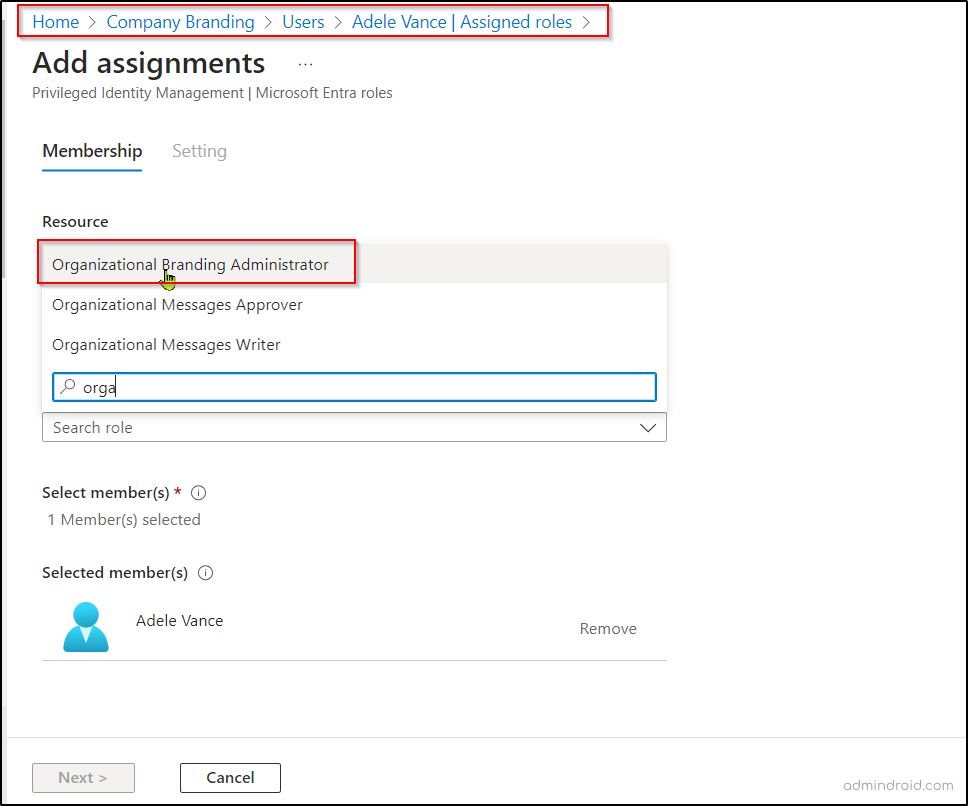
Now, you don’t need global admin permission anymore to customize your company’s branding page. You can give specific users the ability to manage just the company branding.
To assign the role, follow the below steps,
- Login to the Microsoft Entra admin center.
- Under ‘Identity’, navigate to ‘Users’ -> ‘All users’.
- Select and open the user you want to give access to and click the ‘Assigned roles’.
- Click ‘+Add assignments’ and choose the role ‘Organizational Branding Administrator’.
- Once the role is assigned, the user can start customizing and editing the authentication experience using Entra ID company branding.
How to stay safe from Credential Phishing attacks?
As you may be aware, 91% of phishing attacks originate from suspicious emails or vulnerable links. Credential phishing is the most common threat factor used by attackers to gain access to sensitive Office 365 data. If you are an O365 admin more concerned about your organization’s security, check and follow the instructions below to keep your environment safe and secure.
- Monitor the Office 365 sign-ins to detect suspicious logins or unusual logins in different time periods.
- Enable necessary password policies to create strong passwords and allow only safe logins to your O365.
- Don’t forget to confirm whether you have enabled necessary authentication methods like MFA. However, in recent times, attackers can easily bypass MFA with their clever tricks. So, it is highly recommended to enable a passwordless MFA, a secure one.
- Collaborate securely with external companies and partners using Azure B2B collaboration.
- Always stay up to date on security updates and use a firewall to stop suspicious activities.
- Be aware of fake domains such as c-t[.]XYZ, a-c[.]club, etc. and conduct anti-phishing programs regularly to educate employees about current phishing attacks and strategies.
- Fine-tune your phishing protection by following Microsoft Secure Score recommendations to enhance your defenses.
What to do if an account is phished?
If an O365 account has been phished, don’t panic, and take the necessary action to recover the compromised account for safeguarding your organization’s data. Recovering from malicious phishing attacks can be enormously expensive and time-taking. So, don’t wait for it to happen! Be cautious and protect your company from security and reputational damage.
“Be Assured, Be Secured”
Despite the organization’s login page customization, you must track users’ login details to identify any unusual login attempts within Microsoft 365. Unfortunately, native Office 365 tools don’t offer complete capabilities like individual identity, geographical location, and timestamp on all Microsoft 365 services.
One-stop Solution to Monitor Microsoft 365 Login Activities
But don’t despair! AdminDroid will save you from malicious phishing attacks. It offers robust protection by delivering detailed Office 365 sign-in analytics with just a few clicks.
“AdminDroid boasts an enhanced reporting experience that enables you to obtain desired reports quickly and efficiently”.
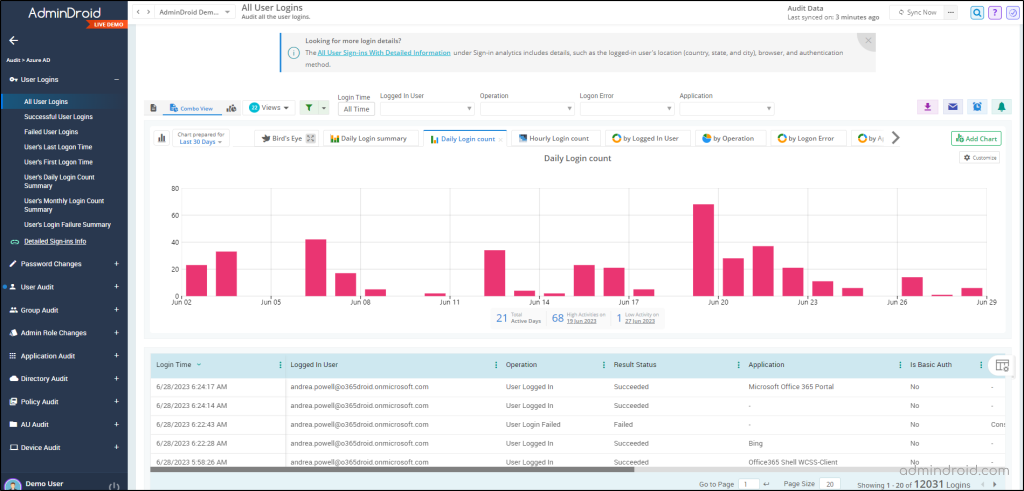
AdminDroid’s Azure AD login reports provide precise analytics that save your time when looking for a user’s login history. It allows you to check users’ previous login history for any specific period since AdminDroid Azure AD monitoring tool retains the data indefinitely after connecting your M365 tenants.
Here’s an intriguing question! Do you believe that you can access these statistics simply by linking your tenant with AdminDroid at no cost?
Indeed, AdminDroid offers 120+ free Azure AD reports along with users’ login details right off the bat and provides a better path to efficient Azure AD management.
It has dedicated sign-in analytics reports where you can easily get critical details, such as login location, devices, applications, logged-in time, etc. Also, it offers clear statistics about the logged-in user’s multi-factor authentication (MFA) status.
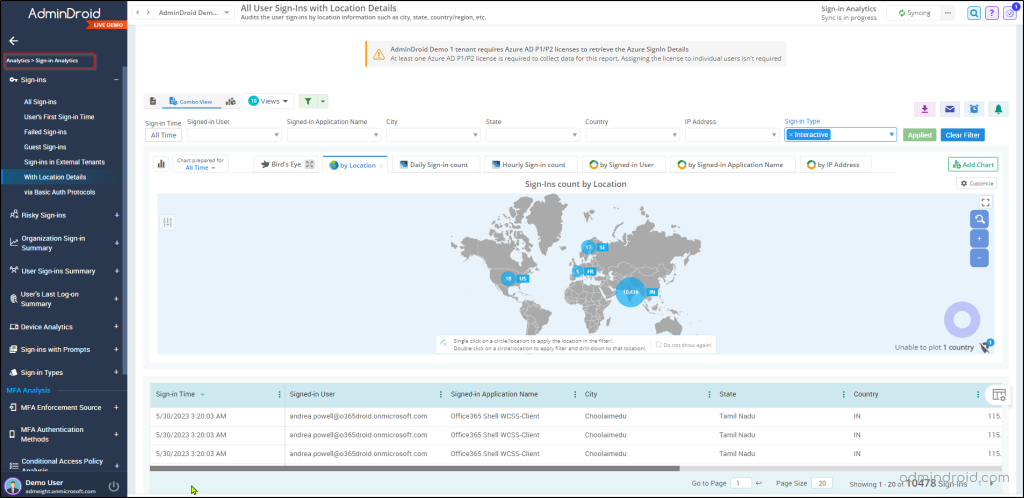
With visually engaging dashboards for each service, you’ll gain a comprehensive overview of all Microsoft 365 activities, enriched by a suite of exceptional features such as advanced filtering options, granular delegation, advanced alerts, scheduling, etc.
No need to search for the best Microsoft 365 reporting solution anymore! Download and install AdminDroid and explore the functionalities it offers!
I hope this blog will find you one more way to enhance your security shields towards suspicious security attacks. Stay tuned for more O365 security instructions!
Don’t forget to post your thoughts or suggestions in the comment section. It will greatly help us to fulfil your requirements in the future.


