When an admin permanently deletes objects like a user account, group, or application in Microsoft Entra ID, the impact can be huge. Because once deleted, these objects are gone for good and there’s no way to restore them, putting your organization at immediate risk of data loss. In some cases, entire teams could be locked out, causing serious disruptions to daily operations. That’s why it’s crucial to put measures in place to prevent such irreversible damage.
In this blog, we’ll explain why it’s important to manage object deletions in Microsoft Entra ID and how protected actions can safeguard your directory from permanent data loss.
What are Objects in Microsoft Entra ID?
In Microsoft Entra ID, objects are the individual items that represent resources or entities within the directory. It includes all the directory entities that store information about your users, apps, and resources. Some common object types are:
- Users: Accounts for employees, guests, or service accounts.
- Groups: Security groups, Microsoft 365 groups, and distribution lists.
- Devices: Registered or joined devices like laptops, mobiles, or VMs.
- Applications (Service Principals): App registrations or enterprise applications.
- Roles and Administrative Units: Entities defining access and boundaries.
Each object is uniquely identified by an Object ID (GUID) in Microsoft Entra ID.
How Directory Object Deletion Works in Microsoft Entra ID?
Microsoft Entra ID allows directory objects to be deleted in two ways: soft deletion and hard deletion. When an object is soft deleted, it is preserved in the recycle bin for 30 days along with its property values. Soft-deleted accounts may still be needed for security investigations. However, sometimes these accounts are permanently deleted from the recycle bin by mistake. Once an object is hard deleted, either manually or after the retention period, it is permanently removed and cannot be recovered. If permanent deletion happens by mistake, those users will be completely removed.
For example, if a user account involved in a security breach is hard deleted before the investigation is complete, all related sign-in logs and linked data could be lost forever. This makes it harder to trace malicious activity and close security gaps.
Now, let’s see how you can prevent the hard deletion of objects in Entra ID.
How to Prevent Permanent Deletion of Entra ID Objects?
To stop objects from being permanently deleted in Microsoft Entra ID, you can use protected actions. These actions ensure that sensitive operations, such as permanently deleting objects, can only be performed when certain conditions are met.
Protected Actions in Microsoft Entra ID
Protected actions in Microsoft Entra ID refer to permissions that are enforced through Conditional Access policies.
It works by first creating a Conditional Access authentication context, then assigning it to a Conditional Access policy, and finally linking that policy to the permission you want to protect 🔐.
This ensures that the object cannot be hard deleted without meeting the conditions you set.
Unlike typical Conditional Access policies, these protections are enforced at the time the protected action is performed and not during sign-in or role assignment. This means protection applies consistently, regardless of the role used or how the user was granted permission.
You can further strengthen security by requiring advanced MFA methods such as passwordless MFA or phishing-resistant MFA for these actions.
Prerequisites to Configure Protected Actions in Entra ID
To add or remove protected actions, you need:
- A Microsoft Entra ID P1 or P2 license
- Conditional Access Administrator or Security Administrator role
How to Use Protected Actions to Prevent Hard Deletions in Entra ID?
To configure protected actions in Entra ID, follow these steps:
Note: These steps must be performed in this sequence to ensure protected actions are configured and enforced correctly. Skipping the order can lead to unexpected behavior, such as repeated reauthentication prompts.
Now, let’s look at each step in detail.
1. Configure Conditional Access Policy for Protected Actions in Entra ID
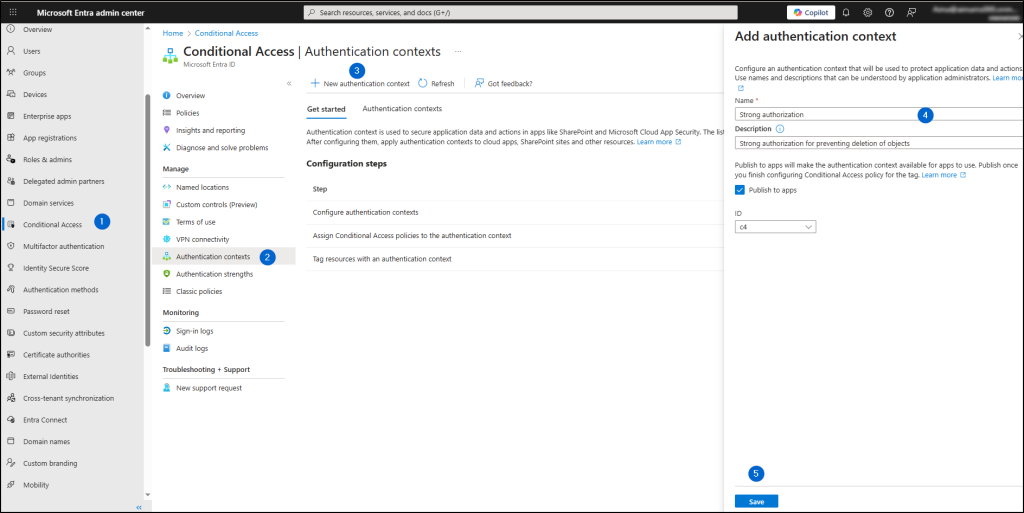
- Sign in to the Microsoft Entra admin center.
- Go to Conditional Access -> Authentication contexts.
- Click ‘New authentication context’ and provide a name and description.
- Save the configuration.
- Now, navigate to the ‘Policies’ tab and create a new Conditional Access policy.
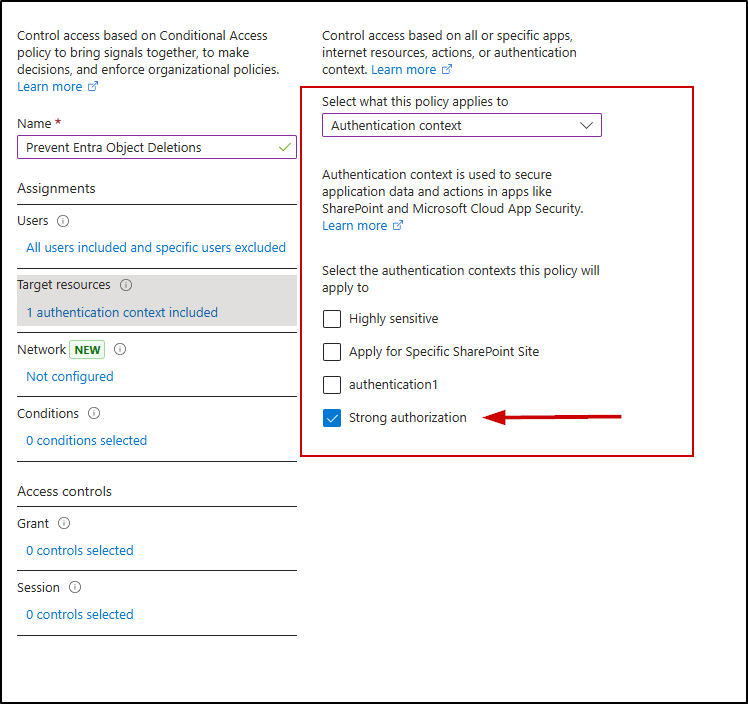
- Provide a name for the policy.
- Under ‘Assignments’, include all users and exclude any admins you don’t want this policy to apply to.
- In ‘Target resources’, from the ‘Select what this policy applies to’ dropdown, choose Authentication context.
- Under ‘Select the authentication contexts this policy will apply to,’ select the authentication context you created in the previous step.
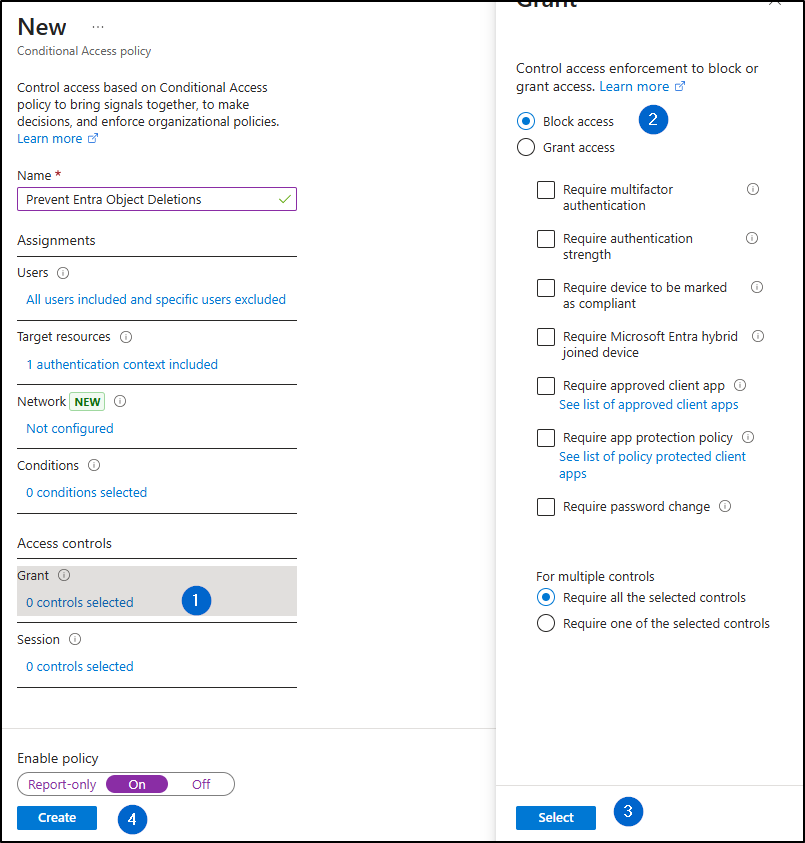
- Under Grant, select ‘Block access’.
- Turn the policy on and click ‘Create’ to finish creating the policy.
2. Add Protected Actions in Entra ID
Next, we need to add the protected action to secure the required permission. To do this, link the Conditional Access policy you created using authentication context to one or more permissions.
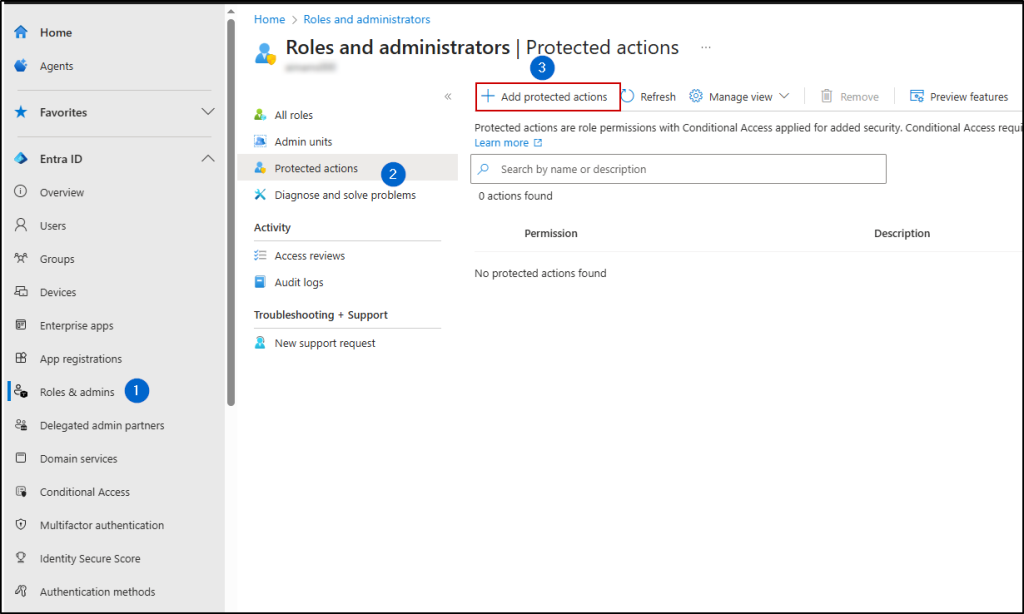
- Go to Roles & admins -> Protected actions.
- Click ‘Add protected actions’.
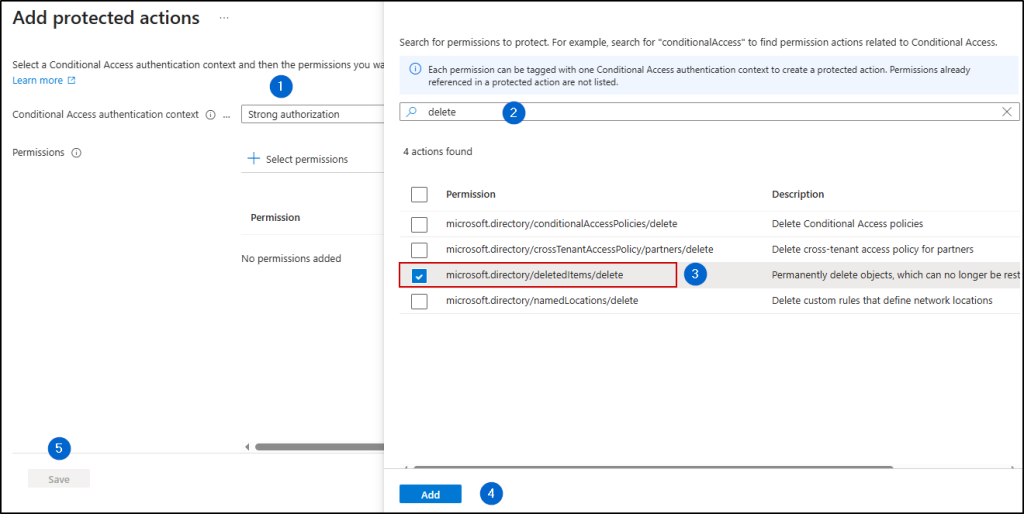
- In the ‘Conditional Access authentication context’ dropdown, select the authentication context you created in the previous steps.
- In the ‘Permissions’ dropdown, search for and select ‘microsoft.directory/deletedItems/delete’.
- Click ‘Add’, then ‘Save’.
You have now successfully added the protected action for the selected permission.
3. Test Protected Actions in Entra ID
Now that we’ve configured protected actions in Entra ID, it’s important to test if they’re working correctly.
- Log in using an admin account that was included in the Conditional Access policy.
- Navigate to Entra admin center -> Users -> Deleted users.
- Select any deleted user and click ‘Delete permanently’.
- Confirm by clicking OK.
You should see the following error:
“Failed to permanently delete user. Insufficient privileges to permanently delete the selected users.”
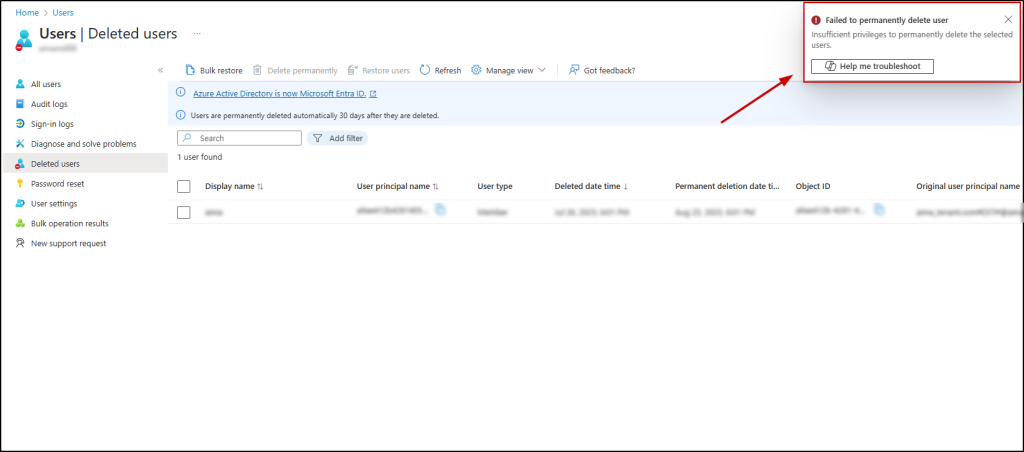
This confirms that the protected actions are configured correctly and are preventing accidental or unauthorized permanent deletions of Entra ID objects.
Troubleshooting Protected Actions in Microsoft Entra ID
If a user is not prompted for action even after adding a protected action, you can use the following tools to verify and troubleshoot your Conditional Access policies:
- What If tool helps you verify if a user is assigned the policy. Select the user and the authentication context linked to the protected action, then run ‘What If’ to see if the expected policy is listed.
- Conditional Access Optimization Agent identifies missing coverage or conflicts in your Conditional Access policies.
- Conditional Access insights and reporting workbook provides detailed visibility into policy assignments, evaluation results, and sign-in activity to help you pinpoint issues and ensure proper enforcement.
We hope this blog has given you clear insights into how to prevent accidental permanent deletion of Entra ID objects using protected actions. Thanks for reading! Feel free to reach out through the comments section if you have any questions.


