On Day 2 of Cybersecurity Awareness Month, discover how to maximize your Microsoft Secure Score. Stay tuned for security tricks and more blogs in the Microsoft 365 Cybersecurity blog series, where we’ll share insights to strengthen your defenses.
One key feature in this journey is Microsoft Secure Score, a metric that helps measure and improve your security posture. Included with your Microsoft 365 subscription, it provides recommendations to strengthen your security. Admins continuously implement these recommendations to improve their Secure Score, understanding that:
“Cybersecurity is a continuous cycle of protection, detection, response, and recovery.” – Chris Painter
With so many recommendations available, the real challenge lies in identifying the ones that will have the greatest impact on both your Secure Score and overall security framework.
In this blog, we’ll explore the top configurations that not only increase your Secure Score but also strengthen your overall Microsoft 365 security. Let’s dive in and discover which settings make the biggest difference!
3 Must-Implement Microsoft Secure Score Recommendations
Curious about which recommendations provide the highest impact? Here are the top three configurations to prioritize:
- Enable multi-factor authentication (MFA) for all users
- Enable MFA for Microsoft 365 admin roles
- Create Safe Link policies in Microsoft 365 Defender
Where to Find These Secure Score Recommendations?🤔
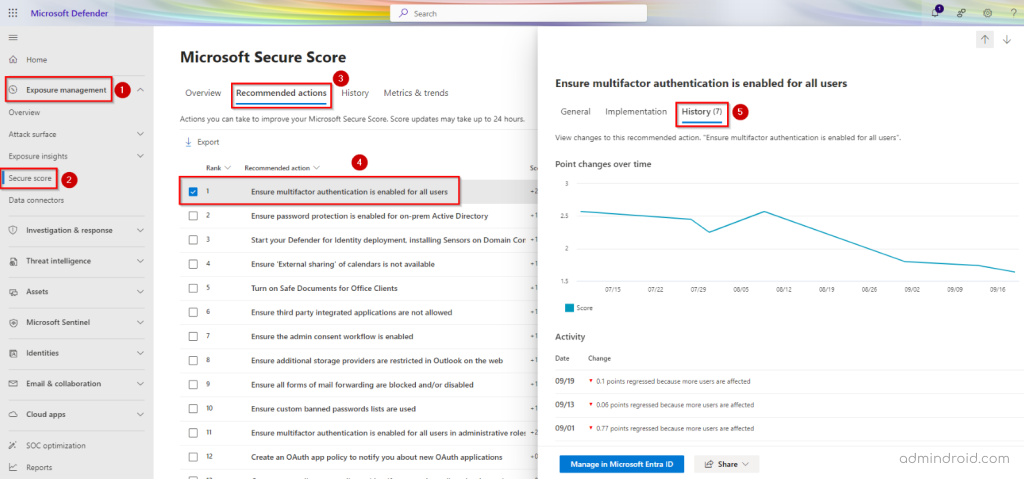
You can easily locate and act on these recommendations within Microsoft 365 Defender. Use the following path to navigate and review the above recommendations:
Microsoft Defender → Exposure Management → Secure Score → Recommended actions
1. Enable Multi-factor Authentication for All Users
Multi-factor authentication (MFA) is a highly effective way to protect user accounts, blocking 99% of attacks like phishing, brute force, credential stuffing, etc. By requiring a second form of verification, MFA ensures that even if a password is compromised, unauthorized access is prevented.
Because of its critical role in security, Microsoft recommends enabling MFA for all users. Not only does it strengthen account security, but it also adds 9 points to your Microsoft Secure Score, making it a key step in safeguarding your organization. Recognizing its importance, Microsoft is now making MFA mandatory for all Azure users, treating it as an essential tenant-level security measure.
How to Enable MFA for All Users in Microsoft 365?
Admins can configure MFA for all Microsoft 365 users using security defaults or Conditional Access policies in Microsoft Entra ID. For larger organizations, consider a phased rollout to ensure a smooth transition. And don’t settle for weak MFA—opt for more stronger, phishing-resistant MFA methods to implement more secure authentication and fully protect your users.
Key takeaway💡: Microsoft not only recommends actions but also demonstrates their impact, so that you can make better decisions on implementing them effectively. After performing a recommended action, you can easily track your Secure Score improvement by verifying the changes in the ‘History’ tab. This helps you see how each step boosts your security.
2. Enable Multi-factor Authentication for Microsoft 365 Admin Roles
Despite recommending MFA for all users, Microsoft specifically emphasizes enabling it for admin roles. Because, admin accounts have elevated privileges, granting access to critical systems, security settings, and sensitive data. This makes them prime targets for attackers. While the roles stay constant, the users assigned to them often change. This increases the risk that new admins may not have the necessary security measures in place.
That’s why Microsoft strongly advises enabling MFA for admin roles. From overseeing operations to fortifying security, admins handle it all—so protecting their accounts is essential to prevent widespread damage. Microsoft even assigns the highest value of 10 points for this recommendation, highlighting its importance as one of the most impactful steps to increase your Secure Score.
How to Enable Multi-factor Authentication for Admin Roles Using CA Policies?
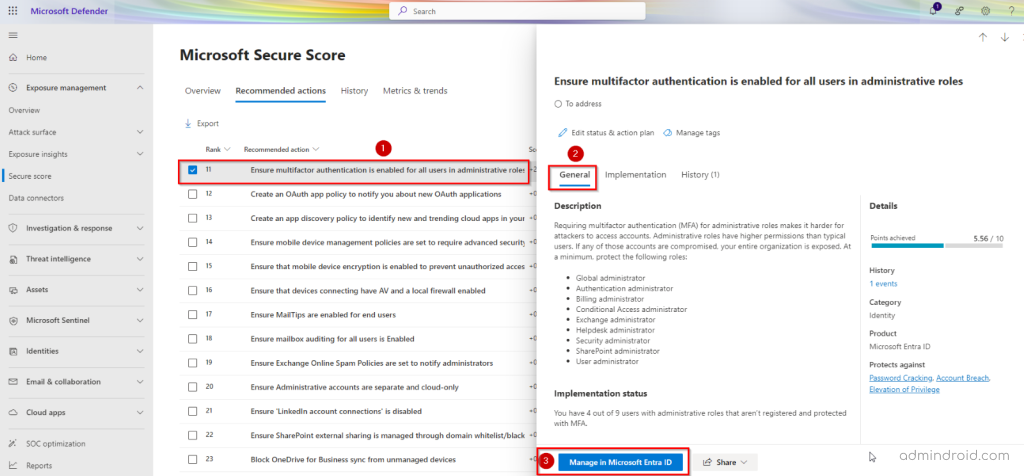
- Head over to the secure score recommendation page and find “Ensure multifactor authentication is enabled for all users in administrative roles”.
- Simply click the ‘Manage in Microsoft Entra ID’ button under the General tab to configure MFA for admin roles.
- This will take you to the Conditional Access page where you can begin the setup.
Not sure how to proceed? Follow the steps below to require MFA for admin roles with Conditional Access.
- Open the Conditional Access page in the Microsoft Entra admin center.
- Click ‘Create New Policy’ and give it a meaningful name.
Assignments:
- In the Assignments section, select Users. Under Include, choose Select users and groups and then select Directory roles.
- Search for and select the relevant administrator roles. Please note that the Conditional Access policies only apply to built-in roles, not administrative unit-scoped or custom roles.
- Under Exclude, select Users and groups and specify the break-glass accounts in your organization.
- In Target resources > Cloud apps > Include, select All cloud apps.
Access Controls:
- In the Access Controls section, select Grant.
- Check the box for Grant access and select Require multi-factor authentication.
- Click Select.
Session Controls:
- In the Session panel, set Sign-in frequency to Every time.
- Click Select.
Review and Enable:
- Review your policy settings and enable the policy in Report-only mode.
- Click Create to finalize the policy.
Note: To implement this Secure Score recommendation, you need Microsoft Entra ID Premium P2. After verifying the policy in Report-only mode, switch it from ‘Report-only’ to ‘On‘ to activate it.
3. Create Safe Links Policies for Email Messages
Safe Links in Microsoft 365 Defender offers time-of-click protection against malicious URLs, which are commonly used in phishing attacks. When users receive emails with links, Safe Links automatically scans the destination URLs to block access to harmful sites. This proactive layer of security helps prevent users from inadvertently accessing dangerous websites.
Implementing Safe Links policies is a key Microsoft Secure Score recommendation, offering 9 points. By reducing the risk of malware and credential theft, Safe Links plays a vital role in strengthening your organization’s security.
How to Create Safe Link Policies for Email Messages in Microsoft 365?
To get started with configuring Safe Links, follow these steps in Microsoft 365 Defender.
- Sign in to Microsoft 365 Defender and open the ‘Email & Collaboration‘ dropdown.
- Then select ‘Policies & Rules‘ and navigate to ‘Threat Policies > Policies > Safe Links’.
- Click Create, then enter a name and description for the policy. Click Next.
Users and domains:
- Include Users, Groups, and Domains: Search for and select users, groups, and domains to include in the Safe Links policy according to your preferences.
- Exclude Users, Groups, and Domains: Check the ‘Exclude these users, groups and domains’ option to remove specific entities from the Safe Links policy coverage.
URL & click protection settings:
- On: Safe Links checks a list of known, malicious links when users click links in email. URLs are rewritten by default: Ensures all links are checked against a database of known malicious links, with URLs rewritten for security.
- Apply Safe Links to email messages sent within the organization: Extends Safe Links protection to internal emails, enhancing security within your organization.
- Apply real-time URL scanning for suspicious links and links that point to files: Enables real-time scanning to detect suspicious or malicious links before they are accessed.
- Wait for URL scanning to complete before delivering the message: Holds emails until URL scanning is complete, ensuring safety before delivery.
- Do not rewrite URLs, do checks via Safe Links API only: Optionally perform URL checks using the Safe Links API without rewriting URLs.
Note: Safe Links protection can also be extended to Microsoft Teams and Office Apps. Additionally, you can customize your click protection settings under this page.
Notification Settings:
- Select either ‘Use the default notification text’ or ‘Use custom notification text’ based on your preference. Click Next.
- Finally, review all settings and click Submit to activate your Safe Links policy.
In conclusion, by implementing these 3 recommendations, you can increase your Microsoft Secure Score by an impressive 28 points. We hope this guide has given you the confidence to maximize your secure score. If you have any questions or need further clarification, drop a comment below—we’re here to help you secure your Microsoft 365 environment! 😉


