When a SharePoint site relies on a single owner, the departure of that user can result in an ownerless site that continues to remain active. While admins previously had to manually identify these sites, SharePoint Advanced Management addresses this through site ownership policy feature. It automatically detects sites with insufficient owners and notifies the selected recipients to take action. This blog walks through how to configure the site ownership policy to maintain ownership across all sites.
When offboarding a Microsoft 365 user, IT teams typically focus on tasks like disabling the user account, revoking sessions, recovering devices, removing site permissions, etc. However, they often overlook SharePoint site ownership during the process. In some cases, a SharePoint site may have only one site owner/admin. If that user leaves the organization without transferring ownership, the site remains active without a responsible owner or admin.
Earlier, admins had to manually verify whether the sites had the required owners or admins, often leading to some orphaned sites being missed. This is where SharePoint site ownership policy helps. It automatically identifies sites that don’t have the required number of owners/admins and notifies the designated recipients to take action. In this blog, we’ll show you how to configure a site ownership policy in SharePoint Online to maintain proper site ownership.
What Happens When a SharePoint Site Owner Leaves Company?
In SharePoint Online, site owners and admins manage permissions, control access, and maintain the site. When the last owner or admin leaves the organization without transferring ownership, it results in an orphaned site. While the site continues to exist and remains accessible, it can no longer be properly managed or governed. Here are some common issues that arise when a SharePoint site does not have an owner:
SharePoint access requests go unanswered — Users requesting access to a site or files within it may face delays because no active owner/admin is available to approve requests.
SharePoint site permissions can’t be managed — Without an active owner, there may be no one responsible for reviewing and managing SharePoint permissions, external sharing settings and guest access. This can increase the risk of unauthorized access to sensitive data.
Site settings and administration become inaccessible – Some administrative activities including storage management, site customization, and hub association changes, may be stalled.
Stale SharePoint sites continue to exist – Without an owner to review or decommission the site, outdated and unused SharePoint sites accumulate over time.
No accountability for the site lifecycle – Nobody is responsible for deciding whether the site should be archived, deleted, or retained.
All these risks share one common root cause — no one owns the site. SharePoint site ownership policy helps prevent orphaned sites by ensuring every site has designated owners to manage access and governance.
What is Site Ownership Policy in SharePoint Online?
Now, let’s briefly understand the site ownership policy and how it helps remediate orphaned SharePoint sites.
The site ownership policy is an opt-in feature available in SharePoint Advanced Management.
It is part of the SharePoint Online site lifecycle management and helps improve governance across sites.
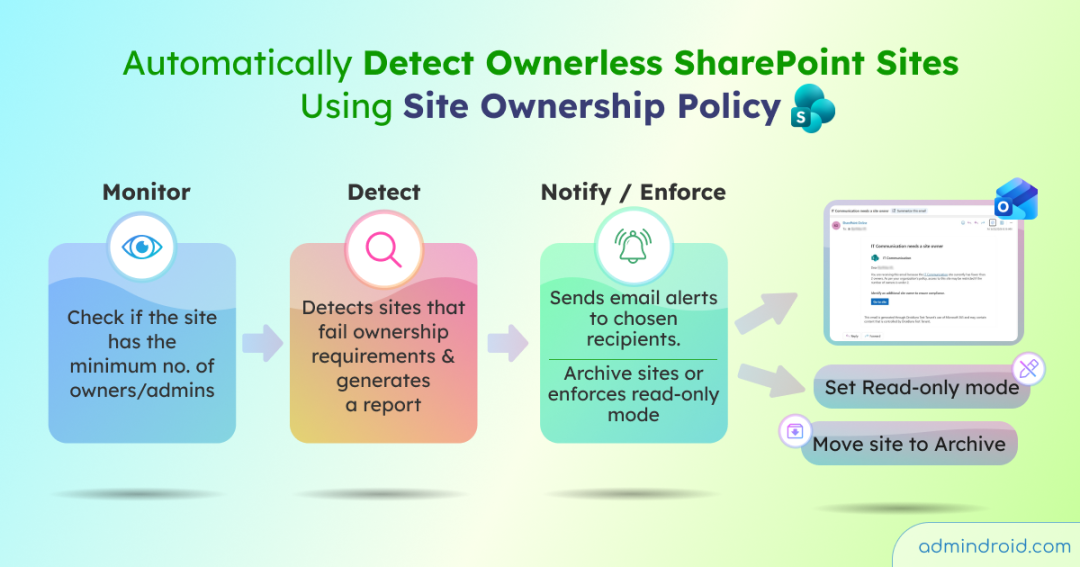
This policy continuously monitors SharePoint sites and identifies those that do not meet the configured ownership requirements. When a site is flagged as non-compliant due to insufficient owners or admins, it automatically sends email alerts to designated recipients.
The policy works in three key stages:
Lets admin define ownership responsibilities for each site.
Enforces a minimum number of SharePoint site owners and admins.
Sends recurring notifications every 30 days for sites flagged as non-compliant until ownership requirements are satisfied.
This compliance cycle recurs every 30 days, re-evaluates sites, and sends notifications until each site meets the required ownership criteria.
How the SharePoint Site Ownership Policy Works?
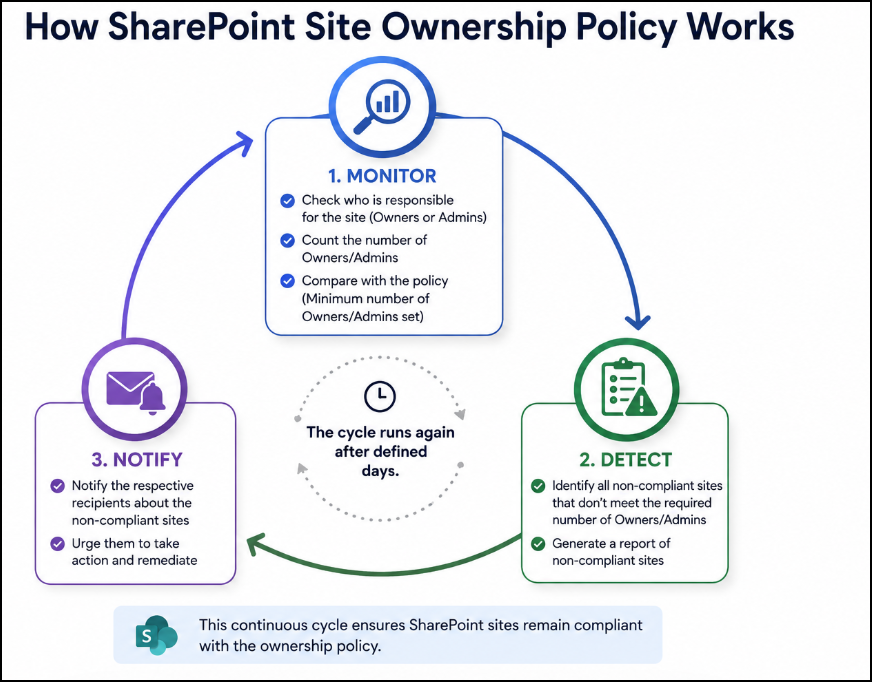
The SharePoint site ownership policy workflow is simple. Here’s how the process works:
Once the policy is created, it starts monitoring the selected SharePoint sites based on the configured scope.
The policy checks whether each site has the minimum number of site owners or admins defined in the policy.
If a site does not meet the required ownership criteria, the policy marks the site as non-compliant and prepares a non-compliance report.
Then, the policy triggers notifications to the selected recipients based on the selected policy mode.
Simulation mode: The policy generates reports and policy insights in the SharePoint admin center, but does not send notification emails.
Active mode: The policy generates reports in the SharePoint admin center and sends email notifications to selected recipients along with the SharePoint site link.
The policy re-evaluates sites in recurring compliance cycles.
Every 30 days, the policy rechecks sites and sends notifications until ownership requirements are met.
In short, the SharePoint site ownership policy workflow looks like this:
Why Site Ownership Policy is Better Than Traditional Ownership Management
Now that we’ve seen how the site ownership policy works, let’s compare it with traditional approaches used to manage SharePoint site ownership.
Admins typically rely on manual methods to find ownerless SharePoint sites. For example, admins review ownership details manually from the Active Sites page in the SharePoint admin center. However, this requires checking sites one by one, which can be time-consuming.
Another common approach is using the Get-SPOSite PowerShell cmdlet to identify sites without owners.
However, both approaches require continuous manual effort and do not scale well in larger environments. The table below compares manual and automated approaches to SharePoint site ownership management.
Aspect
SharePoint admin center
PowerShell
Site ownership policy
How it works
Admins manually check each site one by one to verify the presence of site owners or admins.
Run Get-SPOSite cmdlet to retrieve ownership information across sites.
Automatically scans all sites in scope and identifies non-compliant sites.
Effort
High effort due to manual site-by-site review.
Medium effort with script execution and result analysis.
Low ongoing effort after initial configuration.
Scalability
Time-consuming and difficult to scale across large tenants.
Moderately scalable using bulk reporting (e.g., CSV export).
Highly scalable across thousands of sites.
Notifications
No built-in ownership monitoring notifications.
Schedule PowerShell scripts with Task Scheduler for automated execution.
Built-in recurring notifications for non-compliant sites.
Reporting
No dedicated ownership compliance reporting.
Custom reporting through PowerShell exports (e.g., CSV)
Built in reports generated after each policy evaluation.
Compared to manual reviews and PowerShell-based tracking, site ownership policy provides continuous monitoring, recurring notifications, and built-in reporting to help maintain ownership compliance across SharePoint sites.
Prerequisites to Create a Site Ownership Policy
To set up a site ownership policy in SharePoint admin center, you must have the following pre-requisites.
Role requirements: You must have at least SharePoint Administrator and the SharePoint Advanced Management Administrator roles.
License requirements:
You must have one of the base licenses:
Office 365 E3, E5, or A5
Microsoft 365 E1, E3, E5, or A5
Additionally, you need one of the following:
Microsoft 365 Copilot license (at least one user), or
SharePoint Advanced Management Plan 1 add-on
How to Create a Site Ownership Policy in SharePoint Admin Center?
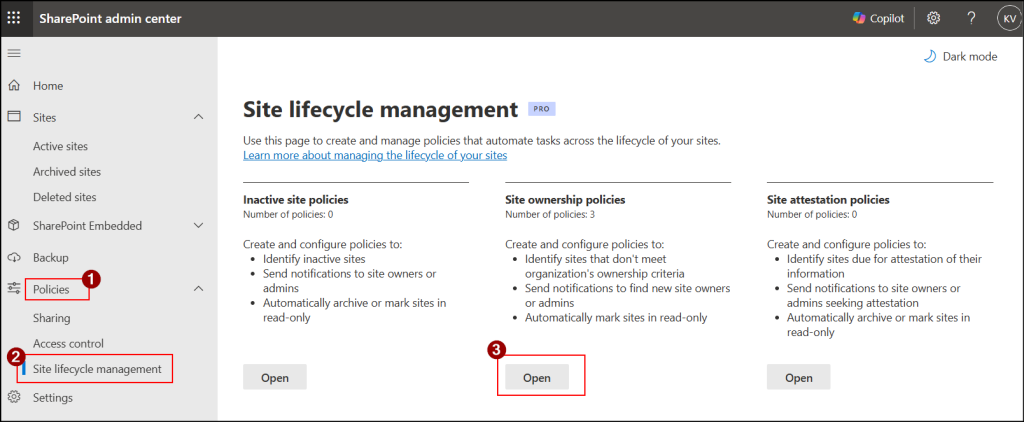
Once the prerequisites are in place, you can create a SharePoint site ownership policy using the following path.
Navigate to Policies → Site lifecycle management → Site ownership policies and click Open.
Click + Create policy. On the Overview page, review how the policy works. Click Next, and then follow the steps outlined below.
Step 1: Configure the Scope of the Site Ownership Policy
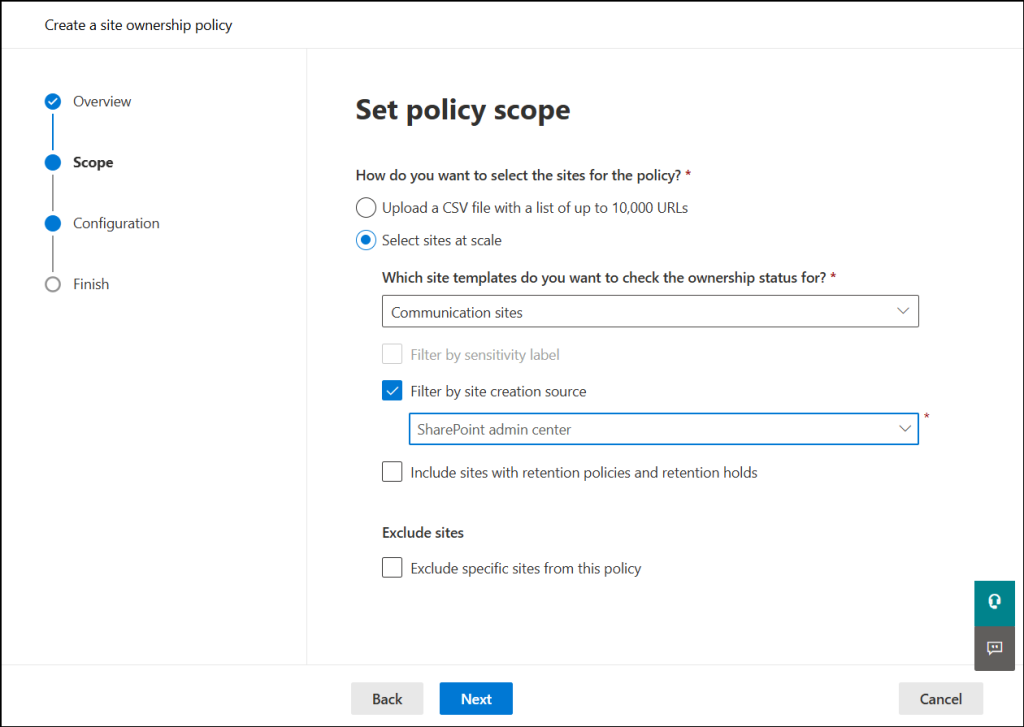
The first step in the configuration process is to define the scope of the SharePoint site ownership policy. The site scope determines which sites are evaluated, not which sites will receive ownership changes. To set the scope in the site ownership policy, follow the steps below:
You can choose from the following options and click Next.
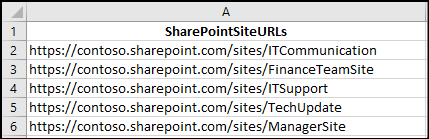
Upload a CSV file with site URLs
Select sites at scale using filters and templates
Upload a CSV file with a list of up to 10,000 URLs: This option allows you to manually define the scope by uploading a CSV file containing site URLs. You can include up to 10,000 site URLs per file, as shown in the image below.Once the CSV file is ready, navigate to the Upload CSV file with URLs field, enter the file path or browse to select the file.
Select sites at scale: This option lets you include sites dynamically using filters.
First, choose the site template such as Communication sites, Teams sites, etc. Then apply additional filters to narrow down the scope further, including sensitivity labels, SharePoint site creation source, Microsoft 365 retention policies, and retention holds.You can also exclude specific sites, with a limit of up to 100 site exclusions per policy. Note: OneDrive sites, sites created by system users, app catalog sites, root sites, home sites, and tenant admin sites are excluded.
Step 2: Define the Configuration Elements for the Site Ownership Policy
After selecting the SharePoint sites to monitor, the next step is to configure how the policy should detect and handle non-compliant SharePoint sites. In the Configure policy page, you can define key settings for ownership evaluation, notification behaviour, and remediation actions.
Define Ownership Responsibility for the Site: Under ‘Who should be responsible for each site’, select whether site owners, site admins, or both are considered for ownership evaluation. For example, if only site admins are selected, the policy ignores site owners during evaluation and checks compliance based only on the configured minimum number of site admins.
Set Minimum Number of Owners/Admins Required: In ‘Minimum owners or admins required for each site‘, choose whether each site requires 1 or 2 owners/admins. It is recommended to set 2 so that if one leaves, the site does not become ownerless.
2.1: Assign Notification Recipients for the Site Ownership Policy
Under ‘Who should be notified (via email) to assign or claim site responsibility‘, you can define the recipients who will receive notifications on any non-compliant sites.
Note: To receive notifications, the required Outlook version prerequisites must be met. This feature does not support Office Professional Plus or Exchange on-premises Outlook on the web. US Government cloud customers must enable actionable messages for SLM policies in GCC High and DoD environments before using this feature.
It is recommended to select at least three recipient types to ensure better notification coverage.
When Current site owners/site admins, if any, is selected, existing owners or admins are notified if ownership requirements are not met and are asked to assign additional owners or admins.
When Managers of previous owners or admins is selected, managers are notified when ownership requirements are not met following user offboarding. Managers can help identify impacted sites and coordinate ownership reassignment. If they already have site access, they can take ownership directly; others can coordinate with administrators.
Note: This works only within 30 days of the user offboarding, as manager-based notifications depend on user information being available in Microsoft Entra ID during this period. For Teams sites, this works only when users are directly assigned to the site and not through Microsoft 365 Groups.
When Active site members is selected, site members with recent site activity in the last 180 days may be notified to take ownership. Guests and inactive users are excluded.
Note: If no eligible recipients are found, the site is still included in the report so that administrators can review and fix it manually.
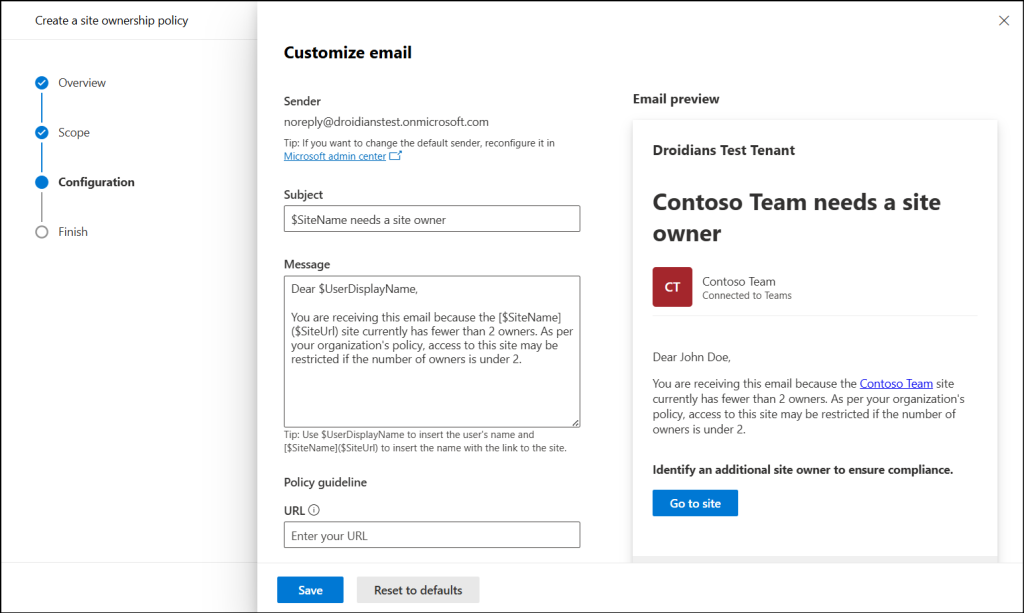
Once the sender email setup is completed, the policy configuration opens the email editor where you can customize the notification message. A default template is provided, and can be edited as needed, and restored anytime using Reset to defaults. Click Save to apply the changes.
2.2: Exclude users or groups from receiving notifications
You can exclude site owners or admins when certain admins, owners, Microsoft 365 groups, or security groups should not receive ownership notifications.
Consider an executive or project sponsor added as a site owner across all project sites for visibility purposes, they’re not managing the sites day-to-day. Notifying them on every policy trigger is irrelevant to their role and floods their inbox unnecessarily. Excluding them ensures notifications reach only the site manager who actually handles ownership actions.
Select Exclude users or groups and add up to 100 users, Microsoft 365 groups, or security groups (each group counts as one entry). Click Save to apply or Edit to update later.
Important: This only controls notifications and has no effect on permissions, ownership, or policy evaluation.
Note on groups: Members are excluded only if their group is directly added or nested under an excluded group. They may still receive notifications if individually assigned to a site or part of a non-excluded group.
2.3: Enforce Read-only/ Archive in Orphaned SharePoint Sites
In this step, you define what action the policy should take when a SharePoint site is identified as an orphaned SharePoint site. After selecting the required mode, click Next. There are two available options.
Do nothing
Take enforcement action
Do nothing: This mode has no effect on ownerless sites. The sites continue to operate without any changes or restrictions.
Take an enforcement: This mode actively applies control actions when an ownerless SharePoint site is detected. Based on the selected configuration, the site can be set to read-only or later archived. Note: This setting cannot be changed after the policy is created.
Read-only access: When an ownerless SharePoint site is detected, the policy automatically sets the site to read-only mode. Users can view content but cannot make changes.
Archive sites after mandatory read-only period (recommended): The policy first places the ownerless sites to read-only for a configured period (3, 6, 9, or 12 months). If no owners are assigned during this time, the site is automatically archived using Microsoft 365 Archive. The site is archived, preserved, and removed from active access.
Step 3: Select Site Ownership Policy Enforcement Mode
Finally, provide a policy name and choose the execution mode in which the policy should run.
Simulation mode: The policy runs once and generates a report without sending notifications or enforcing actions.
Active mode: The policy runs monthly, sends notifications to chosen site owners or admins, and enforces actions on ownerless sites based on configuration.
Once configured, click Finish and then select Done to complete the setup. A policy created in simulation mode can later be changed to active mode.
End User Experience: Monitoring Site Ownership Policy Reports
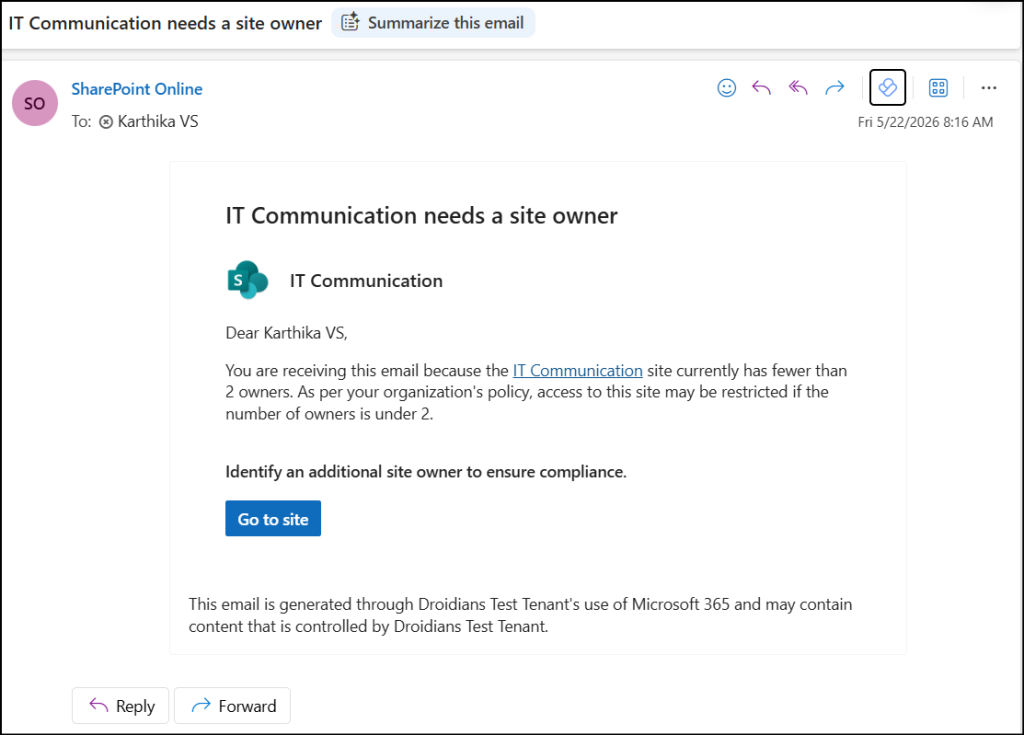
Once configured in Active mode, the policy automatically sends email notifications to selected recipients, prompting action for non-compliant sites. The notification email will look like the example shown below.
The policy generates reports after each evaluation cycle. Notification emails do not include direct report links; users must access the SharePoint admin center to view them. Only SharePoint admins or users with equivalent permissions can access the policy reports. However, it can reduce convenience as reports cannot be accessed directly from notifications.
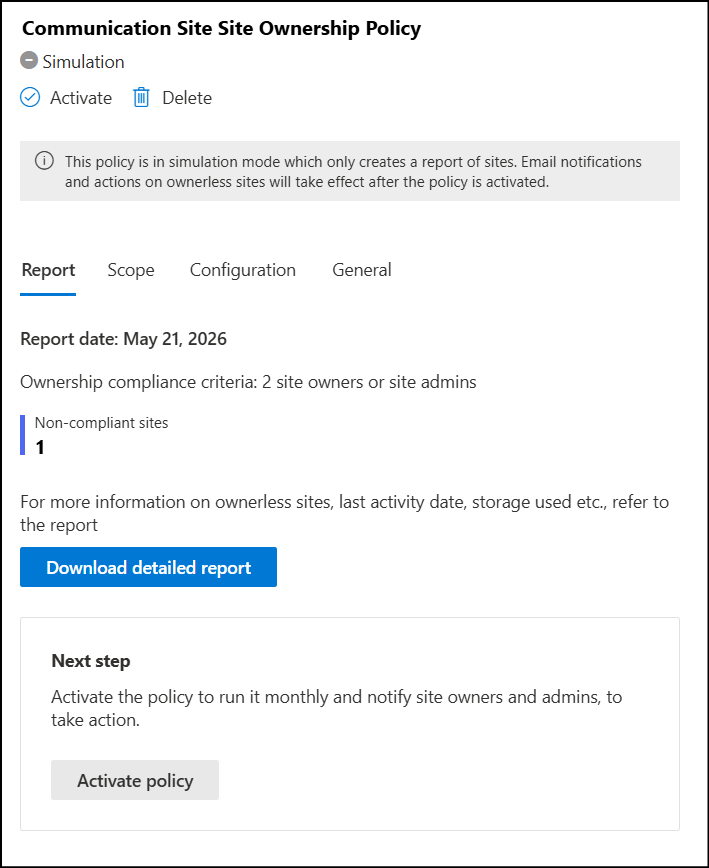
To view reports, go to SharePoint admin center → Policies → Lifecycle management policy and open the required policy. The report will appear as shown below and can also be downloaded as a CSV file for further analysis or record-keeping.
When the site ownership policy is configured in Active mode, the policy not only generates reports but also enforces actions on SharePoint sites based on the defined rules. Below is the behaviour of the policy in active mode:
Enforcement action
After 1 month
After 3 months
Status of the Policy report
How to Revert actions
Do nothing
No changes are made to the site
If the site remains non-compliant, it continues to appear in reports and receive notifications until ownership compliance is restored.
Site is marked as “Unactioned” in the Action status of the policy column in the site ownership policy report.
N/A
Take an enforcement: Read-only access
Ownerless sites are identified and moved into read-only mode.
The site continues in read-only mode, where users can only view content and cannot make changes.
Status is updated as “Site in read-only mode” in the policy report.
A tenant admin can restore edit access by setting the LockState property to Unlock using the Set-SPOSite cmdlet.
Take an enforcement action: Archive sites after mandatory read-only period
The site is moved into read-only mode if owners/admins do not respond.
After the configured read-only period (3, 6, 9, or 12 months), the site is automatically archived using Microsoft365 Archive.
Status is updated as “Site archived” in the policy report.
Tenant admin can go to Sites → Archived sites → select site → click Reactivate to restore the site.
What Happens If a Site is Managed by Multiple Site Ownership Policies
When multiple site ownership policies are created, they may evaluate the same SharePoint sites if their scopes overlap. However, to avoid duplicate alerts, Microsoft enforces a notification suppression mechanism.
If a site is already flagged and notified by one policy, other policies will not send additional emails for the same site within the next 30 days, even if the site is still non-compliant. Instead, those policies simply recognize the site as already handled. In the policy execution report, these sites appear as “Notified by another policy”.
Therefore, it is recommended to avoid creating policies with overlapping scopes.
That’s it! We hope this blog helped you configure site ownership policies in SharePoint Online. Have you configured site ownership policies in your tenant yet? We’d love to hear about your experience. Share your thoughts and feedback in the comments section below. Stay tuned for more upcoming blogs!
Blesslin is a Microsoft 365 and Active Directory contributor focused on feature behavior analysis and investigation workflows, helping administrators connect platform changes with operational decisions.