On Day 12 of Cybersecurity Awareness Month, we’re excited to dive into essential email filtering and spam protection settings to enhance your Microsoft Secure Score. Stay tuned for the upcoming blogs in our M365 Cybersecurity blog series.
Cyberattacks targeting email are constantly evolving, and the consequences of a successful attack can be devastating. From financial losses to reputational damage, email remains a prime attack vector for phishing, malware, and spam. To safeguard your organization’s sensitive data and reputation, it’s important to implement robust email filtering and spam protection settings. This blog will cover essential strategies and provide detailed implementation steps to increase your Microsoft Secure Score via anti-spam policies.
Microsoft Secure Score Recommendations for Spam Protection Settings
Here’s a breakdown of the Microsoft Secure Score recommendations on spam protection settings.
Where to Find Microsoft Secure Score Recommendations?
You can easily locate and act on these recommended spam protection settings within the Microsoft 365 Defender portal. Use the following path to navigate and review the above recommendations:
Microsoft Defender –> Exposure management –> Secure score –> Recommended actions
License Requirement to Access Anti-Spam Policy in Microsoft Defender
If you have Microsoft Defender for Office 365 Plan 2, you are fully equipped to access and manage anti-spam policies in the Microsoft Defender portal.
1. Ensure Exchange Online Spam Policies Are Set to Notify Administrators
✅Microsoft Secure Score Points Gained: 3
Enhancing email security begins with configuring outbound anti-spam policies to notify administrators when outbound messages are flagged as spam. This feature ensures that when a message is classified as spam or junk, administrators receive alerts. This allows admins to take immediate action, minimizing the risk of harmful emails leaving your organization and protecting your domain’s reputation from being blacklisted.
Turn On Anti-Spam Notifications for Admins
- Sign in to the Microsoft Defender portal.
- Expand Email & collaboration and select Policies & rules.
- Under Threat policies –> Policies, click Anti-spam.
- Select the Anti-spam outbound policy (Default).
- Click Edit protection settings:
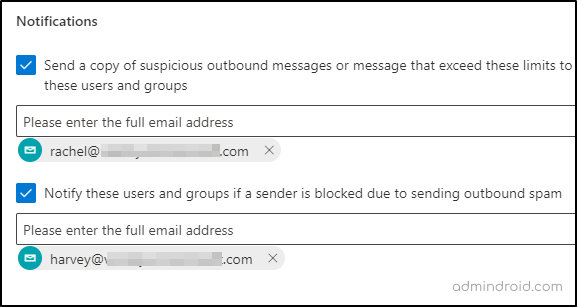
- Under Notifications, check in Send a copy of suspicious outbound messages or message that exceed these limits to these users and groups option and enter email address.
- In addition to this, check in Notify these users and groups if a sender is blocked due to sending outbound spam option and enter email address.
- Click Save.
Note: If a custom policy exists, ensure these spam protection settings are applied to the highest priority policy, not just the default.
We can also use PowerShell to set notifications for Exchange Online spam policies:
Firstly, connect to the Exchange Online PowerShell and run the following command.
|
1 |
$BccEmailAddress = @("INSERT-EMAIL") $NotifyEmailAddress = @("INSERT-EMAIL") Set-HostedOutboundSpamFilterPolicy -Identity Default - BccSuspiciousOutboundAdditionalRecipients $BccEmailAddress - BccSuspiciousOutboundMail $true -NotifyOutboundSpam $true - NotifyOutboundSpamRecipients $NotifyEmailAddress |
This enables real-time alerts for admins to address threats proactively.
2. Retain Spam in Quarantine for 30 Days
✅Microsoft Secure Score Points Gained: 1
Quarantine is an essential feature that enables administrators to hold suspicious emails for review. Once this period ends, the message is permanently deleted and cannot be recovered. Retaining spam messages in quarantine for 30 days provides ample time for analysis.
Set Microsoft 365 Spam Retention Period to 30 Days
- Go to the Microsoft Defender portal.
- Navigate to Email & Collaboration –> Policies & rules –> Threat Policies.
- In the Policies section, select Anti-spam.
- Select the Anti-spam inbound policy (Default or custom if you have any).
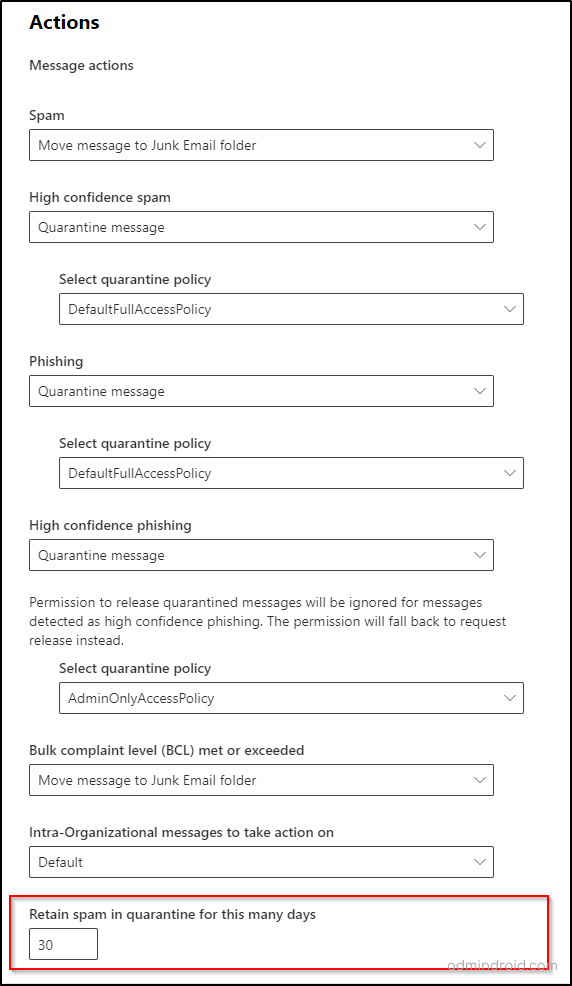
- Scroll down to the Actions section of the policy and click on Edit actions.
- Set the Retain spam in quarantine for this many days option to 30 days.
- Click Save.
Note: For anti-spam policies created in PowerShell, the default retention period is 15 days. In the Microsoft Defender portal, the default is 30 days.
3. Set Action to Take on High Confidence Spam Detection
✅Microsoft Secure Score Points Gained: 5
When emails are flagged as highly suspicious, it’s crucial to act quickly to protect your users. By preventing these emails from reaching inboxes, you significantly reduce the risk of attacks. Setting up clear actions for handling high-confidence spam is an essential part of your email filtering strategy, helping to safeguard users from malicious or unwanted content.
Manage Actions for High-Confidence Spam Detection
- Go to the Microsoft Defender portal.
- Navigate to Email & Collaboration –> Policies & rules –>Threat Policies.
- In the Policies section, select Anti-spam.
- Select the Anti-spam inbound policy (Default or custom).
- Scroll down to the Actions section of the policy and click on Edit actions.
- Ensure that the High confidence spam message action option is set to Quarantine message.
- Click Save.
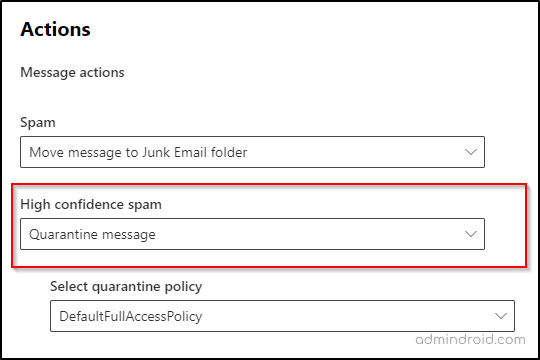
By blocking these emails, you effectively minimize the chances of attacks reaching your users.
4. Set Action to Take on Spam Detection
✅Microsoft Secure Score Points Gained: 5
When spam messages are automatically moved to the junk email folder or quarantined, users can maintain a cleaner inbox. This additional layer of security helps prevent potential phishing attempts that could compromise sensitive information.
How to Configure Actions for Spam Detections?
- Go to the Microsoft Defender portal.
- Navigate to Email & Collaboration –> Policies & rules –> Threat Policies.
- In the Policies section, select Anti-spam.
- Select the Anti-spam inbound policy (Default or custom).
- Scroll down to the Actions section of the policy and click on Edit actions.
- Now, set the Spam message action to Move message to Junk Email Folder or Quarantine message.
- Click Save.
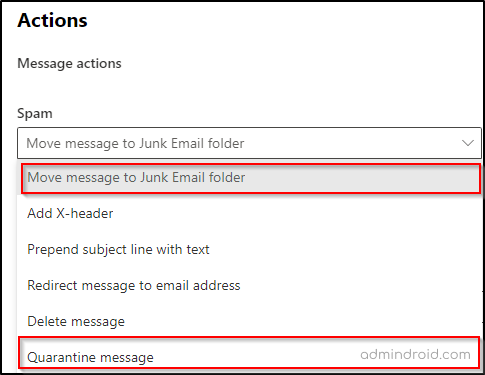
By choosing to move and quarantine spam messages rather than outright deleting them, organizations reduce the risk of losing important communications.
5. Set Action to Take on Bulk Spam Detection
✅Microsoft Secure Score Points Gained: 3
Imagine an organization that frequently receives promotional emails from various sources, leading to a cluttered inbox. By configuring bulk spam handling, IT admins can ensure that these unwanted emails are automatically redirected to the junk folder. This allows employees to focus on important communications without the distraction of irrelevant spam, ultimately enhancing productivity.
Configure Actions for Bulk Spam Detection
- Go to the Microsoft Defender portal.
- Navigate to Email & Collaboration –> Policies & rules –>Threat Policies.
- In the Policies section, select Anti-spam.
- Select the Anti-spam inbound policy (Default or custom).
- Scroll down to the Actions section of the policy and click on Edit actions.
- Check whether the Bulk complaint level (BCL) met or exceeded option is set to Move message to Junk Email folder.
- Click Save.
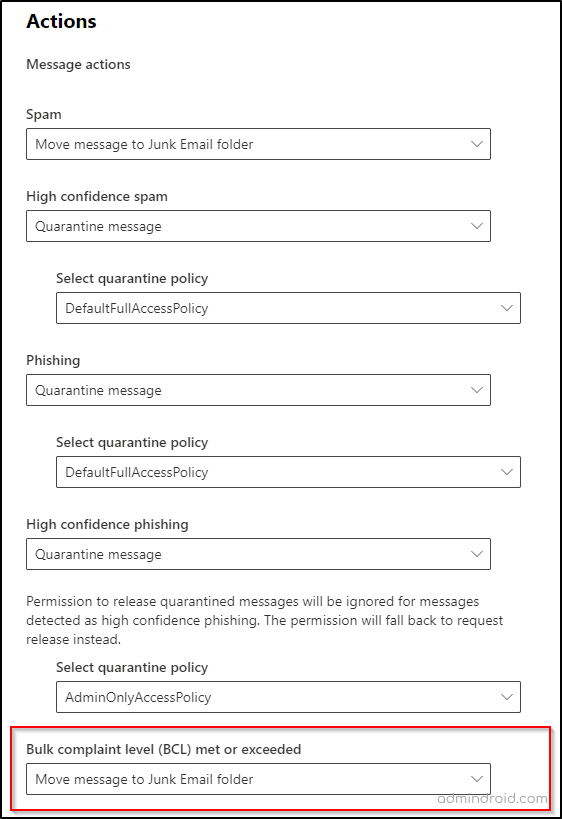
Automatically sending detected spam to the junk folder helps users manage unwanted emails.
6. Ensure that No Sender Domains are Allowed for Anti-Spam Policies
✅Microsoft Secure Score Points Gained: 2
One common mistake organizations make is allowing specific domains in anti-spam policies. It’s advisable to restrict access and ensure that no domains are exempt from anti-spam policies. It minimizes the chances of harmful emails bypassing filters, thereby protecting sensitive information and preventing potential data breaches.
Remove all Allowed Domains and Senders in Inbound Anti-Spam Policies
- Sign in to Microsoft 365 Defender.
- Navigate to Email & Collaboration –> Policies & Rules –> Threat Policies –> Anti-spam.
- Find the Anti-spam inbound policy you want to edit.
- Under Allowed domains and senders, click edit and remove all listed Senders and Domains.
- Click Save to apply the changes.
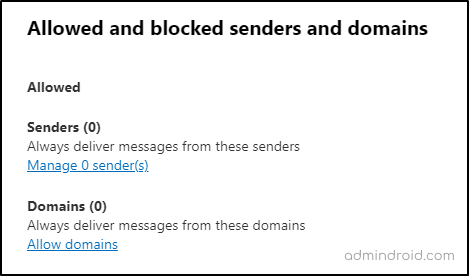
By enforcing this policy, you avoid giving potential attackers a free pass into your users’ inboxes.
7. Create Zero-Hour Auto Purge Policies for Spam Messages
✅Microsoft Secure Score Points Gained: 1
Zero-hour auto purge (ZAP) in Exchange Online allows organizations to automatically remove messages identified as spam after they have been delivered to users’ inboxes. This proactive measure can prevent users from clicking on harmful links even after spam bypasses initial filtering.
How to Enable Zero-Hour Auto Purge for Spam Messages?
- Go to the Microsoft Defender portal.
- Navigate to Email & Collaboration –> Policies & rules –> Threat Policies.
- In the Policies section, select Anti-spam.
- Select the Anti-spam inbound policy (Default or custom).
- Scroll down to the Actions section of the policy and click on Edit actions.
- Verify whether both the Enable zero-hour auto purge (ZAP) and Enable for spam messages options are checked in.
- Click Save.
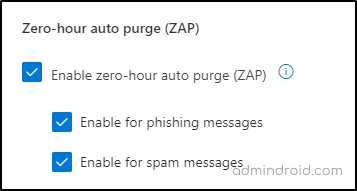
This configuration automatically removes malicious emails, reducing the window of exposure for users. In addition to ZAP, you can start using effective solutions, such as first contact safety tips and moderating Office 365 emails to protect against suspicious malicious attacks.
8. Set the Email Bulk Complaint Level (BCL) Threshold to be 6 or Lower
✅Microsoft Secure Score Points Gained: 1
Setting the email bulk complaint level (BCL) threshold to 6 or lower is important for a secure email system. This adjustment helps your email filters better identify harmless bulk emails while catching those that might be dangerous.
Change Email Bulk Complaint Level (BCL) Threshold to be 6 or Lower
- Go to the Microsoft Defender portal.
- Navigate to Email & Collaboration –> Policies & rules –> Threat Policies.
- In the Policies section, select Anti-spam.
- Select the Anti-spam inbound policy (Default or custom).
- In the Bulk email threshold & spam properties section of the policy and click on Edit spam threshold and properties.
- Set the Bulk email threshold to 6 or lower.
- Click Save.
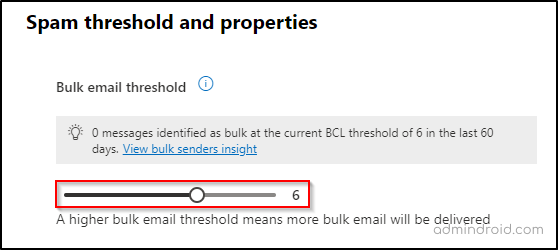
By making this change, you strengthen your email defenses and create a more reliable communication environment for your organization.
9. Don’t Add Allowed IP Addresses in the Connection Filter Policy
✅Microsoft Secure Score Points Gained: 1
Adding IPs to the connection filter skips key security checks like SPF, DKIM, and DMARC, which weakens your email defenses. Avoiding this ensures all messages are properly authenticated, reducing risks like phishing and malware.
How to Remove Allowed IP Addresses in Connection Filter Policy?
- Navigate to the Microsoft Defender portal.
- Select Email & Collaboration > Policies & Rules.
- Under Threat policies, choose Anti-spam.
- Click on Connection filter policy (Default)
- Click Edit connection filter policy.
- Now, under ‘Always allow messages from the following IP addresses or address range’, remove all the allowed IP addresses specified in connection filter policy.
- Click Save to apply changes.
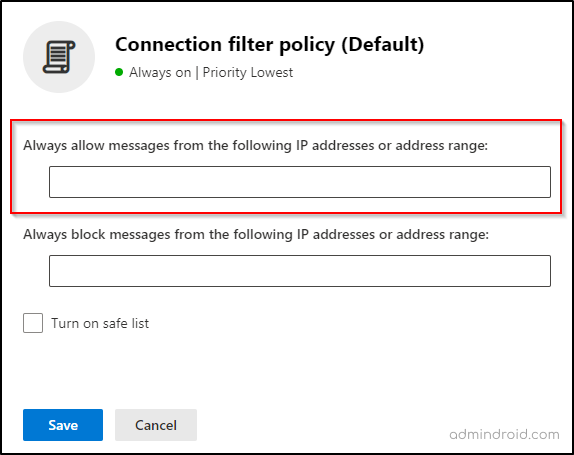
To remove IP addresses in the connection filter policy using PowerShell, run the below cmdlet.
|
1 |
Set-HostedConnectionFilterPolicy -Identity Default -IPAllowList @{Remove="192.168.2.10","192.169.3.0/24"} |
This command will remove the specified IP addresses and ranges from the IP Allow List while keeping other entries intact.
Removing allowed IP addresses from the connection filter policy ensures that all incoming emails undergo important security checks, thereby strengthening your email filtering process.
By adopting these best practices on spam protection settings, your organization can effectively defend against emerging email threats while significantly enhancing its overall security posture. So, configure the settings to increase both your points and security! Additionally, ensure you effectively track the Secure Score changes, as this is essential!


