
As cyber threats rapidly increase, monitoring every aspect of your Microsoft 365 environment is crucial. While securing an organization, preventing unwanted access to resources is a prominent concern as we identify suspicious actions. The real challenge arises when users still retain access to sensitive resources even after completing their tasks. It’s essential to revoke this access promptly, but doing it manually can be time-consuming and impractical for larger organizations. Microsoft offers several features like access reviews, privileged identity management, least privilege, etc., to reduce unauthorized access to resources. Now, privileged access management joins the list and provides even more control over admin’s access rights. Let’s dive in!
What is Privileged Access Management?
Microsoft Purview Privileged access management (PAM) avoids standing access given to users for sensitive resources or critical network configurations in Exchange Online. Enabling privileged access management reduces account compromises and data breaches by limiting standing administrative access and providing a layer of defense against access vulnerabilities. For example, instead of providing constant access, just enough access and just-in-time access rules are implemented for tasks that require elevated privileges.
Note: Privileged Access Management currently supports Exchange Online service only. Microsoft will extend it to other workloads soon.
What is the Difference Between Privileged Identity Management and Privileged Access Management?
Privileged Access Management offers granularity at the task level, while Microsoft Entra Privileged Identity Management applies protection at the role level to execute multiple tasks.
Windows LAPS (Local Administrator Password Solution) is another key security measure that protects administrative access. While PAM focuses on managing privileged access across cloud environments like Exchange Online, Windows LAPS helps secure local administrative accounts on Windows machines by automatically rotating passwords.
Configure Privileged Access Management in Microsoft 365 Admin Center
Admins need to configure privileged access management for Exchange Online to prevent sensitive data breaches and have zero standing administrative access. You can configure and manage PAM using Microsoft 365 admin center or Exchange Management PowerShell. For configuring PAM in Microsoft 365, follow the steps below.
- Create an approval group for privileged access management
- Enable approval requirements for privileged access control
- Configure privileged access policy using Microsoft 365 admin center
- Create privileged access requests in Microsoft 365
License Requirements for PAM:
To use privileged access management, your organization should have any of the following licenses.
- Microsoft 365 E5 (no Teams)
- Microsoft 365 E5 Compliance
- Office 365 E5
- Microsoft 365 F5
Step-1: Create an Aproval Group for Privileged Access Management
It is important to determine the approval authority members to manage incoming requests for access to elevated and privileged tasks. Any of the group members can approve or deny the access requests. For this, admins should create a mail-enabled security group.
- Sign in to the Microsoft 365 admin center using your administrative credentials.
- Navigate to Teams & Groups –> Active teams & groups.
- Select the ‘Security groups’ tab and click on ‘Add a mail-enabled security group’ option.
- Name your group and add a description. Click Next.
- Click on ‘Assign owners’. Choose the required users and select ‘Add’. Then, choose Next.
- Click on ‘Add members’. Choose the desired users and select ‘Add’. Then, choose Next.
- Provide the email address for the group and choose the desired domain. Click Next.
- Review the group details, click on ‘Create group’ and close.
Your mail-enabled security group will be created with your required users for managing approval requests.
Step-2: Enable Approval Requirements for Privileged Access Control
Privileged access must be explicitly enabled with the default approver group. You can also exclude accounts from the PAM access control.
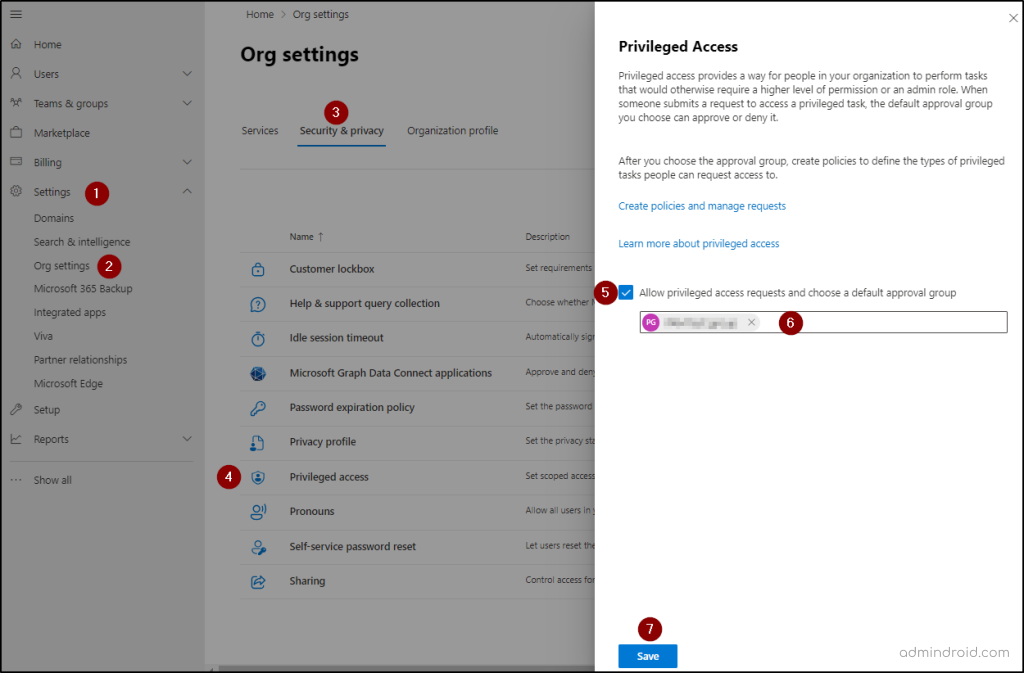
- In the M365 admin center, navigate to Settings –> Org Settings –> Security & Privacy –> Privileged access.
- Check the ‘Allow privileged access requests and choose a default approval group’ checkbox and search and select the desired approval group created in the first step.
- Click on Save and close.
To enable privileged access using PowerShell, run the below cmdlet in Exchange Online PowerShell.
|
1 |
Enable-ElevatedAccessControl –AdminGroup <default approver group> -SystemAccounts @(‘<systemaccountUPN1>’, ‘<systemaccountUPN2>’) |
You can replace the <default approver group> with the desired approver group address, and <systemaccountUPN> can be replaced with the system account’s UPNs that you want to exclude from privileged access control.
Step-3: Configure Privileged Access Policy Using Microsoft 365 Admin Center
Enforcing privileged access controls not only secures critical systems but also ensures personal data protection within the organization. You can create up to 30 privileged access policies for your organization.
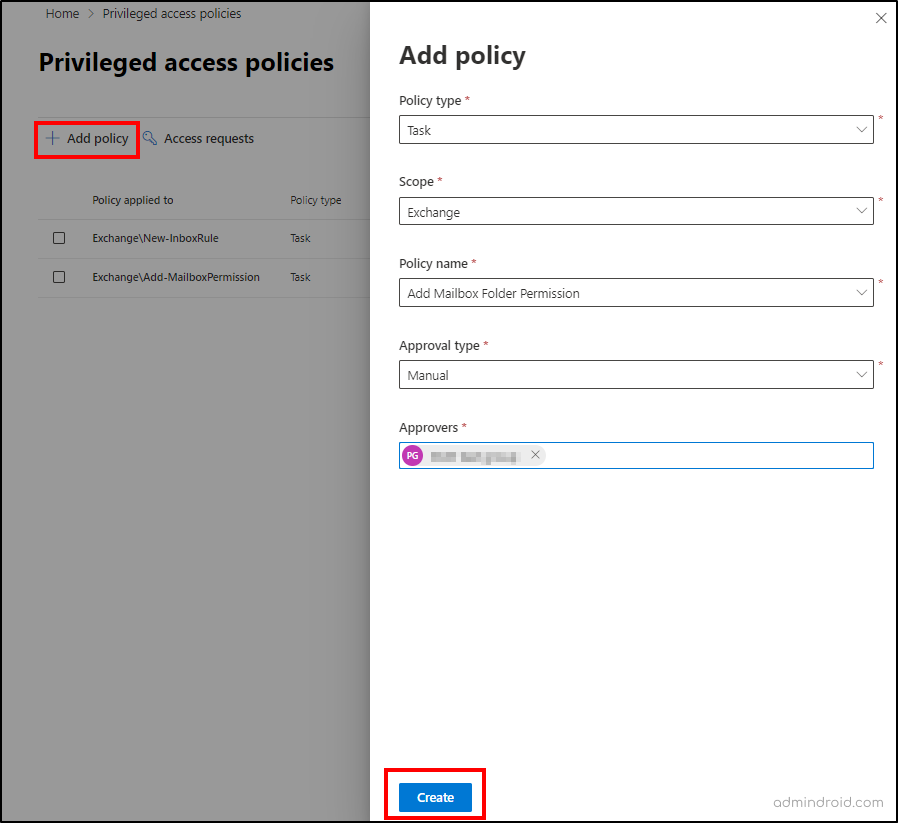
- In the privileged access page in the admin center, select ‘Create policies and manage requests’.
- Select ‘Manage Policies’ and click on ‘Add Policy’.
- Click on the Policy type dropdown and select the desired policy type (i.e., Task, Role, or Role Group).
- Click on the Scope dropdown and select Exchange.
- Click on the Policy name dropdown and choose the required action from the default list. If you select ‘Task’ in the 2nd step, you will see a list of actions for which the privileged access control will be applied.
- Click on the Approval type dropdown and choose Manual or Auto based on the needs.
- If you select ‘Manual’, click on the Approvers search box and choose the approver group created earlier.
- Then, select ‘Create’ and close.
To create an access policy using PowerShell, run the following cmdlet.
|
1 |
New-ElevatedAccessApprovalPolicy –Task ‘Exchange\<exchange management cmdlet name>’ -ApprovalType <approvaltype> -ApproverGroup ‘<approver group> |
You can replace the <exchange management cmdlet name> with the desired cmdlet for the action, <approvaltype> with manual or auto, and <approver group> with the approver groups’ email addresses.
Delete Privileged Access Policies in Microsoft 365
If you want to delete a privileged access policy, you can log in to the M365 admin center.
- In the privileged access page, select ‘Create policies and manage requests’.
- Select ‘Manage Policies’. You can click on the desired policy from the list.
- Select ‘Remove policy’.
To delete a privileged access policy using PowerShell, run the below cmdlet.
|
1 |
Remove-ElevatedAccessApprovalPolicy –Identity <policy guid> |
You can replace the <policy guid> with the original guid of the policy you wish to delete.
Step-4: Create Privileged Access Requests in Microsoft 365
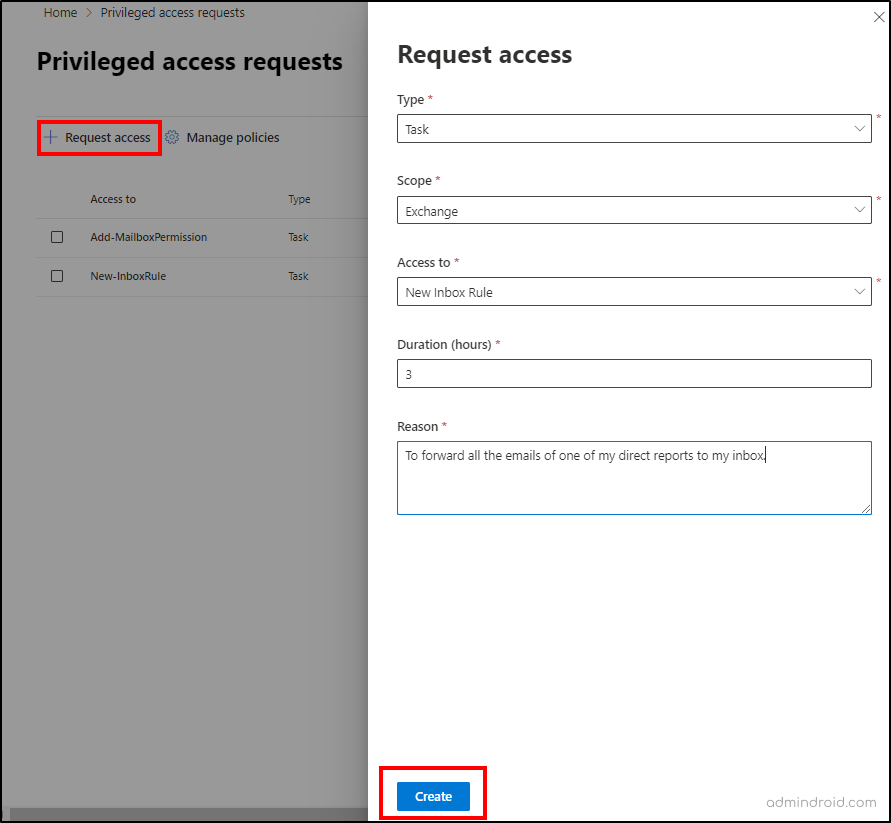
If you want to do any task or want to be a member of any role group or role, you need to submit your access request for privileged access. Remember that the submitted access requests are valid up to 24 hours after submission. If not approved or denied, the request will expire, and access will not be given.
- In the privileged access page in the admin center, select ‘Create policies and manage requests’.
- Select ‘Request access’. Click on the Type dropdown and select the type for requesting access (i.e., Task, Role, or Role Group)
- Click on the Scope dropdown and select Exchange.
- Click on Access to dropdown and select the required option from the list. If you select ‘Task’ as the type, you can choose the required task for which you need to request access.
- Provide the access duration in hours which you required under Duration (hours).
- Enter the proper reason for your access request in the ‘Reason’ text box.
- Select ‘Create’ and close.
Also, you can submit the access requests using PowerShell by running the below cmdlet.
|
1 |
New-ElevatedAccessRequest –Task ‘Exchange\<exchange management cmdlet name>’ -Reason <appropriate reason> -DurationHours <duration in hours> |
You can replace the <exchange management cmdlet name> with the desired cmdlet for the action, <appropriate reason> with the proper reason for your access request, and <duration in hours> with the required time duration for access in hours.
Manage Privileged Access Requests Using Microsoft 365 Admin Center
Managing privileged access requests can be done via both the Microsoft 365 admin center and Exchange Online PowerShell. Admins can view the status of their privilege requests easily. Approvers can also view the access requests and approve or deny them using both the admin center and PowerShell.
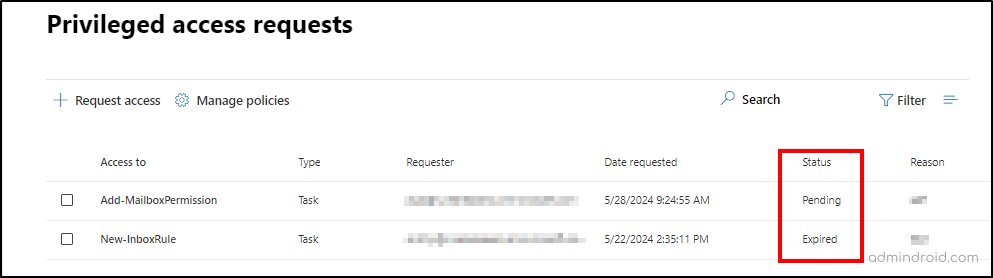
View Status of Privilege Access Requests
Admins who requested privileged access for doing high-risk tasks can view their request status using both the M365 admin center and PowerShell. If the request expires before it is approved or denied, they must create a new request again.
To view the status of privileged access requests using the admin center, follow the steps below.
- Navigate to Settings –> Org settings –> Security & Privacy –> Privileged access in the Microsoft 365 admin center.
- Select ‘Create policies and manage requests’.
- You can see a list of access requests created by users. You can view the status of the desired requests using the ‘Status’ column.
To view the status of elevated access requests using PowerShell, run the below cmdlet.
|
1 |
Get-ElevatedAccessRequest –Identity <request ID> | select RequestStatus |
You can replace the <request ID> with your created request ID.
Note: Even though you can see all the requests, you can’t approve or deny the request unless you are a member of the approver group. If you try to take such actions, you will get an error like ‘Couldn’t process the privilege access request’.
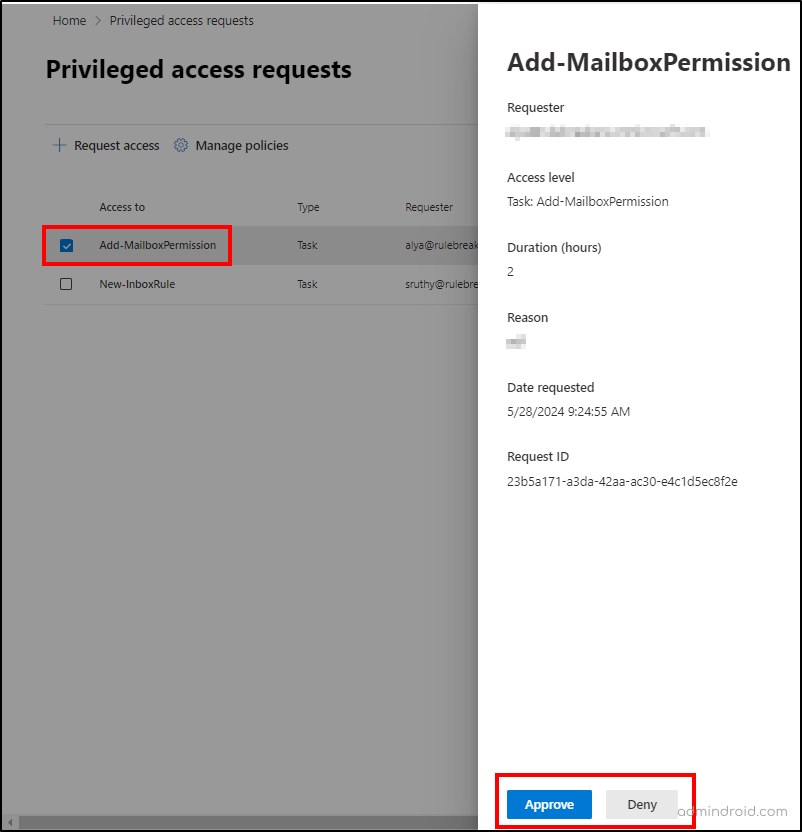
Approve or Deny Privileged Access Requests in Microsoft 365
Users who are members of the approver’s group can approve or deny the privilege access requests using the Microsoft 365 admin center and PowerShell. Follow the steps below to approve or deny privilege requests using the M365 admin center.
- Navigate to Settings –> Org settings –> Security & Privacy –> Privileged access in the M365 admin center.
- Select ‘Create policies and manage requests’.
- From the list of requests, click on the desired request you want to approve or deny.
- Select ‘Approve’ or ‘Deny’ after reviewing the request details. Then, enter your comment for the approval or denial.
- Click Close.
To approve privilege access requests using PowerShell, run the following cmdlet.
|
1 |
Approve-ElevatedAccessRequest –RequestId <request id> -Comment ‘<approval comment>’ |
You can replace the <request id> with the desired request id and <approval comment> with the proper reason for request approval.
To deny privileged access requests using PowerShell, run the below cmdlet.
|
1 |
Deny-ElevatedAccessRequest –RequestId <request id> -Comment ‘<approval comment>’ |
You can provide the respective request ID and your comment for request denial in the appropriate place.
Disable Privileged Access Management in Microsoft 365
If you don’t want to use privileged access management in your organization, you can disable the privileged access using the following steps.
- Navigate to Settings –> Org settings–> Security & Privacy –> Privileged access in the M365 admin center.
- You can uncheck the ‘Allow privileged access requests and choose a default approval group’ checkbox.
- Click Save and close.
To disable privileged access using PowerShell, run the following cmdlet.
|
1 |
Disable-ElevatedAccessControl |
The privileged access management will be disabled for your organization.
I hope this blog helped you to precisely understand privileged access management and its benefits to enhance Microsoft 365 security. Drop your queries in the comment section.


