On Day 31 of Cybersecurity Awareness Month, let’s wrap up our series with a super handy feature: creating an auto-labeling policy to apply sensitivity labels to your content automatically. For a recap on other significant settings to enhance security, check out our Microsoft 365 Cybersecurity blog series.
Throughout this month, we’ve shared some great tips to enhance your security, and now it’s time to spotlight a standout feature from Microsoft Purview Information Protection. Imagine your data—whether it’s in transit or at rest being automatically protected! How does this work? Microsoft Information Protection uses auto-labeling policies to monitor your content for the presence of sensitive information, like credit card numbers, Social Security Numbers (SSN), etc. When such sensitive info is detected, a sensitivity label is automatically applied to that content, restricting access to unauthorized users.
Now, let’s get into the steps to create an auto-labeling policy in Microsoft 365. But first, let’s take a quick look at how sensitivity labels work in Microsoft 365.
What are Sensitivity labels in Microsoft 365?
Sensitivity labels help protect sensitive content across Microsoft 365, including documents and emails across platforms like SharePoint, OneDrive, Teams, Exchange, Microsoft 365 Groups, and Microsoft purview data map. These labels classify documents and emails based on their sensitivity and apply security features like encryption and content markings. You can check out detailed licensing requirements for sensitivity labels here.
By default, only global administrators can create and manage sensitivity labels. However, compliance officers can also be granted access to manage these labels if they are added to specific role groups such as Information Protection, Information Protection Admins, Information Protection Analysts, Information Protection Investigators, and Information Protection Readers.
Applying Sensitivity Labels
Microsoft provides two ways to apply sensitivity labels:
- Manual Application: Users can select and apply labels by themselves.
- Automatic Application: Labels can be automatically applied based on predefined rules.
In this blog, we will explore how to create an auto-labeling policy to apply sensitivity labels automatically to the content in Microsoft 365.
How to Apply Sensitivity Labels to Content Automatically?
After creating a sensitivity label, you can automatically assign it to files and emails that meet specific conditions. Auto-labeling policies eliminate the need to train users on how to classify data accurately. This way, users can focus on their work while the system ensures compliance and data protection automatically. When defining these conditions, you can also create custom Sensitive Information Types (SITs) to detect organization-specific confidential data and ensure the correct label is applied automatically.
Note: Setting up auto-labeling policies is also part of the Microsoft Information Protection Secure Score recommendation.
There are two main methods for automatically applying sensitivity labels:
1. Auto-labeling for Files and Emails (Client-side Labeling)
Auto-labeling for Office apps applies labels during document editing or email composition. Users can accept or reject the labels suggested by the system. Labels can be applied directly to:
- Individual items (files, emails, meetings)
- Groups and sites (Teams, Microsoft 365 Groups, SharePoint sites)
- Schematized data assets in Microsoft Purview Data Map
When the information entered in a document or Outlook email matches your configured conditions, the system will automatically apply or recommend the sensitivity labels based on your auto-labeling settings.
License Requirement:
To use automatic client-side labeling, users need an Azure Information Protection P2 license, which comes with: Enterprise Mobility + Security E5/A5/G5, Microsoft 365 E5/A5/G5, Microsoft 365 E5/A5/G5/F5 Compliance, Microsoft 365 F5 Security & Compliance, and Microsoft 365 E5/F5/G5 Information Protection and Governance.
Client-Side Auto-labeling Behavior:
- If a file isn’t labeled yet, the highest priority sublabel will be applied.
- If a file already has a sub label from the same parent, no changes will be made.
2. Auto-labeling Policy (Service-side Labeling)
You must create an auto-labeling policy to automatically apply sensitivity labels to the content stored in SharePoint and OneDrive (at rest) and for emails sent through Exchange Online (in transit). It ensures that labels are applied immediately across the organization.
License requirement: Automatic service-side labeling requires Information Protection for Office 365 – Premium license.
Service-Side Auto-labeling Behavior:
For service-side auto-labeling, if multiple sub labels from the same parent meet the conditions, the sub label with the highest priority will be selected.
Difference Between Client-side and Server-side Sensitivity Auto-Labeling
Here’s a simplified table showing the major differences between both the auto-labeling methods.
| Feature | Auto-labeling for Files and Emails (Client-side) | Auto-labeling Policy (Service-side) |
| App Dependency | Yes (minimum versions) | No |
| Restrict by Location | No | Yes |
| Conditions: Sharing Options and Additional Options for Email | No | Yes |
| Conditions: Exceptions | No | Yes |
| Support for PDF Files | No | Yes |
| Support for Images | No | Yes |
| Recommendations, Policy Tooltip, and User Overrides | Yes | No |
| Simulation Mode | No | Yes |
| Apply Visual Markings | Yes | Yes (email only) |
| Exchange Attachments Checked for Conditions | No | Yes |
| Label Incoming Email | No | Yes |
| Assign a Rights Management Owner for Emails Sent from Another Organization | No | Yes |
| Replace Lower-Priority Automatically Applied Label | Yes | Yes |
| Override IRM Encryption Applied Without a Label | Yes (if user has minimum usage right of Export) | Yes (email only) |
How to Create an Auto-labeling Policy in Microsoft 365?
In this example, let’s check how to create an auto-labeling policy to detect sensitive information types, like an International Bank Account Number (IBAN), in documents at rest and emails in transit. First, ensure you have a document containing this sensitive information type (at rest) so you can observe the process in action.
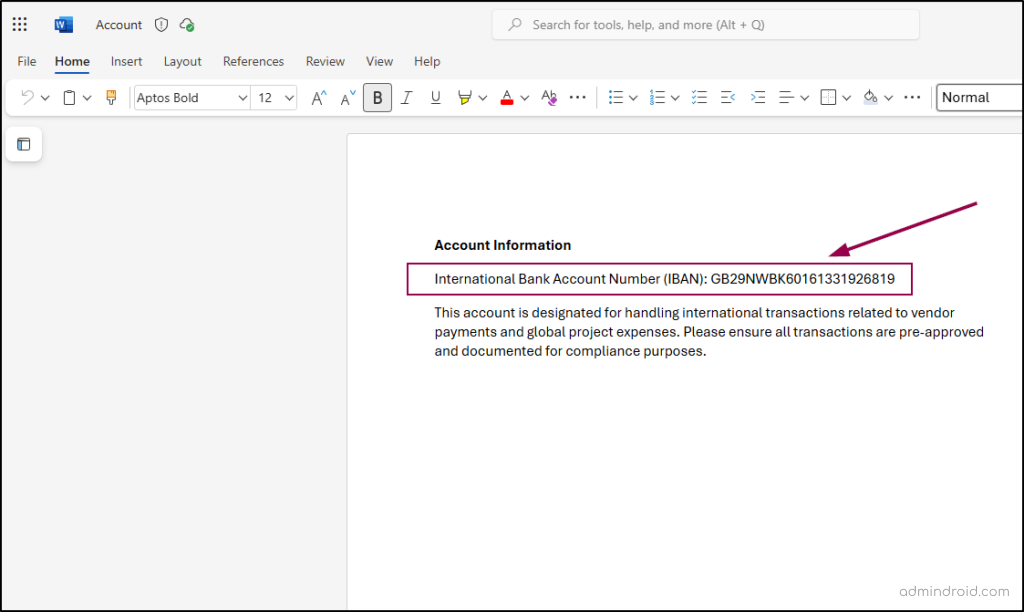
The first step in creating an auto-labeling policy is to create the sensitivity label itself.
Create Sensitivity labels in Microsoft 365
To create and publish sensitivity labels in Microsoft 365, follow the steps below.
- Sign in to the Microsoft Purview portal.
- Navigate to the Information Protection option under Solutions.
- Select Sensitivity labels -> Create a label.
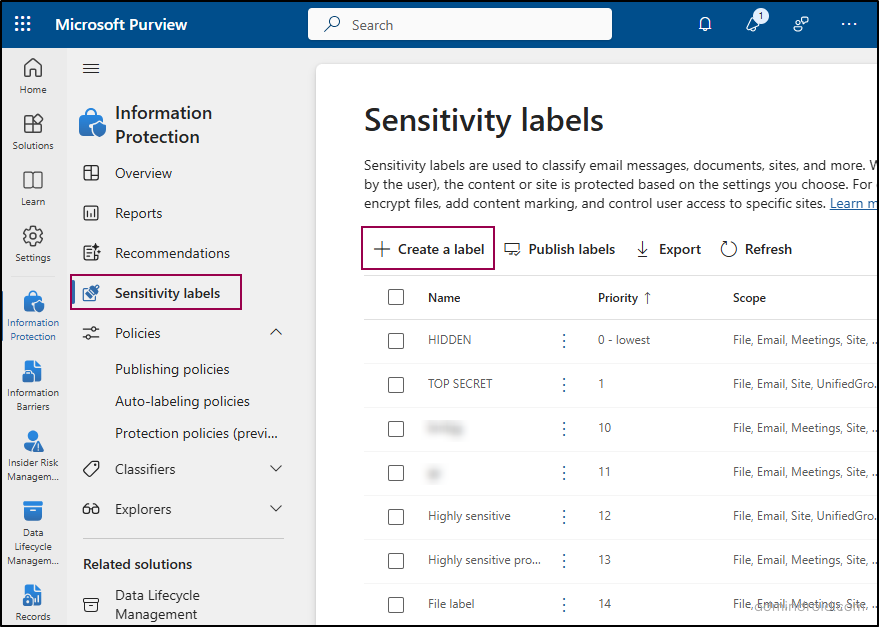
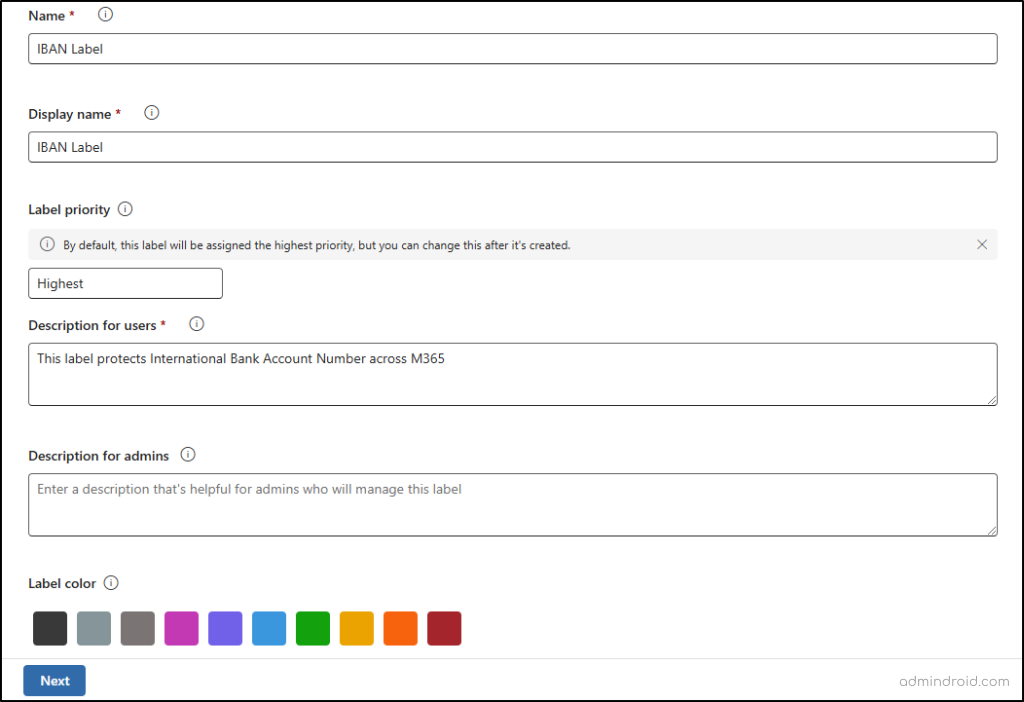
4. Enter the name, display name, label priority, and description for your label, then click Next.
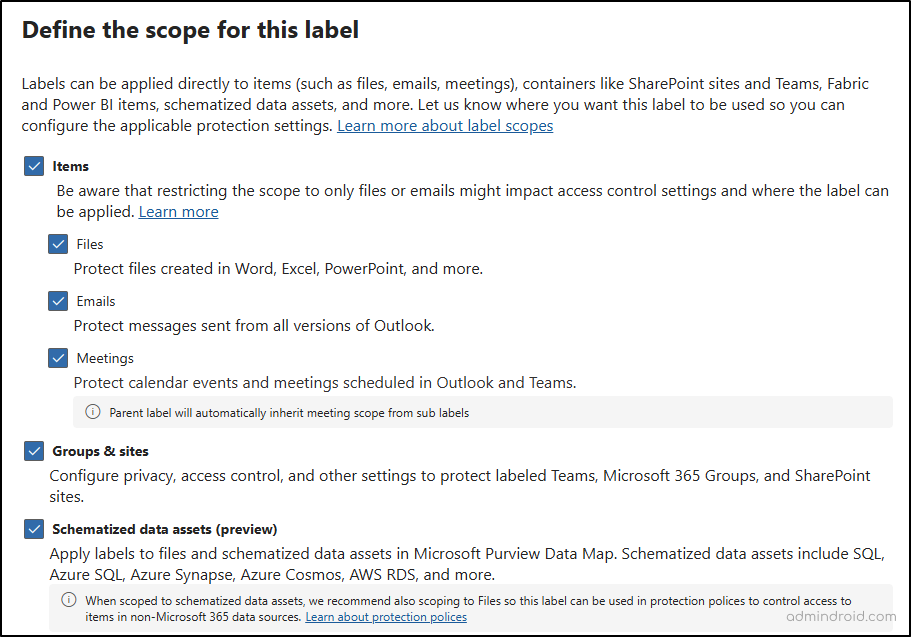
5. On the “Define the Scope for This Label” page, specify where the label will apply (e.g., files, emails, Teams chats).
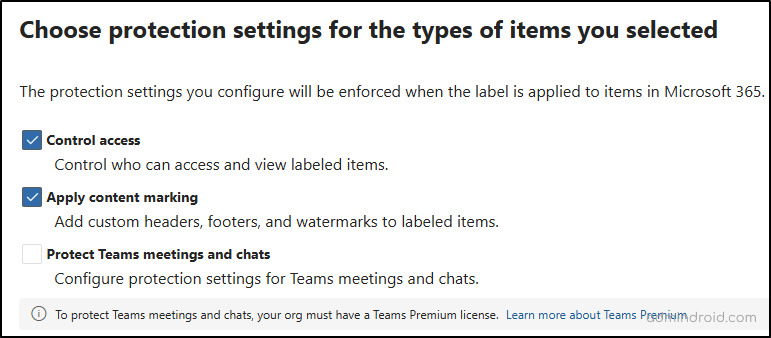
6. Next, configure protection settings for labeled items, such as controlling access, applying content marking, and protecting Teams meetings and chats (note: Teams Premium license is required for this feature).
7. If client-side auto-labeling is needed, you can enable the “Auto-labeling for files and emails” toggle in the next step, though you can skip this if setting up a policy instead.
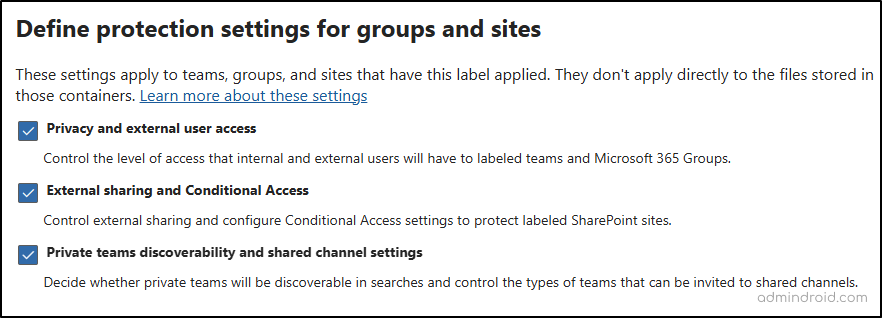
8. Proceed to the next step to define protection settings for groups and sites, then save the label.
Publish Sensitivity Labels to Users and Groups:
Now that we have created the sensitivity label, the next step is to publish it to relevant users or groups so they can view and apply it as needed. Here’s how:
- Select the newly created sensitivity label from the list of labels and click “Publish labels.”
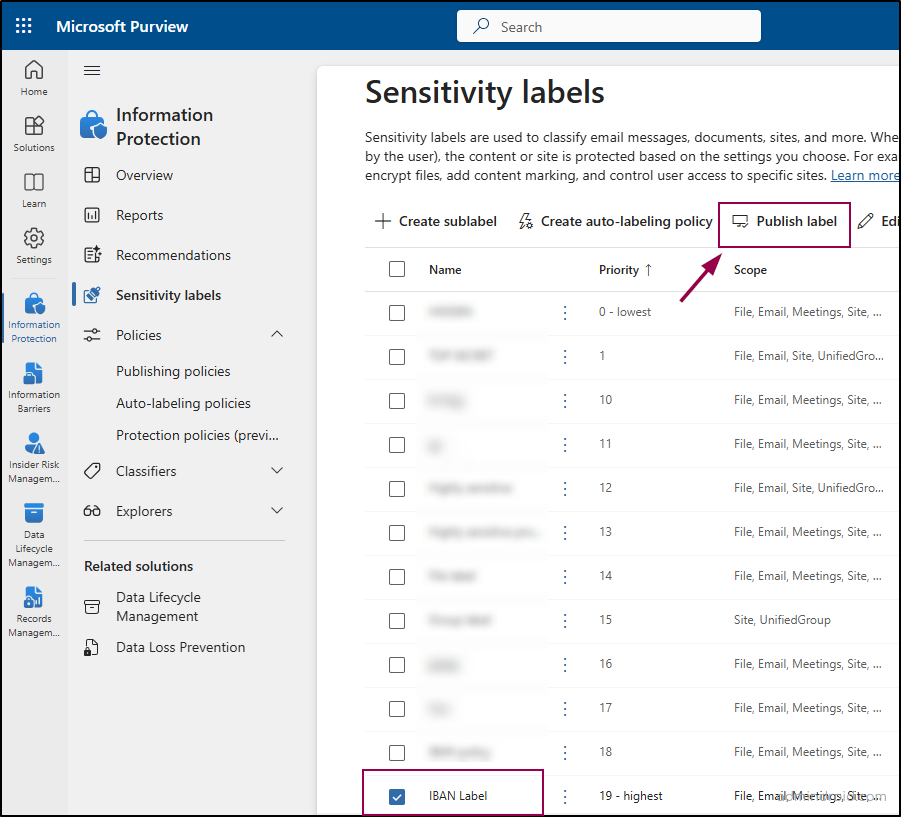
2. In the “Publish to users and groups” section, choose the users or groups who can use the label.
3. Under “Policy Settings,” specify whether users must justify removing or lowering the label classification.
4. Name your policy and click “Submit” to complete the publishing process.
Once the label gets published successfully, the next step is to create an auto-labeling policy that automatically applies a sensitivity label to the content meeting specific conditions.
Configure an Auto-labeling Policy in Microsoft Purview
Once you have created and published the required sensitivity label, you can create an auto-labeling policy to automatically apply or remove sensitivity labels from content that meets specific conditions.
- Sign in to the Microsoft Purview portal.
- Navigate to Solutions → Information Protection → Policies → Auto-labeling policies.
- Select + Create auto-labeling policy.
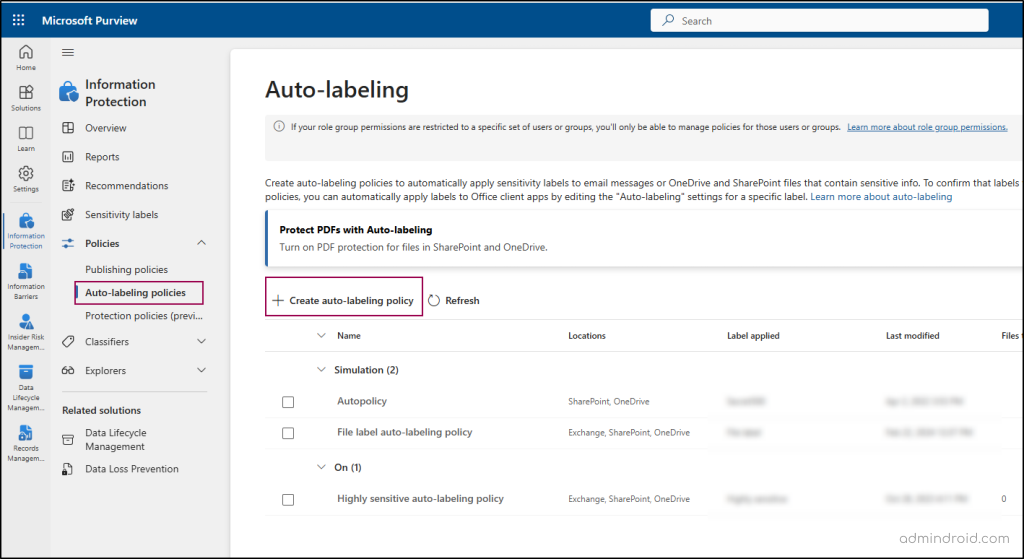
4. Choose whether to Automatically apply label only or Automatically remove label only. For this example, select Automatically apply label only.
5. Under Categories, select Custom -> Custom policy. Name your policy.
6. On the Choose a label to auto-apply page, select + Choose a label, select the required sensitivity label, and click Next.
7. Assign administrative units, if necessary.
8. Select the locations where the policy will apply, such as Exchange email, SharePoint sites, and OneDrive accounts.
8. Choose between Common or Advanced rules, depending on the location; use Advanced to define specific rules for each location.
9. Add a new rule and name it.
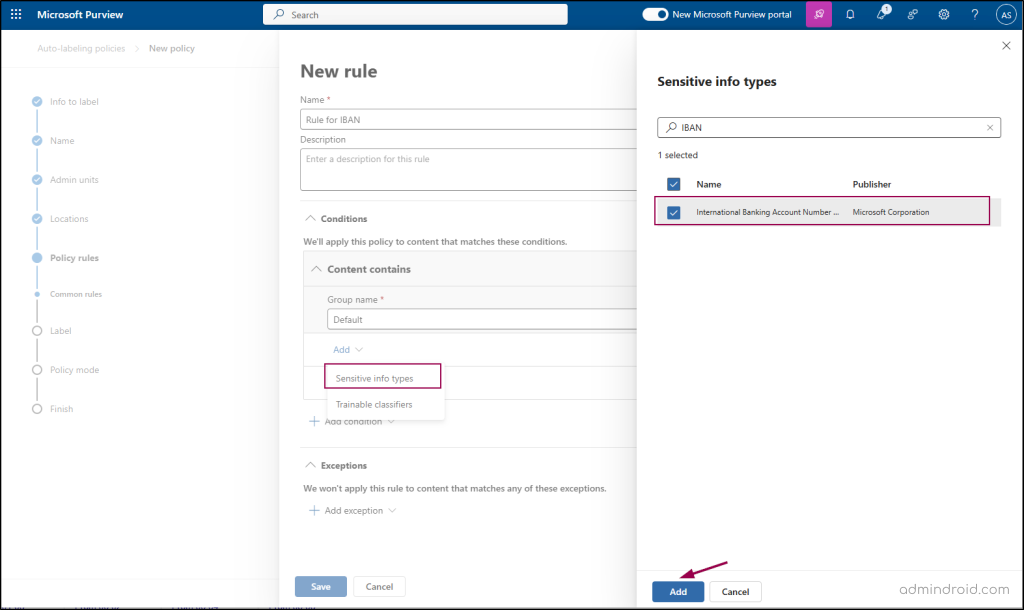
10. In the Conditions tab, select Content contains -> Add -> Sensitive info types -> choose International Banking Account Number (IBAN) -> Add.
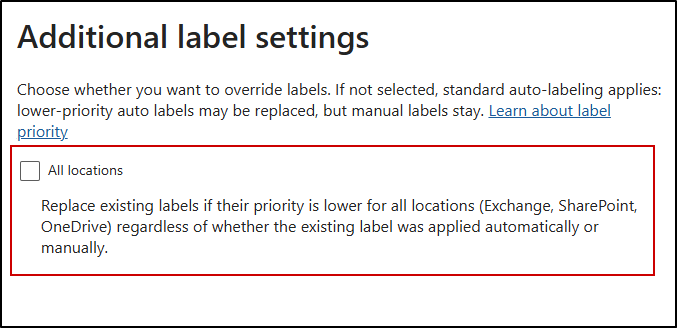
11. For SharePoint and OneDrive, you can optionally configure the policy to override an existing lower-priority sensitivity label, even if it was manually applied, on the Additional label settings page. This gives administrators greater control when a policy identifies content that requires a higher-priority sensitivity label.
12. On the ‘Decide if you want to test out the policy now or later’ page, choose the ‘Run policy in simulation mode’ -> Click create policy.
Review Auto-labeling Policy Simulation Results
After creating the policy in simulation mode, you can review the simulation results to verify whether the configured rules are identifying the intended content before the policy is turned on.
Go to Solutions → Information Protection → Policies → Auto-labeling policies, select the policy running in simulation mode and click View details. This takes you to the “Simulation overview” page.
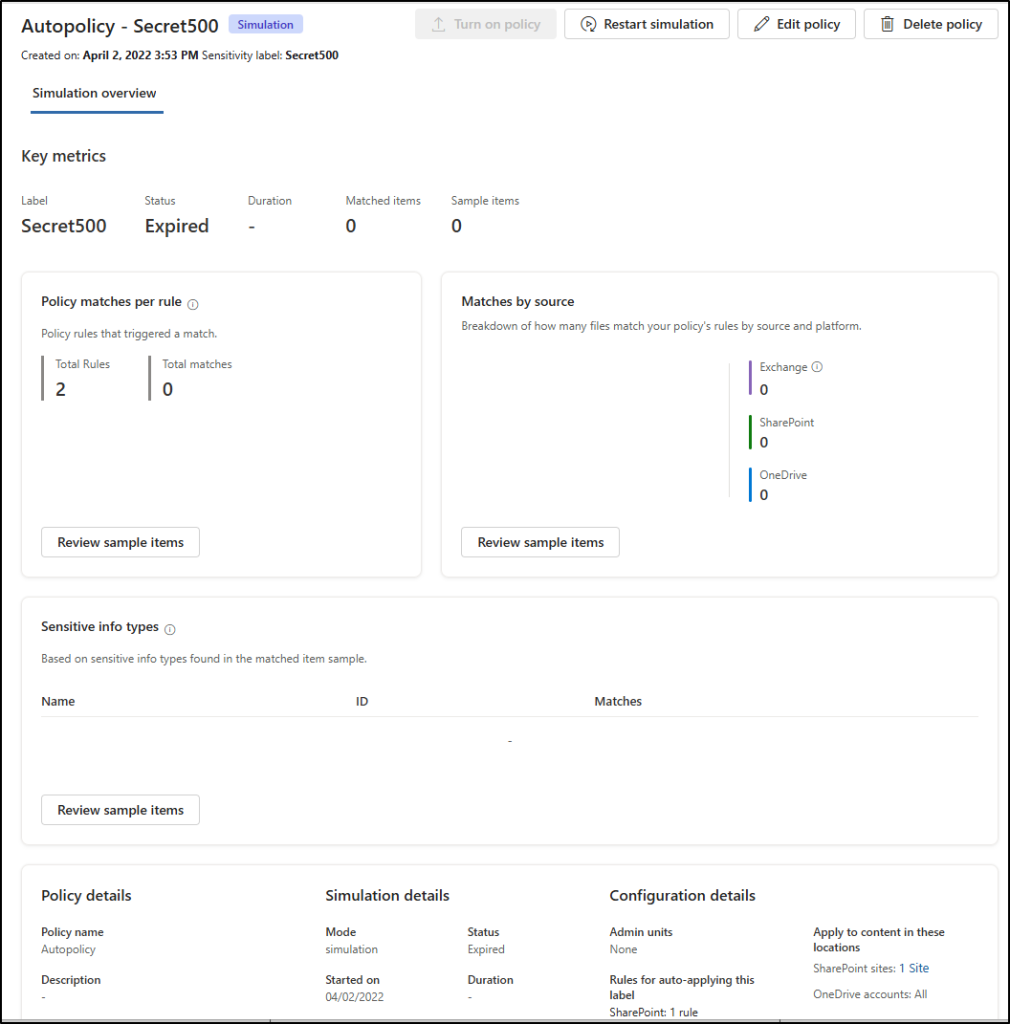
The simulation results show the content that matched the conditions configured in the policy. Review the results to confirm that the policy is identifying the expected files and emails.
Turn On the Auto-labeling Policy
When you’re ready to activate the policy without simulation, select the Turn on Policy option.
Once enabled, the policy automatically applies the selected sensitivity label to content that matches the configured conditions. Keep in mind that it can take some time for labeling to take effect after the policy is turned on. After the policy is turned on, you can monitor its ongoing labeling activity from the policy-level review pages.
Go to Solutions → Information Protection → Policies → Auto-labeling policies and select the turned-on policy you want to review. Then select View details.
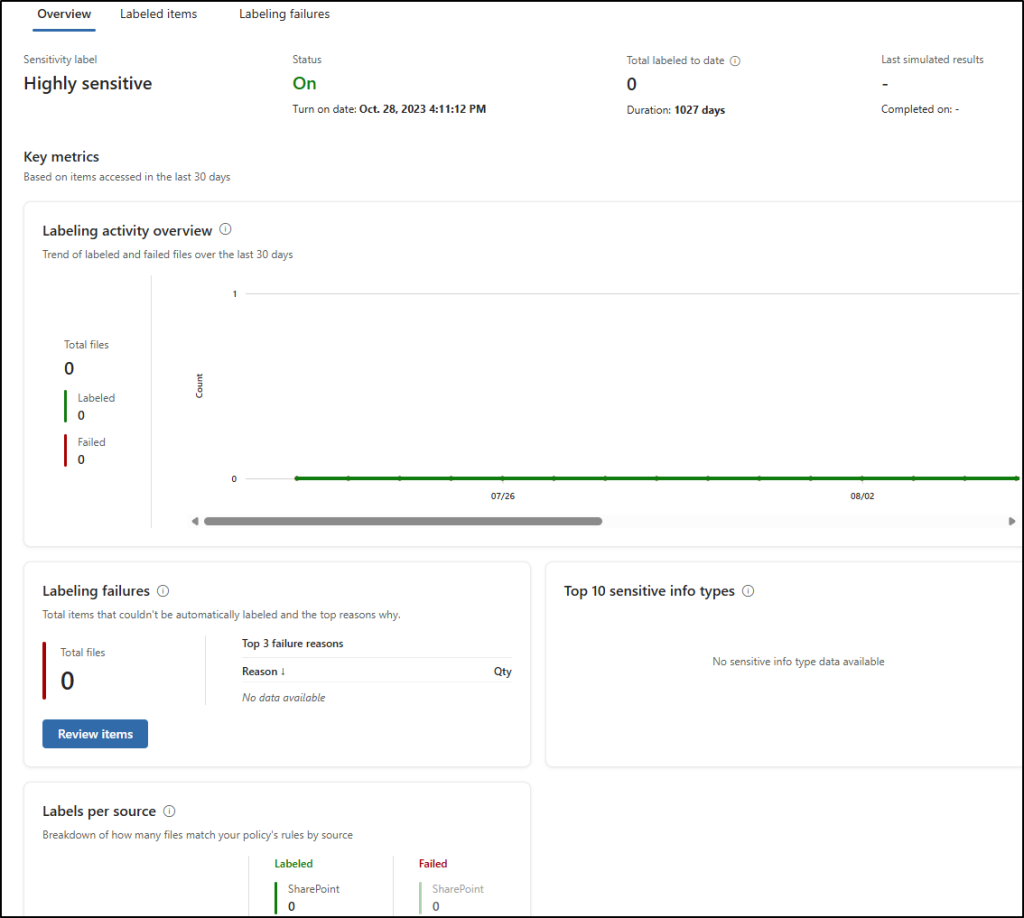
These review pages help administrators:
- Monitor labeling activity.
- Review files labeled by the policy.
- Identify and investigate labeling failures.
- Spot-check labeled files to verify that the expected sensitivity label was applied.
Explore Auto-labeling Policy Insights
The Insights tab provides additional visibility into the policy’s performance and activity. It is available for policies in both simulation mode and when turned on, allowing administrators to evaluate the policy before deployment and continue monitoring it after deployment.
To access Insights, go to Solutions → Information Protection → Policies → Auto-labeling policies, select the policy you want to review, and then select View details. From the policy details page, open the Insights tab.
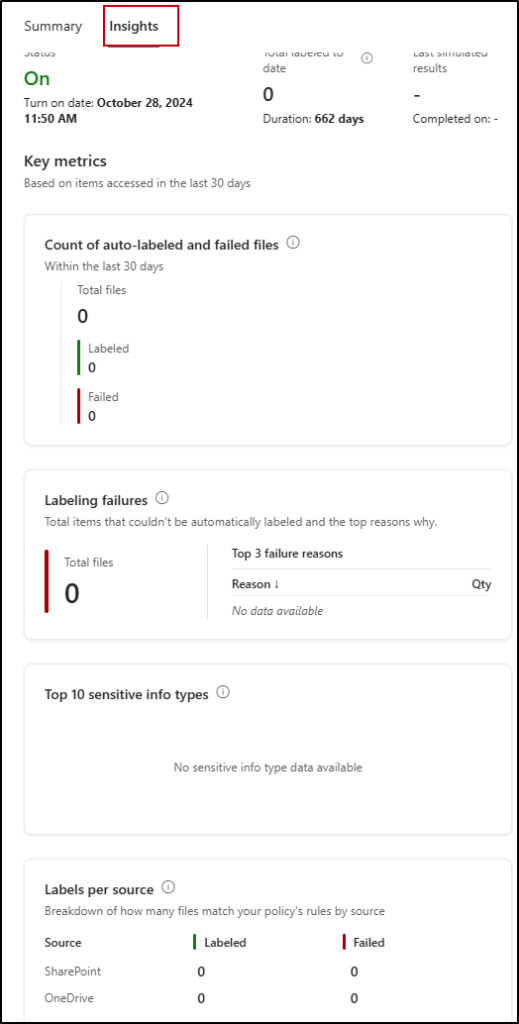
By combining simulation results, policy activity reviews, and insights, administrators can validate auto-labeling policies before deployment and monitor their performance after they are turned on.
Points to Remember
- Always run an auto-labeling policy in simulation mode before turning it on to verify that the configured conditions identify the intended content.
- Auto-labeling policies can run continuously until they are turned off or deleted.
- Auto-labeling policies support several file types, including PDF, Word, PowerPoint, and Excel. Check the current Microsoft documentation for the latest supported file types and limitations.
- Email attachments aren’t labeled by the auto-labeling policy itself, although they can be evaluated as part of applicable Exchange conditions.
- Auto-labeling policies have service limits, including a maximum of 100,000 files labeled per tenant per day.
We hope this blog will help you with insights on how to automatically label content in Microsoft 365. Thank you for reading! If you have any further questions, feel free to reach out to us in the comments section.