In the real world, we have rules and laws that help regulate how we live and work. Similarly, in an Active Directory environment, each object is governed by a set of rules known as policy settings that define how objects behave and enforce security configurations across the organization. These settings are organized into Group Policy Objects (GPOs), which can then be applied to users, groups, or computers within a domain.
Because GPOs play a crucial role in maintaining consistency and security, managing them effectively is essential for a secure domain. In this blog, we’ll explore how to manage these GPOs effectively to strengthen the security of your Active Directory environment.
What is Group Policy Management in Active Directory?
Before diving into how to manage Group Policy Objects (GPOs), let’s have a quick look at what GPOs are and why we need to manage them.
In an Active Directory environment, a GPO is essentially a container for settings that define how users and computers behave. Each GPO primarily contains two main categories of configuration settings:
- User Configuration – These settings are applied to user accounts and control aspects like user rights assignments, desktop restrictions, login behaviours, and so on.
- Computer Configuration – These settings are applied to computers, regardless of which user logs in, and include firewall configurations, software installation and updates, system security settings, and so on.
Beyond User and Computer configurations, GPOs can also include Administrative Templates. These are predefined, registry-based settings that allow admins to control Windows components and manage application behaviour across multiple machines.
In addition, GPOs also include Preferences, which are more flexible, optional settings. This lets you configure settings like shortcuts, mapped drives, printers, and other user or computer options, without enforcing them strictly like other policy settings.
With these components, GPOs allow granular control over user accounts, computer accounts, and the overall system environment. As GPOs can impact thousands of users and devices, proper management is critical. When GPOs are not managed correctly, several risks can arise, including:
- Users and computers may not receive the intended policies
- Conflicting or overlapping policies can cause unexpected behaviour
- Important security configurations might be missed
- Outdated or unnecessary GPOs can linger and cause confusion
Therefore, effective Group Policy Management is essential to ensure that policies are applied correctly, consistently, and securely across the organization. Let’s now explore the essential GPO management actions in Active Directory.
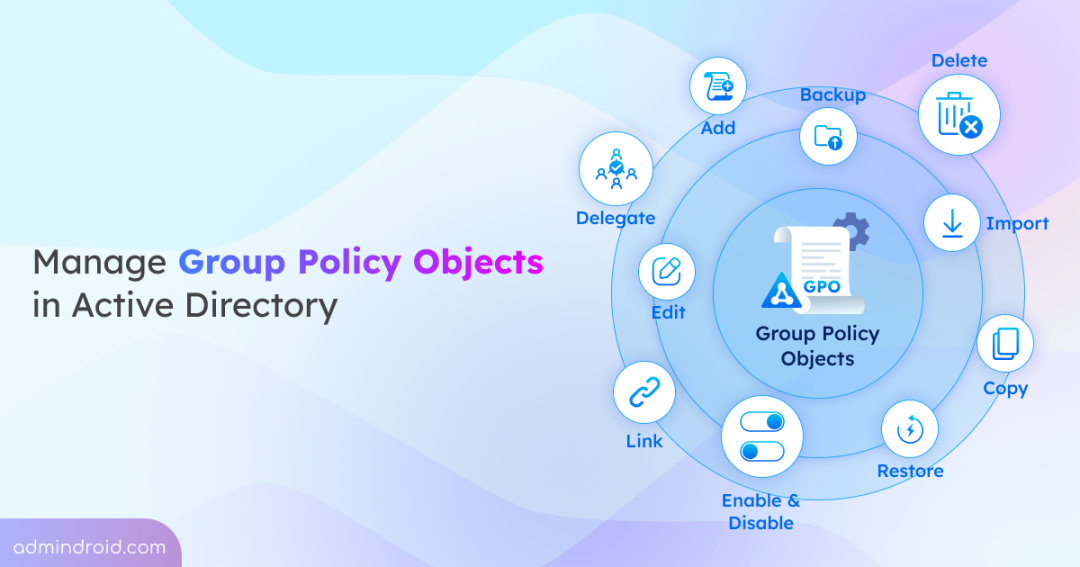
How to Manage Group Policy Objects in Active Directory?
Here are the key management actions for the Group Policy Objects in Active Directory. To perform these actions, you must either be a member of the Administrators or Domain Admins group or have the appropriate delegated permissions.
- Install the Group Policy Management console
- Create a Group Policy Object in Active Directory
- Edit Group Policy settings in Active Directory
- Link Group Policy Objects to Active Directory containers
- Apply Group Policy security filtering in Active Directory
- Block Group Policy Object inheritance
- Enforce a GPO in Active Directory
- Delegate permissions for Group Policy Object
- Enable and disable a Group Policy Object
- Backup and restore Group Policy Objects in Active Directory
- Import Group Policy Objects across domains
- Copy a Group Policy Object
- Remove Group Policy Object links
- Delete Group Policy Objects in Active Directory
Install the Group Policy Management Console (GPMC)
The first step in managing Group Policy Objects is to install the Group Policy Management Console (GPMC). It is an all-in-one management interface that allows you to create, edit, link, and manage Group Policies.
The installation steps for GPMC vary depending on the type of computer, such as a domain controller, member server, or workstation. In a domain environment, GPMC is available by default on domain controllers, as it is automatically installed when you promote a server to a DC. Therefore, you only need to install the Group Policy Management feature on member servers or workstations if you want to manage Group Policy from those systems.
On member servers, you can install Group Policy Management using the steps below:
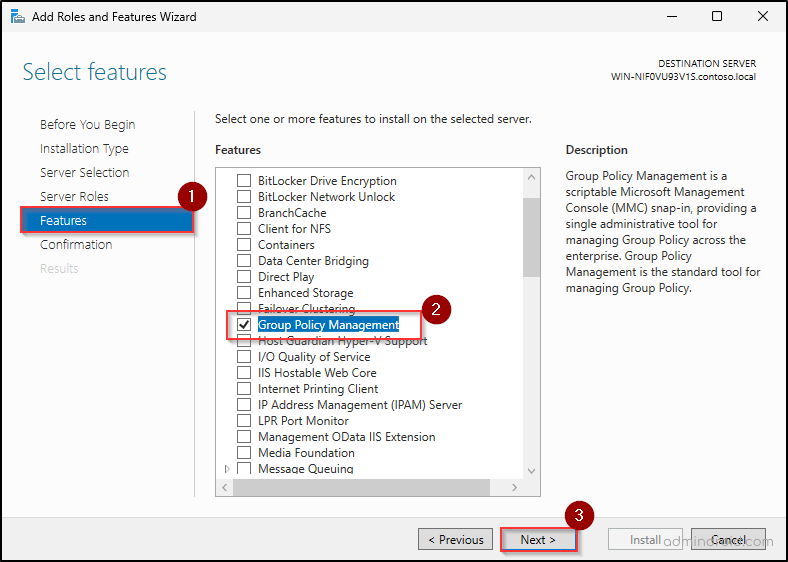
- Open Server Manager from the Start menu and select Quick Start ➜ Add roles and features.
- In the Add Roles and Features Wizard, click Next. If needed, you can modify the default selections on the Installation Type, Server Selection, and Server Roles tabs. Otherwise, continue by clicking Next on each page.
- On the Features page, select “Group Policy Management”, and click Next.
- Then, review the configurations and click Next in the further tabs and click Install.
You can also install GPMC on Windows servers using PowerShell by running the following cmdlet:
|
1 |
Install-WindowsFeature –Name GPMC |
If you need to manage Group Policy Objects (GPOs) from a workstation, you need to install RSAT: Group Policy Management Tools using Windows Settings.
Once installed, you can open the GPMC console either from the Start menu or by using gpmc.msc in Win + R.
Create a Group Policy Object in Active Directory
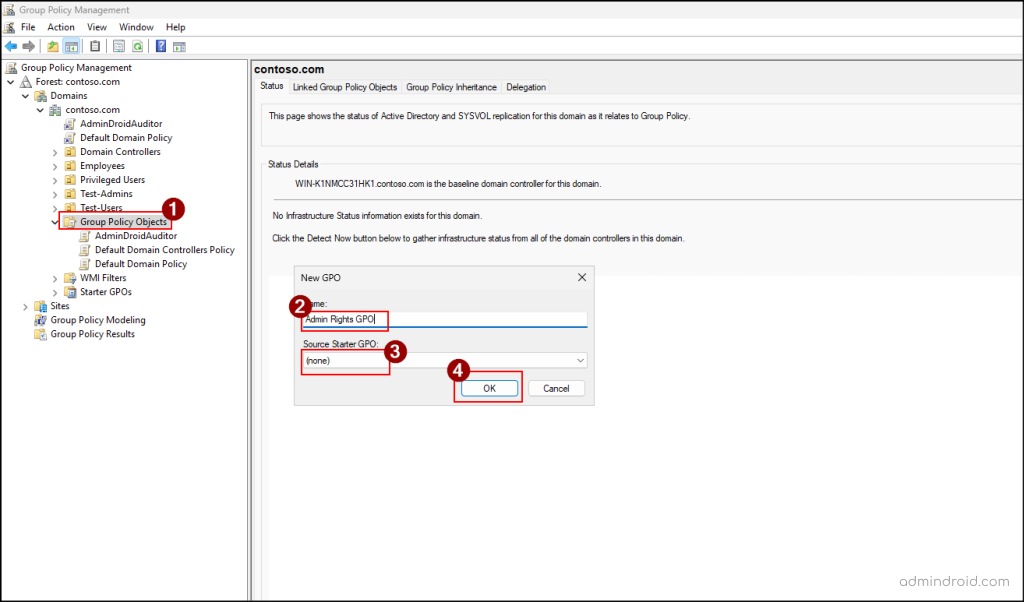
When you open the Group Policy Management console, you’ll notice that your domain already includes two default Group Policy Objects: Default Domain Policy and Default Domain Controllers Policy. These built-in policies contain critical domain-level configurations such as password policies, account lockout policies, etc., which help enforce baseline security across the environment.
However, organizations often need additional configurations beyond these default settings. In such cases, you can create new Group Policy Objects to apply custom policies across the domain, making it easier to manage security and system settings in a structured way.
You can create a new unlinked GPO in Active Directory, using the steps below.
- Open GPMC console in your Active Directory windows.
- Expand the forest and your domain nodes, then right-click Group Policy Objects.
- Select New and provide a name for the GPO.
- If a Starter GPO is available in your environment, you can choose it to apply its predefined Administrative Template policy settings. Otherwise, leave the Source Starter GPO as None and click OK.
To create a GPO in Active Directory using PowerShell, import the Active Directory module and run the cmdlet below.
|
1 |
New-GPO –Name "<GPOName>" |
Replace <GPOName> with a distinct, descriptive name to ensure the GPO can be easily recognized.

Edit Group Policy Settings in Active Directory
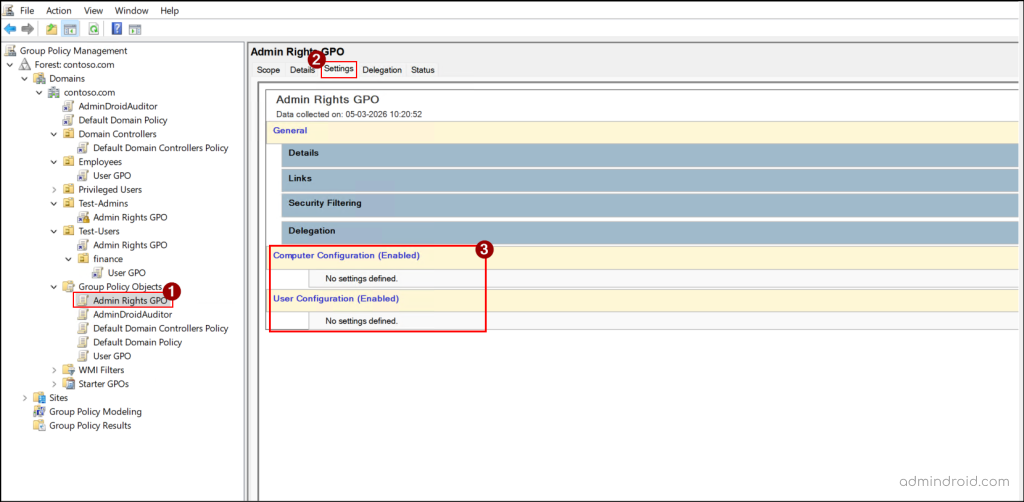
When you create a new Group Policy Object (GPO), it starts as an empty container without any configured settings. You can verify this by selecting the GPO in the Group Policy Management Console (GPMC) and opening the Settings tab. As policies are not configured yet, it will display “No settings defined.”
In order to make the GPO effective, you need to edit it and configure the required policy settings. This is done through the Group Policy Management Editor, where you can define policies under Computer Configuration or User Configuration. From there, you can add new policy settings or modify existing ones in a GPO.
Let’s see how to configure the necessary policy settings in a GPO.
- Right-click the GPO you’ve created and select Edit to open the Group Policy Management Editor.
- Browse through the Computer Configuration and User Configuration to define the required policy settings, such as firewall settings, audit policy, browser settings, etc.
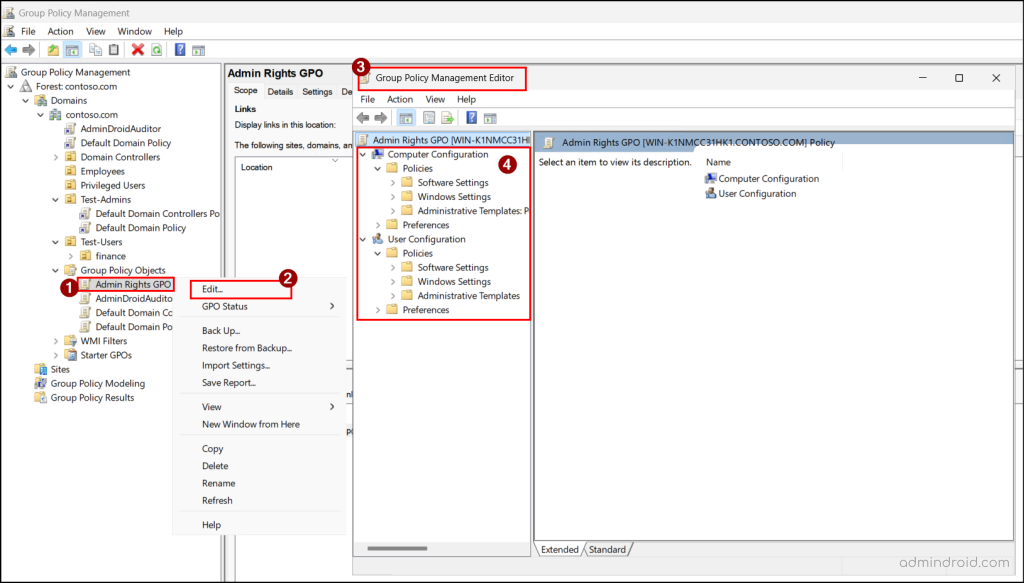
Once configured, you can validate the policy settings in the GPO using the Settings tab of the GPO.
Link Group Policy Objects to Active Directory Containers
Now that you have created a GPO and configured all the required policy settings, the next step is to decide where the policy should be applied. By default, a newly created GPO does not affect any users or computers in the domain. To make the configured policies take effect, you must link the GPO to an appropriate Active Directory container.
You can link a GPO to the following containers:
- Domain – Applies the policy to all users and computers in the domain.
- Organizational Unit (OU) – Deploys the policy to all users and computers within that OU, including objects in its sub-OUs.
- Site – Implements the policy to all users and computers across all domains in that site.
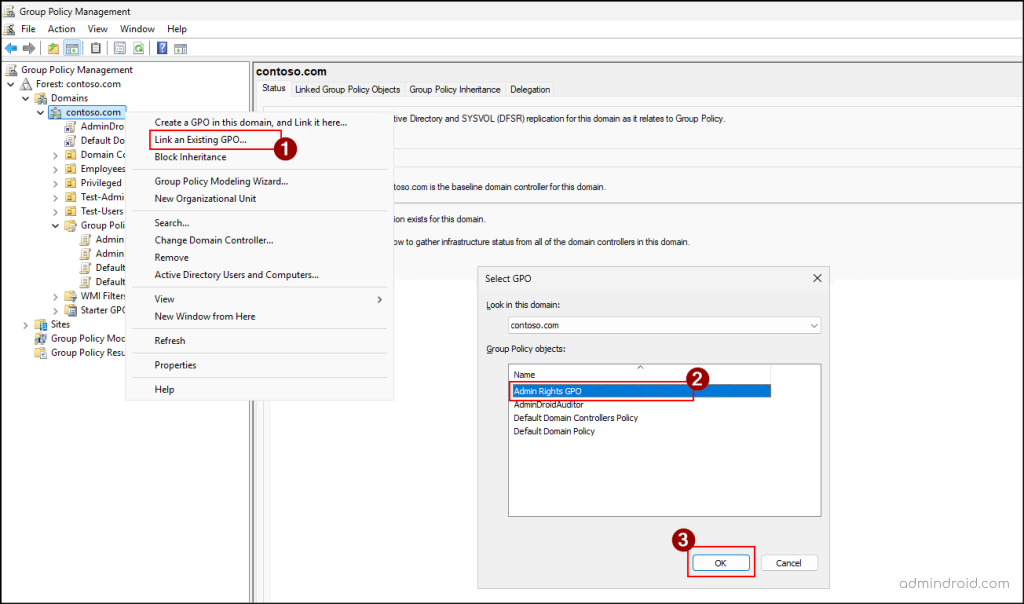
Here’ how you can link GPOs at a domain level in Active Directory.
- Open GPMC, right-click the target domain, and select Link an Exiting GPO.
- In the Select GPO wizard, choose the GPO that you need to assign and click OK.
Similarly, you can follow the above steps to link a GPO to an OU or a site in Active Directory.
Handy Tip: You can create and link a GPO at the same time by selecting Create a GPO in this domain, and Link it here option from the target domain, site, or OU.
Instead of manually linking GPOs, you can run the following cmdlet to link a GPO to an Active Directory domain using PowerShell.
|
1 |
New-GPLink -Name "<GPOName>" -Target "<DomainDistinguishedName>" -LinkEnabled Yes |
To link the GPO to an OU or a site, replace with the OU’s distinguished name or the site name.
Key Considerations to Link a GPO
Before you link a GPO, it’s important to understand a few key points to ensure the policy behaves as expected.
- GPOs are processed in a specific order in a top to bottom approach called LSDOU order. The sequence is as follows:
Local GPO → Site-level GPO → Domain-level GPO → OU-level GPO (Parent OU → Child OU)
For any object, the local GPO is applied first. If a site-level GPO is linked, it overrides the local GPO. This process continues as Domain-level GPOs are applied next, followed by OU-level GPOs. Since Active Directory follows a “last writer wins” approach, policies processed later in the order can override conflicting settings from earlier policies. So, it’s important to carefully plan which policies should take precedence to avoid unintended overrides. - By default, computer-related policy settings override the user-related policy settings when there is a conflict between the two policies. This happens because computer-related settings are applied as soon as the system starts, while user settings are applied later during login. So, you must ensure that the correct policies are configured to prevent computer settings from accidentally overriding important user-level settings.
- When multiple GPOs are linked at the same level, their precedence is determined by their order in the Linked Group Policy Objects list. The GPO with the higher priority in the list is applied last and takes precedence. So, make sure the intended policy has the highest precedence.
You can control this order in the Linked Group Policy Objects tab of the Group Policy Object container. Simply select a policy and use the arrows to move it up or down and adjust its priority.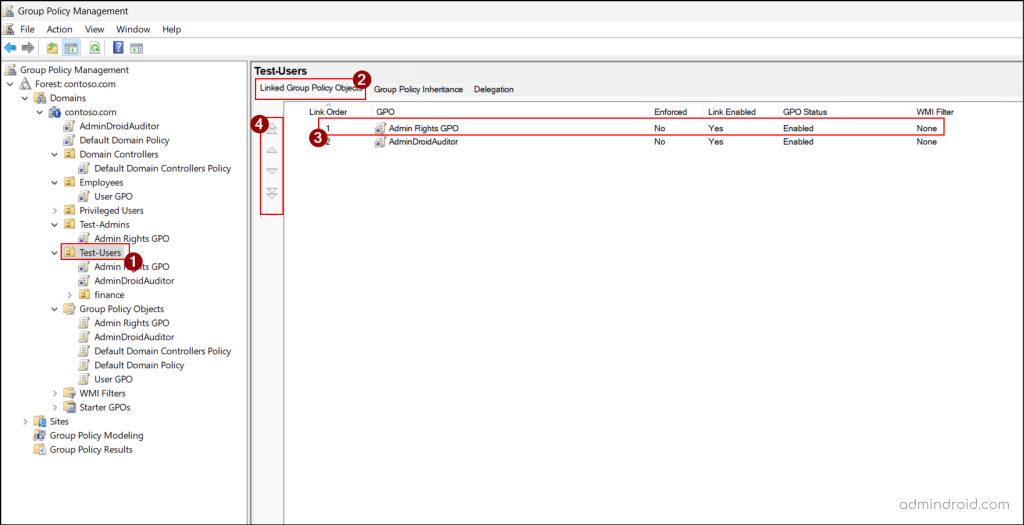
Alternatively, you can run the cmdlet below after replacing placeholders with appropriate value to change the order of a GPO in Active Directory using PowerShell.1Set-GPLink -Name "<GPOName>" -Target "<DomainDistinguishedName>" –Order <Order>
Apply Group Policy Security Filtering in Active Directory
When you link a GPO to domain, OU or a site, it is automatically applied to all objects within that scope. This is because the Authenticated Users group is automatically granted the Apply Group Policy permissions.
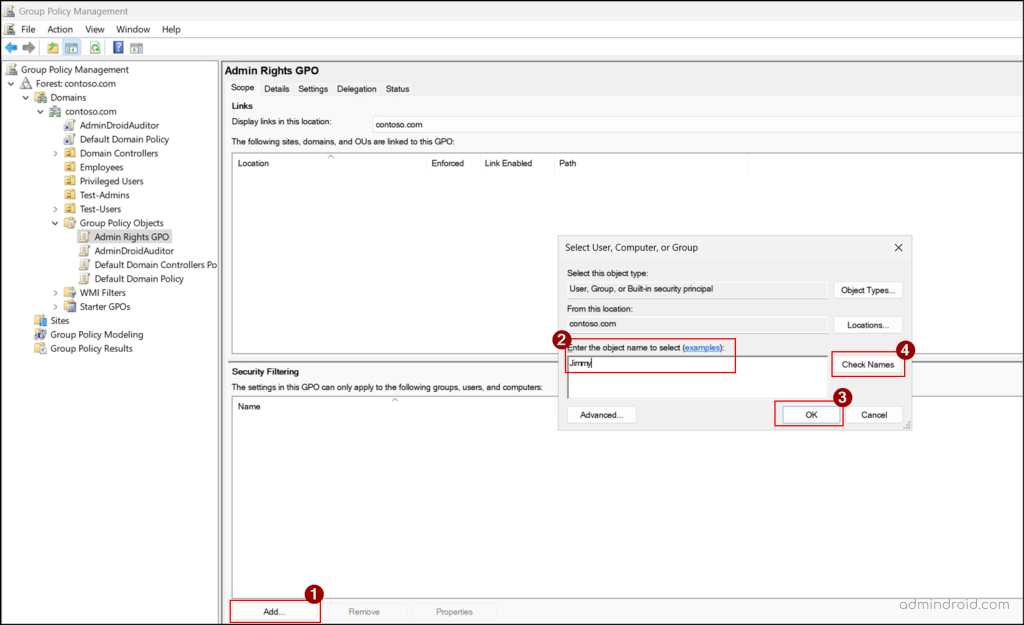
If you want a more granular control and want the GPO to be applied only to specific users, groups, or computers within that scope, you can use security filtering. This allows you to restrict a GPO’s application to the selected Active Directory objects within the linked scope.
Use the below steps to restrict the GPO application to specific users and computers.
- Open GPMC console, select the target GPO, and go to the Scope tab.
- Under the Security Filtering section, select Authenticated Users, click Remove, and select OK.
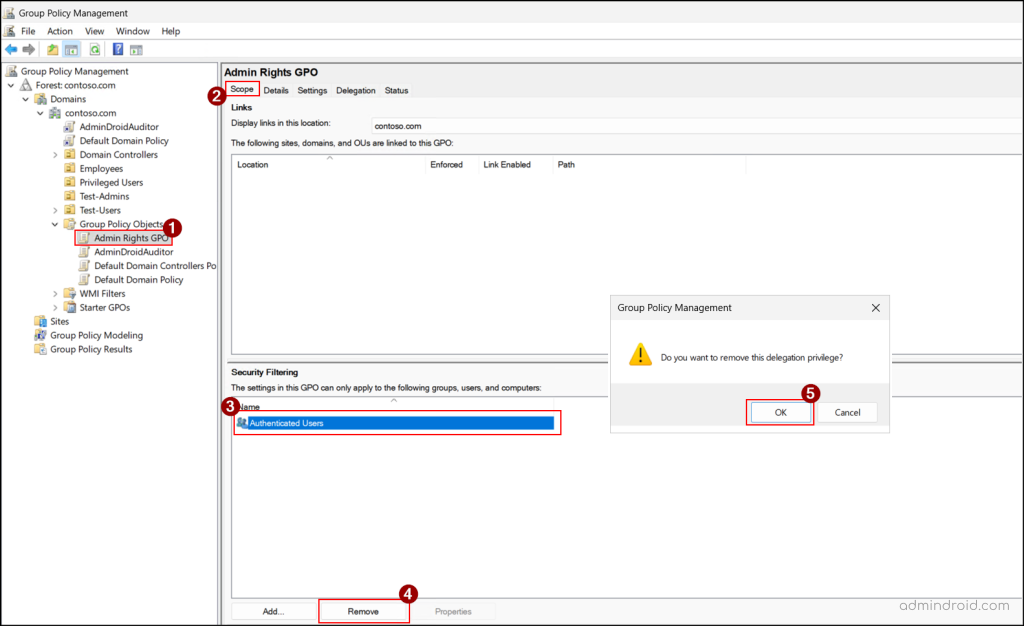
- Next, click Add, enter the name of the user or group within that scope where the GPO is applied. If you need to add a computer, click Object Types, choose ‘Computer‘, and click OK. Then, enter the target computer name.
- Next, click OK to confirm the security filtering.
Note: If an object outside the GPO’s linked scope is assigned in the security filter, the GPO will be ignored for that object.
In addition, you can also create and link a WMI filter to a GPO to ensure the policy settings are applied only to users or computers that meet the defined conditions.
Block Group Policy Inheritance
Imagine a scenario where you need to exclude a restricted Organizational Unit (OU) from high-level policies inherited from the site, domain, or parent OU levels. One approach is to create another GPO with conflicting settings to cancel out those policies, but this is inefficient and can lead to errors. In addition, if you add any new settings to a higher-level GPO later, those settings will still affect the OU.
To avoid this issue, you can use the Block Inheritance feature. This setting prevents higher-level GPOs from being applied to objects within that OU. As a result, only the GPOs linked directly to that OU will be processed, ensuring the policies work as expected.
Follow the steps below to block a Group Policy inheritance in Active Directory.
- Open GPMC, right-click the specific domain, OU, or site for which you need to break the inheritance.
- Select Block Inheritance to restrict higher-level GPOs from being applied.
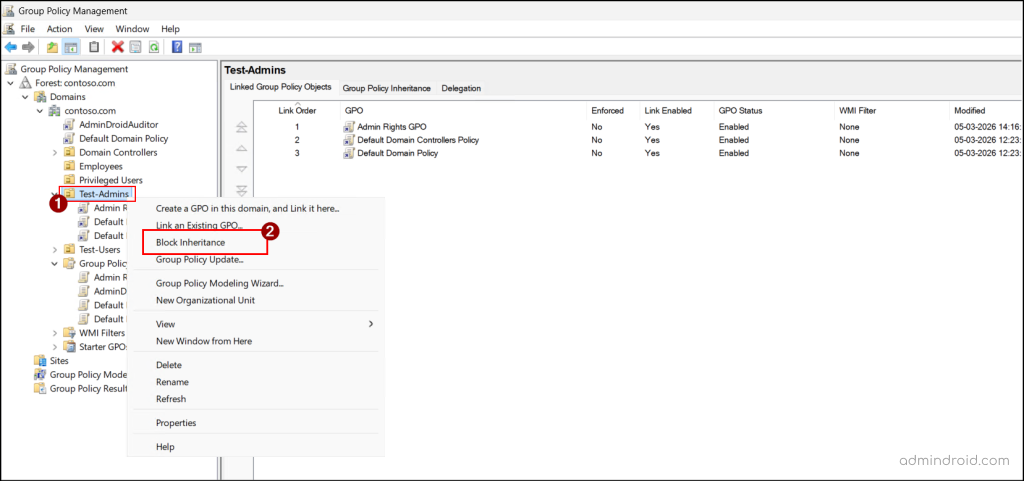
To re-enable inheritance, you can simply select Block Inheritance again where the GPO is blocked.
You can also use the following cmdlet to block inheritance for GPO in Active Directory using PowerShell:
|
1 |
Set-GPInheritance -Target "<TargetDistinguishedName>" -IsBlocked Yes |
Replace <TargetDistinguishedName> with the distinguished name of the target scope.
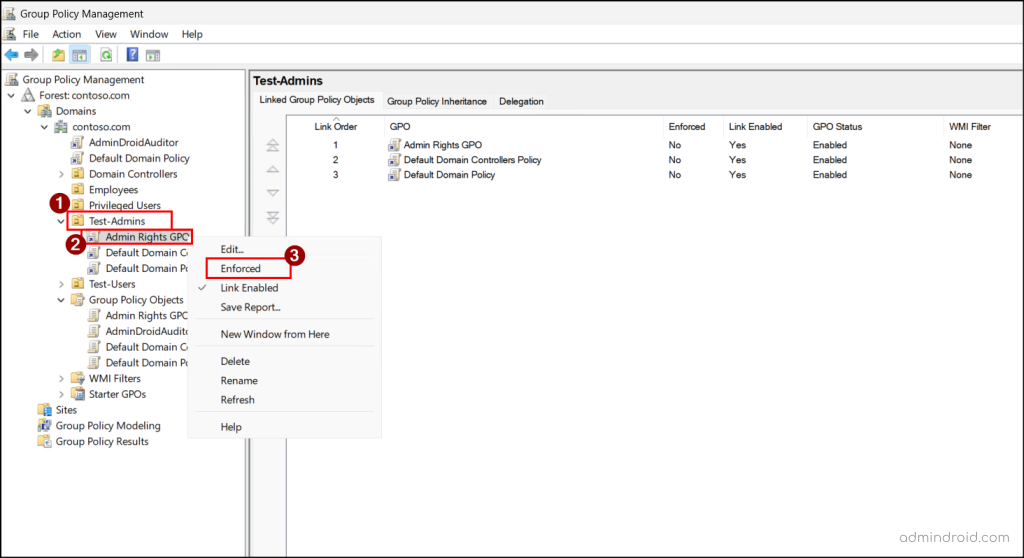
Enforce a GPO in Active Directory
As time passes, multiple Group Policy Objects (GPOs) may be linked to a site, each following an order of precedence. But what if you need a specific GPO to take effect regardless of the others? That’s where enforcing a GPO comes in.
This ensures critical policies are applied precisely where needed, without unintended overrides from other GPOs. Additionally, enforced GPOs can override block inheritance, ensuring that critical policies are applied even if lower-level sites try to block them.
Now, let’s see how to enforce an Active Directory Group Policy.
- Open GPMC and right-click the target GPO under the domain, OU, or site.
- Select Enforced to make the GPO take priority over others and apply its settings.
You can also execute the below cmdlet to enforce a GPO using PowerShell by replacing the GPO name and the distinguished name of the domain or OU, or the site name in the required placeholders.
|
1 |
Set-GPLink -Name "<GPOName>" -Target "<TargetDistinguishedName>" -Enforced Yes |
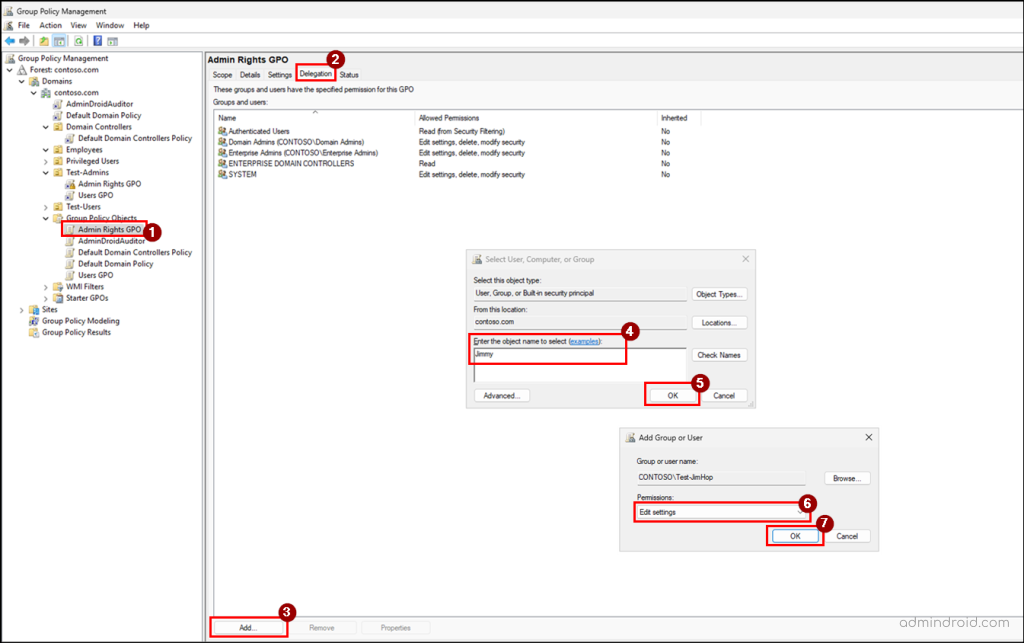
Delegate Permissions for Group Policy Object
By default, Enterprise Admins, Domain Admins, and local Administrators have full control over Group Policy Objects. They can create, edit, modify, and delete GPOs. Authenticated Users and Enterprise Domain Controllers have read access to GPOs.
However, in many organizations, multiple admins may need to manage multiple different policies. In such cases, you can assign delegated permissions to the selected users or groups. There are three types of delegated permissions:
- Read settings – Allow users to view the GPO’s settings, properties and delegated permissions.
- Edit settings – Enables users to update the policy settings in a GPO.
- Edit settings, delete, and modify security – Permits users to edit, delete, and modify GPO security settings.
Follow the steps below to delegate permissions to manage GPOs in Active Directory.
- Open GPMC, select the target GPO, and go to the Delegation tab.
- Click Add, enter the name of the user or group, and click OK.
- In the Add Group or User window, choose the required permission from the Permissions dropdown list and click OK.
You can further modify or remove the delegated permissions by simply right clicking the object, selecting the required option, and clicking OK.
You can also run the below cmdlet to delegate GPO permissions using PowerShell:
|
1 |
Set-GPPermission -Name "<GPOName>" -TargetName "<ObjectSAMAccountName>" -TargetType <TargetObject> -PermissionLevel <PermissionLevel> |
Here, replace the parameters with the appropriate values:
- ObjectSAMAccountName – Specify the SAM account name of the target user or group you want to assign delegated permission.
- TargetObject – Specify as User or Group, depending on which type of object the permission is being delegated.
- PermissionLevel – Specify the required permission as GpoRead, GpoEdit, GpoEditDeleteModifySecurity, or None as per your requirement.
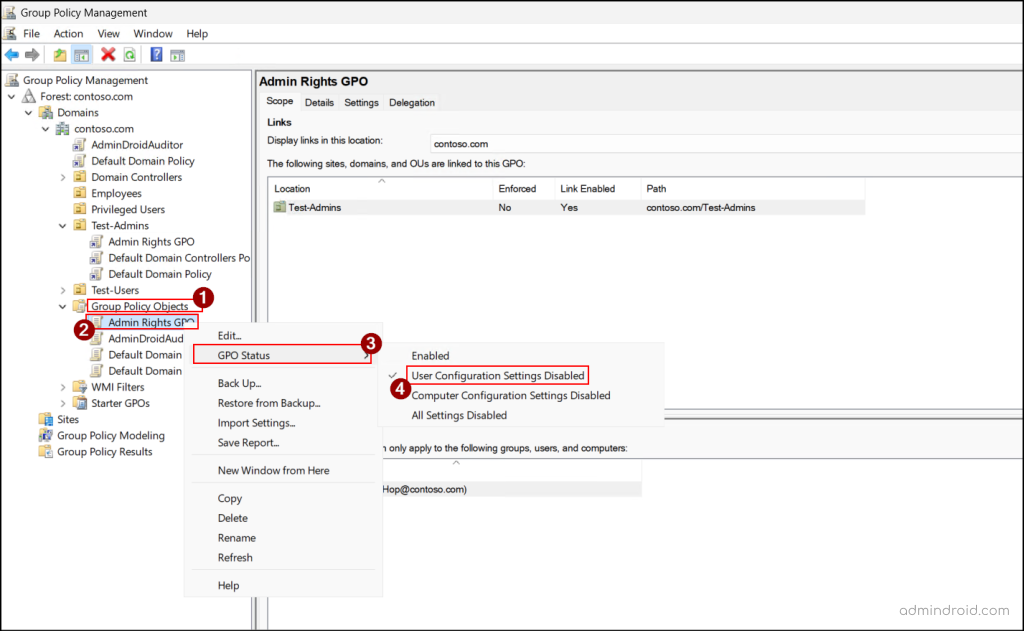
Enable and Disable a Group Policy Object
Sometimes, a Group Policy Object may only be used for user settings or computer settings, not both. In such cases, you can update the GPO status to disable the unused section. This stops the settings in the unused part from processing, thereby simplifies policy management and improves efficiency.
You can manage this policy settings status in 4 categories.
- Enabled – Both User Configuration and Computer Configuration settings will be processed.
- User Configuration Settings Disabled – All User Configuration settings in the GPO will be skipped while processing, so any user-related settings in that GPO will not be applied.
- Computer Configuration Settings Disabled – All Computer Configuration settings in the GPO will be skipped during the policy process, which prevents any computer-related settings from being applied.
- All Settings Disabled – Neither User Configuration nor Computer Configuration settings in the GPO will be processed.
To update the status of a GPO in Active Directory, perform the following steps.
- Open GPMC, right-click a GPO under the Group Policy Objects, and select GPO Status.
- From the available options, choose the one that fits your requirement.
To configure the GPO status using PowerShell, you can use the following cmdlet:
|
1 |
$Gpo = Get-GPO -Name "<GPOName>" $Gpo.GpoStatus = "<GPOStatus>" |
Replace <GPOStatus> with AllSettingsDisabled, AllSettingsEnabled, UserSettingsDisabled, or ComputerSettingsDisabled based on your requirement.
Back Up and Restore Group Policy Objects in Active Directory
In Active Directory, modifying an GPO is a common task, whether you’re adding security features or tweaking settings, but changes don’t always go as planned. Sometimes a GPO gets accidentally deleted, updates fail, or you may need to reset the default GPOs. That’s where backing up and restoring GPOs becomes a real lifesaver.
Think of a backup as a snapshot of all your GPO settings such as policy configurations, security filters, and WMI filters safely stored so you can revert to it anytime. You can even keep multiple versions, giving you flexibility to roll back to a previous configuration. a safe location on your system.
Note: Never edit backup files directly. If you need to change a backed-up GPO, restore or import it into the GPMC console first, then make your updates.
If a GPO is accidentally deleted or stops functioning correctly, simply restore it from the backup. All settings are recovered, but note that you’ll need to relink the GPO to the appropriate OU, domain, or site manually. Also, a backup is tied to the original GPO it was created from and cannot be restored to a different GPO.
How to Back Up Group Policy Objects?
Follow the steps below to back up the existing policy settings of a GPO.
- Open the GPMC console, right-click the target GPO you need to back up, and select Back Up. Alternatively, if you need to back up all GPOs in the domain, right-click Group Policy Objects and select Back Up All.
- In the Location field, select Browse to choose a location where you want to back up the GPO, and then click Back Up.
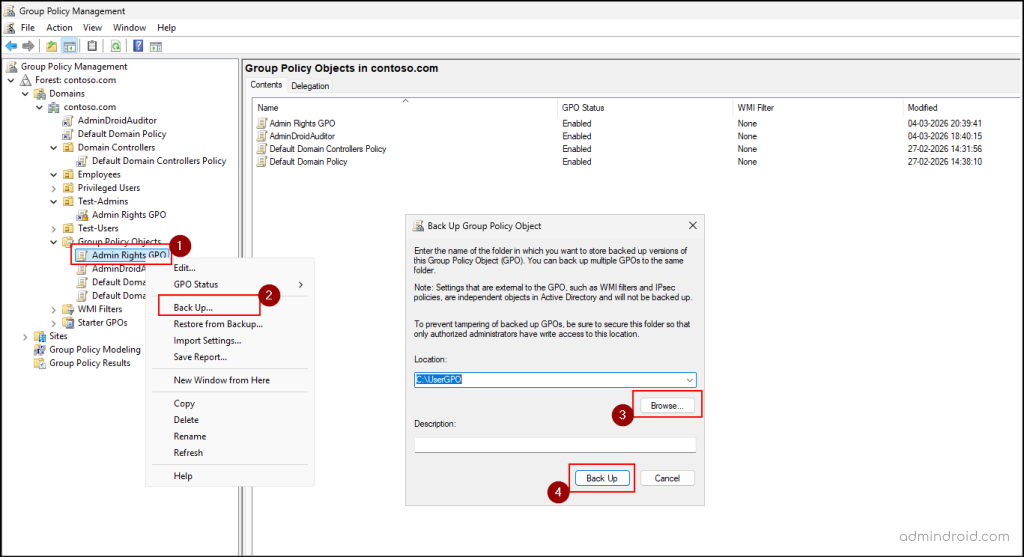
- Once the backup completes successfully, click OK.
You can also use PowerShell to back up the GPOs in Active Directory. To back up a specific GPO, run the following cmdlet.
|
1 |
Backup-GPO -Name "<GPOName>" -Path <BackUpPath> |
Replace <GPOName> with the name of the target GPO that needs to be backed up and <BackUpPath> with the target location where you need to back up the GPO.
To back up all GPOs in a domain using PowerShell, you can execute the cmdlet below.
|
1 |
Backup-GPO -All –Domain "<DomainName>" -Path "<BackUpPath>" |
How to Restore Group Policy Objects?
Once a GPO is backed up, you can restore it whenever needed by following the steps below.
- Right-click the target GPO in the GPMC console where you want to restore the backed-up settings.
- Select Restore from Backup and click Next.
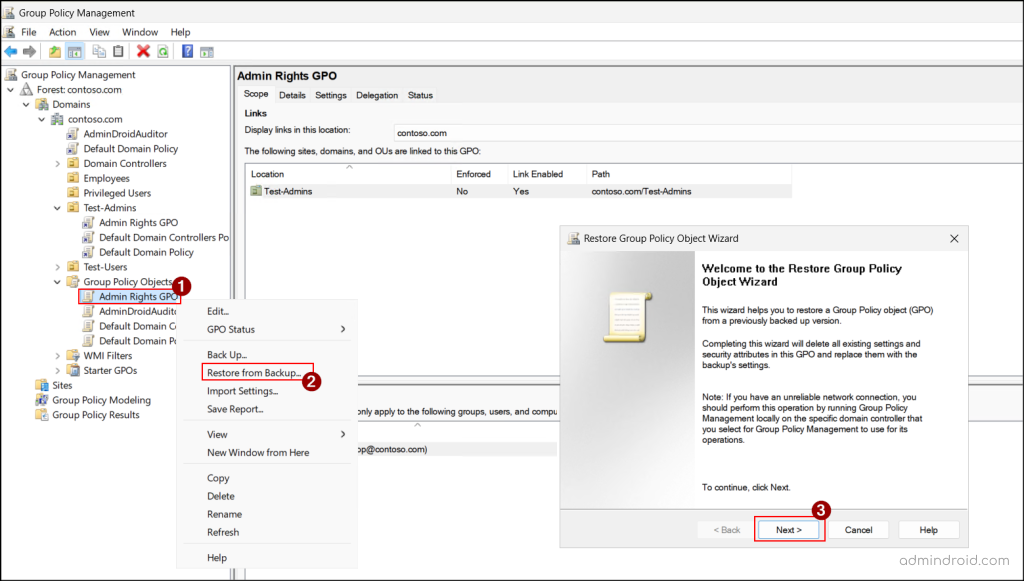
- In the Backup location wizard, enter a path or click Browse to select a location where the backup of the GPO you want to restore is stored. Then, click Next.
- Select the source GPO you need to restore and click Next.
- Then, select Finish to restore the backed-up version of the GPO. Once the restore succeeds, click OK to close the window.
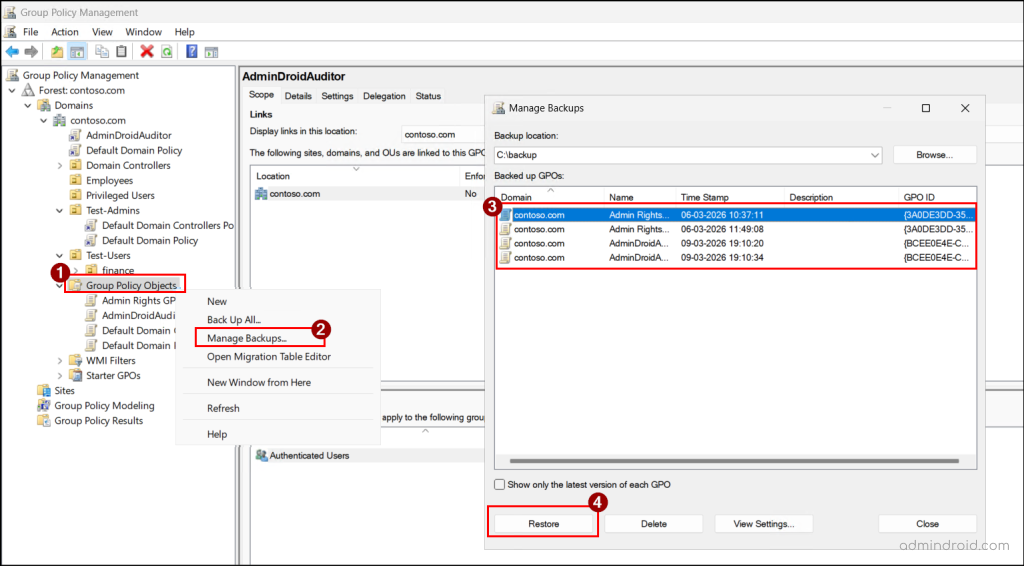
If you need to restore multiple GPOs at the same time, then you can right-click Group Policy Objects and select Manage Backups. In the Manage Backups wizard, select the desired GPO backups and click Restore and click OK in the confirmation prompt.
You can also restore a specific GPO using the following cmdlet:
|
1 |
Restore-GPO -Name "<GPOName>" -Path "<BackedUpPath>" |
Replace <GPOName> with the name of the target GPO that needs to be restored and <BackedUpPath> with the location from where you need to restore the GPO.
To restore all GPOs that are backed up in a domain using PowerShell, you can run the following cmdlet:
|
1 |
Restore-GPO -All -Domain "<DomainName>" -Path "<BackedUpPath>" |
One limitation of the Restore option is that it can only be used within the same domain. You cannot restore a GPO directly into another domain.
Since a GPO backup can only be restored to its original GPO, restoration works directly only if the GPO still exists. If the original GPO has been deleted, you can restore it only from the GPMC console. Go to Group Policy Objects → Manage Backups, select the required GPO, and click Restore.
PowerShell does not support restoring a GPO when the original GPO has been deleted.
Import Group Policy Objects Across Domains
Backing up and restoring a GPO is great for recovery—but you can’t restore a backup into a different GPO or domain. In these cases, you can import the GPO, which lets you transfer the policy settings to a new domain without recreating them from scratch.
Importing a GPO lets you reuse existing policy settings from a backup files or the Administrative Template files (.admx or .adml). When you import, the settings from the source GPO are applied to the target GPO, overwriting any existing configurations.
Note: When you import a GPO, only the policy settings are imported. Security filters, WMI filters, and GPO links are not included.
In cases where you must need to reference the users, groups, or UNC paths, you can use a migration table. It is an XML file that automatically maps these references from the source domain to the target domain during the import process. When it is used, it automatically maps references from the source GPO to the appropriate references in the target domain.
You can follow the steps below to import the GPOs in Active Directory.
- Open GPMC, right-click the target GPO, select Import Settings, and click Next.
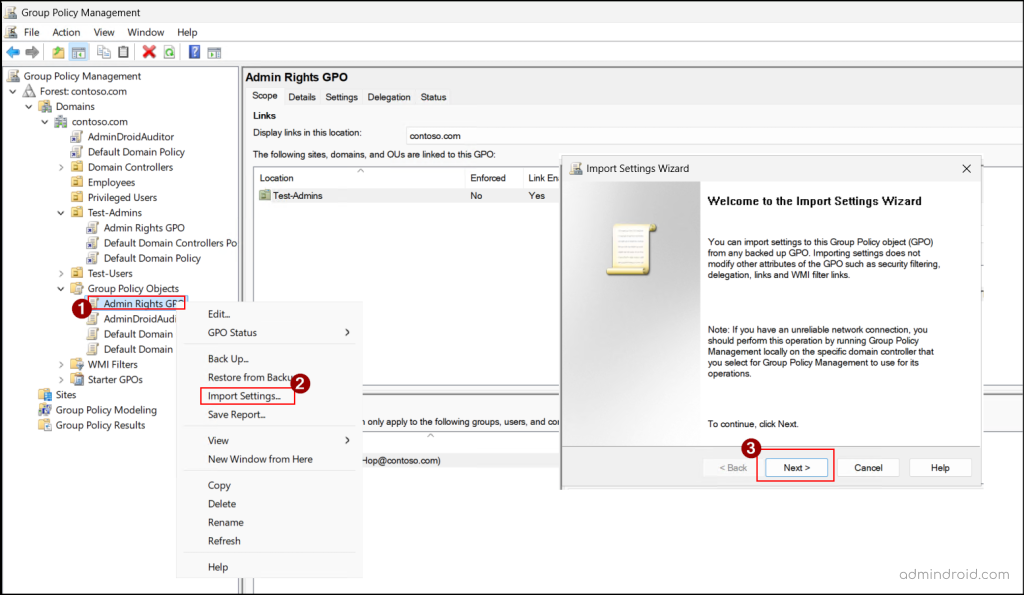
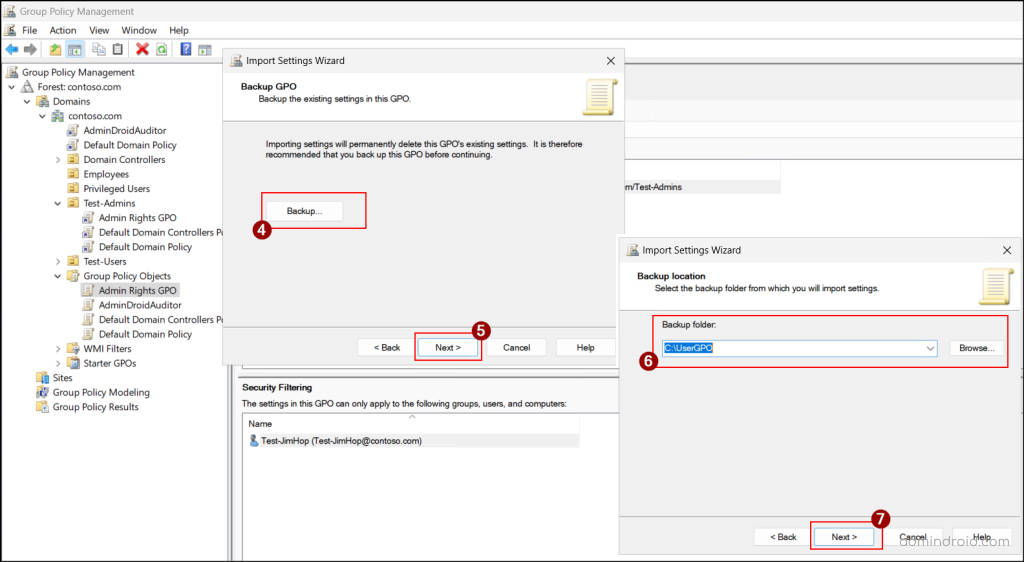
- Before importing the new settings, if you want to back up the current settings of the source GPO, select Backup; otherwise, click Next.
- Enter the path or click Browse to select the folder containing the backed-up GPO. Then, click Next.
- Select the backed-up GPO that you want to import and click Next. To get the most recent version of the backed-up GPOs, enable Show only the latest version of each GPO.
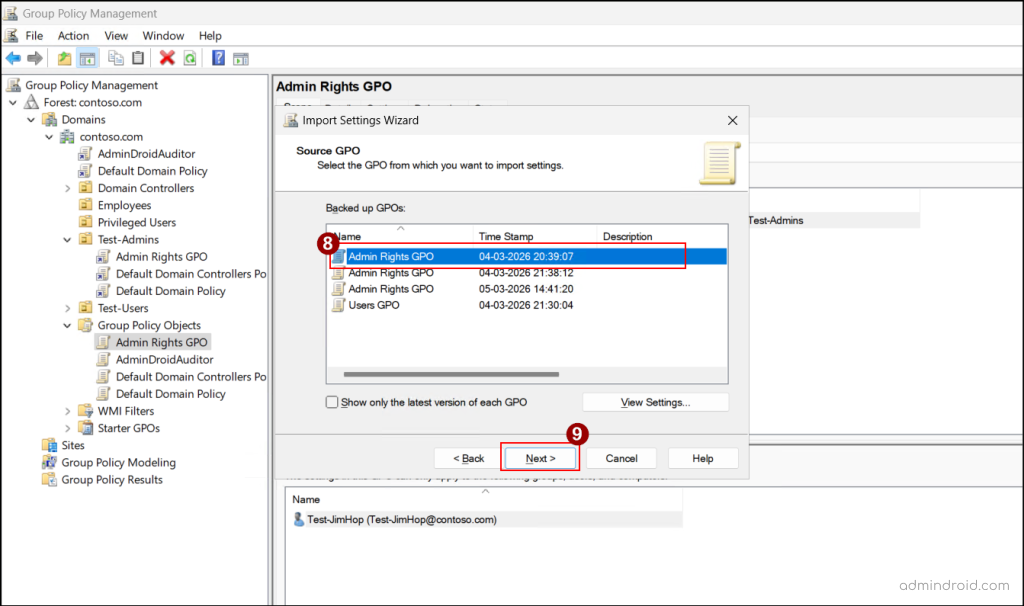
- Click Next, review the scan results, and click Next.
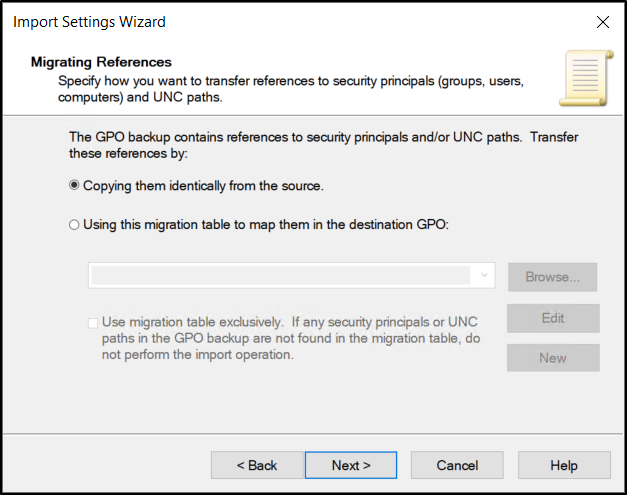
- If the GPO contains references to security principals or UNC paths, an additional page will appear during the import process. Under Migrating References, select any one of the following methods for transferring references and click Next.
- Copying them identically from the source – To keep the references exactly as they are.
- Using this migration table to map them in the destination GPO – To map the references to new users, groups, or paths in the destination GPO.
- Finally, click Finish to import, and then click OK once it succeeds.
To import a GPO in Active Directory using PowerShell, you can execute the following cmdlet.
|
1 |
Import-GPO -BackupGpoName '<SourceGPO>' -TargetName '<TargetGPO>' -path '<BackedUpPath>' |
If the target GPO name does not exist in the Active Directory domain, it will throw an error. To avoid this, you can use the –CreateIfNeeded parameter and run the cmdlet as below.
|
1 |
Import-GPO -BackupGpoName '<SourceGPO>' -TargetName '<TargetGPO>' -path '<BackedUpPath>' -CreateIfNeeded |
This will create a new GPO if the target GPO is not present in the domain and import the GPO.
Copy a Group Policy Object
If you have a complex GPO and want to create a second version with only a small change, you can copy the GPO to create a duplicate of the original GPO with the same policy configurations. You can copy and paste a GPO either within the same domain or to another trusted domain.
When a GPO is copied within the same domain, the new GPO includes all policy settings, security filtering, and WMI filters. This provides a quick way to reuse an existing configuration without recreating the settings from scratch.
However, when copying across domains, only the policy settings are transferred. As security principals (such as users and groups) may not exist in the target domain, you must use a migration table to map the appropriate users, groups, or paths.
With this understanding, let’s see how to copy a GPO into an existing or new domain.
- Open GPMC, go to Group Policy Objects, right-click the GPO you want to copy, and select Copy.
- Once copied, go to the target domain, right-click Group Policy Objects and select Paste.
- Choose one of the following options based on your requirement, and then click OK.
- Use the default permissions for new GPOs – Removes any security filtering and applies the policy only to Authenticated Users.
- Preserve the existing permissions – Keeps the same security filtering and permissions as the original GPO.
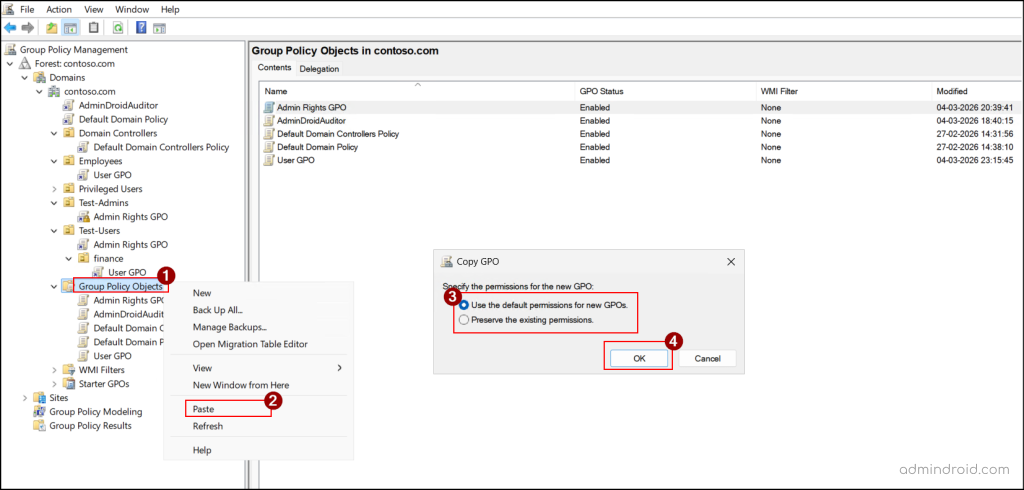
You can also paste a copied GPO into an OU or a site by right-clicking the target scope, selecting Paste, and clicking OK in the confirmation prompt.
Once pasted, a new GPO is created with the name “Copy of {OriginalGPOName}”. You can rename by right-clicking the GPO and choosing Rename.
Alternatively, you can copy settings from one GPO to another using the following PowerShell cmdlet:
|
1 |
Copy-GPO -SourceName "<SourceGPO>" -TargetName "<TargetGPOName>" |
Replace <SourceGPO> with the name of the GPO you want to copy, and <TargetGPOName> with either the name of an existing GPO or a new name where you want the settings to be applied. If a GPO with the same name already exists in the target domain, the command will fail.
To copy a GPO between Active Directory domains using PowerShell, you can use the cmdlet below:
|
1 |
Copy-GPO –SourceName '<SourceGPO>' -SourceDomain '<SourceDomain>' -TargetName '<TargetGPOName>' -TargetDomain '<TargetDomain>' |
Replace <SourceDomain> with the domain where the source GPO exists and <TargetDomain> with the domain where the target GPO will be created.
To copy UNC paths and security principals to a GPO in a different domain using PowerShell, you can use a migration table as follows.
|
1 |
Copy-GPO –SourceName “<SourceGPO>” -SourceDomain “<SourceDomain>” -TargetName “<TargetGPOName>” -TargetDomain “<TargetDomain>” -CopyACL $true –MigrationTable “<MigrationTablePath>” |
Replace <MigrationTablePath> with the path where the created migration table is stored.
Note: When you copy and paste the same GPO into the same location multiple times, it creates duplicates, making it hard to know which version has the latest settings.
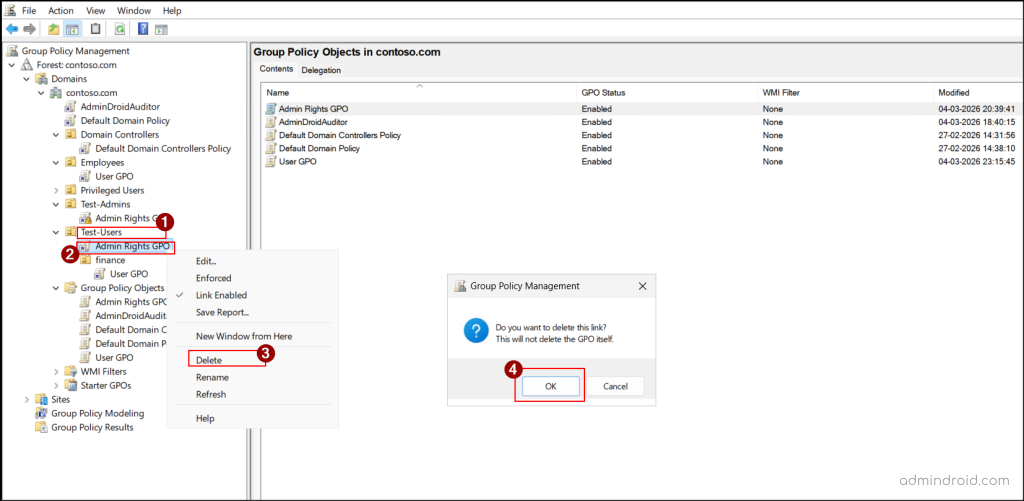
Remove Group Policy Object Links
If a Group Policy Object is no longer needed for a specific OU, domain, or site, you can unlink the GPO. This stops the policy from applying to the objects in that container while keeping the GPO available for use elsewhere in the environment.
Below are the steps to delete a link for a GPO in Active Directory.
- Open GPMC, and expand the target domain, OU, or site.
- Right-click the linked GPO, select Delete to remove the link.
- Click OK in the confirmation prompt.
You can also use the below cmdlet to remove the link for a GPO using PowerShell:
|
1 |
Remove-GPLink -Name "<GPOName>" -Target "<TargetScope>" |
Replace <TargetScope> with the domain, OU, or site from which you need to unlink the GPO.
Delete Group Policy Objects in Active Directory
Over time, unused or duplicate Group Policy Objects can accumulate in an Active Directory environment. In such cases, you can remove these unnecessary GPOs to keep policy management clean and organized. However, deleting a GPO permanently removes that GPO and unlinks it from all locations, so proceed with caution.
You can follow the steps below to delete a GPO in Active Directory.
- Open GPMC, right-click the target GPO under the Group Policy Objects, and select Delete.
- Click Yes in the confirmation prompt to delete the GPO.
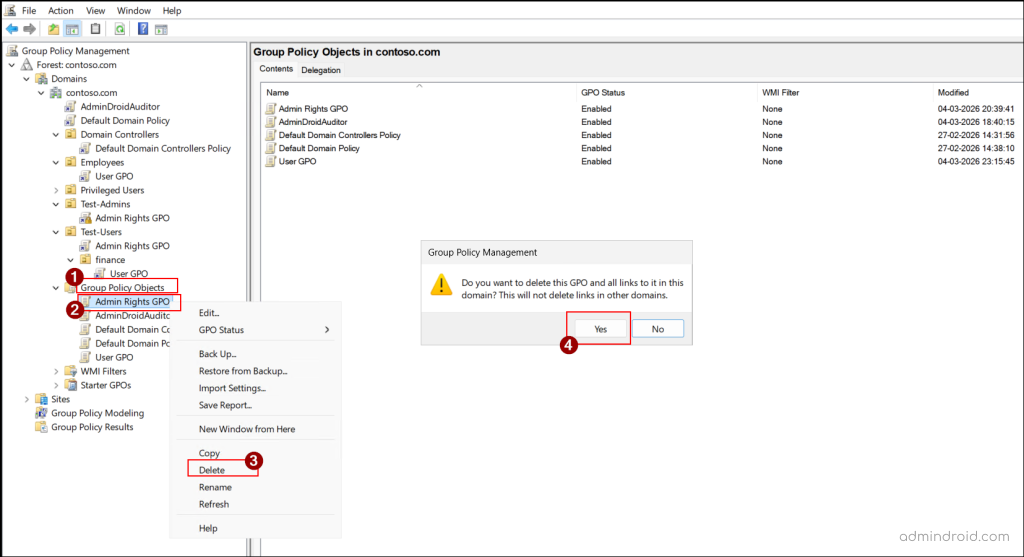
Note: Deleting a GPO does not remove its links in other domains.
You can delete a GPO through PowerShell by running the following cmdlet.
|
1 |
Remove-GPO –Name “<GPOName>” |
Replace <GPOName> with the name of the GPO you want to remove.
Group Policy Modelling and Results in Active Directory
Resultant Set of Policy (RSoP) is a built-in feature in Active Directory that helps administrators manage Group Policy Objects more effectively. Since multiple GPOs can apply at different levels (site, domain, and OU) can sometimes be difficult to determine which policies are applied. RSoP helps you manage these policies and understand how they are applied, making it easier to analyze and troubleshoot issues.
RSoP provides two modes for this purpose:
- Group Policy Modelling Wizard (Planning Mode) – Lets you simulate different scenarios, such as moving a user or computer to another OU, to see how the policies would be applied.
- Group Policy Results Wizard (Logging Mode) – Shows the policies that are currently applied to a specific user or computer, helping you verify and troubleshoot policy behaviour.
And that’s a wrap! We hope this guide makes managing GPOs in your Active Directory environment a lot easier. Have questions or tips from your own experience? Share them in the comments. We’d love to hear your thoughts! Keep an eye out for more practical Active Directory tips coming your way. 😊


