Managing identities across multiple enterprise applications is a constant challenge for IT admins. Over time, applications often accumulate accounts from former employees, local accounts not linked to Entra ID, etc. These unmanaged accounts create gaps in identity management, insider risk, and complicate provisioning.
Microsoft Entra ID Account Discovery, currently in preview, addresses this challenge by identifying and classifying the existing accounts before provisioning begins. It helps admin gain visibility into orphaned or disconnected accounts and connect the right users to the right applications. In this blog, we’ll explore how Account Discovery works, how to configure it in your tenant, and how it strengthens identity management during app provisioning.
Account Discovery for Target Applications in Microsoft Entra ID
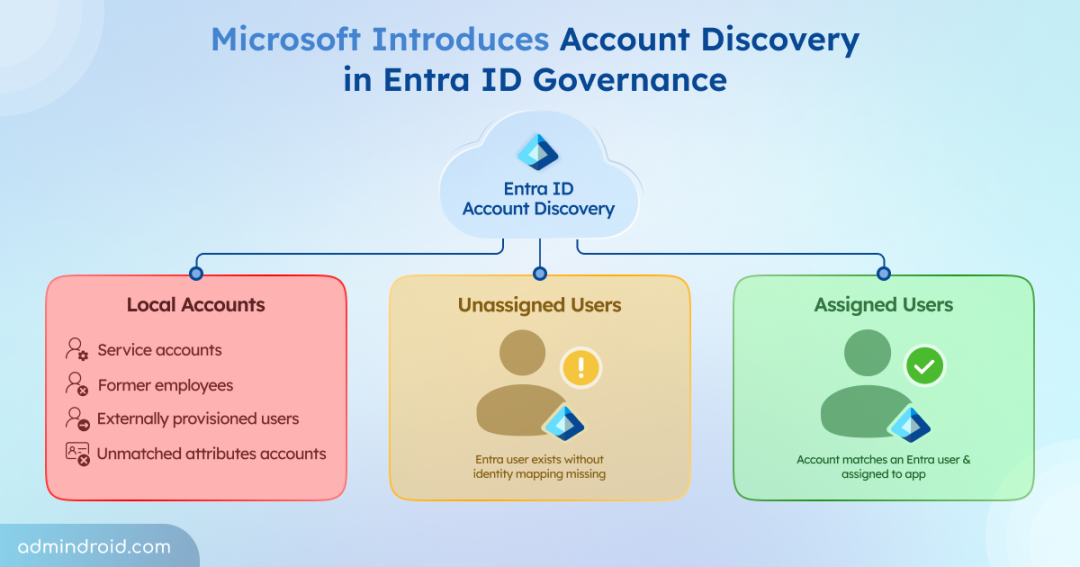
Account Discovery is a new capability in Microsoft Entra ID that helps admins detect and manage accounts that exist outside Entra ID governance. Instead of waiting until provisioning to uncover mismatches, it scans target applications in advance. When Account Discovery runs, it retrieves all user accounts from a target application and classifies them into three categories:
| Category | What It Means | Example | Risks |
| Local accounts | Account in the app that has no matching Entra ID user | A departed employee’s Salesforce account that was never deprovisioned | You don’t know who owns them. It’s a potential security gap. |
| Unassigned users | Account matches an Entra user, but that user isn’t assigned to the enterprise app | A colleague created directly in the app before you set up provisioning | Access exists without proper control |
| Assigned users | Account matches an Entra user who’s already assigned to the app | The baseline. These are what provisioning already manages | Fully governed. Good state. |
With this visibility, admins can identify unmanaged, duplicate, or mismatched accounts early and take the right action before provisioning begins.
Since Account Discovery is still in preview, it is not enabled by default. Admins need to opt in at the tenant level to use it. Microsoft has announced that general availability will begin in early August 2026 and complete by late August 2026.
Prerequisites to Access Account Discovery in Entra ID
Before you can start using Account Discovery, you must have the following requirements in place.
- License requitements: Your tenant must have either the Microsoft Entra ID Governance add‑on or Microsoft Entra Suite assigned.
- Role requirements: You must hold at least Application Administrator, Cloud Application Administrator, or Hybrid Identity Administrator role.
- Enterprise application setup: The target application must be configured for provisioning with valid credentials and a successful test connection.
- Direct matching attribute mapping: You need to configure a direct attribute mapping between Microsoft Entra ID and the target application to ensure accounts can be matched correctly.
- Application support: The target application must support the SCIM 2.0 protocol (RFC 7644) for Account Discovery to work.
- Connectors: Account Discovery is currently supported only for specific provisioning connectors, such as Atlassian Cloud, Salesforce, SAP Cloud Identity Services and ECMA (for on-premises applications).
Once these prerequisites are met, you can enable and start using the Account Discovery feature.
How to Run Account Discovery in Microsoft Entra ID?
To use Account Discovery to find existing user accounts in a target application, follow the steps below:
- Sign in to the Microsoft Entra admin center.
- Navigate to Entra ID ➝ Enterprise apps, and open the target application where you want to discover existing user accounts.
- From the left navigation pane, under Manage, select Provisioning.
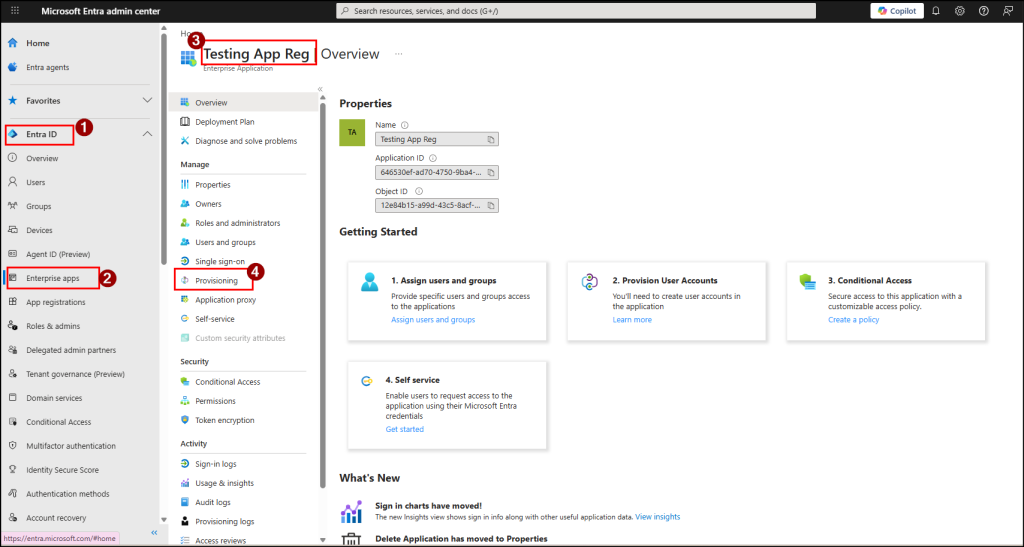
- Here, select Discover Identities.
- Once triggered, the provisioning service will fetch all user accounts from the target application and organize them into the three categories. If your discovery report shows no results, then check that you’ve set up a single direct matching attribute and the target application supports pagination.
Note: The discovery process can take at least 30 minutes for the report to generate. The exact time depends on the number of user accounts in the target application.
Review and Remediate User Categories in Microsoft Entra ID Account Discovery
Once the report is ready, you can review all the discovered accounts and take the appropriate action based on their category:
- For local accounts – Investigate before you delete. These could be genuine orphans, but they can also be service accounts, shared accounts, or users hidden behind a mismatched attribute.
For each user account:- Check with the app owner to confirm the account isn’t an active integration.
- If it’s an orphan, remove it in the target app.
- If it’s a real user hidden by a data-quality mismatch, fix the attribute in Entra ID and re-run discovery. They should move to Assigned or Unassigned on the next run.
- For unassigned users – Bring them under provisioning. Then, open the target application, go to Users and groups, and assign the necessary users or groups to the application so provisioning can manage them.
- For assigned users – No action required. If you prefer, you can take additional actions such as assigning existing users to access packages, setting up lifecycle workflows for provisioning or deprovisioning, and configuring entitlement management to keep access up to date.
Where Account Discovery Doesn’t Apply
If you’re using applications configured through unsupported connectors such as AWS, ServiceNow, Snowflake, or HR provisioning systems like Workday or SuccessFactors, Account Discovery won’t apply. Microsoft doesn’t currently support these connectors for this feature. However, you can still manage these applications through their native provisioning configurations until Microsoft expands support.
Hope this blog helped you understand how Account Discovery can simplify identity cleanup and reduce risk. Have any questions or experiences to share? Feel free to drop them in the comments section below. Stay tuned for more upcoming blogs!


