At first glance, Microsoft 365 feels secure right out of the box. After all, it comes with built-in protections, modern authentication, and continuous updates. But that’s only part of the picture. Security in Microsoft 365 isn’t just about enabling the right controls – it’s also about questioning what’s already enabled.
Since many of these settings are designed to support a wide range of use cases, they may need to be adjusted to align with your organization’s security requirements. Instead of assuming everything is secure, it’s important to take a closer look at these configurations and understand what needs attention.
In this blog, let’s focus on Microsoft 365 settings that should be disabled to lock down weak spots and make your setup more secure.
Security Settings in Microsoft 365 You Should Turn Off
To simplify things and bring clarity, we have grouped the settings that need to be disabled based on their default state. This helps quickly identify what needs immediate attention versus what just needs confirmation or conditional review.
- Settings enabled by default (must be disabled)
- Disable direct send in Exchange Online
- Disable “Chat with anyone” feature in Microsoft Teams
- Disable “Stay signed in” prompt in Microsoft 365
- Disable guest inviting other guests
- Disable anonymous links in SharePoint
- Disable user app registrations in Microsoft Entra ID
- Disable self-service purchase in Microsoft 365
- Block client secret creation in Microsoft Entra ID
- Disable Outlook roaming signatures
- Disable MDM enrollment prompt in Intune
- Disable LinkedIn integration with Microsoft 365
- Disable Office add-ins in Microsoft 365
- Disable third-party storage integration in Teams & Outlook
- Limit user consent to applications in Microsoft Entra ID
- Prevent users from creating new tenants in Microsoft Entra ID
- Restrict user access to Microsoft Entra admin center
- Restrict users from recovering BitLocker keys
- Settings that are disabled by default (verify)
- Optional settings (turn off when not needed)
Settings Enabled by Default in Microsoft 365 That Should Be Disabled
Some settings in Microsoft 365 are switched on by default to keep things running smoothly from day one. But what works as a general setup can sometimes allow more access or behavior than intended. Leaving them unchanged can create blind spots in how data is shared or accessed. Reviewing and turning off what’s unnecessary helps keep things tighter and more predictable.
1. Disable Direct Send in Exchange Online
Direct Send is enabled by default in Exchange Online and allows devices & applications to send emails without authentication. This creates a direct path for spoofing and unauthorized email delivery.
Attackers can exploit this configuration to send emails that appear legitimate, increasing the likelihood of phishing and internal impersonation attacks.
Therefore, it is strongly recommended to disable Direct Send in Exchange Online by setting –RejectDirectSend to $true.
➡️ Refer to the steps to disable it:
https://blog.admindroid.com/how-to-enable-reject-direct-send-in-microsoft-365/
💡Tip: If you still have devices or applications that need to send emails, use authenticated SMTP submission or configure connector-based routing with certificate or IP restrictions.
2. Disable “Chat with Anyone” Feature in Microsoft Teams
The “Chat with anyone” feature in Teams allows users to start conversations with personal contacts using just an email address. This capability is widely available across Microsoft Teams licenses.
As a result, users in your organization can initiate conversations without any restrictions. Once the external person accepts the invitation link, they are automatically provisioned as a Microsoft Entra B2B guest user. This extends the interaction beyond a simple chat session into a guest account relationship within your tenant.
To avoid these risks, it’s recommended to disable this feature unless there is a strong business need.
➡️ Refer to the steps to disable it:
https://blog.admindroid.com/microsoft-teams-new-chat-with-anyone/
3. Disable “Stay Signed In” Prompt in Microsoft 365
The “Stay signed in” option in Microsoft 365, also known as the KMSI (Keep Me Signed In) prompt, allows user sessions to persist beyond active use. This becomes especially dangerous on shared or unmanaged devices, where lingering sessions can be reused without reauthentication.
For example, if a user signs in from a shared device and leaves the session active, anyone with access to that device can continue using the account without re-authentication⚠️. Over time, this creates silent exposure points that are often overlooked. To minimize this risk, it’s recommended to disable the stay signed-in prompt and enforce session expiration policies.
➡️ Refer to the steps to disable it: https://m365scripts.com/microsoft365/disable-stay-signed-in-prompt-in-microsoft-365/
4. Disable Guest Inviting Other Guests
By default, guest users are allowed to invite other guests in Microsoft 365. This external access can quickly expand beyond what admins are intended. A vendor, partner, or contractor could invite additional external users without IT visibility, creating unmanaged access paths to Teams, SharePoint sites, and other resources.
This makes it harder to track who has access and increases the risk of accidental data exposure. Restricting guest invitations to admins helps keep external collaboration controlled and auditable.
➡️ To disable guest users from inviting other guests in Microsoft Entra ID: https://blog.admindroid.com/restrict-guest-user-invitations-in-microsoft-entra/
5. Disable Anonymous Links in SharePoint
By default, when a SharePoint tenant is set up, anonymous sharing is enabled at the configuration level. If this setting goes unnoticed, it can unintentionally allow anonymous sharing across sites, eventually enabling the creation of anonymous links without proper oversight.
This default behavior makes it even more important to review and disable anonymous link sharing to prevent uncontrolled external access to sensitive data.
➡️ Refer to the steps to disable it and other essential settings you must block for secure external sharing in SharePoint: https://o365reports.com/essential-settings-you-must-block-for-secure-external-user-access/
6. Disable User App Registrations in Microsoft Entra
By default, users can register applications in Microsoft Entra ID. This creates a direct path for misuse if an account is compromised. For instance, an attacker with access to a user account can register a malicious application and assign high API permissions.
Even after a password reset or MFA enforcement, the application can continue operating using its granted permissions, making it a persistent and overlooked threat.
To avoid unmonitored app registrations and reduce shadow IT risks, it’s recommended to restrict app registrations to administrators only.
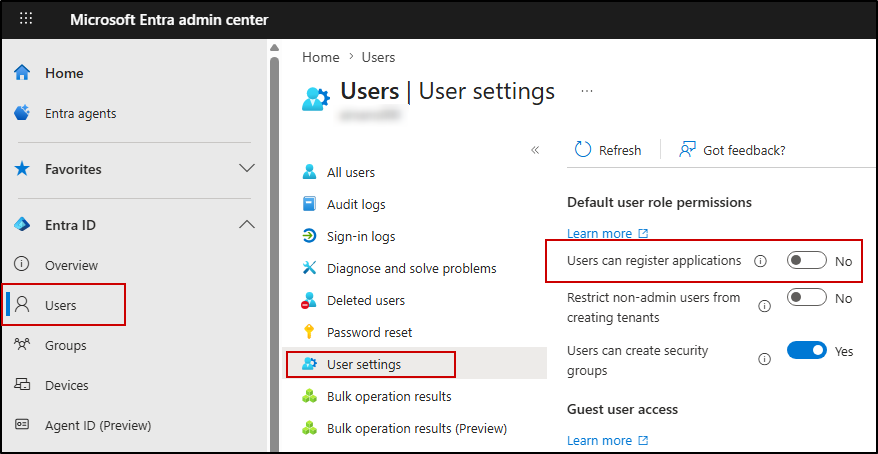
To block app registrations for users in Microsoft Entra ID, follow the steps below:
- Go to the Microsoft Entra admin center
- Navigate to Entra ID → Users → User settings
- Set Users can register applications = No
7. Disable Self-Service Purchase in Microsoft 365
Microsoft allows users to self-purchase or start trials for products like Power BI, Power Apps, Power Automate, Project, Visio, and Teams Premium without IT approval. This introduces shadow IT, unexpected licensing costs, and compliance risks when users purchase tools outside organizational oversight.
Admins may also lose visibility into who owns subscriptions and how company data is being used. To maintain licensing control and prevent unauthorized purchases, it’s strongly recommended to disable self-service purchases for your organization.
➡️ Refer to the steps to disable self-service purchase across all products using our PowerShell script: https://o365reports.com/globally-block-self-service-purchase-in-microsoft-365/
8. Block Client Secret Creation in Microsoft Entra
Client secrets are often hard coded in scripts or applications and can be easily exposed. Once compromised, they provide long-term access to organizational resources.
Blocking the creation of client secrets forces the use of more secure alternatives like certificates or managed identities.
➡️ Refer to the steps to disable it:
https://blog.admindroid.com/block-client-secrets-on-microsoft-entra-applications/
9. Disable Outlook Roaming Signatures
Outlook roaming signatures allow users’ email signatures to sync across devices. This introduces a key administrative limitation – it can override or ignore the signature settings configured using the Set-MailboxMessageConfiguration cmdlet in Exchange Online. This means that centrally defined signature policies may not be consistently enforced across all devices.
As a result, admins who invest time in standardizing email signatures for branding, compliance, or legal disclaimers often find that those configurations are not reliably applied. In addition, roaming signatures can still propagate to unmanaged or non-corporate devices, making signature behavior less predictable across the organization.
Therefore, disabling roaming signatures helps avoid unintended usage across devices and keeps signatures consistent and controlled.
➡️ Refer to the steps to disable it:
https://o365reports.com/disable-outlook-roaming-signatures/
10. Disable MDM Enrollment Prompt in Intune
When users sign in to Microsoft 365 apps on personal devices, they may see the “Allow my organization to manage my device” prompt. Many users click “OK” without realizing it can enroll their personal device into Intune. This gives the organization control over device settings and creates privacy concerns.
This leads to unnecessary device enrollments, user confusion, and added admin overhead. If full device management isn’t required for personal devices, it’s better to disable this prompt and rely on app protection policies instead.
➡️ Refer to the steps to disable it:
https://blog.admindroid.com/disable-allow-my-organization-to-manage-my-device-prompt/
11. Disable LinkedIn Integration with Microsoft 365
LinkedIn integration in Microsoft 365 links users’ personal LinkedIn profiles with work apps like Teams and Outlook, allowing profile details such as job history, skills, and connections to appear within the organization’s environment.
While this can help with quick networking and context about colleagues, it also raises concerns around privacy, data exposure, and workplace distractions, especially in regulated or security-focused environments.
➡️ Refer to the steps to disable it:
https://blog.admindroid.com/how-to-disable-linkedin-integration-in-microsoft-365/
12. Disable Office Add-ins in Microsoft 365
Microsoft 365 application add-ins are extensions that enhance functionality in apps like Outlook, Word, and Excel. These add-ins are often installed from the Microsoft Marketplace (Office Store) by users and will operate without central governance. As a result, they can access sensitive data such as emails and documents, creating direct security risks.
Microsoft 365 add-ins can be managed through multiple controls, including restricting installations for specific users, disabling Outlook add-ins particularly, etc.
➡️ Refer to the blog for various ways to restrict and disable Microsoft 365 add-ins:
https://o365reports.com/an-effective-approach-to-disable-office-add-ins-in-microsoft-365/
13. Disable Third-Party Storage Integration in Teams & Outlook
Microsoft Teams allows users to connect and use third-party storage providers such as Dropbox and Google Drive. This bypasses built-in security controls and creates blind spots in monitoring and governance. As a result, sensitive data can be stored, accessed, and shared outside organizational oversight, significantly increasing the risk of data leakage.
A similar risk exists in Outlook on the web (OWA), where users can connect to external storage providers and attach files directly from services like Dropbox or Google Drive. This extends the same exposure beyond Teams, allowing data to move outside the organization’s governed storage without sufficient oversight.
To maintain control over data storage and sharing, it is recommended to disable external storage integrations across both Teams and Outlook.
️ ➡️Refer to the steps to disable in Teams:
https://blog.admindroid.com/microsoft-teams-security-best-practices/➡️ Refer to the steps to disable in Outlook (OWA):
https://m365scripts.com/exchange-online/restrict-external-storage-providers-in-owa/
14. Limit User Consent to Applications
Allowing users to grant consent to third-party applications opens the door to consent phishing attacks, where users may unknowingly approve apps that request excessive permissions.
In many Microsoft Entra ID environments, user consent has already been restricted by Microsoft and replaced with admin-controlled approval workflows. Users cannot directly approve third-party applications and must request administrator approval instead.
To further strengthen control, organizations should ensure user consent is limited or disabled and rely on admin consent workflows.
➡️ Refer to the steps to restrict user consent to applications:
https://blog.admindroid.com/manage-user-consent-to-applications-in-microsoft-365/
15. Prevent Users from Creating New Tenants
By default, Microsoft Entra ID allows users to create new tenants using their work account. When a user creates a new tenant, they become a Global Administrator of that tenant, with full control over its configuration, users, and services.
It is important to note that creating a new tenant using a work account does not carry over any data, configurations, or access from the existing tenant. Therefore, it does not introduce a direct security risk to the current environment.
However, it can lead to tenant sprawl, lack of visibility, and governance challenges, especially when organizational identities are used to create and manage unmanaged environments. Restricting this capability helps maintain centralized control and prevents the proliferation of unmanaged tenants.
➡️ Refer to the steps to disable it: https://blog.admindroid.com/disable-users-creating-new-azure-ad-tenants-in-microsoft-365/
16. Restrict User Access to Microsoft Entra Admin Center
By default, users with non-admin privileges can access the Microsoft Entra admin center and view certain directory information such as user profiles, group details, and organizational structure.
This can expose sensitive identity and organizational data beyond what is required for day-to-day operations, increasing the risk of unintended information disclosure. Microsoft notes that restricting access to the Microsoft Entra admin center is not intended as a primary security control, but rather as an optional configuration for organizations that want to reduce directory visibility.
To reduce such risk, organizations can restrict access to Microsoft Entra ID so that only authorized administrators can view directory data.
➡️ Refer to the steps to disable it: https://blog.admindroid.com/restrict-user-access-to-azure-ad-to-prevent-data-exposure/
Note: However, even after restricting access, some limited directory information may still remain visible based on Microsoft Entra ID’s built-in behavior.
17. Restrict Users from Recovering BitLocker Keys
By default, BitLocker recovery keys stored in Microsoft Entra ID can be accessed by users. These keys provide full access to encrypted devices and can be used to bypass disk encryption.
Allowing users to access recovery keys creates a direct security risk. If a user account is compromised, attackers can obtain the recovery key and unlock the device, completely defeating BitLocker protection.
Access to BitLocker recovery keys must be restricted so that only authorized administrators can view or retrieve them, ensuring strict control over encrypted devices and preventing unauthorized data access.
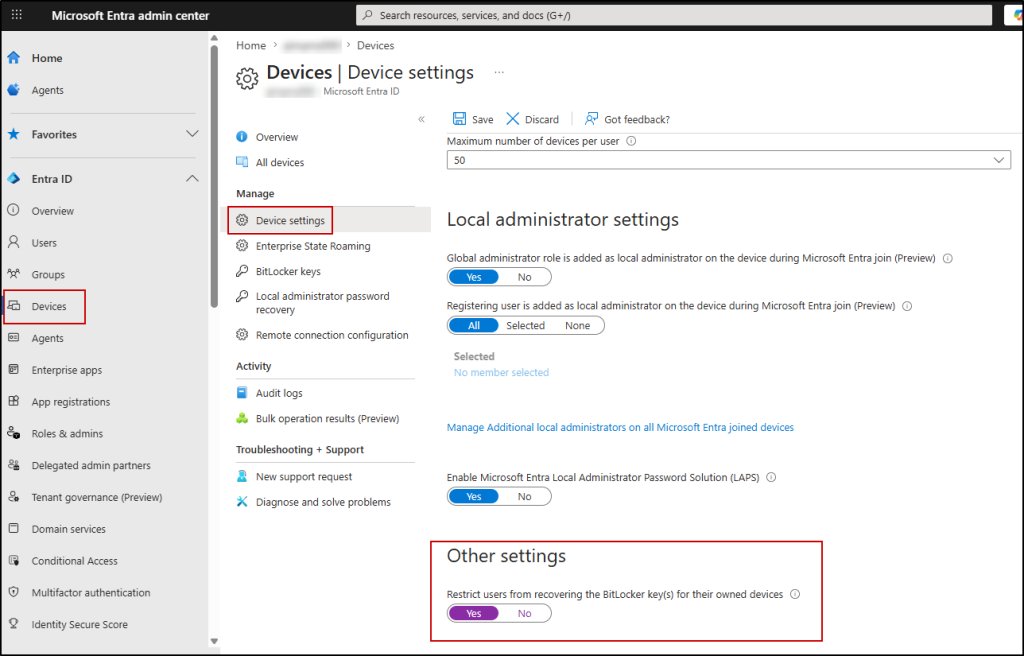
To restrict access to BitLocker recovery keys:
- Sign in to the Microsoft Entra admin center
- Navigate to Devices → Device settings
- Locate “Restrict users from recovering the BitLocker key(s) for their owned devices” under ‘Other settings’.
- Set it to Yes to prevent users from viewing recovery keys.
- Save the changes.
This ensures only administrators can access BitLocker recovery keys and prevents unauthorized retrieval.
Settings That are Disabled by Default (Verify)
Some Microsoft 365 settings are disabled by default to provide a more secure baseline configuration. However, it is important to verify these settings, as changes during deployment or by administrators can sometimes enable them unintentionally.
18. Verify SMTP AUTH is Disabled
SMTP AUTH is disabled by default in most Microsoft 365 tenants, but it may still be enabled for specific scenarios where legacy systems require it. This includes older printers and scanners that only support basic authentication, on-premises applications that send emails through Microsoft 365, third-party tools that don’t support modern authentication, etc.
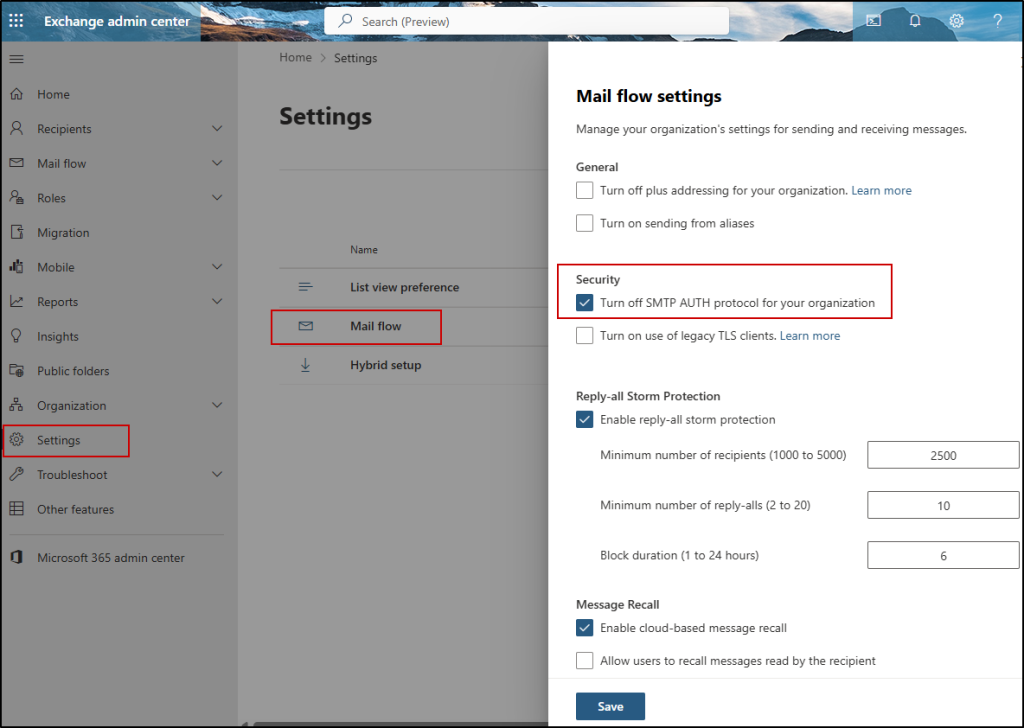
To verify:
- Go to Exchange admin center
- Navigate to Settings → Mail flow
- Ensure SMTP AUTH is turned off
19. Block Legacy Authentication Protocols
Legacy authentication protocols such as IMAP, POP, and older Exchange methods use basic authentication and do not support modern security controls like multifactor authentication (MFA). This makes them a common target for password spray and brute-force attacks.
As of November 2022, Microsoft has deprecated basic authentication protocols for all Office 365 organizations. However, certain legacy configurations or exceptions may still allow their use, making it important to verify and enforce restrictions.
To eliminate these risks, you can block legacy authentication using a Conditional Access policy or disable basic authentication protocols in Exchange Online. This ensures only modern authentication methods are used across the environment.
➡️ Refer to the steps to disable it from Exchange Online:
https://m365scripts.com/microsoft365/disable-microsoft-exchange-unnoticed-basic-authentication-protocols-in-one-go/
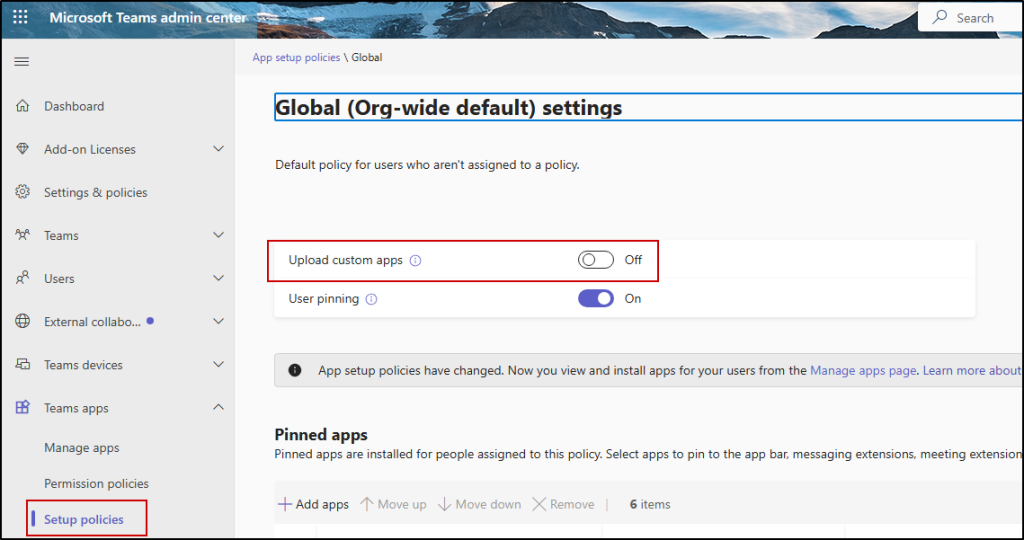
20. Disable Custom App Uploads in Teams
The ability to upload custom apps in Microsoft Teams is controlled through setup app policies and may be enabled in the default (Global) configuration depending on the tenant. Allowing users to upload custom apps in Teams introduces unverified or potentially malicious applications into your Teams environment. These apps can request permissions that expose organizational data and can also be used for OAuth consent grant abuse.
By restricting custom app uploads, admins can ensure that only approved and vetted applications are used within the organization.
To disable custom app uploads in Teams,
- Go to the Teams admin center
- Navigate to Teams apps → Setup policies
- Select the Global (Org-wide default) policy under Manage policies
- Turn off Upload custom apps
- Save changes
You can also allow only specific users to upload custom apps by creating a custom setup policy with Upload custom apps enabled.
⚠️Important: Note that disabling app registration in Entra and disabling custom app uploads in Teams serve different purposes:
- App registration control: Limits who can create new Microsoft Entra ID applications, reducing risks like OAuth abuse and long-lived token misuse.
- Custom app upload control: Determines whether users can upload custom apps into Microsoft Teams, helping prevent unverified or potentially risky apps from entering the environment.
Optional Settings to Disable Based on Your Security Needs
Certain Microsoft 365 settings are optional to disable and should be evaluated based on your organization’s security posture. These settings may introduce risk in some environments and can be turned off where stricter control is required.
21. Restrict Anonymous Users from Joining Meetings
Allowing anonymous users to join Microsoft Teams meetings means anyone with the meeting link can join without verifying their identity. This creates a direct risk of unauthorized access to sensitive discussions. It also increases the likelihood of unverified participants joining meetings, which can lead to exposure of confidential information.
Microsoft is moving away from the organization-wide setting “Anonymous users can join a meeting”. Instead of controlling this at the tenant level, the recommended approach is to manage anonymous access using the “Anonymous users can join a meeting unverified” per-organizer meeting policy.
If your organization handles sensitive or confidential discussions, it’s strongly recommended to restrict anonymous access at the policy level and allow only authenticated users whenever possible.
➡️ Refer to the steps to manage it:
https://m365scripts.com/microsoft-teams/manage-anonymous-user-participation-in-teams-meetings/
22. Block Microsoft 365 Group Creation for Users
By default, all users can create Microsoft 365 Groups. This can quickly lead to group sprawl, unmanaged Teams/SharePoint sites, and governance issues. To restrict this, follow the steps below:
Note: Before proceeding, make sure you have Microsoft Entra ID P1 or P2 licensing, or Microsoft Entra Basic Education (EDU) enabled in your tenant.
- Create a security group in the Microsoft 365 admin center
- Add only the users who should be allowed to create Microsoft 365 Groups
- Retrieve the Object ID of the security group you created using Get-MgGroup -Filter “displayName eq ‘Group Creators'”
- Run the following commands by replacing <GroupID> with your security group’s Object ID:
|
1 2 3 4 5 6 7 8 9 10 11 12 13 14 |
$params = @{ TemplateId = "62375ab9-6b52-47ed-826b-58e47e0e304b" Values = @( @{ Name = "EnableGroupCreation" Value = "False" } @{ Name = "GroupCreationAllowedGroupId" Value = "<GroupID>" } ) } New-MgDirectorySetting -BodyParameter $params |
- Test the setup by signing in as a regular user to confirm they can no longer create groups, while authorized users still can.
This keeps collaboration environments under control.
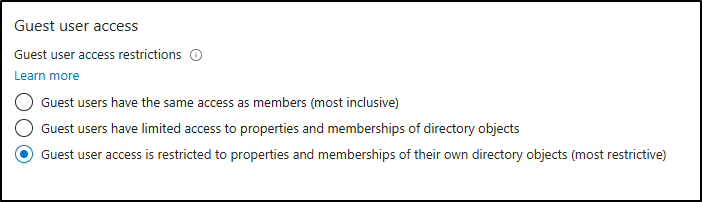
23. Restrict Guest Access to Limited Properties
By default, guest users may be able to browse certain directory details, such as usernames and groups-related information. However, even this default level of visibility may not be necessary for all scenarios. In more security-sensitive environments, further restricting guest access helps minimize exposure of internal structure details to external users.
Applying a more restrictive configuration ensures guest users only access explicitly shared resources.
To restrict guest access to limited directory properties in Microsoft Entra ID:
- Sign in to the Microsoft Entra admin center.
- Navigate to Identity → External Identities.
- Select External collaboration settings.
- Under Guest user access restrictions, locate the access settings.
- Choose “Guest user access is restricted to properties and memberships of their own directory objects (most restrictive)”.
- Click Save to apply the changes.
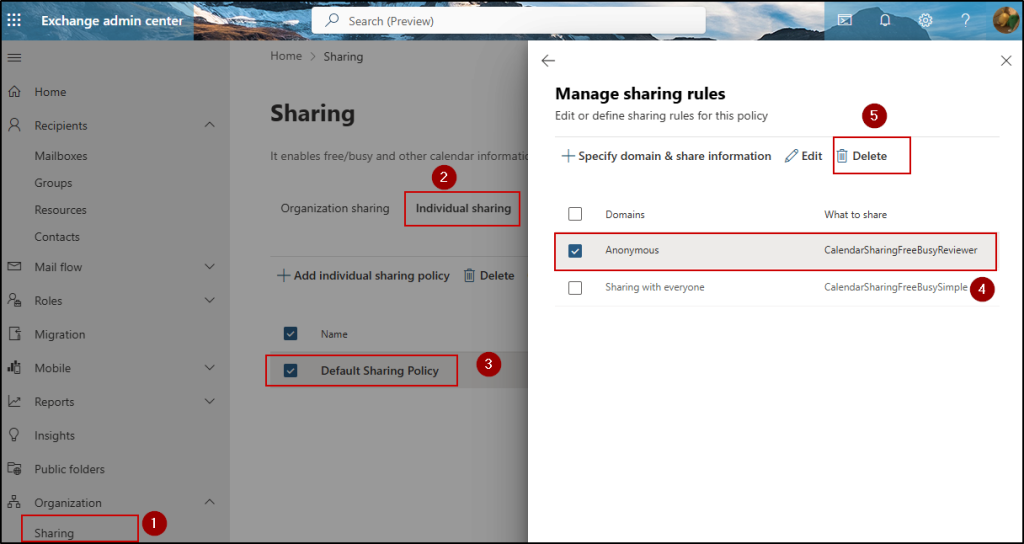
24. Disable Anonymous Calendar Sharing
Anonymous calendar sharing in Exchange Online allows users to share their calendar availability without any identity verification or access tracking.
This exposes patterns such as recurring meetings, collaboration details, out-of-office timings, and heavily booked schedules.
Since access is link-based, it can also be easily forwarded beyond the intended recipient, resulting in uncontrolled visibility.
To disable anonymous calendar sharing in Exchange Online:
- Sign in to the Exchange admin center
- Navigate to Organization → Sharing → Individual sharing
- Locate Default Sharing Policy
- Open Manage domains under Domains & share information
- Select Anonymous – CalendarSharingFreeBusyReviewer and click Delete
Prevent Calendar Publishing (Tenant-Level Control)
In addition to anonymous sharing, calendar publishing is a separate feature that allows users to publish calendars externally via public URLs. Calendar publishing works in two modes: HTML view links and ICS subscription feeds, both of which introduce distinct risks. HTML links can expose readable schedules in a browser without authentication, while ICS feeds enable continuous syncing of calendar updates into external applications.
To control this, you can disable or restrict calendar publishing at the tenant level.
➡️ Refer to the steps to manage and unpublish calendars:
https://m365scripts.com/microsoft365/how-to-find-and-unpublish-calendars-m365/
25. Restrict OneDrive Sync Access
By default, users can sync OneDrive files to local devices, including unmanaged or personal devices. This means sensitive files can be downloaded and stored offline, increasing the risk of data leakage if the device is lost, compromised, or shared. Restricting OneDrive sync access helps ensure organizational files remain protected and accessible only from trusted devices.
➡️ Learn how to restrict OneDrive sync access: https://o365reports.com/how-to-choose-between-sync-and-add-shortcut-to-onedrive/
We hope this blog helped you identify the settings that are better turned off to align with Microsoft 365 security best practices. Thanks for reading. If you have any questions or additional settings to share, feel free to drop them in the comments.


