In Microsoft 365 organizations, guest users are invited for vendor collaboration, project work, or other temporary engagements. But when those engagements end, their access often remains unchanged. Over time, these inactive guest users quietly clutter the organization and continue to retain access to previously shared files, recordings, & internal conversations.
To manage this, admins often rely on Entra ID Access Reviews and Lifecycle Workflows to automate inactive guest management and removal. However, Microsoft recently enforces billing for guest governance in Entra ID. With this change, organizations using lifecycle workflows or access reviews will be billed for each guest user who undergoes governance actions.
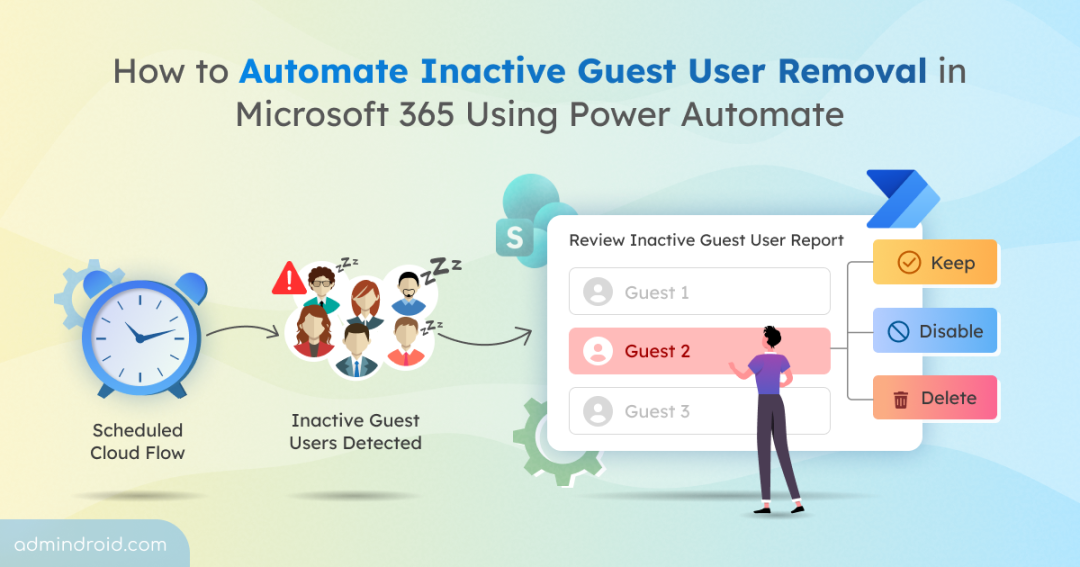
To address this, we built an approval-driven Power Automate workflow. It detects inactive guest users, sends them for review, and takes action based on admin decisions in a more cost-effective way. Without further delay, let’s explore how you can set up this workflow and manage Microsoft 365 guest users more efficiently.
Prerequisites for Managing Inactive Guest Users Using Power Automate
Before building the workflow, ensure the following prerequisites are met:
- Power Automate Premium: You need a Power Automate Premium license, as this flow uses a premium connector (HTTP), and you can opt for an 90-day free Power Automate trial if needed.
- SPO Site: A dedicated SharePoint site to store inactive guest user reports collection and perform approval actions.
Note: Ensure that only the guest management admin(s) are included in the SharePoint site to prevent unauthorized users from performing approval actions. - App with Delegated Permissions: A custom application must be registered with the required Microsoft Graph permissions such as User.Read.All, User.DeleteRestore.All, and AuditLog.Read.All.
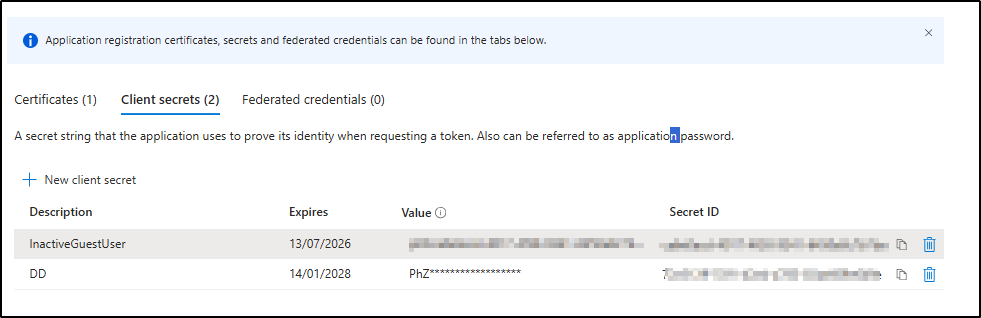
- Then, create a new client secret, and ensure its value is copied and stored securely.
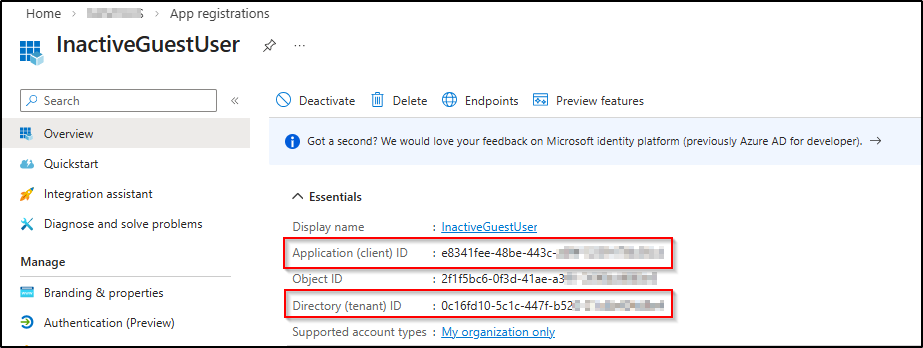
Note: You can copy the client secret value only while creating it. Afterwards, you won’t be able to copy it again. Make sure to store the copied value securely, as it will be required for the flow. - Next, copy the Application (client) ID and Directory (tenant) ID from the Overview tab.
An Overview: Inactive Guest Management Workflow Using Power Automate
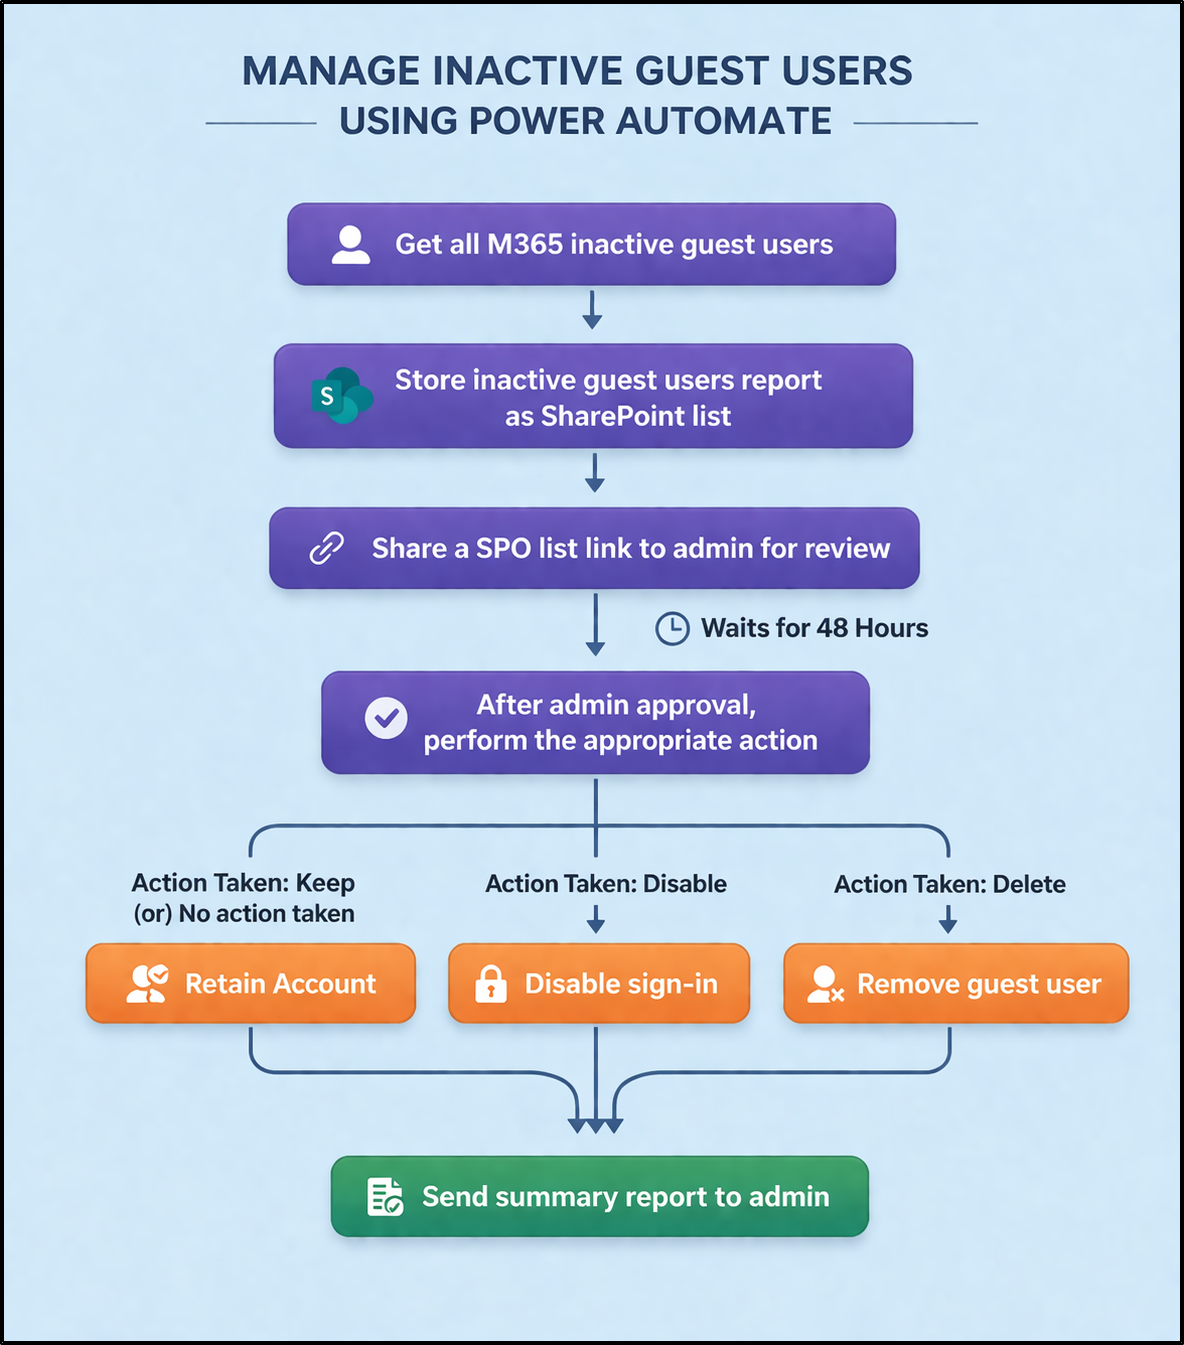
This workflow helps organizations periodically review inactive guest accounts in Microsoft 365 and unapproved external users do not remain in the directory after they become stale.
Here’s how it works:
- The workflow runs automatically at predefined intervals⏰ based on admins’ input. For example, if admin configure the recurrence as 30 days, the flow will run once every 30 days.
- Next, the flow retrieves all inactive guest users whose inactivity exceeds the defined threshold (for example, 90 days).
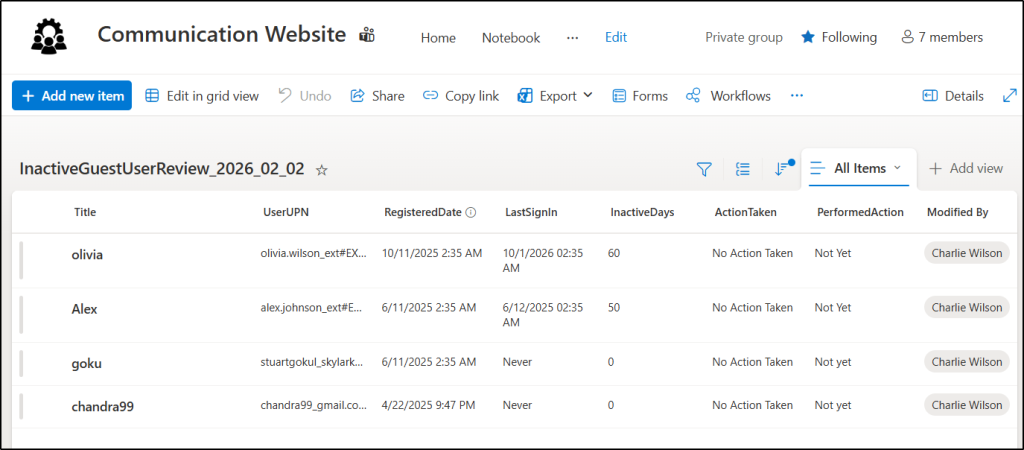
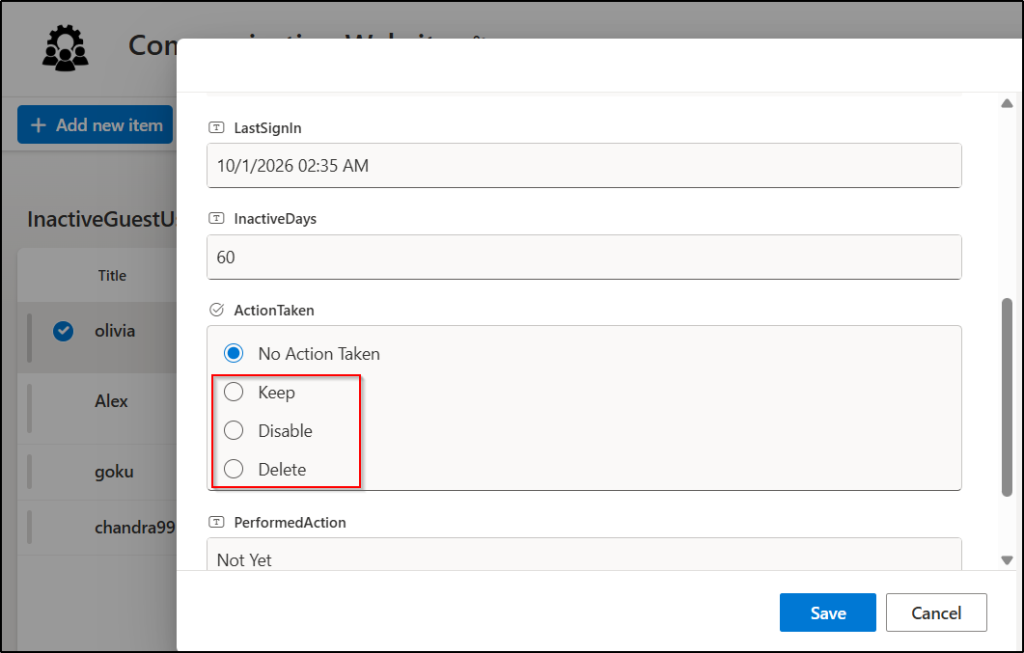
- Inactive guest users’ details are then logged in a SharePoint list🧾, as shown below. The generated SharePoint list contains information such as guest username, user principal name, registration date, last sign-in, inactive days, and more.
4. Then, the 🔗 link to the SharePoint list is directly sent to the guest management admin(s), so they can review the inactive guest user list and take the necessary action.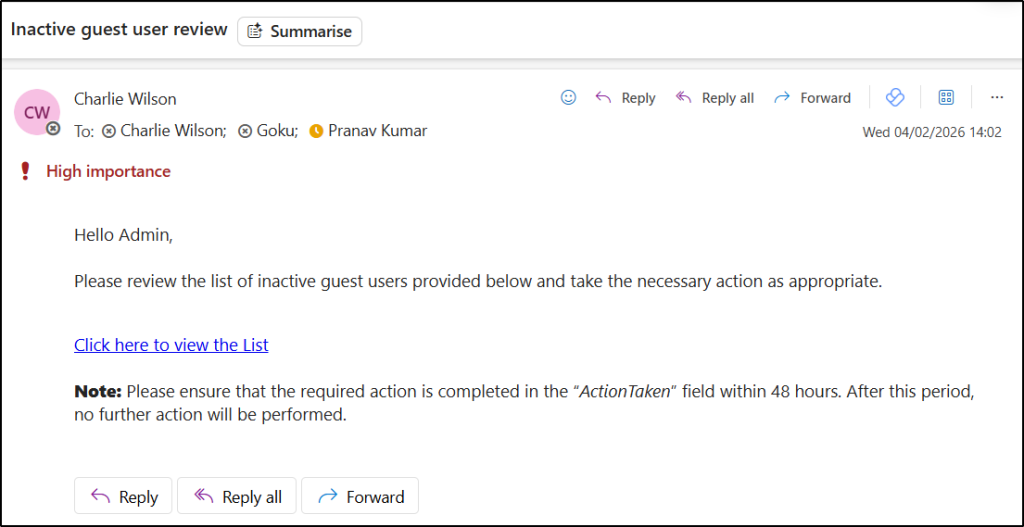
- After the admin chooses an action in the ActionTaken column (Keep, Disable, or Delete), it will be executed after 48 hours. Any changes or new selections made by the admin after 48 hours will not be performed.
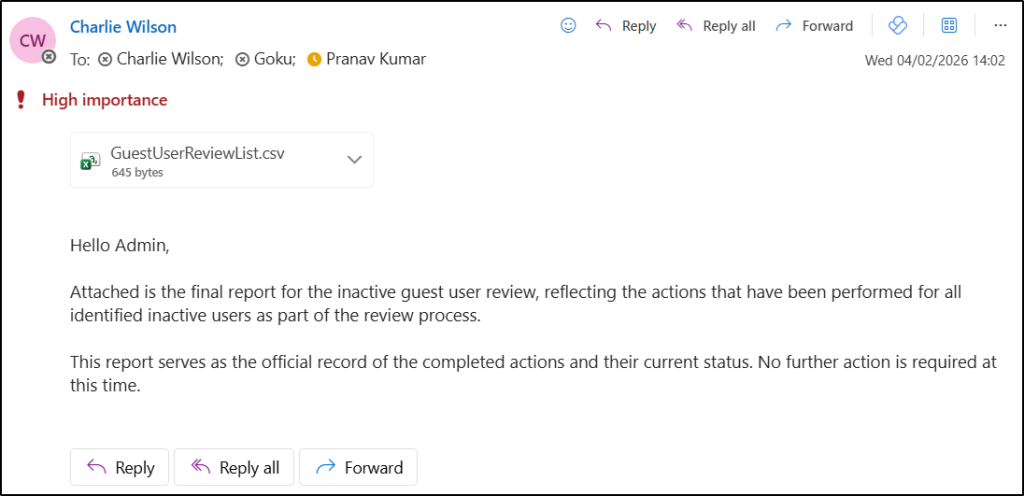
- Finally, the inactive guest user report is sent to the guest management admin(s) as a CSV file via Outlook 📬. It includes details such as who performed the action, what action was taken, whether it was successful, and more.
Note: While approvals can also be implemented using adaptive cards, they are better suited for smaller sets of users. When handling a larger number of inactive guest users, approvals may be processed in batches, which can introduce delays. Using a SharePoint list helps streamline review by providing all users in a single place.
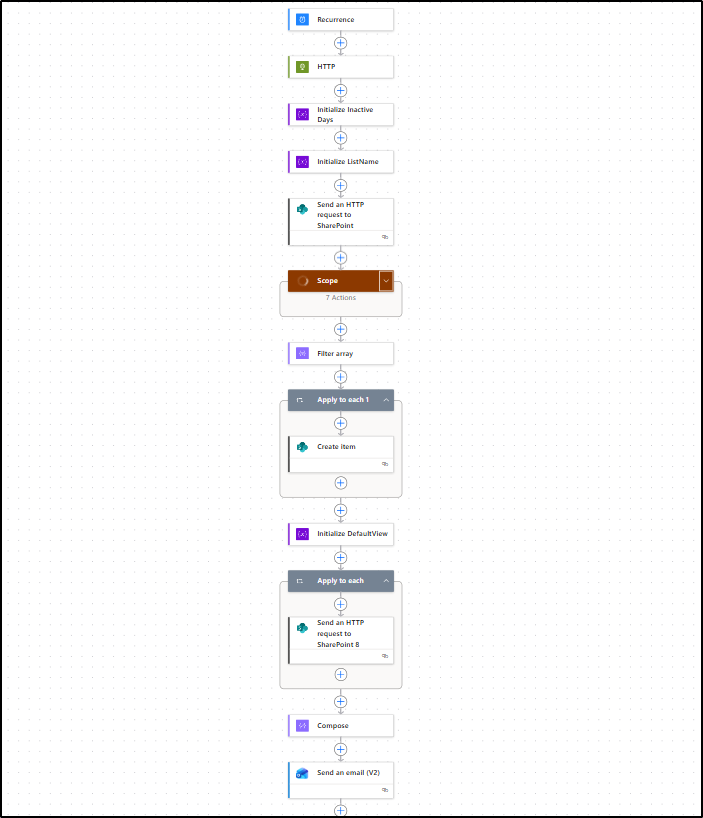
For a clearer understanding of this Power Automate workflow, refer to the flowchart below.
Import a Power Automate Flow to Manage Inactive Guest Users
Download Flow Package from GitHub: An Approval Workflow for Inactive Guest Management.zip
- Once downloaded, open Power Automate with the required permissions and navigate to Solutions → Import solution.
- Under Select a file, click Browse and choose the downloaded ZIP file.
- Click Next, review the solution details, and click Next again to verify the connections.
- Replace the default environment variable values with the required details, including the approver email address, SharePoint site URL, Client ID, Tenant ID, and Client Secret value.
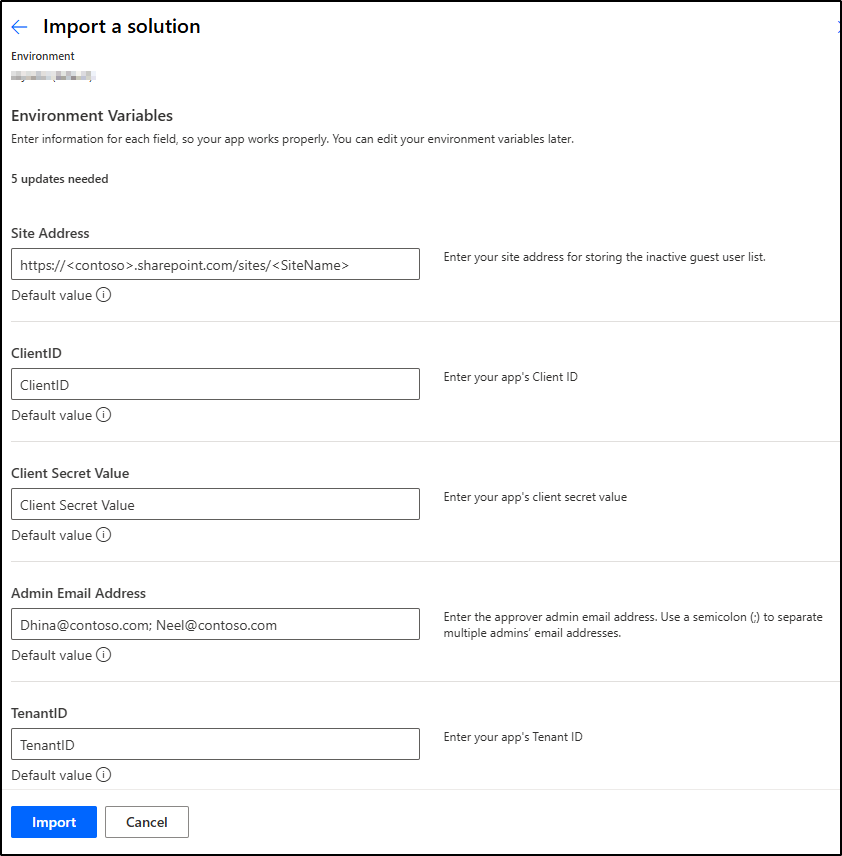
- After updating the values, click Import.
- Once the import is completed, go to the Solutions tab and open the solution.
- Locate the cloud flow “Inactive Guest Users Management Workflow”
- Run a test submission to verify that the flow works correctly.
⚠️ Important: If the default values in the environment variables are not replaced, warnings will appear and the flow will not turn on in your environment.
Step-by-Step Guide to Build a Power Automate Workflow for Managing Inactive Guest Users in Microsoft 365
Follow the steps below to create an approval workflow for inactive guest users using Power Automate.
- Step 1: Configure the Recurrence and Retrieve Inactive Guest Users
- Step 2: Create a SharePoint List to Store Inactive Guest Users
- Step 3: Send Inactive Guest User Details to an Approver
- Step 4: Execute Actions on Inactive Guests Based on Admin Approval
Step 1: Configure the Recurrence and Retrieve Inactive Guest Users
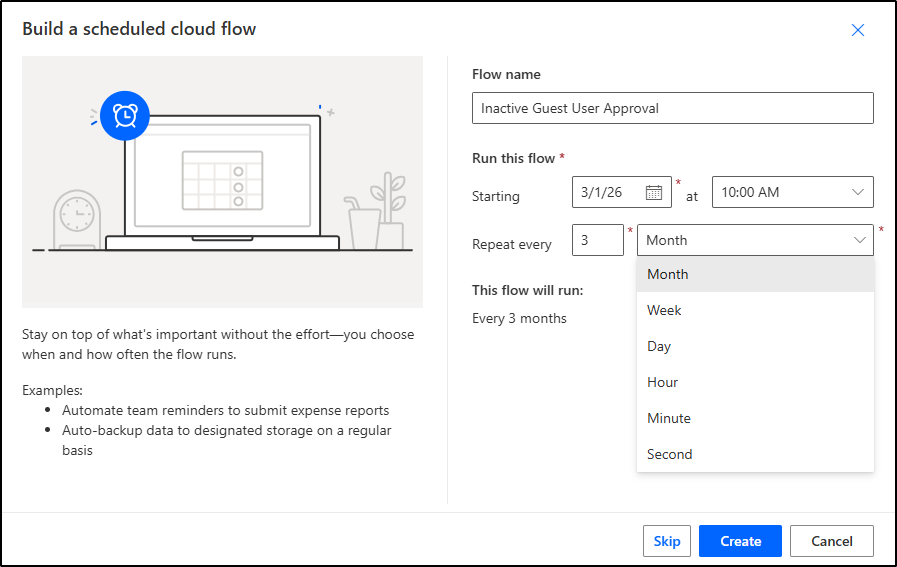
- Sign in to Power Automate portal, click on the ‘+ Create’ tab and select Scheduled cloud flow.
- In the Build a scheduled cloud flow pane, provide a flow name. Then, under Run this flow, configure the start date, time, and recurrence settings, and click Create.
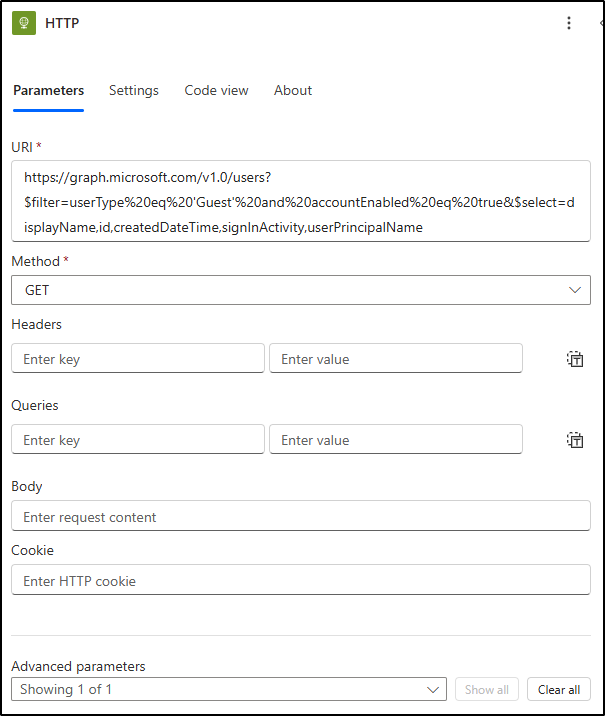
- Next, add the HTTP (Premium) 💎 connector action to retrieve details of all guest users in your organization using Microsoft Graph. Configure the action as follows:
- URI: https://graph.microsoft.com/v1.0/users?$filter=userType%20eq%20’Guest’%20and%20accountEnabled%20eq%20true&$select=displayName,id,createdDateTime,signInActivity,userPrincipalName
- Method: GET
- Under Advanced parameters, configure the following authentication details:
- Authentication type: Active Directory OAuth
- Audience: https://graph.microsoft.com
- Client ID: Application’s Client ID
- Credential type: Secret
- Secret: Secret Value
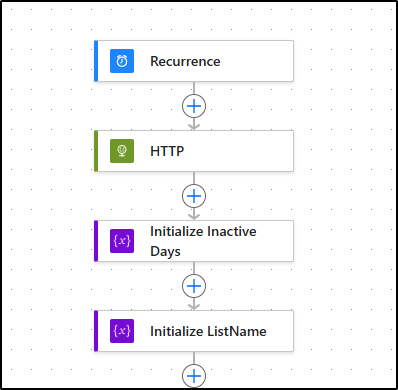
- Then, add the Initialize variable action to specify the inactive days.
- Name: InactiveDays
- Type: Integer
- Value: 90
- Next, add another Initialize variable (Initialize variable 1) action to create a variable for assigning a name to the inactive guest users list.
- Name: TargetListName
- Type: String
- Value:
|
1 |
InactiveGuestUserReview_@{formatDateTime(utcNow(), 'yyyy_MM_dd')} |
Step 2: Create a SharePoint List to Store Inactive Guest Users
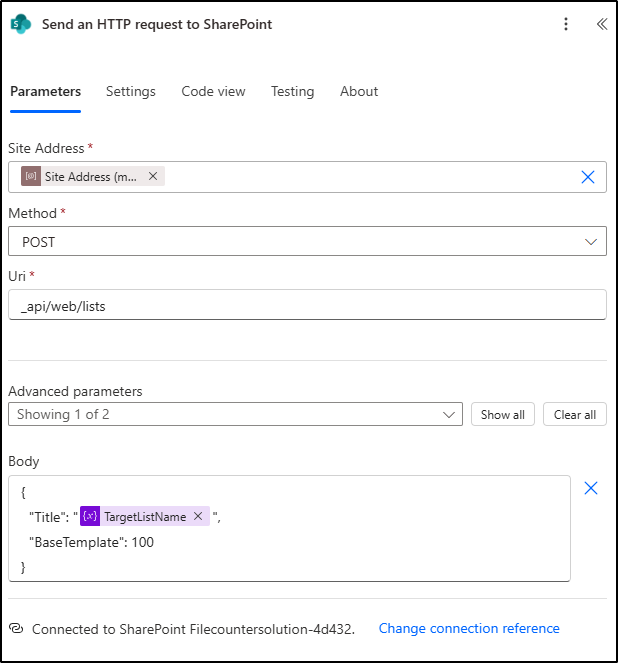
1. Search and select “Send an HTTP request to SharePoint”, then configure the action as follows:
- Site Address: Select Enter custom value, then click the Dynamic content icon and choose SiteURL. (You have to use this site address throughout the flow.)
- Method: POST
- URI: _api/web/lists
- Under Advanced Parameters, configure the Body as follows:
|
1 2 3 4 |
{ "Title": "@{variables('TargetListName')}", = "BaseTemplate": 100 } |
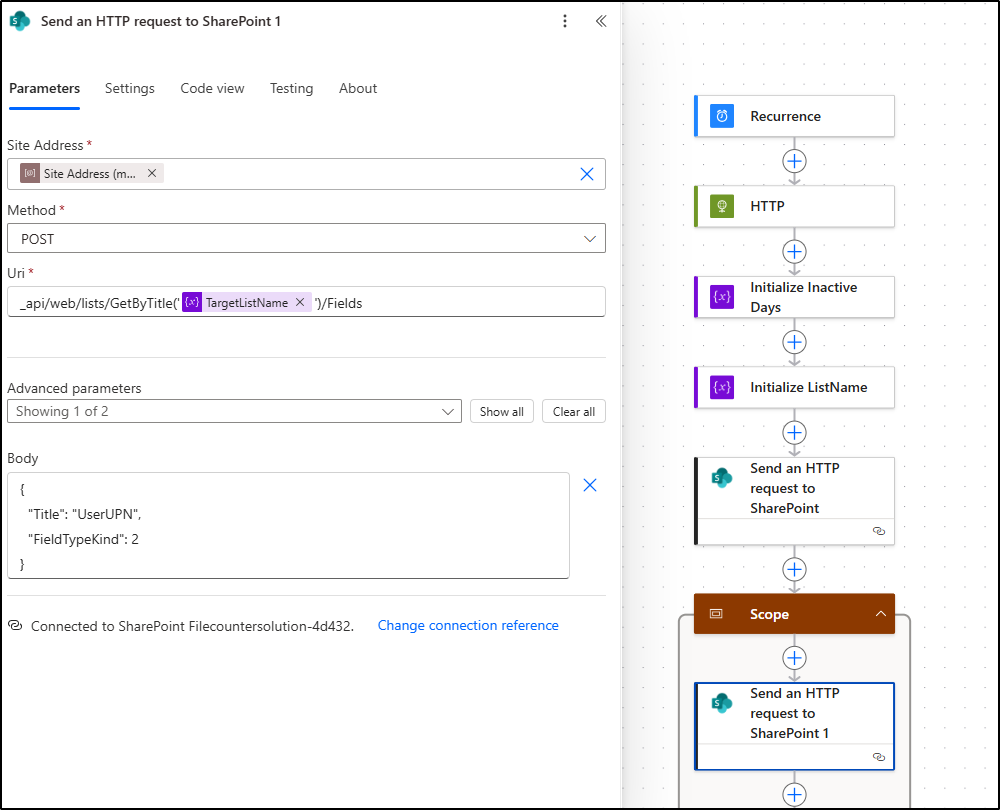
So far, we have configured the flow to create a SharePoint list. To log the retrieved inactive guest user details, we need to create columns such as UserUPN, UserID, RegisteredDate, LastSignIn, InactiveDays, ActionTaken, and PerformedAction.
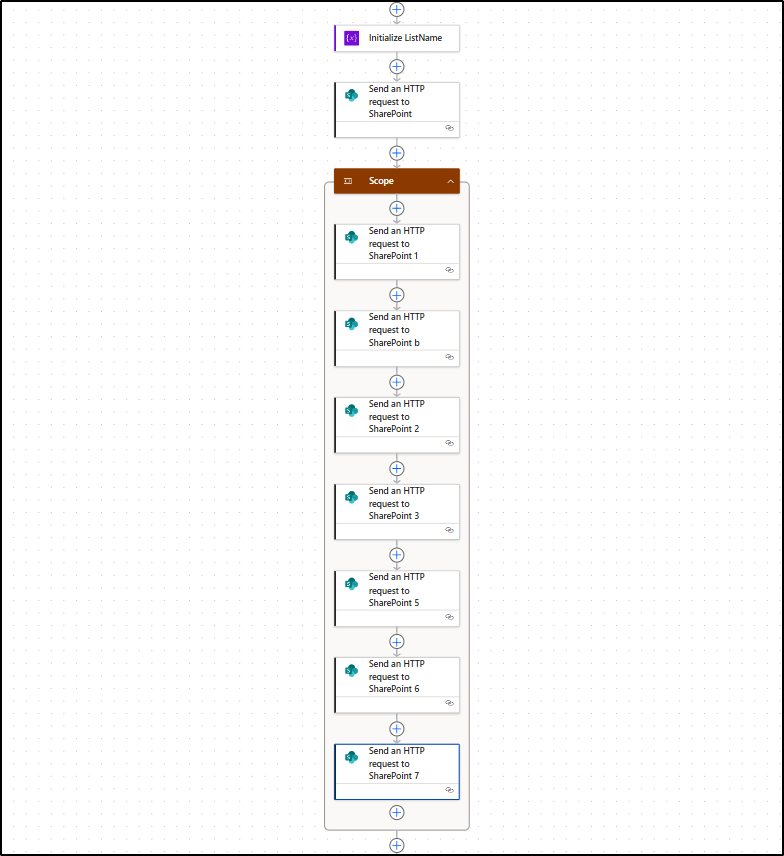
To accomplish this, we need to add a total of seven ‘Send an HTTP request to SharePoint’ actions, equal to the number of columns we want to include.
2. After ‘Send an HTTP request to SharePoint’, add the Scope action.
3. Inside the scope, add another ‘Send an HTTP request to SharePoint’ action (Send an HTTP request to SharePoint 1). Configure the action as follows:
- Site Address: YourSiteAddress
- Method: POST
- URI:
|
1 |
_api/web/lists/GetByTitle('@{variables('TargetListName')}')/Fields |
- Under Advanced Parameters, configure the Body as below.
|
1 2 3 4 |
{ "Title": "UserUPN", "FieldTypeKind": 2 } |
Similarly, to create columns such as UserID, LastSignIn, InactiveDays, ActionTaken, and PerformedAction, follow the same steps as above. For creating the column “RegisteredDate”, change the FieldTypeKind to 4.
Note: FieldTypeKind ‘4’ represents a Date and Time field, while FieldTypeKind ‘2’ represents a Single line of text field in a SharePoint list.
For creating the column “ActionTaken” (Send an HTTP request to SharePoint 6), follow the below steps.
Headers:
- Accept: application/json;odata=verbose
- content-type: application/json;odata=verbose
- Under Advanced Parameters, configure the Body as below.
|
1 2 3 4 5 6 7 8 9 10 11 |
{ "__metadata": { "type": "SP.FieldChoice" }, "FieldTypeKind": 6, "Title": "ActionTaken", "Choices": { "__metadata": { "type": "Collection(Edm.String)" }, "results": ["No Action Taken", "Keep", "Disable", "Delete"] }, "DefaultValue": "No Action Taken", "EditFormat": 1 } |

Note: The Scope action is used to group related actions together in a single block.
Step 3: Send Inactive Guest User Details for Review and Take Action
Until now, we have created a flow that sets up a SharePoint list along with the required columns to store inactive guest users. The next step is to store the retrieved inactive guest user details in the list and share the list link to the admin for review.
1. To do this, add a Filter array action to filter inactive guest users and configure it as follows:
- From: @outputs(‘HTTP’)?[‘body’]?[‘value’]
- Filter Query:
| @addDays(utcNow(), mul(variables(’90Days’), -1), ‘yyyy-MM-dd’) | Is greater or equal to | @coalesce(item()?[‘signInActivity’]?[‘lastSignInDateTime’], item()?[‘createdDateTime’]) |
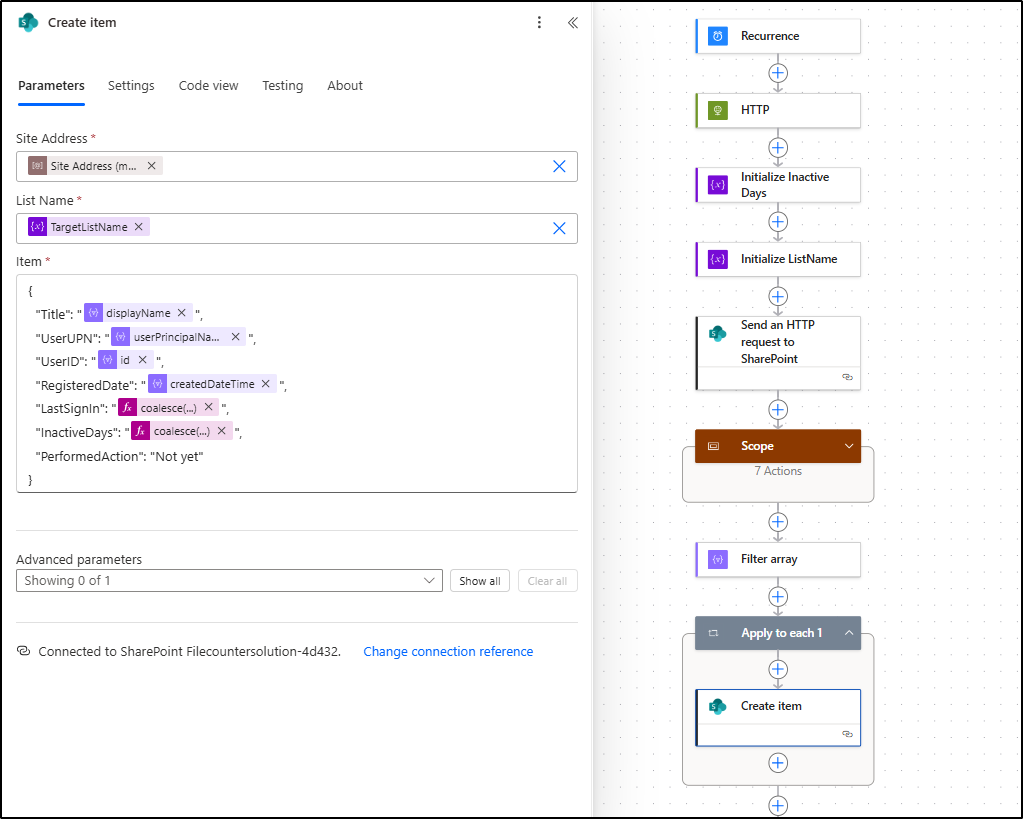
2. Next, add the Apply to each action.
- In the ‘Select an output from previous steps’ field, choose the value output from the “Filter array” action.
3. Inside the Apply to each action, add Create item action and configure it as shown below to store the retrieved inactive guest user details:
- Site Address: Your site address
- List Name: @{variables(‘TargetListName’)}
- Item:
|
1 2 3 4 5 6 7 8 9 |
{ "Title": "@{item()?['displayName']}", "UserUPN": "@{item()?['userPrincipalName']}", "UserID": "@{item()?['id']}", "RegisteredDate": "@{item()?['createdDateTime']}", "LastSignIn": "@{coalesce(item()?['signInActivity']?['lastSignInDateTime'], 'Never')}", "InactiveDays": "@{coalesce(div(sub(ticks(utcNow()), ticks(coalesce(item()?['signInActivity']?['lastSignInDateTime'], utcNow()))), 864000000000), 'N/A')}", "PerformedAction": "Not yet" } |
4. After the Apply to each action, add the Initialize variable action to define the columns to be displayed.
- Name: ColumnsToShow
- Type: Array
- Value:
|
1 2 3 4 5 6 7 8 9 |
[ "UserUPN", "RegisteredDate", "LastSignIn", "InactiveDays", "ActionTaken", "PerformedAction", "Modified By" ] |
5. Then, add another Apply to each (Apply to each 1) action.
- In the Select an output from previous steps field, choose the value output from the Initialize variable action.
6. Next, under Apply to each, add another Send an HTTP request to SharePoint action (Send an HTTP request to SharePoint 8) to add the respective columns to the default view. Configure the action as follows:
- Site Address: YourSiteAddress
- Method: POST
- URI:
|
1 |
_api/web/lists/GetByTitle('@{variables('TargetListName')}')/Views/GetByTitle('All Items')/ViewFields/AddViewField('@{item()}') |
7. After the Apply to each (Apply to each_1) action, add a Compose action to generate the sharing link for the inactive guest user list.
- Use the expression below to create a sharing link for your list. Replace <YourSiteAddress> with the site address you use throughout this flow.
|
1 |
@concat(parameters('Site Address (<YourSiteAddress>)'), '/Lists/', variables('TargetListName'), '/AllItems.aspx') |
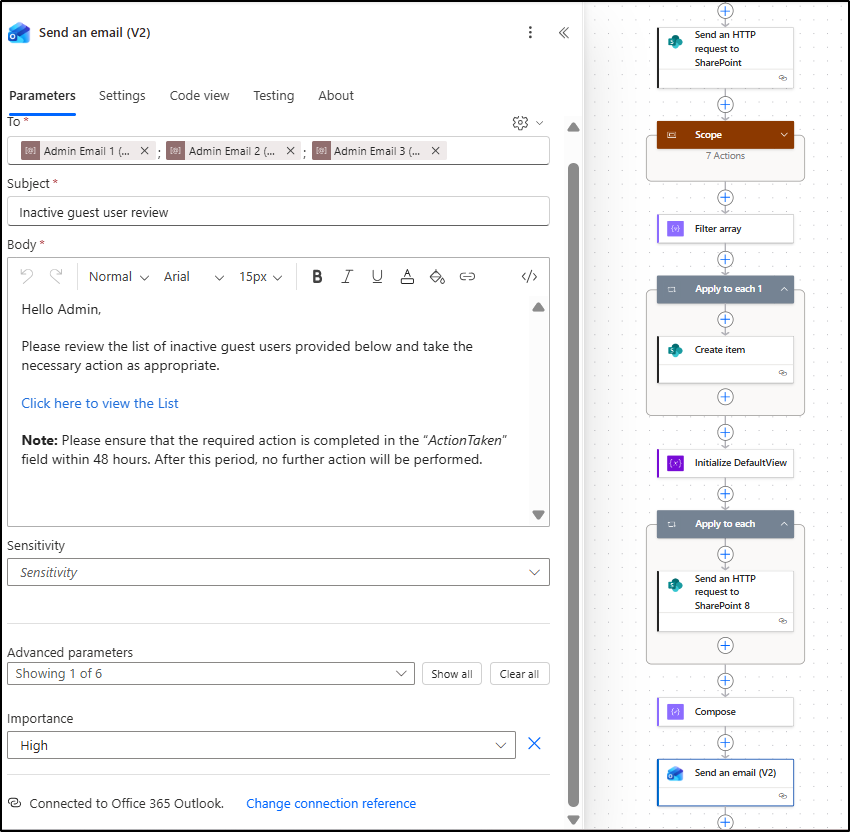
8. Next, add the Send an email (V2) action to notify the user via email.
- To: Add the admin UPN(s) separated by “;”.
- Customize the subject and body based on your requirements.
- Select the text and apply a link by using the below expression
|
1 |
@outputs('Compose') |
After this step, the flow can send the inactive guest user list to the guest management admin(s) for review. Next, we need to configure the flow to execute actions after the admins have reviewed the list and performed actions.
Step 4: Execute Keep, Disable, or Delete Actions After Admin Approval
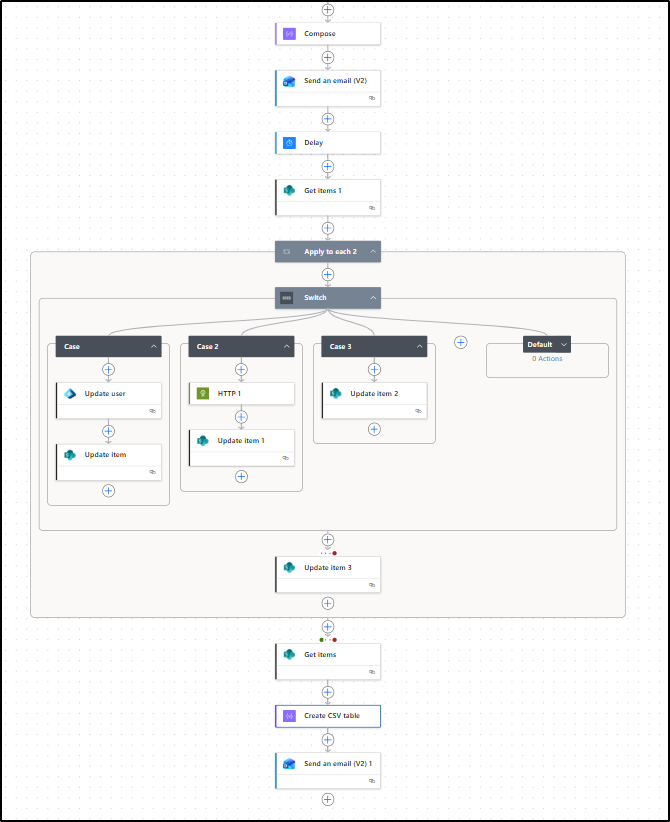
1. After the “Send an Email (V2)” action, add a Delay to define the timeout period for reviewing and approving the inactive guest user report, and configure it as follows:
- Count: 48
- Unit: Hours
2. Next, search and add the action Get items from the “SharePoint” connector to retrieve the reviewed inactive guest user list.
- Use the same Site Address used in the previous actions, and for the List field, use the value @{variables(‘TargetListName’)}.
3. Now, add another Apply to each (Apply_to_each_2) action. In the Select an output from previous steps field, choose the value output from the Get items action.
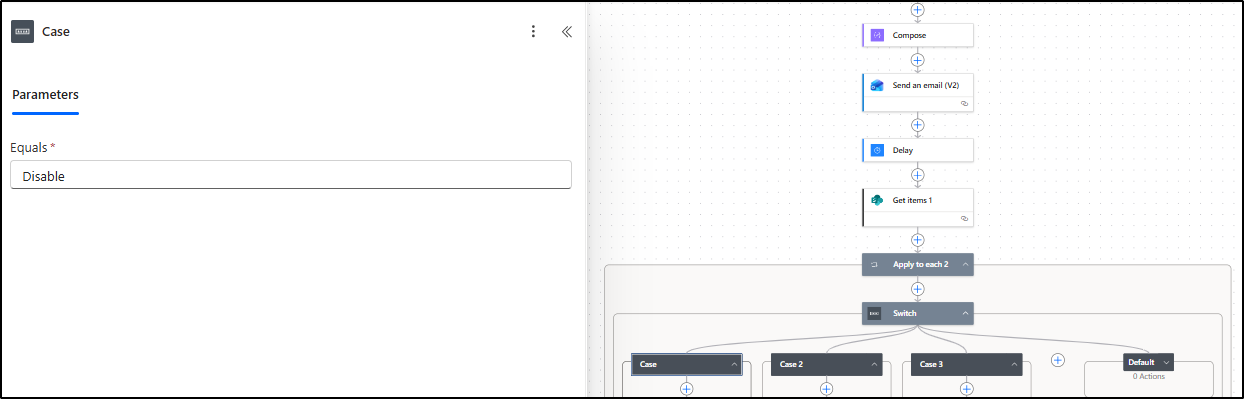
4. Inside the Apply to each (Apply_to_each_2) action, add the Switch control to execute different actions based on the admin’s approval decision.
- In the On field, use the expression below:
|
1 |
item()?['ActionTaken']?['Value'] |
5. Under the Switch control, click the ‘+’ (Add a case) button to create three separate cases. Configure the Equals field for each case as follows:
- Case 1: Disable
- Case 2: Delete
- Case 3: Keep
Note: The Default case acts as a fallback option, it runs if none of the specified cases (Keep, Delete, Disable) match the value.
6. For each case created under the Switch action, add an action and configure the relevant steps as given below to perform the actions based on the list.
Case 1:
- Search for and add Update user to disable the inactive guest user after admin approval.
- In User ID or User Principal Name, use the following expression:
|
1 |
@items('Apply_to_each_2')?['UserID'] |
- Under Advanced parameters, set Account Enabled to No.
Note: After the workflow disables user sign-in, you can remove the corresponding guest license if required.
Case 2:
- Add the HTTP action and configure it as follows to delete the inactive guest after admin approval:
- URI:
|
1 |
https://graph.microsoft.com/v1.0/users/@{items('Apply_to_each_2')?['UserID']} |
- Method: Delete
- Under Advanced parameters, configure the following authentication details:
- Authentication type: Active Directory OAuth
- Tenant: Your Tenant ID
- Audience: https://graph.microsoft.com
- Client ID: Application’s Client ID
- Credential type: Secret
- Secret: Secret Value
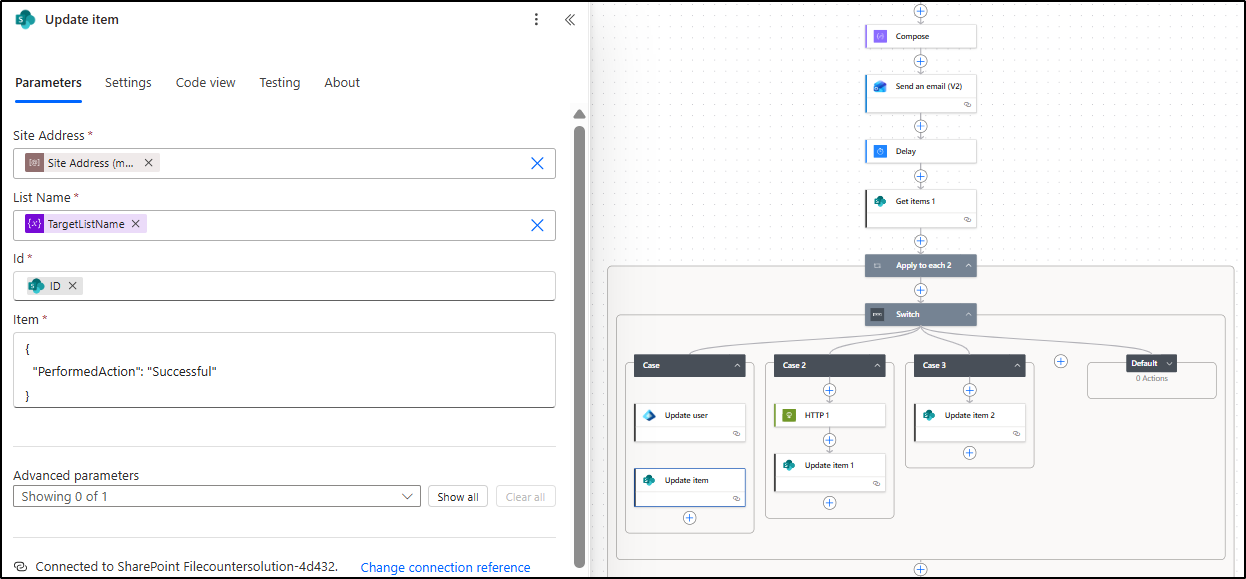
7. For each case created under the Switch action, add an Update item action to update the SharePoint list after the action is successfully performed. Use the following configuration:
- Use the same Site Address and List Name as before.
- For the ID, use the Expression: @items(‘Apply_to_each_2’)?[‘ID’].
- Item:
|
1 2 3 |
{ "PerformedAction": "Successful" } |
Note: For Case 1 (Disable) and Case 2 (Delete), add this action after Update user and HTTP (HTTP 1). For Case 3 (Keep), you can directly add this action.
8. After the Switch case, add another Update item action to update the list in case the action fails. Configure the parameters the same as above, but change the Item value:
|
1 2 3 |
{ "PerformedAction": "Failed" } |
Then click Settings and under Run after, select:
- Has Failed
9. After the Apply to each (Apply to each 2) action, add another action Get items to get final list of reviewed inactive guest users. Provide the Site Address and List Name. Then click Settings and under Run after, select:
- Is Successful
- Has Failed
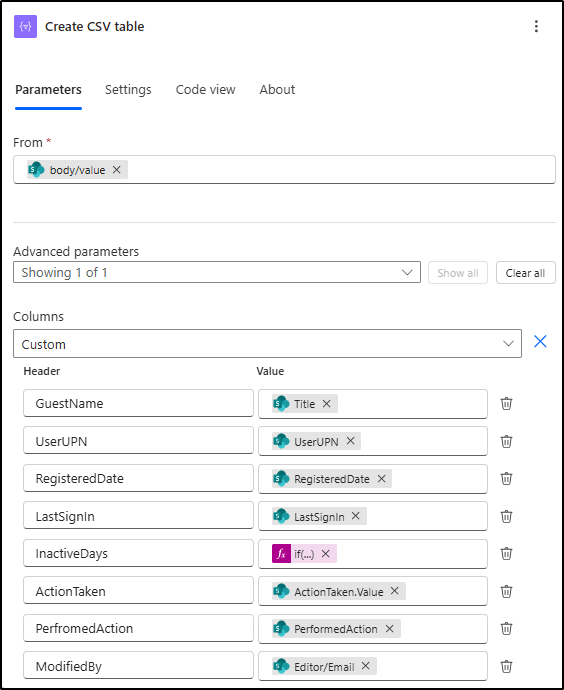
10. Next, add the Create CSV Table action to generate a CSV file of the reviewed inactive guest user report, and configure it as follows:
- From: Output from the above Get items action.
- Select Custom columns and map the required values as shown below.
| Header | Value |
| GuestName | @{item()?[‘Title’]} |
| UserUPN | @{item()?[‘UserUPN’]} |
| RegisteredDate | @{item()?[‘RegisteredDate’]} |
| LastSignIn | @{item()?[‘LastSignIn’]} |
| InactiveDays | @{if(equals(item()?[‘InactiveDays’], null), ‘Never-Logged-in’, string(item()?[‘InactiveDays’]))} |
| ActionTaken | @{item()?[‘ActionTaken’]?[‘Value’]} |
| PerfromedAction | @{item()?[‘PerformedAction’]} |
| ModifiedBy | @{item()?[‘Editor/Email’]} |
11. Finally, add a Send an Email (V2) action to notify the admins about the actions performed. Configure the subject and body as per your requirements.
That’s it! The flow is now complete. Turn on the flow and test it in a test environment. The final flow image has been attached for your reference.
Common Errors and Fix for the Flow:
Here are some common errors and resolution steps when creating a Power Automate flow for inactive guest user removal in Microsoft 365.
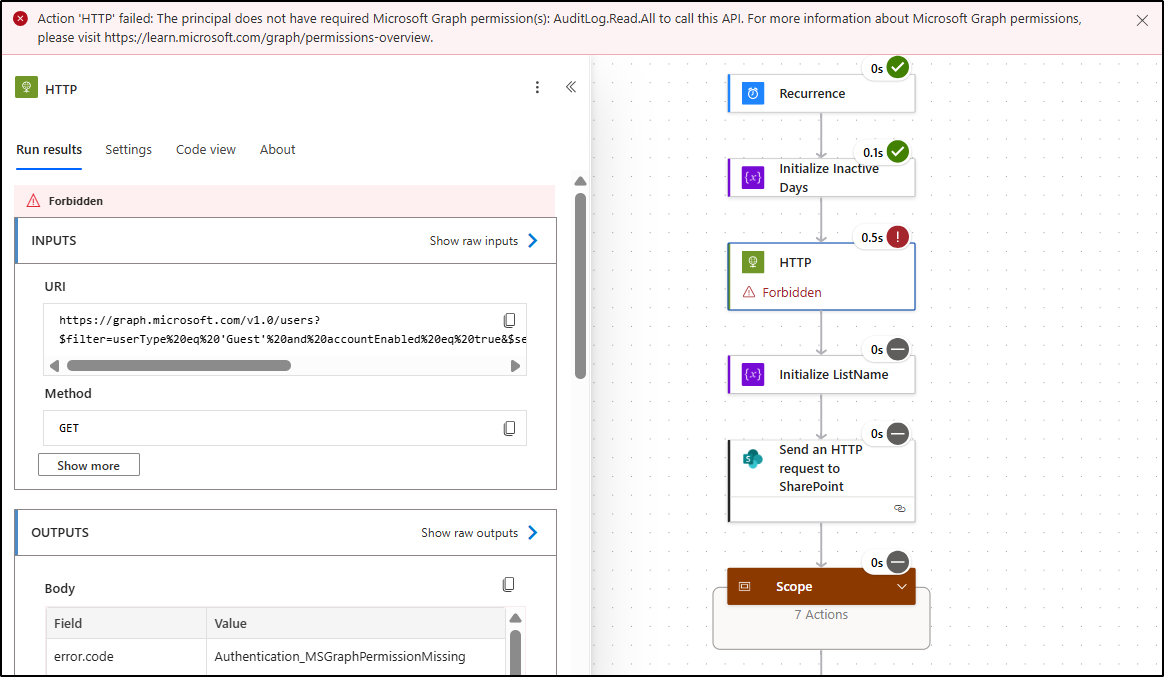
1. Action ‘HTTP’ failed: The principal does not have required Microsoft Graph permission(s): AuditLog.Read.All to call this API. For more information about Microsoft Graph permissions, please visit https://learn.microsoft.com/graph/permissions-overview 1
Reason: This error occurs when the application used in the HTTP action does not have the required permissions to access the guest users’ sign-in activity information.
Solution: To resolve this error, ensure that the registered application in Microsoft Entra ID has the AuditLog.Read.All Microsoft Graph permission assigned.
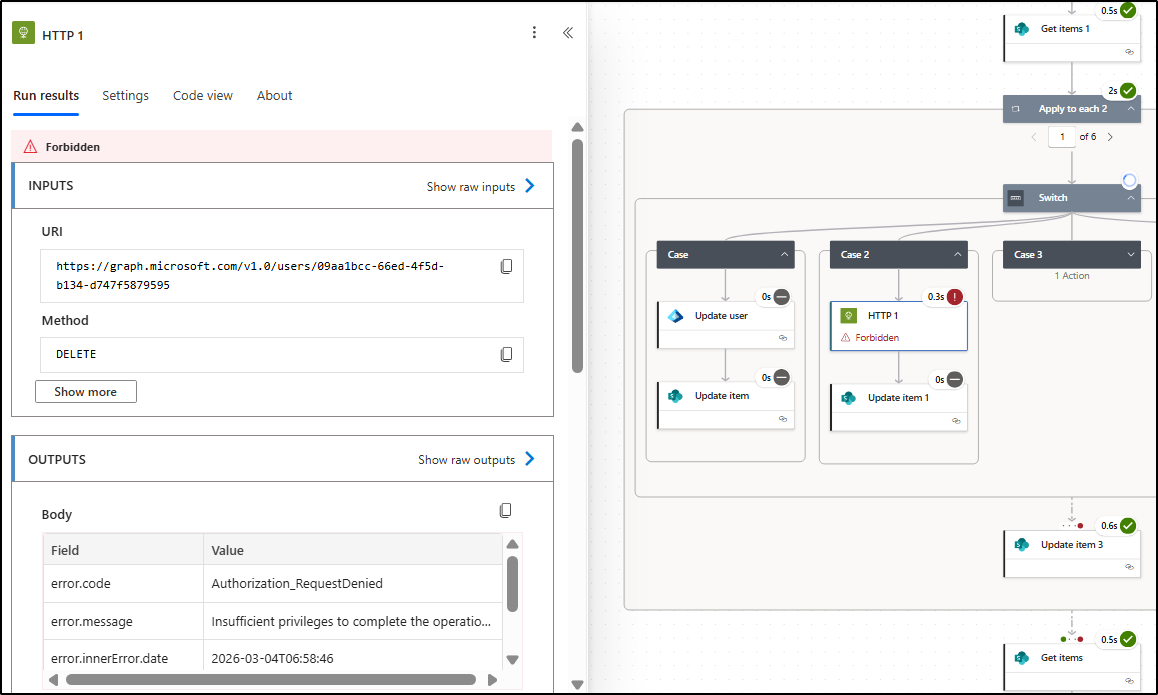
2. Forbidden
Reason: This error occurs when the application does not have the required Microsoft Graph permission to delete user accounts.
Solution: To resolve this error, ensure that the application used in the flow has the User.DeleteRestore.All application permission granted in Microsoft Entra ID.
And that’s a wrap! We hope this blog helps you create an approval workflow for managing inactive guest users using Power Automate. Similarly, you can automate other admin tasks like user onboarding, offboarding, external user invitations, and much more.
Thank you for reading! We’d love to hear your thoughts and experiences. Feel free to share your thoughts or questions about the workflow and its implementation.


