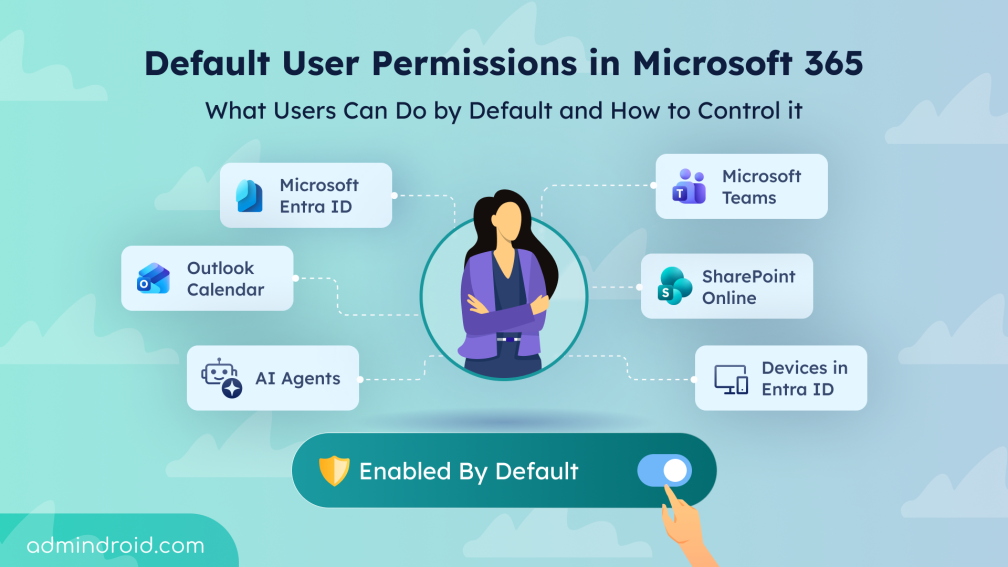
Many organizations underestimate the default user permissions granted in Microsoft 365 until security or governance issues arise. The real risk is not what users cannot do, but what they can do without admin awareness.
From creating Teams and SharePoint sites to sharing, registering apps, and interacting with AI-powered tools, everyday users are empowered to do a lot from day one. This flexibility improves productivity and collaboration, but can also introduce risks such as uncontrolled resource creation, unauthorized external access, unmanaged devices, and data exposure.
“Instead of focusing only on what to restrict later, it is important to first understand what is already allowed“
So, in this blog, we will explore the default user permissions in Microsoft 365, their purpose, and take necessary actions where needed.
Why Microsoft 365 Settings Enabled by Default Should Be Reviewed
Microsoft 365 includes several user permissions and capabilities enabled by default. These settings allow users to perform certain actions without requiring additional administrator approval or elevated roles.
For example, users can create Microsoft 365 groups and Teams, share files anonymously, invite guest users, register applications, join devices to Microsoft Entra ID, and much more.
These capabilities are intended to improve collaboration, productivity, and self-service experiences across Microsoft 365 services. However, many organizations leave these default settings unchanged without fully realizing how much access and control standard users already have!
While these permissions support flexibility, they can introduce serious risks if left unreviewed. Below are some common situations that arise when these permissions are not managed properly:
- Uncontrolled creation of resources: Users can freely create Teams, SharePoint sites, and Microsoft 365 groups, which can result in duplicate workspaces and a cluttered environment.
- Security gaps in identity and access: App registrations, device registrations, and Entra ID joins are open to all users by default. Compromised accounts may register malicious applications, connect unauthorized devices, and gain persistent access to organizational resources.
- Unintentional data exposure: Default sharing capabilities allow users to share SharePoint and OneDrive files or do so anonymously without strict controls.
- Ungoverned AI agent usage: Users can access and share AI agents across the organization, which may lead to sensitive data being used in prompts or shared through agents beyond organizational oversight.
- Guest access sprawl: By default, any user can invite external users directly into the organization. This can lead to unauthorized guest access to organizational resources and uncontrolled external collaboration.
Along with these, many other risks can arise if default permissions are not managed properly. Let’s explore the detailed steps and configurations to mitigate these risks through the various admin centers below.
How to Manage Default User Permissions in Microsoft 365
Microsoft 365 permissions span multiple services and govern access, collaboration, and data sharing in different ways. To help you review and prioritize them effectively, we’ve broken them down by service below.
- Manage default user role permissions in Entra
- Control device registration and join permissions
- Govern user access for AI agents
- Restrict SharePoint site creation and sharing settings
- Manage user collaboration settings in Microsoft Teams
- Restrict calendar sharing permissions in Exchange Online
Manage Default User Permissions in Microsoft Entra
Microsoft Entra includes several user settings that govern how users interact with resources, apps, and external identities. These settings are designed to support self-service and reduce administrative overhead. But some of them can also increase security and governance risks when left unrestricted.
Below are some default configurations that should be reviewed regularly to ensure users have appropriate access.
- Default user role permissions in Entra ID
- Restrict non-admin user access to Microsoft Entra
- LinkedIn integration with Microsoft 365
- User guest invitation permissions in Microsoft 365
Default User Role Permissions in Entra ID
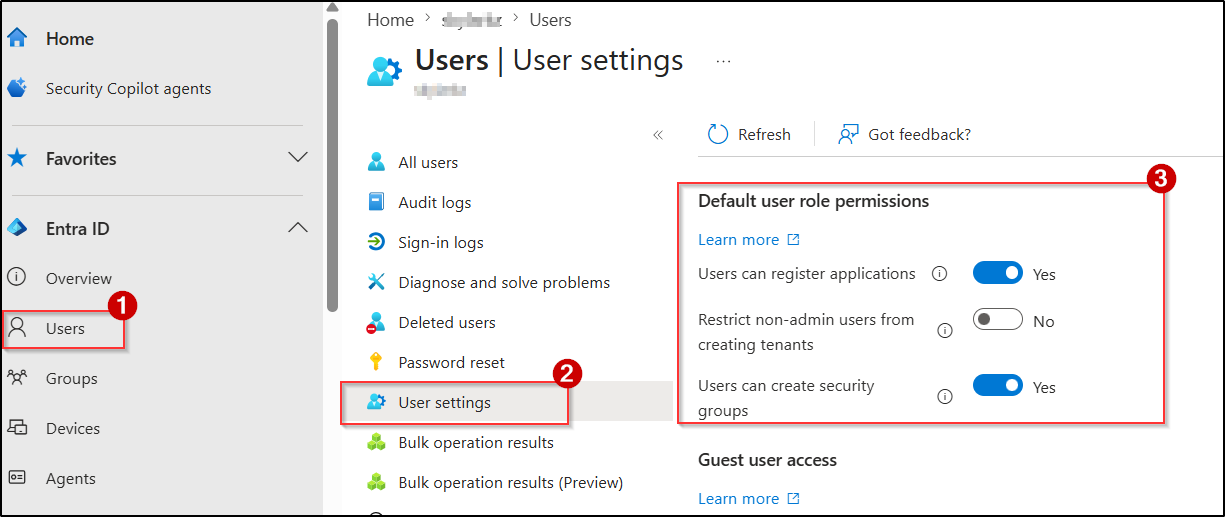
To manage default user role permissions, navigate to Microsoft Entra ID → Users → User settings. Here, you can configure default user permissions for creating new tenants, security groups, and app registrations.
1. User Security Group Creation Permission
Setting Name: Users can register applications
Default Status: Yes
Purpose: Allows users to register applications, configure authentication settings, and grant permissions to Microsoft Graph or other APIs.
Recommendation: Disable app registrations for standard users by setting it to No and restrict this capability to approved admins.
Why Disable Default User Role Permission: Allowing non-admin users to register applications can lead to unauthorized app registrations and cause serious security issues. For example, an attacker who compromises a user account can register a malicious application to maintain persistent access to organizational data through delegated permissions and consent-based attacks.
2. User Permission for Tenant Creation
Setting Name: Restrict non-admin users from creating tenants
Default Status: No
Purpose: Allows users to create new Microsoft Entra ID tenants and become the first Global Administrator of those tenants. The created tenant is completely independent of the parent org’s configurations, policies, or security baselines.
Recommendation: Prevent non-admin users from creating new tenants and maintain centralized control over Microsoft 365 environments.
Why Disable Non-Admin Tenant Creation: Users can create separate tenants to store organizational data or configure services without administrative oversight. As a result, data and configurations within these tenants remain invisible to admins, operating outside governance, monitoring, and compliance controls.
3. User Security Group Creation Control
Setting Name: Users can create security group
Default Status: Yes
Purpose: Allows users to create security groups in the organization.
Recommendation: Disable security group creation for standard users by configuring the value to No to maintain better governance.
Why Disable User Security Group Creation: Security groups are often used to control access to applications, SharePoint sites, Teams, and other organizational resources. Allowing users to create and manage groups without oversight can result in unauthorized access, excessive permissions, and unmanaged access paths across the environment.
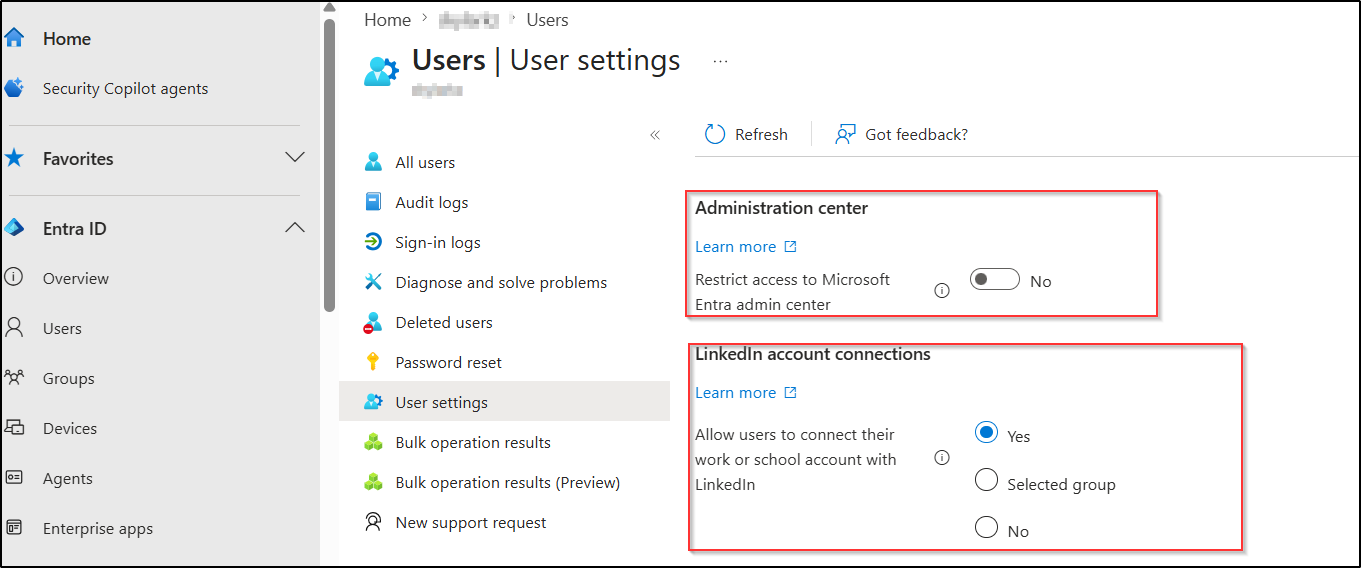
Restrict User Access to Microsoft Entra Admin Center
Setting Name: Restrict access to Microsoft Entra admin center
Default Status: No
Purpose: Allows non-admin users to access the Microsoft Entra admin center and view certain directory information, such as user profiles, group details, and organizational details.
Recommendation: Most organizations leave this enabled because the data exposed is already semi-public through Teams, Exchange, or SharePoint. The decision depends on your org’s transparency culture, not security risk.
Why to Restrict User Access to Microsoft Entra Admin Center: Although this setting is not considered a security boundary, allowing all users to access the Entra portal can lead to unnecessary visibility into directory objects, administrative workflows, and tenant structure. In regulated environments, this might violate data minimization principles. So, you can restrict user access to the Microsoft Entra based on your organizational requirements.
LinkedIn Integration with Microsoft 365
Setting Name: Allow users to connect their work or school account with LinkedIn
Default Status: Yes
Purpose: Allows users to connect their personal LinkedIn accounts with Microsoft 365 applications such as Teams and Outlook. This integration allows LinkedIn profile information, including job history, skills, and connections, to appear within the organization’s environment.
Recommendation: You can set this to No to completely disable LinkedIn integration, or choose Selected group to allow it only for specific groups.
Why to Disable LinkedIn Integration: LinkedIn integration may expose additional personal and organizational information within Microsoft 365 applications. This may raise privacy, compliance, or data exposure concerns.
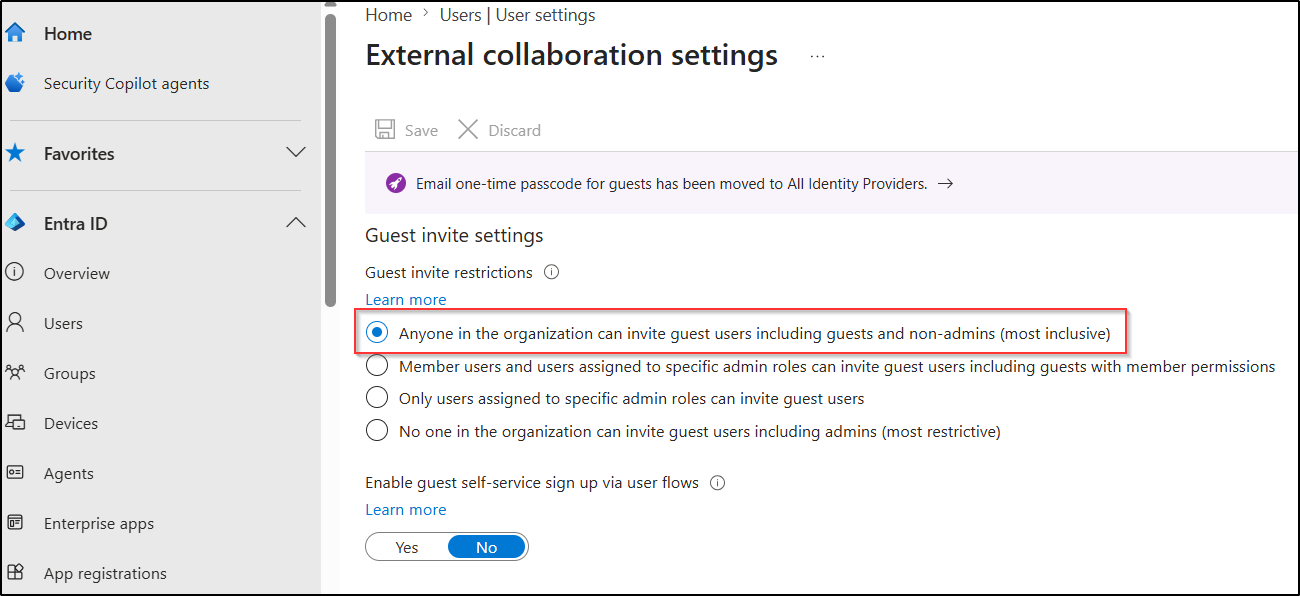
User Guest Invitation Permissions in Microsoft Entra ID
Setting Name: Guest invite restrictions
Default Status: Anyone in the organization can invite guest users, including guests and non-admins.
Purpose: Allows users in the organization to invite any external user into the Microsoft 365 environment.
Recommendation: Organizations can restrict guest invitation permissions with either of these configurations:
- Only users assigned to specific admin roles can invite guest users
- No one in the organization can invite guest users, including admins
Why Restrict Guest User Invitations: When all users can invite guests, admins lose control over external access. Over time, this can result in excessive guest accounts, unmanaged external collaboration, and reduced visibility into who has access to organizational resources and data.
Control User Device Registration and Join Permissions
In Microsoft Entra ID, several device settings are configured by default that determine who can join and register devices, and how many devices users can connect within the organization. While these settings support device flexibility and remote access, they can also allow unmanaged or unauthorized devices to access organizational resources if not reviewed properly.
Below are some default device settings that should be managed to control user device registration and joins within the organization.
- Microsoft Entra device join settings for users
- Device registration settings for users in Entra
- User Device Registration and Join Limit
- Entra device BitLocker recovery key access for users
Microsoft Entra Device Join Settings for Users
Setting Name: Users may join devices to Microsoft Entra ID
Default Status: All
Purpose: Allows users to join devices directly to Entra using their organizational account. When a device is joined, it becomes identity-associated with the organization and can be managed through policies (Conditional Access, device compliance, etc.). This is commonly used for organization-owned Windows devices.
Recommendation: Set the value to Selected or None to restrict Microsoft Entra device join setting. This can help admins to prevent unauthorized devices from being added to the directory.
Why to Disable Device Join Permissions: If all users are allowed to join devices to Entra, unmanaged devices can accumulate over time. And in a compromised account scenario, an attacker can join a malicious device, have it appear as organization-owned, inherit default policies, and gain persistent access to resources.
Device Registration Settings for Users in Entra
Setting Name: Users may register their devices with Microsoft Entra ID
Default Status: All
Purpose: Allows users to register personal devices (Windows, iOS, Android, macOS) in Entra ID without joining them. A registered device is recognized for Conditional Access checks but does not become a full member of your organization. It’s typically used in BYOD scenarios.
Recommendation: Restrict device registration based on organizational BYOD policies and ensure appropriate compliance, Conditional Access, or mobile application management controls are enforced for registered devices.
Why to Disable Device Registration Settings: Since registered devices are typically personal and not fully organization-managed, they can increase the risk of organizational data being accessed from unsecured or non-compliant devices. Admins also have limited control over security measures such as encryption, patching, and device compliance.
User Device Registration and Join Limit
Setting Name: Maximum number of devices per user
Default Status: 50
Purpose: Defines the maximum number of devices a user can register or join in Microsoft Entra ID.
Recommendation: We recommend limiting this setting to the minimum value required for your organization.
Why Manage User Device Limits in Microsoft 365: A high device limit can result in excessive device registrations, which makes device monitoring, management, and governance difficult.

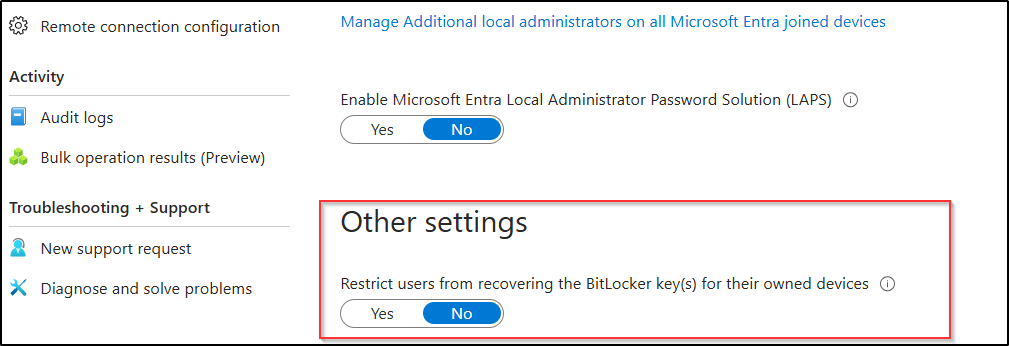
Restrict User Access to BitLocker Recovery Keys
Setting Name: Restrict users from recovering the BitLocker key(s) for their owned devices
Default Status: No
Purpose: Allows users to view and copy the BitLocker recovery keys for devices they own.
Recommendation: Setting this to Yes ensures that BitLocker recovery keys can only be retrieved by authorized administrators and stops users from accessing them directly.
Why Restrict User Access to BitLocker Keys: By default, users can access the BitLocker recovery keys of their owned devices from the My Account portal. If a user account is compromised, attackers may retrieve recovery keys and gain access to encrypted organizational devices and stored data.
Govern User Access for AI Agents in Microsoft 365
By default, users can access all Microsoft agents, custom-built agents, and agents from external publishers. Although these AI agents enhance productivity and automation, they can also introduce governance and security challenges. To maintain better control, organizations should restrict unauthorized or unnecessary AI agents and define which users are allowed to access them.
Here are some default settings that should be managed to control how users access and share AI agents.
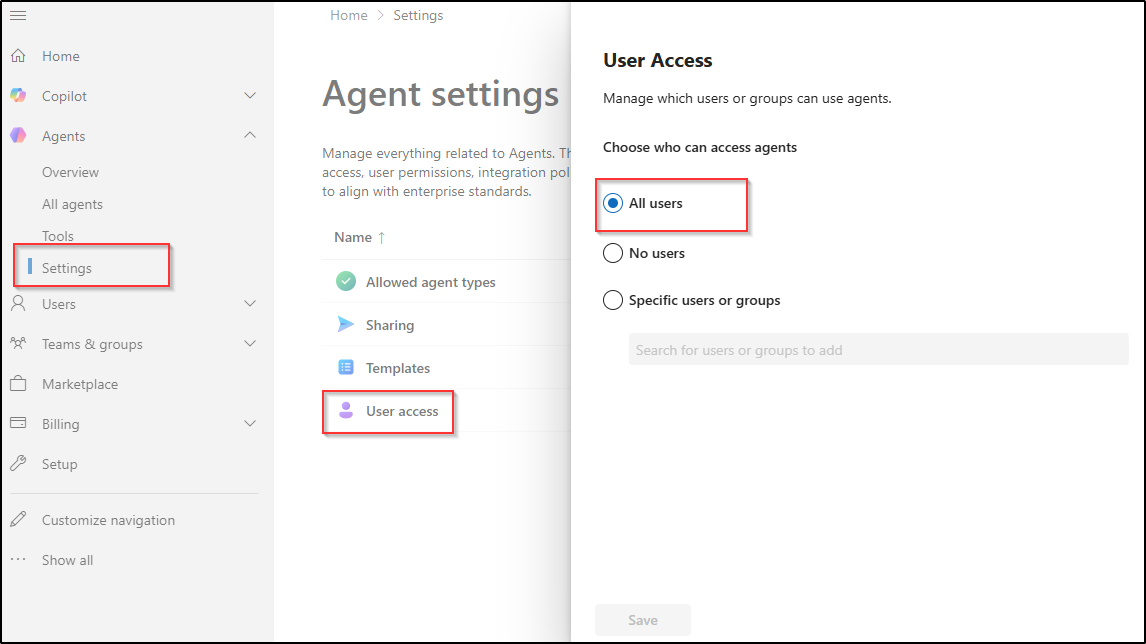
User Access to AI Agents in Microsoft 365
Setting Name: Agents Settings → User access
Default Status: All users
Purpose: Allows everyone in the organization to access AI agents in Microsoft 365, including Microsoft agents, custom-built agents, and external publisher agents.
Recommendation: Block AI agent access to specific users or groups based on your organization’s security, compliance, and data governance requirements.
Why Restrict User Access to AI Agents: Users may interact with third-party agents whose data handling practices may not align with organizational privacy or compliance requirements. Organizations subject to data residency, regulatory compliance (e.g., GDPR, HIPAA), or internal data governance policies should restrict access to specific authorized user groups rather than the entire tenant. It also prevents ungoverned AI usage from expanding the attack surface through unreviewed agent integrations.
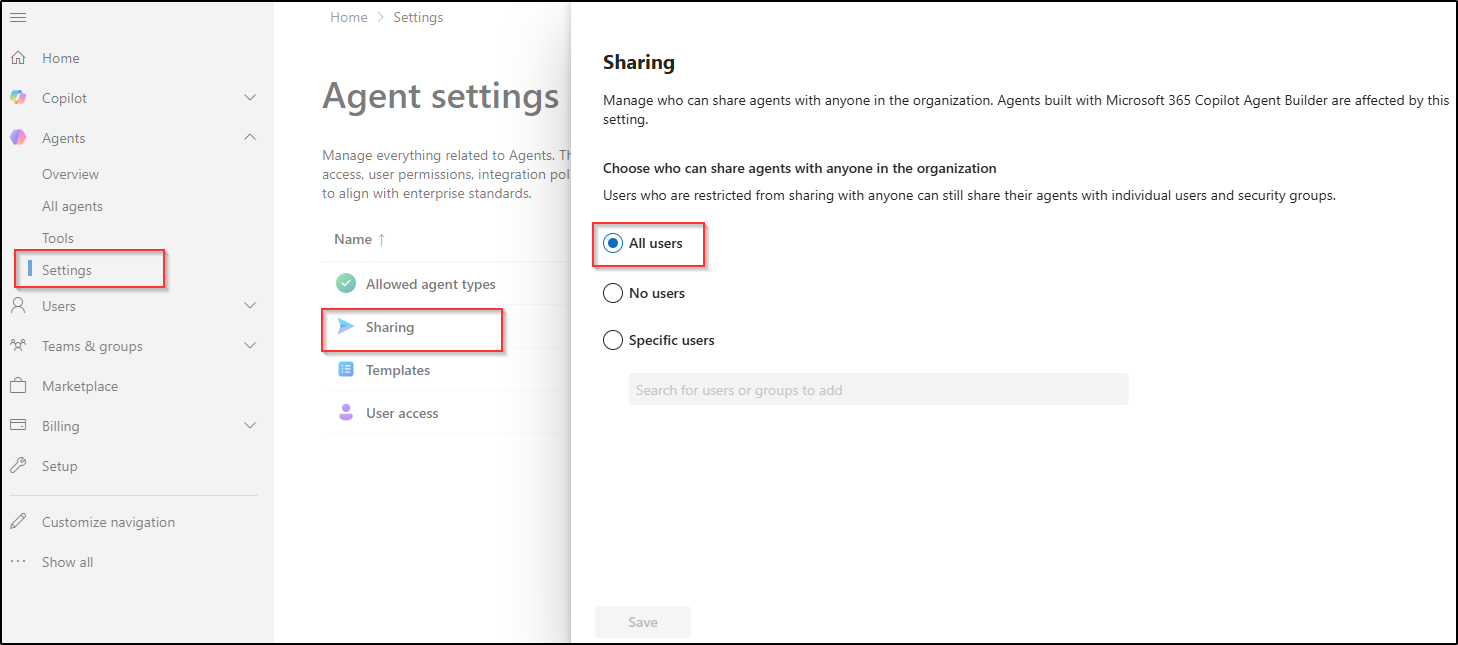
Manage AI Agent Sharing in Microsoft 365
Setting Name: Agents Settings → Sharing
Default Status: All users
Purpose: Allows users to share Microsoft agents, custom-built agents, and external publisher agents with other users across the organization.
Recommendation: You can change this setting to No users or Specific users based on your organizational requirements.
Why Manage AI Agent Sharing Permissions: Allowing users to share AI agents without restrictions can expose critical information through connected knowledge sources, integrated workflows, or agent actions. Shared agents may also perform unintended actions or provide broader access to information than originally intended. Managing this setting helps organizations control how AI agents, their connected data, and operational capabilities are shared across the environment.
Restrict SharePoint Site Creation and Sharing Settings
SharePoint Online includes several built-in collaboration features that allow users to create sites and share content externally by default. If not managed properly, these settings can lead to uncontrolled site creation and increased risk of data exposure through external sharing.
Below are the default SharePoint settings to review for controlling site creation and content sharing.
- SharePoint Online site creation permissions for users
- External sharing permissions in SharePoint Online and OneDrive
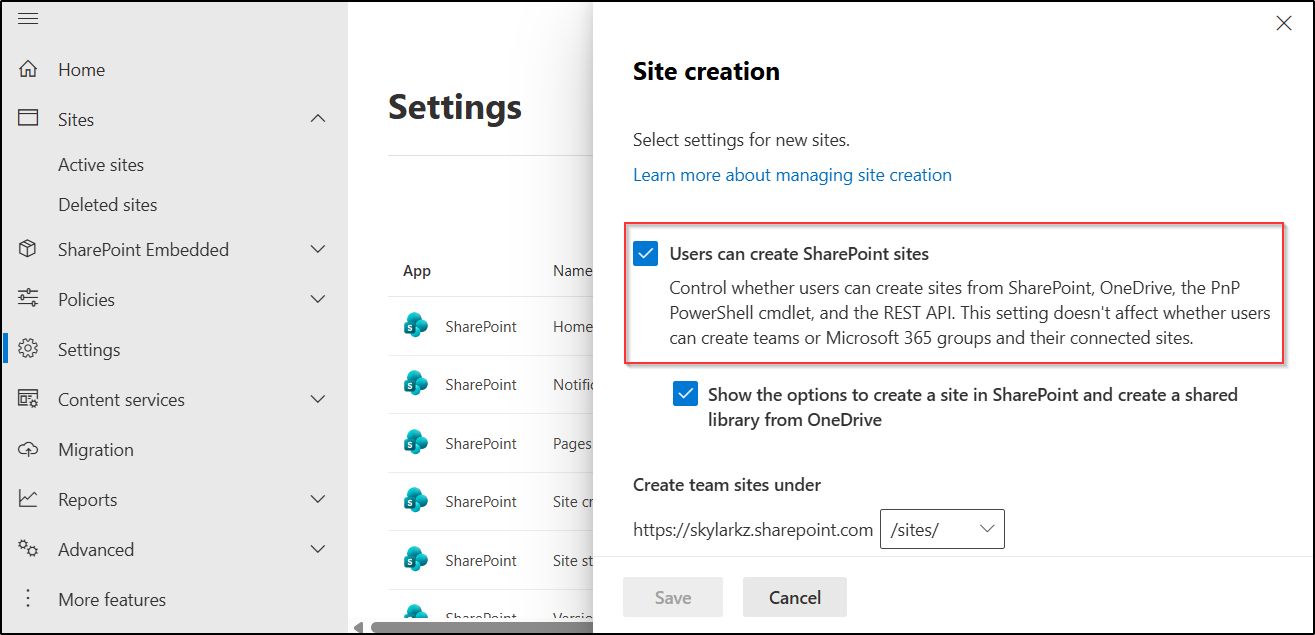
SharePoint Online Site Creation Permissions for Users
Setting Name: Users can create SharePoint sites
Default Status: Enabled
Purpose: Allows users to create SharePoint sites in SharePoint Online
Recommendation: Restrict site creation to approved admins based on organizational governance requirements. If you allow open creation, enforce approval workflows.
Why Restrict SPO Site Creation for Users? This would lead users to create sites in SharePoint Online as they wish, which can lead to sprawl, orphaned sites with unclear ownership, and unmanaged data governance.
External Sharing Settings in SharePoint Online and OneDrive
Setting Name: External sharing setting for SharePoint Online and OneDrive
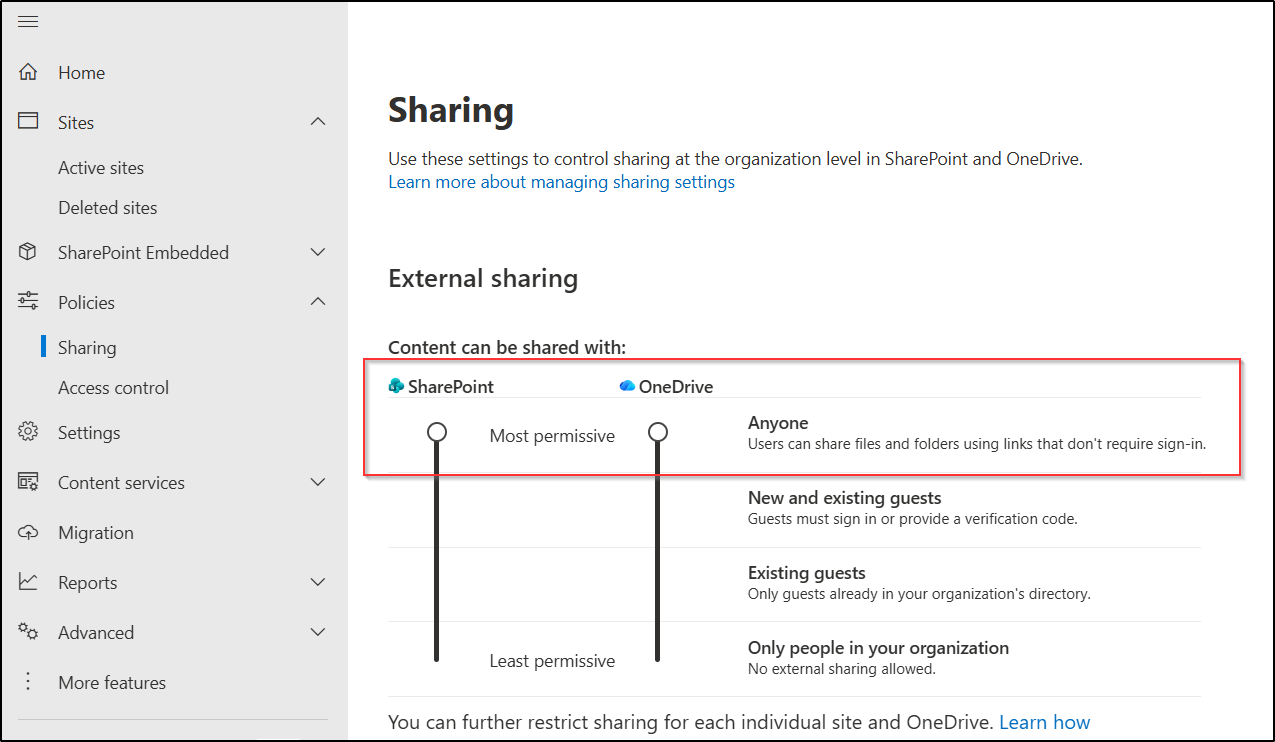
Default Status: Anyone(Users can share files and folders using links that don’t require sign-in)
Purpose: Allows users to share SharePoint and OneDrive files and folders with anyone.
Recommendation: Disable “Anyone” external sharing based on organizational security and compliance requirements. If external sharing is required, restrict it to trusted domains or specific users.
Why to Disable Anonymous Sharing: By default, users can share SharePoint and OneDrive content using anonymous links that do not require sign-in. This means anyone with the link can access the shared content from anywhere on the internet, which can lead to serious organizational data exposure! Always restrict external sharing settings based on your organization’s security and collaboration requirements.
How to Disable Anonymous Links Creation in SharePoint Online
- Sign in to the SharePoint admin center.
- Navigate to Policies → Sharing → External sharing.
- Under ‘Content can be shared with:’, modify the sharing level “Anyone” to options like Existing guests or Only people in your organization as required.
- Finally, click Save to apply the changes.
Manage User Collaboration Settings in Microsoft Teams
Microsoft Teams includes several default collaboration settings that allow users to create channels, collaborate with external users, and join shared channels across organizations. If not managed properly, these settings can increase external access and reduce visibility into collaboration within the organization.
Below are some important Teams collaboration settings that should be configured based on organizational requirements.
Prevent Creation of Private and Shared Channels
The default Teams settings include several settings, while only a subset of essential permissions is enabled for non-admin users to create resources. Let’s look at what these permissions are and how to manage them effectively.
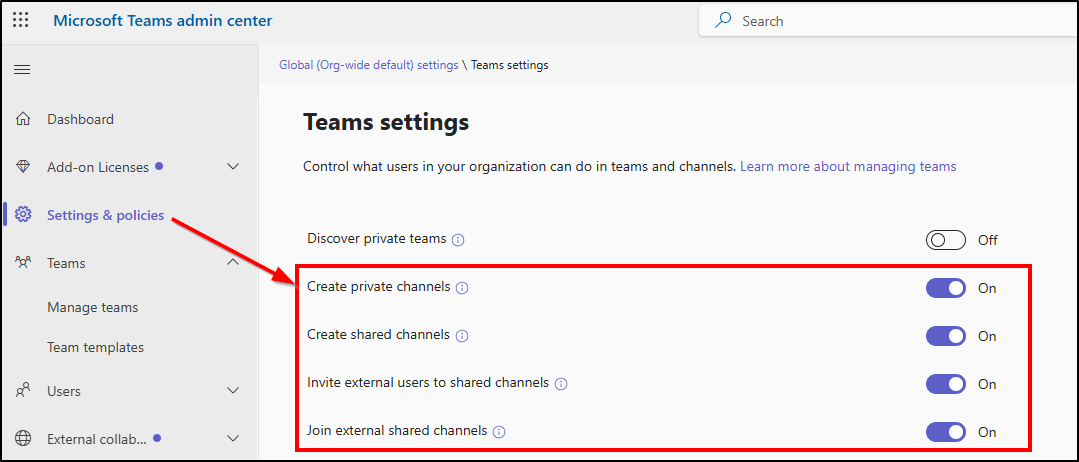
Setting Name: Global (Org-wide default) Teams policy
- Create private channels
- Create shared channels
- Invite external users to shared channels
- Join external shared channels and more
Default Status: Enabled
Why to Disable Teams User Collaboration Settings: If these settings are not managed properly, compromised accounts can be misused to invite external users or organizations into internal shared collaboration spaces. Attackers may use these opportunities to access sensitive conversations and files, distribute malicious links, or establish persistent communication channels with external tenants.
How to Disable User Collaboration Settings in Teams
- Sign in to the Teams admin center and go to Settings & policies.
- Under the Global (Org-wide default) tab, select Teams from the Teams & channels section.
- You will be able to find the four settings discussed earlier and turn them off according to your organization’s requirements.
Disable Chat with Anyone in Microsoft Teams
Setting Name: Chat with Anyone in Microsoft Teams
Default Status: Enabled
Purpose: Allows users to chat with anyone using an email address, even if the recipient is not using Microsoft Teams.
Recommendation: You can disable the chat with anyone feature using PowerShell to restrict external chat in Microsoft Teams.
Why to Disable Chat with Anyone in Teams: This setting allows users to chat with anonymous users using only an email address. It can increase the risk of phishing attacks, malware sharing, unauthorized external communication, and accidental exposure of sensitive organizational data outside compliance and monitoring.
Restrict Calendar Sharing Permissions in Exchange Online
Built-in calendar sharing settings in Exchange Online allow users to share availability, scheduling information, etc., with external users by default. These calendar sharing can expose meeting schedules, organizational activity patterns, and user availability to unintended users outside the organization.
Here are some default calendar sharing settings that should be reviewed and changed based on your organizational requirements.
Anonymous Calendar Sharing in Microsoft 365
Setting Name: Anonymous calendar sharing
Default Status: Enabled
Purpose: Allows users to share their calendar availability, recurring meetings, collaboration details, out-of-office timings, and booked schedules.
Recommendation: Disable anonymous calendar sharing to prevent calendar information from being shared.
Why to Disable Anonymous Calendar Sharing: Anonymous calendar links expose employee availability, busy schedules, and out-of-office timings to anyone with the link. Attackers can use this information for social engineering, identifying low-activity periods, or mapping organizational activity patterns. Since these links can be forwarded without authentication, organizations also lose visibility into who accesses the shared calendar information.
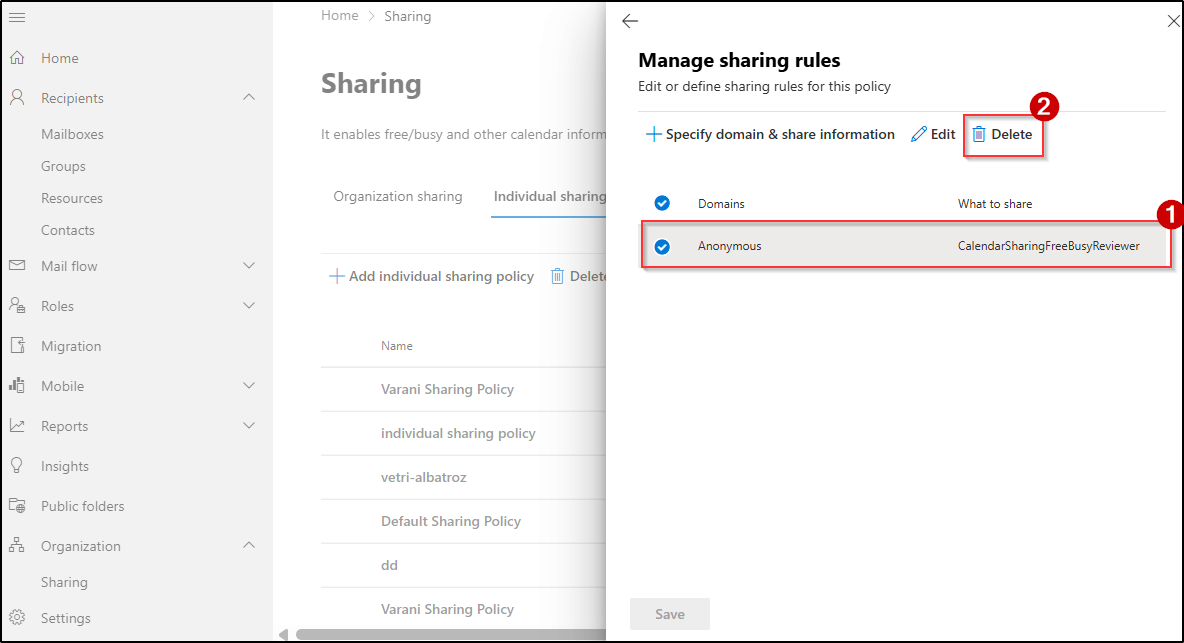
How to Disable Anonymous Calendar Sharing in Exchange Admin Center
- Sign in to the Exchange admin center.
- Navigate to Organization → Sharing → Individual sharing.
- Locate and select the Default Sharing Policy.
- Under Domains, click Manage domains.
- Select Anonymous – CalendarSharingFreeBusyReviewer, click Delete, and Save the changes.
It removes anonymous calendar sharing and prevents users from sharing calendar information without authentication.
Restrict Calendar Publishing in Microsoft 365
Setting Name: Calendar publishing
Default Status: Enabled
Purpose: Allows users to publish calendars online through publicly accessible links that expose scheduling and availability information on the internet.
Recommendation: Disable calendar publishing to prevent users from sharing scheduling information through public calendar links.
Why to Disable Calendar Publishing: If calendars are published accidentally, they can expose meeting details, employee availability, and activity patterns through publicly accessible URLs. Attackers may misuse exposed meeting details, such as Zoom links and Teams meeting URLs, to gain unauthorized access to live meetings. They can also exploit exposed calendar information to send highly convincing phishing messages that reference real meetings or projects.
And that’s a wrap!
We hope this blog helped you understand the default user permissions in Microsoft 365 and where they may need adjustments. While these settings are designed to support productivity, reviewing and managing them is essential to maintain security, control, and proper governance across your environment.
Thanks for reading. If you have any questions or additional insights on managing default user permissions, feel free to share them in the comments.


